KevinMLee
Wannabe
First I want to say that there is no one right way to do Bush Limb Risers. This is merely how I did it and why I chose this method versus all the other methods available.
In this article, I'm going to include pictures, tools I used list, and hard wear I chose to use.
When I first set out to research other trucks limb riser setup, I noticed and considered using P-Clamps (probably wouldn't have held), considered taking 2-piece shaft collars and welding a U-shaped rod to it (too much work), considered just loop tying the end of a cable to the bumper (ehh didn't "look" that great), and even considered just crimping a cable around my front end.
I then spotted someone drilling through their bars and mounting an eye screw to it. And then I thought to myself, how could I make this better. So I spent a few weeks drafting and pondering a set of criteria that would meet my needs or expectations.
1. Had to look clean and (somewhat) professionally done.
2. Had to be modular and easily field repairable.
3. Had to be somewhat resistant to corroding.
4. Had to fit my front bar and my roof rack (In this case, a ARB Front and BajaRack Roof).
So this is the fruits of my labor. Total time took me 5-Hours (a majority of it was waiting for the paint to dry, more about this past the photos).


Tools List:
-Eastern Technologies Drill-Rite Drill Jig
-Electric Hand Drill (In this case a DeWalt 20v MAX Drill)
-No.3 "Swage-It" Tool (Yes there are other tools but I don't Swage that often)
-Masking Tape and Pen
-Debur Tool (One I use with my Reloading Stuff, but a round file will work just as well)
-Combination Wrenches (5/8", 7/16", 11mm)
-Rustoleum Metal Primer Spray Can
-Rustoleum Black Satin Spray Can (I find that this matches the ARB very closely)
-Rustoleum Black Truck Bed Spray Can (I find that this matches the BajaRack a bit better than Satin)
-Nylon block and/or 1/2" Brass Punch
-Blue Lock Tite
-Long Handle P3 Screw Driver
-12-15feet of String/Paracord/etc
-Tape Measure or Other Measuring device
-Phillips Drill Bit P3
-Hammer
-Cable Cutters (ones that can handle 1/8" steel)
-Needle Nose Vise Grips
-1/4" Drill Bit
-Cutting & Tapping Fluid (I used Craftsman #52329)
-1/2"-Drive Socket 5/8"
-3/8"-Drive Socket 7/16", 1/4", 11mm
-3/8"-Drive Universal Socket
-3/8"-Drive Rachet Wrench
-1/2" & 3/8" Drive Drill Adapters
Supples/Parts:
*Where Possible I will get Stainless Steel
-(20ft) of Galvinized Black Nylon Sheathed Cable (1/8" ID, 3/16" OD; webriggingsupply.com)
-(4x) Stainless Steel 1/8" Wire Thimbles (webriggingsupply.com)
-(2x) Stainless Steel Eye & Eye 1/4" Turnbuckles (West Marine)
-(4x) Stainless Steel 1/4" Snap Gate (webriggingsupply.com)
-(4x) Stainless Steel 1/4" thread Oblong Lifting Nut (eBay.com)
Fasteners
*Where Possible I will get Stainless Steel
-(2x) 1/4-20 x 2.5" Stainless Steel Hex Bolt Screw (Lowes; #396458)
-(2x) 1/4-20 x 1.5" Stainless Steel Hex Bolt Screw (Lowes; #396456)
-(6x) 1/4" Stainless Steel Fender Washers (Lowes; #15346)
-(4x) 1/4" Stainless Steel Lock Washers (Lowes; #311725)
-(1x) 1/4" Regular Ol'Nut
-(2x) 5/8" Stainless Steel Quarter Washers (?; Just had them around)
-(4x) 5/32" Zinc Oxide Swage (West Marine)


So now that the lists are done, this is what I did:
**Safety is paramount. Please wear gloves and eye protection at the very least**
1. The first thing I did was take off the BajaRack airspoilers and wind deflectors. This is a must because you won't be able to do any of the following parts, and most importantly, the Drill Jig will not be able to go around the deflectors. This easily done with a P3 Screwdriver or P3 Drill Bit and a 7/16" Combination Wrench.
2. Next with the Rack deflector/windspoiler out of the way, I'm now able to take masking tape and tape up the intended area of where I'm going to attach my "eyes". Be generous, a roll of masking tape isn't at all expensive.
3. Take the 12-15ft of string/cord and tie it to the rack and then tie the other end to the front bumper. This is your guide (rough guide). This helps you to make sure there aren't any other parts of the truck in the way (ie. Safari Snorkel, antenna, etc). I suggest doing the side with the Snorkel first, that way making the Limb Risers symmetrical is a piece of cake to do on the other side.


4. After seeing where I want to mount my Limbs, I went ahead and used the sharpie and marked my drill spot. Don't worry about the other side, thats what the "Drill-Rite" jig is for.
5. Repeat for the other side. This side should be considerable easier since there isn't any obstacles like a Safari Snorkel in the way. I would advise that to keep things symmetrical, try and measure out the first side so its easy to mark it out. Once marked, remove the string/cord from the vehicle. Check to make sure all your "dots/marks" look right because next is the drilling time.
6. Drilling. Lets see if this Drill-Jig is worth the $$. Take the 1/4" sleeve (it comes with it) and mount it in the jig as per the instructions. Line up the hole of the jig with the dot/mark we made earlier. I would stress that you after you tighten down, take a look again to make sure it is still lined up and hasn't moved. **Be mindful of bends in the metal tubing in bars, the jig can't do bends very well (if at all), so plan accordingly. You may have to go back and make new dots/marks.


7. Drill. I would recommend at this time that you use "Tapping & Cutting" fluid/lube on your 1/4" Drill bit. The ARB steel is thick enough that you can dull out and ruin your drill bit. You only need a little per hole that you make, and I would rest between cuts.

8. Deburring. After drilling of all holes were complete, I removed all the tape and tested each hole with a 1/4" screw to make sure it fit (moment of truth, but of course with the jig, its fool proof... sorta). Then a few quick turns of the deburring tool to each hole made them safe to the touch.

9. Bending and fitting the washers. The next part is optional but I think it adds more surface area to each screw/bolt. As physics would point out, more area of contact will spread out the weight distribution of the shock load. Thus, preventing dents if it were to ever come under static shock (like a whipping tree branch). So technically the bigger the washer the better. I went ahead and took the 2 fender washers, a bolt, and a regular nut, and mounted to each hole. Then with a Nylon block and a hammer, I rounded out the fender washers so that they curved with the bars. This way I'm hoping they will provide more contact and more weight distribution spread over more area of the bar.
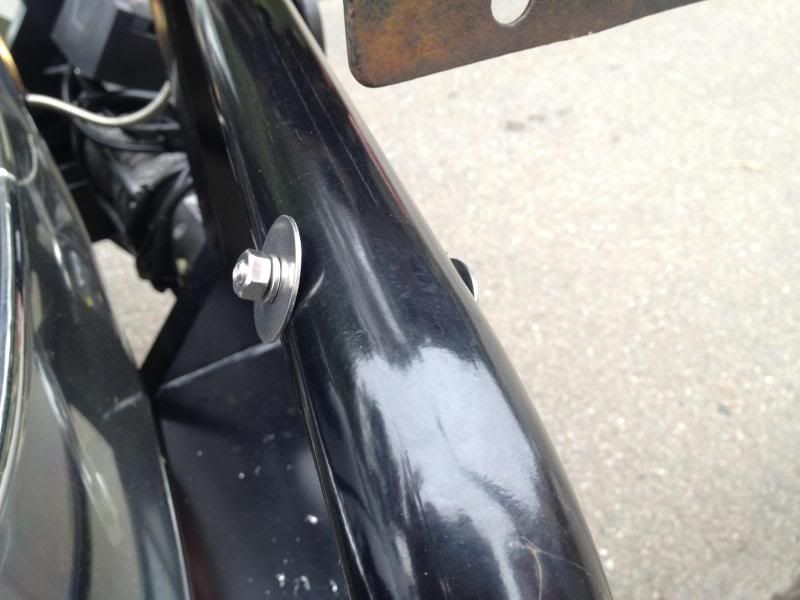


10. ***This is the hard part of the whole process. Make sure you remember what Fender Washer goes to which hole, and which orientation it was. Since you just "pounded" out a custom washer for that bar, it might be nice to use the correct fender washer after the next step.
11. Painting. Again totally optional but I thought that this would add a bit of custom to it. I sprayed each of the washers with Rustoleum Primer and then the Black Satin or Truckbed to match the application.
12. Painting for Rust Prevention. While waiting for the fender washers to dry, I sprayed each fresh hole I made with a bit of primer (masking each hole of course). This part cannot wait. If you leave bare steel for a even a fraction of a day, you could come back to rust already... then you'll have to wirebrush it or file it out, which makes the hole bigger. Since we are putting hardware over this fresh hole, it doesn't really matter how "pretty" the paint job needs to be, but I would still mask it so that your bumper or roof doesn't splatter out.


13. Putting it all together. It's just a matter of putting everything together now. Screw+LockWasher+FenderWasher>FenderWasher+OblongLiftingNut. In that order (where ">" denotes the "bar").
14. Swage the cable, test it before crimping, make sure you have enough room to tighten down the cables. At this thickness of Swage, remember to swage in three places per crimp.
15. Test and tighten, check the snaps, tighten, check the snaps... don't go crazy on this though...
My After Thoughts
I think that if I didn't have to wait for paint to dry, I would be done in about 3-4 hours. Of course I went slow as to do the job right. In the future, I think I may consider adding black head shrink over the swages on the cable as well as paint the turnbuckle bodies a black truckbed. Of course these are things that aren't necessary but may add a bit of flair to them.
I also know it isn't the cheapest route for Limb Risers, but I decided against cheap and went with a quality parts instead. I know some of you may roll your eyes at this but it is "to each their own".
Again to each their own, and this is just one way to "skin a cat". Let me know what you guys think, always open to new ideas and critiques.") Hopefully this article will help anyone else considering this mod for their vehicles.
Hopefully this article will help anyone else considering this mod for their vehicles.
*Edit*
Despite some people objecting to having these cables on while "urban" driving, I decided to keep them on. Some say that it will create wind noise and a whistling when driving high speeds. So far, I've driven 75mph and haven't experienced any noise above my Borla Exhaust system or normal road noise for that matter. I was expecting to hear a whistling of sort, but was disappointed when I didn't hear anything.
Another Edit?
After reviewing the limbs a bit further, I'm thinking that the weakest link of the whole setup is going to be the 1/4" SS Snap Gate Connectors. If these should break, I will consider using SS Quick Link Connectors (found at WebRiggingSupply.com under "Hardware">"Chain Fittings"). Because the Link screws together, all the weight and pressure gets more or less evenly distributed around the link. Heres a photo of what I'm talking about.

In this article, I'm going to include pictures, tools I used list, and hard wear I chose to use.
When I first set out to research other trucks limb riser setup, I noticed and considered using P-Clamps (probably wouldn't have held), considered taking 2-piece shaft collars and welding a U-shaped rod to it (too much work), considered just loop tying the end of a cable to the bumper (ehh didn't "look" that great), and even considered just crimping a cable around my front end.
I then spotted someone drilling through their bars and mounting an eye screw to it. And then I thought to myself, how could I make this better. So I spent a few weeks drafting and pondering a set of criteria that would meet my needs or expectations.
1. Had to look clean and (somewhat) professionally done.
2. Had to be modular and easily field repairable.
3. Had to be somewhat resistant to corroding.
4. Had to fit my front bar and my roof rack (In this case, a ARB Front and BajaRack Roof).
So this is the fruits of my labor. Total time took me 5-Hours (a majority of it was waiting for the paint to dry, more about this past the photos).


Tools List:
-Eastern Technologies Drill-Rite Drill Jig
-Electric Hand Drill (In this case a DeWalt 20v MAX Drill)
-No.3 "Swage-It" Tool (Yes there are other tools but I don't Swage that often)
-Masking Tape and Pen
-Debur Tool (One I use with my Reloading Stuff, but a round file will work just as well)
-Combination Wrenches (5/8", 7/16", 11mm)
-Rustoleum Metal Primer Spray Can
-Rustoleum Black Satin Spray Can (I find that this matches the ARB very closely)
-Rustoleum Black Truck Bed Spray Can (I find that this matches the BajaRack a bit better than Satin)
-Nylon block and/or 1/2" Brass Punch
-Blue Lock Tite
-Long Handle P3 Screw Driver
-12-15feet of String/Paracord/etc
-Tape Measure or Other Measuring device
-Phillips Drill Bit P3
-Hammer
-Cable Cutters (ones that can handle 1/8" steel)
-Needle Nose Vise Grips
-1/4" Drill Bit
-Cutting & Tapping Fluid (I used Craftsman #52329)
-1/2"-Drive Socket 5/8"
-3/8"-Drive Socket 7/16", 1/4", 11mm
-3/8"-Drive Universal Socket
-3/8"-Drive Rachet Wrench
-1/2" & 3/8" Drive Drill Adapters
Supples/Parts:
*Where Possible I will get Stainless Steel
-(20ft) of Galvinized Black Nylon Sheathed Cable (1/8" ID, 3/16" OD; webriggingsupply.com)
-(4x) Stainless Steel 1/8" Wire Thimbles (webriggingsupply.com)
-(2x) Stainless Steel Eye & Eye 1/4" Turnbuckles (West Marine)
-(4x) Stainless Steel 1/4" Snap Gate (webriggingsupply.com)
-(4x) Stainless Steel 1/4" thread Oblong Lifting Nut (eBay.com)
Fasteners
*Where Possible I will get Stainless Steel
-(2x) 1/4-20 x 2.5" Stainless Steel Hex Bolt Screw (Lowes; #396458)
-(2x) 1/4-20 x 1.5" Stainless Steel Hex Bolt Screw (Lowes; #396456)
-(6x) 1/4" Stainless Steel Fender Washers (Lowes; #15346)
-(4x) 1/4" Stainless Steel Lock Washers (Lowes; #311725)
-(1x) 1/4" Regular Ol'Nut
-(2x) 5/8" Stainless Steel Quarter Washers (?; Just had them around)
-(4x) 5/32" Zinc Oxide Swage (West Marine)


So now that the lists are done, this is what I did:
**Safety is paramount. Please wear gloves and eye protection at the very least**
1. The first thing I did was take off the BajaRack airspoilers and wind deflectors. This is a must because you won't be able to do any of the following parts, and most importantly, the Drill Jig will not be able to go around the deflectors. This easily done with a P3 Screwdriver or P3 Drill Bit and a 7/16" Combination Wrench.
2. Next with the Rack deflector/windspoiler out of the way, I'm now able to take masking tape and tape up the intended area of where I'm going to attach my "eyes". Be generous, a roll of masking tape isn't at all expensive.
3. Take the 12-15ft of string/cord and tie it to the rack and then tie the other end to the front bumper. This is your guide (rough guide). This helps you to make sure there aren't any other parts of the truck in the way (ie. Safari Snorkel, antenna, etc). I suggest doing the side with the Snorkel first, that way making the Limb Risers symmetrical is a piece of cake to do on the other side.


4. After seeing where I want to mount my Limbs, I went ahead and used the sharpie and marked my drill spot. Don't worry about the other side, thats what the "Drill-Rite" jig is for.
5. Repeat for the other side. This side should be considerable easier since there isn't any obstacles like a Safari Snorkel in the way. I would advise that to keep things symmetrical, try and measure out the first side so its easy to mark it out. Once marked, remove the string/cord from the vehicle. Check to make sure all your "dots/marks" look right because next is the drilling time.
6. Drilling. Lets see if this Drill-Jig is worth the $$. Take the 1/4" sleeve (it comes with it) and mount it in the jig as per the instructions. Line up the hole of the jig with the dot/mark we made earlier. I would stress that you after you tighten down, take a look again to make sure it is still lined up and hasn't moved. **Be mindful of bends in the metal tubing in bars, the jig can't do bends very well (if at all), so plan accordingly. You may have to go back and make new dots/marks.


7. Drill. I would recommend at this time that you use "Tapping & Cutting" fluid/lube on your 1/4" Drill bit. The ARB steel is thick enough that you can dull out and ruin your drill bit. You only need a little per hole that you make, and I would rest between cuts.

8. Deburring. After drilling of all holes were complete, I removed all the tape and tested each hole with a 1/4" screw to make sure it fit (moment of truth, but of course with the jig, its fool proof... sorta). Then a few quick turns of the deburring tool to each hole made them safe to the touch.

9. Bending and fitting the washers. The next part is optional but I think it adds more surface area to each screw/bolt. As physics would point out, more area of contact will spread out the weight distribution of the shock load. Thus, preventing dents if it were to ever come under static shock (like a whipping tree branch). So technically the bigger the washer the better. I went ahead and took the 2 fender washers, a bolt, and a regular nut, and mounted to each hole. Then with a Nylon block and a hammer, I rounded out the fender washers so that they curved with the bars. This way I'm hoping they will provide more contact and more weight distribution spread over more area of the bar.


10. ***This is the hard part of the whole process. Make sure you remember what Fender Washer goes to which hole, and which orientation it was. Since you just "pounded" out a custom washer for that bar, it might be nice to use the correct fender washer after the next step.
11. Painting. Again totally optional but I thought that this would add a bit of custom to it. I sprayed each of the washers with Rustoleum Primer and then the Black Satin or Truckbed to match the application.
12. Painting for Rust Prevention. While waiting for the fender washers to dry, I sprayed each fresh hole I made with a bit of primer (masking each hole of course). This part cannot wait. If you leave bare steel for a even a fraction of a day, you could come back to rust already... then you'll have to wirebrush it or file it out, which makes the hole bigger. Since we are putting hardware over this fresh hole, it doesn't really matter how "pretty" the paint job needs to be, but I would still mask it so that your bumper or roof doesn't splatter out.


13. Putting it all together. It's just a matter of putting everything together now. Screw+LockWasher+FenderWasher>FenderWasher+OblongLiftingNut. In that order (where ">" denotes the "bar").
14. Swage the cable, test it before crimping, make sure you have enough room to tighten down the cables. At this thickness of Swage, remember to swage in three places per crimp.
15. Test and tighten, check the snaps, tighten, check the snaps... don't go crazy on this though...
My After Thoughts
I think that if I didn't have to wait for paint to dry, I would be done in about 3-4 hours. Of course I went slow as to do the job right. In the future, I think I may consider adding black head shrink over the swages on the cable as well as paint the turnbuckle bodies a black truckbed. Of course these are things that aren't necessary but may add a bit of flair to them.
I also know it isn't the cheapest route for Limb Risers, but I decided against cheap and went with a quality parts instead. I know some of you may roll your eyes at this but it is "to each their own".
Again to each their own, and this is just one way to "skin a cat". Let me know what you guys think, always open to new ideas and critiques.
Hopefully this article will help anyone else considering this mod for their vehicles.*Edit*
Despite some people objecting to having these cables on while "urban" driving, I decided to keep them on. Some say that it will create wind noise and a whistling when driving high speeds. So far, I've driven 75mph and haven't experienced any noise above my Borla Exhaust system or normal road noise for that matter. I was expecting to hear a whistling of sort, but was disappointed when I didn't hear anything.
Another Edit?
After reviewing the limbs a bit further, I'm thinking that the weakest link of the whole setup is going to be the 1/4" SS Snap Gate Connectors. If these should break, I will consider using SS Quick Link Connectors (found at WebRiggingSupply.com under "Hardware">"Chain Fittings"). Because the Link screws together, all the weight and pressure gets more or less evenly distributed around the link. Heres a photo of what I'm talking about.
Last edited: