My low buck & low tech camper

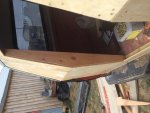
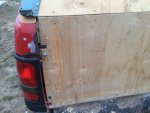
Lower panel mocked in placed

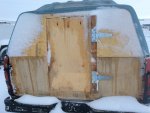
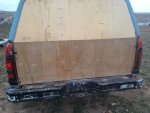
Here is the lower in place. It's secured by a few lag screws going through the plywood, then into the adaptor boards then, into the bed. All materials and hardware were already on hand so that's why I used what I did.
 

Attachments

  • IMG_0566.jpg
    IMG_0566.jpg
    525.1 KB · Views: 19
  • IMG_0565.jpg
    IMG_0565.jpg
    522.7 KB · Views: 22
This is weird, there was a reply to my pintle hitch question.

I remember seeing that response, but in my experience pintles are pretty noisy (only used with 25ft flat decks and 4 ton wood chippers) but as for deadening the noise who ever it was that responded said cut a section of radiator hose lengthwise and wrap it around the lunet ring (I don't remember if they said to, but I would find a way to affix it, probably 3 or 4 hose clamps)
 
I have a pintle hitch on mine, doesn't bother me whatsoever. The trailer probably makes as much noise down a bumpy road as the hitch does.
 
Much of that noise depends upon the tow rig, and how well isolated the cab is from the chassis.

Some are nearly hard mounted, so you hear and feel EVERY little noise that hitch makes, like its right under your seat.

Others, you can barely notice.
 
A little progress

Made a little progress today while I finally had decent weather. I used the latest CAD technology to come up with a pattern to cut up a couple 2x6 uprights for the door opening. Also kinda mocked up a door. Currently trying to brainstorm a hinge. It appears I'm going to have to break down and buy something!
 

Attachments

  • IMG_0579.jpg
    IMG_0579.jpg
    529.8 KB · Views: 32
  • IMG_0580.jpg
    IMG_0580.jpg
    519.7 KB · Views: 33
  • IMG_0581.jpg
    IMG_0581.jpg
    529.1 KB · Views: 29
Trial fitting hinges

Went to Home Depot and picked up these hinges at $9.00 (+/-) each. My plan is to stick them in my vise, heat them with my torch, and bend to desired angle. We'll see how that goes. Rained all day yesterday, turned into snow all night. Won't get any attention for the next couple of days.
 

Attachments

  • IMG_0585.jpg
    IMG_0585.jpg
    481.9 KB · Views: 21
  • IMG_0583.jpg
    IMG_0583.jpg
    541.4 KB · Views: 24
  • IMG_0584.jpg
    IMG_0584.jpg
    509 KB · Views: 21
Latch, framed and inside skinned

Had better weather conditions today than expected. So I was able to get the door framed and inside skinned and installed the latch. I used the old heat 'n' beat on the hinges to get them better lined up. They have plastic bushings in them so I couldn't get too aggressive with the torch. Anyway, I still have to trim out and seal the door. I'll have to come back later and insulate the door.
 

Attachments

  • IMG_0587.jpg
    IMG_0587.jpg
    532.2 KB · Views: 14
  • IMG_0588.jpg
    IMG_0588.jpg
    512.3 KB · Views: 15
So I have a question about fiberglass. Seeing as I have a fiberglass repair kit lying around, I thought why not skin the door with it? Do I need anything special to adhere it to the plywood or no? Do you just glass over it? TIA.
 
Well, I went ahead and put some fiberglass on the door. What a mistake! I used a sheet of repair fabric that was a loose chopped type mat. Not the woven stuff. It made a huge mess. Like trying to smear a cotton ball over caramel. Now I get to spend quality time with a sander.
 
I know this is going to violate the low buck theme of your situation, but it might be worth trying to fit into the budget somehow: Look into Rot Doctor's Clear Penetrating Epoxy Sealer: http://www.rotdoctor.com/products/cpes.html

It isn't cheap. The two pint kit will probably cost you about $50 shipped. But it will do a great job of sealing up all that plywood. Plywood rots so quickly because it has exposed end grain all around all four edges. If you can seal those edges then you greatly extend its life. Paint doesn't really seal the edges, but CPES soaks in very well and then cures.

Just a thought.
 

Forum statistics

Threads
190,881
Messages
2,932,909
Members
234,698
Latest member
OchoSolo
Top