wheredojoego24
New member
I live in Ohio and picked up the camper from ovrlnd and go on a 3 month, working road trip with my wife. Because of the distance and the plan, I had dry fit everything based on measurements and then hoped I got them all right, because the plan was to live and work from it immediately. Worked out kind of cool to get to live in it for awhile and now I get to do all the finish work, knowing exactly what we do and don’t want. This is just a general overview of my buildout that I did before ever seeing the camper in person. I am very excited to put all the finishing touches on it but as I was researching what others had done, I decided it was only fair for me to do a post like this since I used so many other peoples on here as inspiration. I have embedded links for damn near everything I purchased but if I missed something, happy to answer any questions.
Add ons made to the bread n butter option:
+3 inches on the height
-Flip up door in the back instead of the straight open
-Extra stud added on both sides for a future awning to be installed
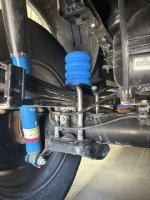
-Airmaxxx deluxe
-Solar port
-Interior lights
-Roof insulation
-Headliner cover
-Medium firm 3" mattress
-Positive pressure vent
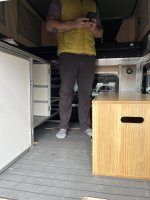
-I bought bam boards and the corresponding slide outs as well. This took away 9 inches but added so much storage. Because of the weight of the everything that would be on the boards, I decided to reinforce them. So I routered out space for 1 1/2” x 3/4” steel bars found at any hardware store, that drastically reduced the flex in the boards when standing on it and gave me peace of mind. For the flooring, I added marine flooring, the kind they use in boats. So that it could handle whatever nonsense got spilled on it. And it works as advertised. The installation process was simple. After that was done, I cut out the hand holes and routered the edges to clean it up and so I could find the t-nuts I had installed for the cabinets.
View attachment IMG_4645.JPG
View attachment IMG_4650.JPG
-Pine cabinets from ikea
View attachment IMG_4916.jpg
-The mattress with the additional foam wasn’t enough for me, I have a bum back, so got the Nemo roamer double inflatable . Truly amazed by this mattress, had never used a camping mattress that didn’t need constantly reinflated. We went weeks without needing to adjust the air. This combined with the memory foam mattress led to very comfortable sleeping arrangements. Defintely made putting the bed away way more difficult but we left the bed out the majority of the time anyhow
-Starlink truly is amazing. Consistently better internet speeds than we get at our home.
-Total Chaos Bed Stiffners - very glad we decided to purchase these, definitely a must have in my opinion and easy to install. Did lead to some issues with the 8020 cabinets I build, they ended up taking away about 1/16th" and in my infinite wisdom, I left myself zero room to play with so really had to slam that in there and ended up making it slightly out of square sadly.
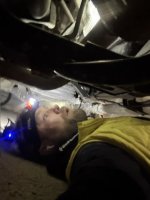
-Wolfbox back up camera, made a huge difference and gives crystal clear live video. only issue is when it rains, difficult to see through the water droplets. Debating updating to the 24/7 recording when off. Ended up needing to buy the 33ft extension cable to be able to run the wire under the truck and snake it through my tailgate system for the view I needed
-I initially wanted to cheap out on some tailgate storage but my wife talked me into buying the nice stuff instead and I’m so glad she convinced me. The Yakima exo tailgate system is amazing and so functional, the added storage and the table top were so damn useful. Yakima Exo Swing base($471), Yakima exo top shelf ($367) , Yakima Exo gear locker ($529) , Yakima Exo top deck (I got it for $95 on ebay but $160 new) $1,462 total. Can buy another box in the future or add the bike rack function at a later date. The way we got such a discount in the unit was because I found a floor model from a company called ReRack.com. I wasn't sold on the deck but it was so nice to have for cooking and many other tasks

Jackery solar generator 2000 plus + solar sage 200w x 2 and an additional 2000 plus battery pack. This amount of energy was perfect for our needs. Always had enough to work and charge our computers and run the starlink. Had a few cases of cloudy days where the solar was t bringing in much but overall, had little to no power issues. Had over 120ft of extension cord for days where we needed to steal power. Only needed to do that 2-3 times in the trip. The system is amazing and the tax rebate was nice as well. Going to mount a hard solar panel or two to the roof in the future. Also, news that jacket is releasing a 600w alternator that charges the jackery while driving. Will be a nice addition and put the mind even more at ease.
-I build a custom cabinet using the free design tool on the 80/20 website. Definitely took some getting used to but once I got the hang of it, wasn't all that difficult. The really cool part was that when I finished my design, I was able to export it to a PDF and directly contact different vendors to get it made. Once a company got back to me, someone from their design team reached out and help me pick the proper hardware and made sure I had enough support where I needed it. Was really great. Was delivered shockingly fast, like 5 days and everything had to be custom cut and fabricated the connection points. Expensive but so lightweight and versatile as a material. Did not come with directions or order of how things should be put together. Which would have been helpful considering order of operations is very important with this material. I am a former commercial carpenter and I am pretty handy but boy did I make some silly mistakes with this extruded aluminum. Butttt you live and you learn. Here was my final design:
View attachment IMG_4546.JPG
View attachment IMG_4547.JPG
View attachment IMG_4553.JPG
-A cheap mount from Amazon that was surprisingly sturdy and allowed us to drive with it hooked up when we wanted. Also installed a modem and router mount to one of the studs and a clear, protective shield that goes over the starlink satellite

Everything dry fit and ready for the drive across the country, had to rent a U-Haul since I needed everything we might need over the next 3 months. Thankfully, will never have to have this much stuff with us ever again.
View attachment IMG_4710.JPG
I cannot attach anymore images to this message so will just add some more in an additional one
Add ons made to the bread n butter option:
+3 inches on the height
-Flip up door in the back instead of the straight open
-Extra stud added on both sides for a future awning to be installed
-Airmaxxx deluxe
-Solar port
-Interior lights
-Roof insulation
-Headliner cover
-Medium firm 3" mattress
-Positive pressure vent
-I bought bam boards and the corresponding slide outs as well. This took away 9 inches but added so much storage. Because of the weight of the everything that would be on the boards, I decided to reinforce them. So I routered out space for 1 1/2” x 3/4” steel bars found at any hardware store, that drastically reduced the flex in the boards when standing on it and gave me peace of mind. For the flooring, I added marine flooring, the kind they use in boats. So that it could handle whatever nonsense got spilled on it. And it works as advertised. The installation process was simple. After that was done, I cut out the hand holes and routered the edges to clean it up and so I could find the t-nuts I had installed for the cabinets.
View attachment IMG_4645.JPG
View attachment IMG_4650.JPG
-Pine cabinets from ikea
View attachment IMG_4916.jpg
-The mattress with the additional foam wasn’t enough for me, I have a bum back, so got the Nemo roamer double inflatable . Truly amazed by this mattress, had never used a camping mattress that didn’t need constantly reinflated. We went weeks without needing to adjust the air. This combined with the memory foam mattress led to very comfortable sleeping arrangements. Defintely made putting the bed away way more difficult but we left the bed out the majority of the time anyhow
-Starlink truly is amazing. Consistently better internet speeds than we get at our home.
-Total Chaos Bed Stiffners - very glad we decided to purchase these, definitely a must have in my opinion and easy to install. Did lead to some issues with the 8020 cabinets I build, they ended up taking away about 1/16th" and in my infinite wisdom, I left myself zero room to play with so really had to slam that in there and ended up making it slightly out of square sadly.
-Wolfbox back up camera, made a huge difference and gives crystal clear live video. only issue is when it rains, difficult to see through the water droplets. Debating updating to the 24/7 recording when off. Ended up needing to buy the 33ft extension cable to be able to run the wire under the truck and snake it through my tailgate system for the view I needed
-I initially wanted to cheap out on some tailgate storage but my wife talked me into buying the nice stuff instead and I’m so glad she convinced me. The Yakima exo tailgate system is amazing and so functional, the added storage and the table top were so damn useful. Yakima Exo Swing base($471), Yakima exo top shelf ($367) , Yakima Exo gear locker ($529) , Yakima Exo top deck (I got it for $95 on ebay but $160 new) $1,462 total. Can buy another box in the future or add the bike rack function at a later date. The way we got such a discount in the unit was because I found a floor model from a company called ReRack.com. I wasn't sold on the deck but it was so nice to have for cooking and many other tasks
Jackery solar generator 2000 plus + solar sage 200w x 2 and an additional 2000 plus battery pack. This amount of energy was perfect for our needs. Always had enough to work and charge our computers and run the starlink. Had a few cases of cloudy days where the solar was t bringing in much but overall, had little to no power issues. Had over 120ft of extension cord for days where we needed to steal power. Only needed to do that 2-3 times in the trip. The system is amazing and the tax rebate was nice as well. Going to mount a hard solar panel or two to the roof in the future. Also, news that jacket is releasing a 600w alternator that charges the jackery while driving. Will be a nice addition and put the mind even more at ease.
-I build a custom cabinet using the free design tool on the 80/20 website. Definitely took some getting used to but once I got the hang of it, wasn't all that difficult. The really cool part was that when I finished my design, I was able to export it to a PDF and directly contact different vendors to get it made. Once a company got back to me, someone from their design team reached out and help me pick the proper hardware and made sure I had enough support where I needed it. Was really great. Was delivered shockingly fast, like 5 days and everything had to be custom cut and fabricated the connection points. Expensive but so lightweight and versatile as a material. Did not come with directions or order of how things should be put together. Which would have been helpful considering order of operations is very important with this material. I am a former commercial carpenter and I am pretty handy but boy did I make some silly mistakes with this extruded aluminum. Butttt you live and you learn. Here was my final design:
View attachment IMG_4546.JPG
View attachment IMG_4547.JPG
View attachment IMG_4553.JPG
-A cheap mount from Amazon that was surprisingly sturdy and allowed us to drive with it hooked up when we wanted. Also installed a modem and router mount to one of the studs and a clear, protective shield that goes over the starlink satellite
Everything dry fit and ready for the drive across the country, had to rent a U-Haul since I needed everything we might need over the next 3 months. Thankfully, will never have to have this much stuff with us ever again.
View attachment IMG_4710.JPG
I cannot attach anymore images to this message so will just add some more in an additional one
Last edited:


 For those willing to deal with it, underbed storage is a great solution.