NOTICE: Applying excessive amounts of sealant may prohibit the intake gasket from sealing properly.
View attachment 407624
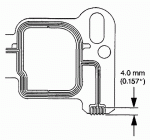
1. Apply a 4.0 mm (0.157 inch) patch of adhesive GM P/N 12346141 or equivalent to the cylinder head side of the lower intake manifold gasket at each end.
2. Install the lower intake manifold gasket onto the cylinder head.
Use the gasket locator pins in order to properly seat the lower intake manifold gasket onto the cylinder head.
View attachment 407626
NOTICE: Care must be used to apply the correct amount of sealant onto the gaskets. Applying excessive amounts of sealant may prohibit the intake gaskets from sealing properly.
IMPORTANT: All sealing surfaces must be clean, free of oil, dirt, or any other foreign material.
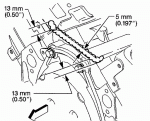
3. Apply a 5 mm (0.197 inch) bead of adhesive GM P/N 12346141 or equivalent to the front top of the engine block.
4. Extend the adhesive bead 13 mm (0.50 inch) onto the each lower intake manifold gasket.
View attachment 407627
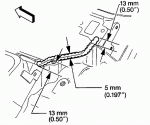
5. Apply a 5 mm (0.197 inch) bead of adhesive GM P/N 12346141 or equivalent to the rear top of the engine block.
6. Extend the adhesive bead 13 mm (0.50 inch) onto each lower intake manifold gasket.
View attachment 407628
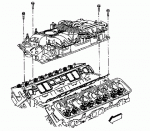
7. Install the lower intake manifold onto the engine block and the cylinder heads.
NOTICE: Refer to Fastener Notice in Service Precautions.
8. Apply threadlock GM P/N 12345382 or equivalent to the threads of the lower intake manifold bolts.
View attachment 407629
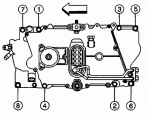
NOTICE: Proper lower intake manifold fastener tightening sequence and torque is critical. Always follow the tightening sequence, and torque the intake manifold bolts using the 3 step method. Failing to do so may distort the crankshaft bearing bore alignment and cause damage to the crankshaft bearings.
9. Install the lower intake manifold bolts.
9.1. Tighten the bolts on the first pass in sequence (1-8) to 3 Nm (27 lb in).
9.2. Tighten the bolts on the second pass in sequence (1-8) to 12 Nm (106 lb in).
9.3. Tighten the bolts on the final pass in sequence (1-8) to 15 Nm (11 lb ft).
When I said thin coating of oil I meant a THIN coating and only on the top of the gasket on the rubber where the intake sits, and always use permatex ultra grey RTV where the instructions call for GM adhesive, and where the instructions call for a 4mm patch you just use a tiny amount of RTV not a thick strip, it is only there to help keep the gaskets in place not to seal a leak!
You will not have to remove the upper intake either, just the lower, and buy a new set but check out the old gasket and if it is not damaged you can reuse it and return the new set but chances are the gasket is going to be ruined, as for the other gaskets they should be fine to reuse!!
And NEVER put a bead around the coolant passages!! that is a sure way to get to do this job again, just follow these directions and you should be good to go for a LONG time, this is how I have done around 20 of these jobs and after the first failure I have never had to redo one!! Good luck and remember that this is just a test of your patience and you should pass this test easily!

