Newbie AWD Astro Overlander Build

nobodyhome

Adventurer
Well, not much of an update... but it's all I can do with no budget.

I did fluid drain/ replace all around:
- Transfer case w/ AutoTrac II
- Front Diff w/ 80W90 conventional
- Rear Diff w/ GM 75W90 synthetic (with new grape scent too!)
- Trans Dexron III / filter

All went as planned, very boring stuff. The trans fluid looked like reeeally old oil, no redish tinge to be found at all, so it was past time.

The misfire is still quite tame after the Seafoam trick, all things considered.
I did try my hand at a little carpentry last weekend by building the rear deck so I can start on my evil pull-out kitchen plans... didn't go so well as you can see... haha
rear deck fail 1.jpg
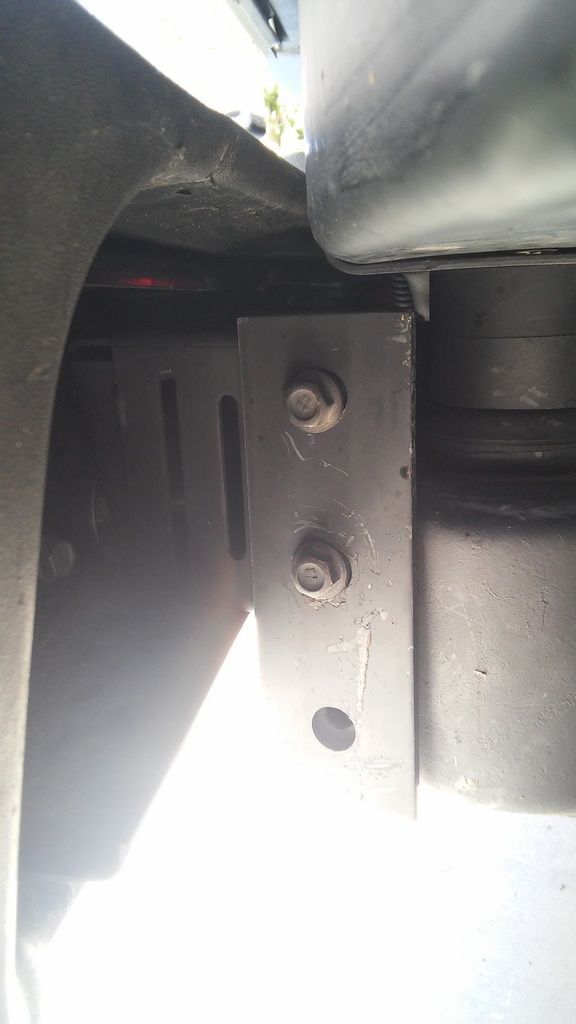
Yes, those are crooked, but the lower cross beams are drilled/ matched to bolt into the factory hold down loops, so the whole thing can be removed as a module if needed.

rear deck fail 2.jpg
Next version top will be a little wider w/ weather stripping along the edge to bridge the 2" gaps on the sides and face to seal the whole thing off.
At least I got the height right to lay flush with the rear seat folded down

rear deck fail 3.jpg
..but forgot to slide the seat forward when I took the measurements, so it's 3" short... whoops.

Sooo, back to the ole drawing board. I worked a deal with a buddy for his help on all this carpentry BS while I make him a Bluetooth/ Android controlled ext. lighting system for his 4runner... now THAT I can do!
 
Last edited:

nobodyhome

Adventurer
OK, I gave this creation to my local smog guy, who also happens to be an Astrofarian, and I'm starting over new. This time, I'm getting help!
More to come in about a month... I'm off to explore the mysteries of Asia...
 

nobodyhome

Adventurer
I thought a Jeep JK front bumper might fit the van...and I was right! I still need to add the bumper relocation brackets to bring it up further... Think I'll fab my own ;-)

I took the BatVan out to a local trail called BC109, mostly flat with mild to moderate articulation. It did really well although the tires bottomed out a few times. Need more lift!

0603161310.jpg

0603161252c.jpg
 

nobodyhome

Adventurer
Sure thing AA-Ron, here's a build write up (subject to tweaking over the next week or so)...

How to fit a stock Jeep Wrangler JK Front Bumper on Your Astro/ Safari

Why would I wanna do this?
In my humble opinion, the best way to shed the mommy mini van look, is to pull the bumper covers. What you are left with is less than flattering, so why not kick it up a notch... BAAAAM! The stock Jeep Wranglers JK (2007-20xx) have a great, aggressive looking bumper, which tells people this ain't mommy's mini van brudda! It lines up well and nothing interferes with each other, it would actually fit perfectly if not for the tilt on the bumper crush mounts. BTW- I'll show you how to fab up some brackets that will allow you to use one of those cool bumpers in a few months.
The best thing about it is a TON of people pull off the stock bumpers in favor of something with a winch plate, stinger, etc. Therefore, they are super cheap and quite plentiful, and come with damn near everything you'll need to install, just be sure you gather everything from your donor. Everything aligns very well and follows the body lines for teh most part, so it doesn't look out of place in my opinion that is.

How big of a project is this?
Follow these "no welding required" guidelines, and any shade-tree mechanic can knock it out in about an hour. I did all the knuckle busting so your experience should be way less painful.

What supplies you'll need:

2007-2014 Stock JK bumper w/ the following:
- Steel sub-frame
- Plastic cover
- 2x recovery hooks w/ 8 18mm nuts
- 4x 15mm bolts (attaches cover to sub frame)
- 2x fog lights (or get some aftermarket)

- 2x original bumper bolts (bring with you the the Hardware Store)
- 2x ~7cm long bolts of same size/ thread as bumper bolts (sorry I forgot to write the size down)
- 2x ~3cm long spacers (these will account for the slant in the original brackets, or you can fab your own. I'll post a printable template in the next few months with the next project).

What tools you'll need:
- 15mm socket
- 18mm deep socket
- Phillips Screwdriver
- Sharpie
- Square or T-Ruler
- Measuring tape or calipers
- Calibrated Eyecometer

Procedure:

- Remove front bumper cover and sub bumper support, donate to charity or equiv.

- Measure to find center of donor bumper, mark with sharpie.

- Place donor bumper on crush mounts and center both vertically and horizontally, using the line you just drew and eyecometer to line up with the center of the grill. (Note: I found taping 2 washers to the top of the crush mount vertically centered the bumper perfectly).

- Mark off crush mount holes relative to the bumper. There are a few ways to do this... I traced the outline of the mounts on the back of the bumper, then used calipers to determine the position and spacing of the mounting holes, then transferring those to the bumper.

- Drill holes, probably one at a time to ensure you are still on target. Since the bottom holes will be at an angle, best to make them elongated to ensure the bolt aligns properly. Do plenty of test fits, make slots and use larger washers if you are off target like I was, dang it only a 1/4" too!

- Once the holes are ready, feed the new longer bolts through the bumper with the spacer behind the bottom hole. You may have to add washers to ensure the bumper sits at 90 deg with the frame. Tighten everything down.

0604160958.jpg
(Note: This photo was taken before I installed the bumper relocation brackets and after my 2" body lift; this is why it looks a little funky here)

- Using the 15mm socket, remove the crush mount from the frame while still attached to the bumper sub frame.

- With the bumper cover laying face down, put the tow hooks into place in the cover. Then lower the sub frame onto the cover, align the 8 tow hook bolts through and secure the nuts with 18mm deep socket. Then attach the cover to the sub frame via the 4x 15mm bolts. NOTE: THE TOW HOOKS ARE NOT PROPERLY SUPPORTED AND JUST FOR DECORATIONS UNTIL THE PERM BRACKET IS INSTALLED

- Add fog lights and secure with Philips head screws. Wire light in with pig tail or directly, how ever you like. A switch can be added easily in the cab to operate them, or just shove them in for looks (lame).

0604161232_HDR.jpg

- Place assembled bumper back on to frame by bolting on the crush mounts. Tighten with 15mm socket.

- Open beer or favorite beverage and celebrate, you just made your van look that much more bad azz!

0604161306.jpg

I will post my crappy home made 2" bumper relocation brackets I made for this build. I another project I'll be welding up mounting brackets that will allow you to mount most any full size JK bumper to your van... stay tuned for more low dollar solutions!
0604161305.jpg
 
Last edited:

Herbie

Rendezvous Conspirator
Great work! I'm excited to see that the width looks more or less "correct". That opens up a lot of possibilities for us.
 

nobodyhome

Adventurer
Right on, thanks Herbie. Yeah the angle is slightly off, but it aligns with the body and the wheel well, I'll post more pictures. Also, the bottom of the bumper lines up with the bottom of the door too, so yeah hell for a near $0 upgrade its hard to beat.
I'll work on better mounting brackets to replace the funky angled crush mount and firm everything up, then post a template if anyone is interested.
 
Last edited:

nobodyhome

Adventurer
I got a few close up shots to see the fitment better. Like I said, not as tight as a custom built bumper, build a whole lot easier and cheaper!
Originally I had the idea and just threw this together to see if the size, shapes and clearances all worked out. Turns out it did pretty well on it's own, so I'll probably just keep it... until I need a winch that is.
My plan was to get a XRC style bumper with winch plate and brush guard, but I think I like this better...

0604162241a_zpstcgt9iky.jpg


0604162241_zpszblpim9m.jpg


0604162242_zpssspe14rr.jpg


I decided to see about making some better full-size brackets via CAD. In the next month or 2, I'll get around to getting these cut, mounted and welded together. This better bracket will be the ones for the XRC bumper and sturdy enough to actually use the tow hooks without buckling the whole deal.

0603161919_zps0abohi64.jpg


The idea is to have 2 of these ET looking brackets on either side of the frame rail, then welded to the front plate w/ a 45 deg cross support. Then, drill out the holes to the same as the JK mounts, and you can mount pretty much any JK bumper. You might have to play with the frame side mounting to give you enough room to clear things, but the idea is there. Probably add back some more meat around the back/ top, which was cut short to clear the body.
Once built and refined, I'll post printable templates should anyone wanna give it a go.
 

nobodyhome

Adventurer
Since my fabrication skills and equipment are very limited, I was about to order up some bumper relocation brackets (for 2" body lift) to properly mount my new Jeep bumper.
I hear that OLV makes the best out there, but Journey also makes one for half price. When I looked at theirs, I quickly realized why that is... they kinda suck... and they are way over priced. So I set out to find a cheap easy solution, and I hit the mother load!
Here's what I did...
On a trip to Lowes, I found some 1/4" think steel straps that looked like they might work. When I got them home I found not only did they fit, but the holes were already in the correct locations! Also, I could make both brackets from one strap... AND it was only $12!

Here is the strap, made by USP Structural Connectors, PN HST2-R, Lowes item# 140630
0604161123_zpsbpy54a63.jpg


Then measured off 7.5" from each end and marked off a cut line.
0604161159_zpsiyp6ge6b.jpg


Using my $20 HFT cut off wheel, I chewed through that strap until I had 2 bumper mounts. A little flat black paint later, I got it installed in under 5 minutes. As suspected the bolt holes lines up very well, although they were a little larger than needed, so I went ahead and added washers (photo is test fit).
0604161305_zpsulkpdp8s.jpg


On the top hole, I added 3x 1.5" long 1/2" diameter spacers to keep the crush mount from crushing more.
Then added a grade 8, 5.5" 7/16 diameter bolt to the bottom to help hold everything in true position and cranked down those bolts as hard as I could.

We'll see if it works out in the long run. This is just a temporary fix until I can get the better brackets designed, fab'd and tested.
 
Last edited:

nobodyhome

Adventurer
Great work! I'm excited to see that the width looks more or less "correct". That opens up a lot of possibilities for us.

BTW- Did I mention this bumper 'appears' to fit on the rear of our vans too? The radius is the same, but I haven't looked at mounting, only overall size. Someone on my other site mentioned the tow hooks might interfere with the doors, so more to look at. Thought you might like the idea. Also, you could wire the fog lights come on with the reverse indicators...
 

nobodyhome

Adventurer
Did some more shake down tests, this time in Hungry Valley ORV park here in SoCal. I started off with some mild hills and was soon beating up serious grades with lose gravel and 1ft deep ruts...no problem. Did some flex obstacles too and did ok but tires are rubbing too much....i need a taller lift, 2" ain't gonna cut it.

On my way back from my drove up north, i made a quick stop in Pismo Beach. Aired down to about 20psi, and hit the dunes!
People were freaking out watching a mini van do bowls and jump...hehehh i love messing with people.
Check it out...
20160713_185135.jpg

20160713_185504.jpg

20160713_185553.jpg
 
Last edited:

Forum statistics

Threads
186,649
Messages
2,888,455
Members
226,767
Latest member
Alexk
Top