Nissan Titan/FRP Flippac Build

Just getting started with some free scrap wood we literally had laying in the back yard. Some of it was pretty rough but it was free! Got the front truck box built over about 8-10 hours. Next will be a false floor to eliminate the wheel well humps and allow me to put in the slide(s). I may end up redoing this on with good materials and more precision but it will work for now. We just wanted to be able to sleep four comfortable.

It is exactly 6' between the walls of the shell so the purpose of this box was to fill in between the base of the shell. It forms a single height 24" x 72" platform for the cushions.
 

Attachments

  • Truck Box.JPG
    Truck Box.JPG
    703.4 KB · Views: 595
  • Truck Box 2.JPG
    Truck Box 2.JPG
    624.5 KB · Views: 419
  • Truck Box Int.JPG
    Truck Box Int.JPG
    759.5 KB · Views: 328
Stuffed a Die Hard Platinum Marine Group 31 battery under the hood. It'll have to do until I get a second one for the bed and a dual battery setup. I pulled out the stock battery tray, measured everything up, bought a bigger tray and a bunch of bolts to mount it. Then after messing around with it for far too long, cut the side off the stock tray and remounted it. It fits like a glove.

We were saving money to buy a FWC but decided to build up the Flippac instead. It's going to be an ExPo Christmas at my house as we use the camper fund to buy goodies for the current rig instead. :wings: I'm not sure how long I can wait before springing for the dual battery setup though. I'll test this battery overnight when the fridge comes in this week. If it can hold enough charge overnight to start the truck, it'll give me a couple months to do other things before I buy the second battery.
 

Attachments

  • DHP.JPG
    DHP.JPG
    705.4 KB · Views: 209

WASURF63

Adventurer
Stuffed a Die Hard Platinum Marine Group 31 battery under the hood. It'll have to do until I get a second one for the bed and a dual battery setup. I pulled out the stock battery tray, measured everything up, bought a bigger tray and a bunch of bolts to mount it. Then after messing around with it for far too long, cut the side off the stock tray and remounted it. It fits like a glove.

We were saving money to buy a FWC but decided to build up the Flippac instead. It's going to be an ExPo Christmas at my house as we use the camper fund to buy goodies for the current rig instead. :wings: I'm not sure how long I can wait before springing for the dual battery setup though. I'll test this battery overnight when the fridge comes in this week. If it can hold enough charge overnight to start the truck, it'll give me a couple months to do other things before I buy the second battery.


Not a bad shift in plans at all toward the FP interior build up. :lurk:

BTW I'm running house lights, an Engel MT45, and a 12v pump "very carefully" (for now) from a single battery also.
Second battery / NL powerpack / and fuseblock install to run all ATFP house power as soon as $$$ alow.
 
Last edited:

homemade

Adventurer
Good move. In addition to saving the cost of buying a new camper there is no need to spend extra $ for suspension and tire upgrades. No extra time spent loading and unloading a camper then covering it and storing it. You have a daily use truck cap to boot. It looks like your flippac has a lot more useable space for 4 to sleep in also.

I am going to try my hand at building a flip top camper, since I weld on my driveway it will probably have to wait until spring.

PS I don’t think the need for a rain fly in wet weather is that much of a disadvantage, it would help keep the tent portion clean and is removable so it can be dried and cleaned easily. The fly they sell just doesn’t seem that adequate, it seems it should have flaps or awnings for all of the windows, not just the tiny openings at the ends. I’m sure someone could do much better. I’m using urethane coated cordura for my tent portion, maybe that would be a good material for a tent fly for a flippac.
 
Had my new custom rocksliders welded on today. I still need to hit them with a rattle can of bedliner but it's threatening rain so that will have to wait. I'm very pleased with how they turned out. :wings:

UPDATE: I got some of those heavy white papers Costco uses to separate stacks of paper towels and toilet paper and taped them to the truck for overspray. Two coats of Rustoleum Auto Primer and two coats of Rustoleum Truck Bedliner and I'm very pleased with the results.
 

Attachments

  • slider4.JPG
    slider4.JPG
    564.2 KB · Views: 144
  • slider3.JPG
    slider3.JPG
    609.5 KB · Views: 131
  • Final Slider 2.JPG
    Final Slider 2.JPG
    592.7 KB · Views: 133
  • Final Slider1.JPG
    Final Slider1.JPG
    602.8 KB · Views: 108
Last edited:
MWC Jerry Can Faucet

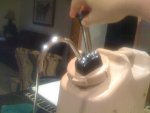
A small nicety for the camp kitchen. I copied this from someone else but I can't find the original write up to thank him. You drill out the pour spout on a Scepter water can and install a Fynspray faucet with a manual pump. The spout turns up for storage. I still need to attach a small piece of hose to the bottom to reach the full depth of the can.

If you're going to do this be sure and drill out as far away from the edge of the lid as possible. Mine is a bit close and has to be turned just right to attach without the nut hitting the lip. We can't wait to try it in the field. It works fine in the kitchen!
 

Attachments

  • Jerry Can Faucet 1.JPG
    Jerry Can Faucet 1.JPG
    689.1 KB · Views: 142
  • Jerry Can Faucet 2.JPG
    Jerry Can Faucet 2.JPG
    744.6 KB · Views: 188
  • Jerry Can Faucet 3.JPG
    Jerry Can Faucet 3.JPG
    639.8 KB · Views: 196
Very cool, where did you get the faucet pump?

I got mine at pleasureboatmarine.com but I'd find another place. They didn't ship it for two full weeks. It took a follow up call to finally get it shipped. Its a Fynspray WS-67 if you're interested. I'm very pleased with the quality of it.
 
National Luna PPP

I drilled a 1.5"(ish) hole though the bedliner and truck bed which was a little :yikes: . Then ran the PPP wires along the wireloom attached to the frame and up to the truck battery. I build up the floor of my sleeping platform/storage box to attach it to, dropped in a Group 31 Die Hard Platinum marine battery, plugged it in and now have my fridge and house lights powered in the bed. :wings: I added a few panels in the box to keep things separated a bit and plan to do a little more as I add more stuff in there with 'permanent' spots for storage.
 

Attachments

  • PPP1.JPG
    PPP1.JPG
    596.8 KB · Views: 186
  • PPP2.JPG
    PPP2.JPG
    675.7 KB · Views: 158
Small but Useful Mod

I added d-rings behind the pole holders at all four corners, in the middle where the cot sets up, and above the side windows. It gives me anchor points for netting and privacy curtains (for the porta-potty).
 

Attachments

  • Dring1.JPG
    Dring1.JPG
    682.2 KB · Views: 199
  • Dring2.JPG
    Dring2.JPG
    773.4 KB · Views: 173
  • Dring3.JPG
    Dring3.JPG
    751.9 KB · Views: 178

Forum statistics

Threads
188,039
Messages
2,901,517
Members
229,352
Latest member
Baartmanusa
Top