Trixxx
Well-known member
After we returned from our NM/AZ trip, it was time to get started on the rear platform to hold the spare and for additional storage. The owner of the storage unit put a stop to all our metal fabrication (we were renting a generator, bringing it to the storage unit, and fabricating all weekend). It was against the rules, but the owner was pretty cool and let me finish the last day to get the core of the structural steel completed before the trip.
For the platform, we were able to fabricate this separately in our single car garage at our apartment. I had a piece of 4x4 square tubing left over from the bumper, so we built a mock up assembly of the actual bumper. We used this to fabricate the platform, then would cut it off to install on the actual trailer bumper.
I had a lot of different ideas on how I wanted to do this, and tons of different things to take into account. I had seen other designs on Casita’s, but I could not be happier with how our design turned out. I probably spent 20-30 hours racking my brain drawing rudimentary iPad sketches on different possibilities. There were pro’s and con’s to so many different options. One “easy“ option, was to just build a platform straight out of the bumper. With this, I felt like you use some departure ground clearance, plus the spare tire would take up a decent chunk of space on top. The company that installed my axle had modified another Casita and they built the platform this way. I didn’t care for that.
My other thought was to build the platform elevated, and have the spare tire sit underneath the platform, parallel to the ground, like if it was under a SUV or truck bed. This would have required the platform to be at least 32” or more from the rear of the trailer.
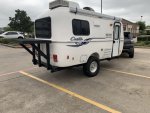
My last idea, which I ultimately settled on, was having the spare tire mount similar in position to it’s factory location, then have a platform above it that is 60” wide (bumper is 64”) and 32” in depth. I also had to take the license plate into consideration, so I needed each leg of the platform to be 11.5” in from the outside of the bumper, so the support would land right in the center of my license plate, where there’s no letters or numbers.
Here’s a screenshot of my different sketches for the build. Like I said, they are very rudimentary, but I didn’t need them perfect or to scale, just something that I can understand and fabricate from. I deal with engineered drawings all day at work in my line of oil & gas and could have used bluebeam to generate something more professional, but there was no need. The top row, second from the left is the ultimate sketch of what I ended up with. The photo to the right is from a rear view without the spare tire. Middle row, far left is looking down. To the right of that is one of my “other” ideas I mentioned above. Middle row, second to the right is the material takeoff weights for the steel I added. It was just a close evaluation based on my design at the time to ensure I wasn’t throwing the trailer off balance by adding too much weight to the front or back.

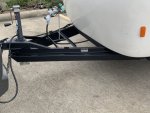
The critical 11.5”. My actual bumper is 64” wide, and my scrap piece of 4x4 was only like 48”, so I had to go through the math a million times to not mess this up.

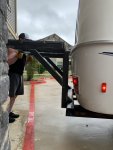
The bumper mock up

Near completion

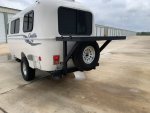
Spare tire test fit


In this photo, you can see that the orientation of the middle 2x3 is different, and it is spaced out 2” further. Once installed, you’ll see why I had to do this. The rear of the Casita is rounded, so this needed to be cheated forward for the supports to somewhat match the contour of the trailer.

Getting my groove back with the welding.. When I started out, I felt like Austin Powers when he lost his mojo..


For the platform, we were able to fabricate this separately in our single car garage at our apartment. I had a piece of 4x4 square tubing left over from the bumper, so we built a mock up assembly of the actual bumper. We used this to fabricate the platform, then would cut it off to install on the actual trailer bumper.
I had a lot of different ideas on how I wanted to do this, and tons of different things to take into account. I had seen other designs on Casita’s, but I could not be happier with how our design turned out. I probably spent 20-30 hours racking my brain drawing rudimentary iPad sketches on different possibilities. There were pro’s and con’s to so many different options. One “easy“ option, was to just build a platform straight out of the bumper. With this, I felt like you use some departure ground clearance, plus the spare tire would take up a decent chunk of space on top. The company that installed my axle had modified another Casita and they built the platform this way. I didn’t care for that.
My other thought was to build the platform elevated, and have the spare tire sit underneath the platform, parallel to the ground, like if it was under a SUV or truck bed. This would have required the platform to be at least 32” or more from the rear of the trailer.
My last idea, which I ultimately settled on, was having the spare tire mount similar in position to it’s factory location, then have a platform above it that is 60” wide (bumper is 64”) and 32” in depth. I also had to take the license plate into consideration, so I needed each leg of the platform to be 11.5” in from the outside of the bumper, so the support would land right in the center of my license plate, where there’s no letters or numbers.
Here’s a screenshot of my different sketches for the build. Like I said, they are very rudimentary, but I didn’t need them perfect or to scale, just something that I can understand and fabricate from. I deal with engineered drawings all day at work in my line of oil & gas and could have used bluebeam to generate something more professional, but there was no need. The top row, second from the left is the ultimate sketch of what I ended up with. The photo to the right is from a rear view without the spare tire. Middle row, far left is looking down. To the right of that is one of my “other” ideas I mentioned above. Middle row, second to the right is the material takeoff weights for the steel I added. It was just a close evaluation based on my design at the time to ensure I wasn’t throwing the trailer off balance by adding too much weight to the front or back.
The critical 11.5”. My actual bumper is 64” wide, and my scrap piece of 4x4 was only like 48”, so I had to go through the math a million times to not mess this up.
The bumper mock up
Near completion
Spare tire test fit
In this photo, you can see that the orientation of the middle 2x3 is different, and it is spaced out 2” further. Once installed, you’ll see why I had to do this. The rear of the Casita is rounded, so this needed to be cheated forward for the supports to somewhat match the contour of the trailer.
Getting my groove back with the welding.. When I started out, I felt like Austin Powers when he lost his mojo..