You are using an out of date browser. It may not display this or other websites correctly.
You should upgrade or use an alternative browser.
You should upgrade or use an alternative browser.
One Swell Trailer
- Thread starter GeoTracker90
- Start date
BSR
Utter Numpty
Looking good.
When you do the 'camp lights' on the trailer, consider building in one/two of these:
http://www.ebay.co.uk/itm/12V-24V-10W-15W-20W-30W-50W-Cool-White-LED-Flood-Light-Garden-Landscape-Lighting-/331510505317?pt=LH_DefaultDomain_0&var=&hash=item4d2f90df65
I have a couple, very good light for not much consumption on 12v.
GeoTracker90
Adventurer
Thanks for the kind words guys.
stomperxj I was able to find the lights on Amazon. Here's a link to the page:Flush Mount 12 Volt LED Lights
BSR, that's a great idea. I hadn't even thought of doing a search for landscaping lights. I'll keep it in mind.
Mike
stomperxj I was able to find the lights on Amazon. Here's a link to the page:Flush Mount 12 Volt LED Lights
BSR, that's a great idea. I hadn't even thought of doing a search for landscaping lights. I'll keep it in mind.
Mike
GeoTracker90
Adventurer
Sorry for going silent guys. Life took a bit of a different course over the last few months, but I think I'm getting close to picking this build back up. It's time to start making some progress again.
Mike
Mike
knawledgeman
New member
This build is extremely detailed, I really hope you start to pick this back up. Best of luck to you.
BSR
Utter Numpty
Ditto Mike... Hope all is well
Double ditto.
GeoTracker90
Adventurer
Back From the Dead
Hey guys, it's not dead yet!!! Not only that but I've actually started making a little progress again.
Last weekend I flipped the frame over and quickly laid out the axle and the trailing arms. This was just to see where everything was going to land as I start getting familiar again with what I was thinking a year ago. I currently have handed the four inner brackets for the trailing arms off to the machinist at work. Those four brackets just need to have a 5/8" hole drilled in them to locate the inner joint. I could have just done it in the drill press, but with the trailing arm suspension I'm trying to get things as accurate as possible from the get go. My hope is that by doing this I'll have to do less adjustment and alignment once everything is together.
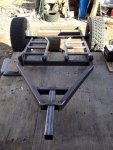
Today I dug in a little deeper and started actually making some progress. Originally, I had planned on making the box 78" long x 42" wide x 30" tall. As of today these dimensions are fixed, but there was one small change. The height of the main box went from 30" tall to 36" tall. Yes, this potentially can raise the center of mass of the trailer. I'm not concerned though. Proper planning and loading of the trailer will negate any negative consequence from making it 6" taller.
Another executive decision was made in how the interface between the main box and the trailer frame will happen. In the past I've just used the trailer frame as the base of the main box. Because of the complexity of the trailing arm / air bag suspension I've decide to build the main box as a unique part that gets bolted to the trailer frame. My intention is to never have to separate the two once I'm finished, but should there ever be a need to do any work on the suspension or repair / modifications to the brackets or frame it would be so much easier if the main box was out of the way. With this in mind I welded up a base perimeter out of 2" x 1" rectangle tube.
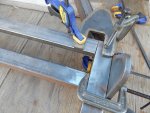
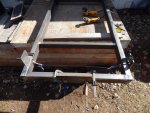
Plenty of clamps and plate steel were used to align the base perimeter of the main box with the perimeter of the trailer frame. Doing the welding outside, I had to be fairly selective as to when I chose to pull the trigger on the welding gun. From time to time there was just enough of a breeze to really mess with the shielding gas as I was trying to weld.
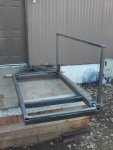
With the base of the main box welded up I started on the side frame of the box. With the base made out of the 2" x 1" rectangle tube, I moved on to using 1.5" square tube for the remainder of the main box structure. Unfortunately, I only had enough tube on hand to get the passenger side wall framed in and welded to the base. I'll have to grab another stick of the 1.5" square tube and the 2" x 1" rectangle tube some time this week so I can continue on with the main box while I wait for the suspension brackets to get machined. The last thing I want to do is put this on an extended pause again.
Once I do get the sticks of tube I'll get the main box structure finished off. After that I have two sheets of 16 gauge metal that I'll start wrapping the box with. I'm excited to get the box done so that I can start designing everything that will be going into the box. I've got access to my buddy's CNC router and I can't wait to start designing the slide out kitchen and then see it jump off the computer screen with a few clicks of the mouse. Until then....
Hey guys, it's not dead yet!!! Not only that but I've actually started making a little progress again.
Last weekend I flipped the frame over and quickly laid out the axle and the trailing arms. This was just to see where everything was going to land as I start getting familiar again with what I was thinking a year ago. I currently have handed the four inner brackets for the trailing arms off to the machinist at work. Those four brackets just need to have a 5/8" hole drilled in them to locate the inner joint. I could have just done it in the drill press, but with the trailing arm suspension I'm trying to get things as accurate as possible from the get go. My hope is that by doing this I'll have to do less adjustment and alignment once everything is together.

Today I dug in a little deeper and started actually making some progress. Originally, I had planned on making the box 78" long x 42" wide x 30" tall. As of today these dimensions are fixed, but there was one small change. The height of the main box went from 30" tall to 36" tall. Yes, this potentially can raise the center of mass of the trailer. I'm not concerned though. Proper planning and loading of the trailer will negate any negative consequence from making it 6" taller.
Another executive decision was made in how the interface between the main box and the trailer frame will happen. In the past I've just used the trailer frame as the base of the main box. Because of the complexity of the trailing arm / air bag suspension I've decide to build the main box as a unique part that gets bolted to the trailer frame. My intention is to never have to separate the two once I'm finished, but should there ever be a need to do any work on the suspension or repair / modifications to the brackets or frame it would be so much easier if the main box was out of the way. With this in mind I welded up a base perimeter out of 2" x 1" rectangle tube.


Plenty of clamps and plate steel were used to align the base perimeter of the main box with the perimeter of the trailer frame. Doing the welding outside, I had to be fairly selective as to when I chose to pull the trigger on the welding gun. From time to time there was just enough of a breeze to really mess with the shielding gas as I was trying to weld.

With the base of the main box welded up I started on the side frame of the box. With the base made out of the 2" x 1" rectangle tube, I moved on to using 1.5" square tube for the remainder of the main box structure. Unfortunately, I only had enough tube on hand to get the passenger side wall framed in and welded to the base. I'll have to grab another stick of the 1.5" square tube and the 2" x 1" rectangle tube some time this week so I can continue on with the main box while I wait for the suspension brackets to get machined. The last thing I want to do is put this on an extended pause again.
Once I do get the sticks of tube I'll get the main box structure finished off. After that I have two sheets of 16 gauge metal that I'll start wrapping the box with. I'm excited to get the box done so that I can start designing everything that will be going into the box. I've got access to my buddy's CNC router and I can't wait to start designing the slide out kitchen and then see it jump off the computer screen with a few clicks of the mouse. Until then....
GeoTracker90
Adventurer
Body Mounts
I believe that I've settled on what to use as a body mount to attach the main box to the frame.
A&A Manufacturing has a spectacular selection of brackets and tabs. Many are very well priced, and many are in forms that you don't see in the typical 4x4 web stores. In looking through their web store I came across part #AA-041-C. A channeled fuel cell mounting bracket formed out of 1/8" steel with a 3/8" bolt hole. Sounds about perfect for a body mount on the trailer.
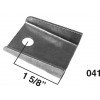
A&A MFG Channeled Fuel Cell Mounting Bracket
At only $1.50 each it's not a huge expense to buy the brackets. It's for sure a lot cheaper than making a dozen brackets from scratch myself. I'll check some more on A&A's web site and see if there are any other brackets and tabs that need to be added to the order. Either way, I should have the order placed by the end of the week.
I believe that I've settled on what to use as a body mount to attach the main box to the frame.
A&A Manufacturing has a spectacular selection of brackets and tabs. Many are very well priced, and many are in forms that you don't see in the typical 4x4 web stores. In looking through their web store I came across part #AA-041-C. A channeled fuel cell mounting bracket formed out of 1/8" steel with a 3/8" bolt hole. Sounds about perfect for a body mount on the trailer.

A&A MFG Channeled Fuel Cell Mounting Bracket
At only $1.50 each it's not a huge expense to buy the brackets. It's for sure a lot cheaper than making a dozen brackets from scratch myself. I'll check some more on A&A's web site and see if there are any other brackets and tabs that need to be added to the order. Either way, I should have the order placed by the end of the week.
BSR
Utter Numpty
Hey guys, it's not dead yet!!! Not only that but I've actually started making a little progress again.
Yay! Good to have you back dude.
GeoTracker90
Adventurer
Yay! Good to have you back dude.
BSR, thanks for enthusiastically welcoming me back. It's great to be making some progress again.
Similar threads
- Replies
- 32
- Views
- 5K
- Replies
- 1
- Views
- 601
- Replies
- 31
- Views
- 5K
- Replies
- 7
- Views
- 1K
