Only AUX batteries getting charged, OEM batteries are not

Reno_master

New member
I have a retired ambulance (2002 E-450). It has a battery separator/isolator under the passenger seat accessed via the door well (i.e. where you put your foot to climb into the van). A 2 position battery switch is behind the passenger seat base. It has two positions: OEM ONLY and OEM PLUS CONVERSION.
My problem is that the OEM batteries (engine and rail) are completely dead yet the AUX (Conversion) are always fully charged. All 4 batteries are the same and new within the last year. I suspect that something is wrong with the separator/Isolator. Do separators go bad? Are there fusable links in there.
I am including a picture of the separator and what wires are attached there.
The system used to work just fine. All the batteries are grounded.

The legend for the wires:
1. Separator switch
2. AUX bank "+"
3. OEM bank "+"
4. Instrument panel ( ammeter and voltage)
5. Alternator output.
6. OEM bank "+“
7. Separator switch.

Is my logic sound? Had anyone taken these isolators apart? Do they fail in the manner I'm describing? Any insight would be appreciated.
Thanks.Screenshot_20220909-113045_Photos.jpg
 

Attachments

  • Screenshot_20220909-113045_Photos.jpg
    Screenshot_20220909-113045_Photos.jpg
    1.3 MB · Views: 4

NatersXJ6

Explorer
Do you have a picture of the “separator switch”?

Have you done any voltage or continuity checks of the system in its various modes or the switch in its modes?

Do the dash gauges show charging taking place?

I would also give every terminal a good shining with fine abrasive or a wire wheel on a dremel.

And… the snarky side of me says you should hook up those cables to charge! But I realize
That isn’t helpful when you are fighting an issue!
 

Reno_master

New member
Do you have a picture of the “separator switch”?

Have you done any voltage or continuity checks of the system in its various modes or the switch in its modes?

Do the dash gauges show charging taking place?

I would also give every terminal a good shining with fine abrasive or a wire wheel on a dremel.

And… the snarky side of me says you should hook up those cables to charge! But I realize
That isn’t helpful when you are fighting an issue!
Thanks for responding,
The switch creates/breaks a connection between cables 1 and 7. Basically it is a jumper between the left terminal and the far right terminal.
The gauges show sufficient voltage to charge, but only the left terminal (the one AUX and OEM are attached to) is getting alternator current. Yet only the AUX is receiving the flow.
 

NatersXJ6

Explorer
Have you checked continuity through the switch when closed / in the OEM+AUX position?

getting out there a ways, is it possible that the OEM batteries have been connected in series, Thus not having enough charging voltage?

Have you tried charging each OEM battery separately and disconnected from the vehicle? I know you said they are new, but infant mortality in batteries is relatively common and you might have a bad cell preventing that leg of the system from taking charge.
 
Last edited:

Alloy

Well-known member
Strange Aux and OEM are on the same terminal but only Aux is charged?

Strange there is 2 OEM + and they are on different terminals?

If that's the type of isolator I think it is then yes they (diodes) go bad. They went out of style becuses the voltage drops though them. VSR (voltage sensing relay) or DC-DC chargers are used now.

The terminals need to be cleaned. How are the neg leads / terminals?

Does everything charge/hold a charge for 3-4 days when the switch connects 1 and 7 together?
 

DiploStrat

Expedition Leader
Snarky advice may be worth a bit more than you pay for it. So here goes: Unless I very much miss my guess, that is a diode isolator with a starter battery sense wire. There are much, much better ways to isolate batteries - either an intelligent relay if you are using lead acid or a battery to battery charger if you are using lithium iron.

N.B. I REALLY doubt that the wires are connected as you outlined. In fact, it looks like someone may have tried to bypass the whole mess.
 

NatersXJ6

Explorer
@DiploStrat, I think you are hitting the core of my question about seeing the switch. Lacking scale in the photo, I’m going to guess either 4 AWG or maybe 2 AWG cables with 5/16 lugs in the photo? It doesn’t make sense to have a full-load rated switch connecting the 2 battery sets unless “someone” attempted to bypass a bad isolator, as you noted earlier. I’ve never worked directly with one of these, but some things just set off the “What is more likely?” in me.
 

iggi

Ian
Looks very similar to the battery isolator in my ambo. No issues with mine but it's several years newer and installed in a more protected area. I don't recall the model number off the top of my head but there was a manual online. I'd clean up the terminals and confirm correct installation via the manual. I've had other devices fail just from the terminals being that corroded.
 

Reno_master

New member
Problem Discovered.
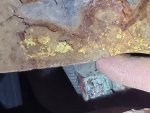
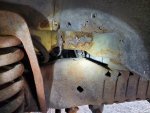
I traced all the battery cables (and there are a lot of them in this old ambulance and difficult to see because everything is so cramped). I found the main battery cable runs down the frame toward the isolator. The cable was frayed by rubbing against the frame beside the right wheel well. See the pictures. This resulted in a short every time I tried to start the vehicle with the switch on OEM only. Eventually the battery would be dead. So what I thought was the main issue was only a symptom of what was really happening (root cause) but I didn't think of it. Had I tried to start it at night and someone was watching they would have seen a lot of sparking! I'm going to replace the cable and report back.
Thanks for all the insights and suggestions20221003_174821.jpg20221003_174848.jpg
 

Reno_master

New member
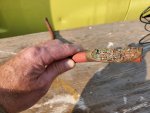
This is the problem battery cable, size 3/0. It's been replaced and all is right with the world! Thanks again for the input.
 

Attachments

  • 20221004_115533.jpg
    20221004_115533.jpg
    2.8 MB · Views: 10

NatersXJ6

Explorer
This is the problem battery cable, size 3/0. It's been replaced and all is right with the world! Thanks again for the input.

Did you secure or sheath it better to prevent recurring failure? Typically I run short sections of Heather hose over cable at potential abrasion points AND securely bolt them in place to things like frames.
 

DiploStrat

Expedition Leader
Do clean up all of those corroded terminals. (And I would still lose the diode isolator! )

Bravo on finding the real problem!
 

Reno_master

New member
Yes, I encased the soldered connector in shrink wrap and then wrapped rubber membrane around it with zip ties and secured it to the frame. It feels so great to have 4 batteries again!
 

Forum statistics

Threads
188,217
Messages
2,903,951
Members
229,665
Latest member
SANelson
Top