Our "new" Tiger...

HMR

Rendezvous Conspiracy
Couple small updates...
Found the center caps we wanted:
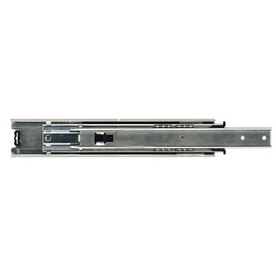
810248953_zqurc-M.jpg


Fridge Slide...
The refrigerator slide was a little tricky to complete. The sides of the original fridge "box" aren't square so it took awhile to get the angles just right. The 150lb drawer slides work perfectly and are plenty stout but I'm not happy with my design. I'm going to find some slides that sit lower to the floor so I can build a larger drawer above the fridge for additional food storage. Here's a pic showing where the fridge ends up when "out". With the passenger seat turned around, it doubles as a table:
814138709_MK79W-M.jpg


For anyone with a "factory fridge" setup I highly recommend you inspect your refrigerator compartment. The vents for the fridge compartment on many of these RVs, conversion vans and slide-in truck campers leave room for critters to enter. I thoroughly inspected the compartment with a flashlight during my prebuy inspection and saw no evidence of mice, rats, etc. A few weeks ago, when I yanked out the old refrigerator, I was surprised to find a nest hidden below the fridge in what appeared to be a sealed, "inaccessible" area:
786870823_eLpoT-M.jpg


786870578_QT9sK-M.jpg


I scrubbed and sanitized the compartment, sealed up all the factory holes, sealed up the vent (no longer needed with the compressor fridge) and laid down a new floor on top of the old one:
814148178_EVraY-M.jpg


FWIW- The Edgestar is working perfectly so far and is a nice improvement over the stock absorption refrigerator.
 
Last edited:

suntinez

Explorer
A few weeks ago, when I yanked out the old refrigerator, I was surprised to find a nest hidden below the fridge in what appeared to be a sealed, "inaccessible" area:
786870823_eLpoT-M.jpg

Ewww! Better not to travel with that, drive the pups crazy. Going to blow mine out now with a compressor - couldn't see anything with a flashlight either.

I like how your slideout fridge can be a table now, that's a good spot for one. :coffee:
 

HMR

Rendezvous Conspiracy
Fridge Slide V2.0

My original fridge slide design worked fine but I wanted to drop the whole thing down a bit to create more space for a drawer above the fridge.

I needed the fridge to slide out as far as possible so I chose an "Over-Travel" type drawer slide. The 150lb slides I used are great but their "Over-Travel" design requires them to be taller than a standard slide:
89757-01-500.jpg


After some experimenting I discovered that a standard "Full-Travel" type slider in a longer size could do the same thing while allowing the platform to be as close to the floor as possible:
029274284794lg.jpg


It took some time to figure out how to make the longer slide fit in the available space but the results are exactly what we wanted.

Here are some pics showing how the fridge is mounted to the platform:
818132945_CGvL8-M.jpg


818134732_qmsKE-M.jpg


818133875_7QYui-M.jpg


The finished product:
818135456_rDPLb-M.jpg


Notice the latch next to the fire extinguisher- we chose that location so the person in the right seat could reach back and access the fridge without getting up. Works great!

Next step is to frame in the area around the fridge and install a drawer above it.
 

T.Low

Expedition Leader
Wow, great work and thanks a ton for the documentation. It's very helpful. How does the front edge of the fridge and cabinet fit with the side of the driver's seat? I thought tha type pf fridge would sit out too far past the edge of the seat, but it looks like it fits flush.

Thanks.
 

HMR

Rendezvous Conspiracy
How does the front edge of the fridge and cabinet fit with the side of the driver's seat? I thought tha type pf fridge would sit out too far past the edge of the seat, but it looks like it fits flush.
I just realized that the angle of the picture I posted causes a bit of an optical illusion. The fridge sticks out 3-4" from the cabinet. The latch is flush with the wall behind the seat and the handle on the platform is a few inches closer to the camera. You can kinda see it by the shadow under the platform. The platform length doesn't cause any issues with the pass-through as it's less than the width of the armrests on the seats.

Keyblazer said:
What type of flooring are you using there?
It's a Pergo-type laminate.
 

T.Low

Expedition Leader
But the entire unit still fits within the seat width, correct, significance being it does not encroach into the walk thru area. (the seat is wider than fridge/cabinet/drawer unit).
 

HMR

Rendezvous Conspiracy
But the entire unit still fits within the seat width, correct, significance being it does not encroach into the walk thru area. (the seat is wider than fridge/cabinet/drawer unit).
Correct, it's less than the seat width.

I don't have a perfect picture but you can see a bit of it below:
808845517_W2pMu-M.jpg


The seat is quite a bit wider.
 

HMR

Rendezvous Conspiracy
Found a couple more pics showing the width of the fridge slide:
822149495_PKXB4-M.jpg


822150007_eNMau-M.jpg


So far, it's working perfectly.
 

HMR

Rendezvous Conspiracy
781210243_8RP6P-M.jpg

When I had my 1994 the silver grill stripes annoyed me. A little Goof-Off and some scrubbing removed it. I'll try to locate a pic.
I agree. Mine looked pretty bad but were easily removed with a razor blade and isopropyl alcohol.

I ended up sanding the grill and both headlight housings and repainting them. Turned out great:
822146341_aZVBt-M.jpg


Now I just need a nice Chevy emblem to complete the grill...
 

HMR

Rendezvous Conspiracy
New Shocks.

I installed some "heavy duty" Bilsteins in the rear:

W01331608553BIL.JPG


With the new airbags and the ancient rear shocks, the back end would get a little bouncy on rough roads. These new shocks were an easy install and are a nice improvement. The combination of the new seats, tires, shocks and proper airbag inflation have made the Tiger fun and comfortable to drive.
 

Ned B

New member
Just caught up on this thread, great find and an even better job at refitting an older rig. I'm going to be in the market for a mobile office/rv and you've inspired me to now look at an older class B RV. Having seen the difference after you put down the new flooring, changed out the seats etc, I think I'll be able to find an affordable rig to travel and do photo shoots from.

I'm also a huge fan of astro/safari vans. Had a '95 astro for a couple of years, plain jane 'family' van, (had full seating, but the only option was cruise control), still miss that thing, going to be looking for a younger astro when I move to VA in a year or so.
 
Last edited:

HMR

Rendezvous Conspiracy
Just caught up on this thread, great find and an even better job at refitting an older rig. I'm going to be in the market for a mobile office/rv and you've inspired me to now look at an older class B RV. Having seen the difference after you put down the new flooring, changed out the seats etc, I think I'll be able to find an affordable rig to travel and do photo shoots from.
Good idea- one of our desires was to be able to use the van as a mobile office. My job allows me plenty of time off to travel but I occasionally get a phone call and have to review and approve documents, on the spot. It's nice to be able to setup my laptop and printer on the rear table and go to work, if necessary.

One of the best things about these van conversions like the Tiger, Phoenix, Pleasure Way, etc. is the chassis and drive train remain pretty much 100% stock and were designed at the factory to carry the heavy weight. You routinely see these conversions with 150K+ miles on the original components and still going strong. In comparison, most Class A or C motorhomes are considered "high mileage" at 50K miles. The interiors are often cheaply built so some interior renovation is usually necessary but the "shell" lasts for years. Good luck with your search!
 

HMR

Rendezvous Conspiracy
The Next Big Project: The Bathroom...

One of our favorite things about the Tiger is the hot shower. We have a nice outdoor shower setup for the Tacoma that we love but it's a hassle to deploy and stow so we only end up using it every now and then. With the Tiger, we can wake up, light the water heater, brew some coffee on the stove and by the time we're half done with the first cup, the shower is ready to go. There's nothing to setup and nothing to stow... it's just there.

However, I had two problems with our particular shower:
1) The whole compartment didn't seem very waterproof. I found myself trying not to spray anything other than myself fearing the water was soaking through the wallpaper and into the wood. The compartment is tiny and there's very little room to move around so it would work better if I could just crank the water and not worry about soaking everything. I needed to find something 100% waterproof to cover the walls.

2) The rear window was a strange thing to include in the shower compartment. The window frame collected water which easily flowed to the rest of the rear window located on the other side of the sidewall and directly above the rear couch. If you aimed it just right, you could bounce water off the rear window and spray someone sitting on the couch. Also, even with the curtain closed and an opaque sticker covering the window, you could still see through it at night when the bathroom light was on. No big deal out in the desert but kinda creepy for busy campgrounds where the Tiger will likely spend some time. We decided to get rid of the window.

We'd been dreading tearing into the bathroom. We'd seen the scary pictures and heard the stories of the rotted wood and rusted metal common on old RVs. Our bathroom had a small tear in the wallpaper and a soft spot in the back corner. We were prepared for the worst...

Here's a pic taken after I started tearing into the wallpaper to look for water damage. Notice the back window (with fake stained-glass "privacy" sticker) and the "water resistant" curtains:
822145336_v8s7G-M.jpg


Turns out there was very little water damage behind the wallpaper (BIG relief #1!). I think the lack of water damage has more to do with the limited use this Tiger saw with the previous owner vs. the design of the shower compartment. The soft areas are deceiving- the rear of the Tiger has some tricky angles. It appears that Provan used a paper-thin wood laminate to bend around the curves. As a result, in areas where there's little structural support, the walls feel "soft".

Here's a pic showing some of the angles on the exterior that form the back and side wall of the shower. I drew the red line to show the approximate length of window that extends into the shower compartment:
822223460_sppCT-M.jpg


Here's another view showing the window and some of the wood paneling:
822145762_GGzck-M.jpg


Below the window and above the toilet you can see a small section of wood I removed to get a look behind the wall. There's a layer of fiberglass insulation behind there that I was worried would be damaged and need replacing. It was in fine shape and saved me from tearing out the whole wall (big relief #2!).

As usual, removing wallpaper sucks! Provan saved money by using cruddy screws and bolts in some areas but they apparently spared no expense in using the World's strongest wallpaper glue! :Wow1: I rotated between tearing out chunks of wallpaper for 10-20 minutes at a time and cutting the new walls to keep my sanity.

Before I could install the new walls I had to seal up the window. I drew up a couple different ideas and settled on fiberglass insulation and a piece of plywood to both insulate the back wall and make the window opening flush with the rest of the wall. I cut the plywood to size and then used it as a template for the fiberglass:
822146208_ArWNU-M.jpg


Fiberglass:
822146986_k4FeE-M.jpg


I drilled holes through both the plywood and aluminum window frame and secured them with sheet metal screws- it's not going anywhere. You can also see another piece of plywood (lower right corner) I used to strengthen a "soft" area and smooth out the wall:
822147601_MmA2P-M.jpg


We looked at 4 or 5 different materials to use for the walls and decided that FRP (Fiberglass Reinforced Plastic) paneling was the best fit for what we wanted. It's flexible, built for commercial applications and 100% waterproof:
ae5d464a-0986-4e6e-99b6-226a720f2211_300.jpg


I took measurements every 6” along each wall and copied the outlines on the back of the FRP. I used tin snips instead of the recommended saw to make the cuts. The cuts came out clean and it seemed safer and easier to manipulate the FRP while using the snips. FRP creates fiberglass dust when cut. I wear gloves, safety glasses and a respirator when working with it.
822147942_qevBW-M.jpg


Hard to get a good picture but here’s a test fit of the panels:
822148906_YJFUA-M.jpg


The FRP really brightens up the space and should add many years to the useful life of the shower.
 

suntinez

Explorer
You're right - there's nothing like a hot shower in your house, well worth the effort. That is quite a project, didn't realize the window protruded into the bath area (mine is covered up). Water-resistant curtains?? Ha! BTW if you heat the water at night then turn the flame down to pilot, you'll still have a full tank of hot water in the AM and barely use any propane to do it.

I like the FRP stuff you decided on, will you have to re-cover the other "wet" wall too?

How's the shower pan/plumbing in there, will that need replacing also?

Great work, enjoying watching you transform this Tiger! :coffeedrink:
 

Forum statistics

Threads
186,502
Messages
2,886,731
Members
226,515
Latest member
clearwater
Top