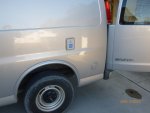
The window worked out nicely, I had talked with an RV repair man before looking for a window and he said to look for one where the inside frame ring fits towards the van's inside body and that a smaller window would work better, than when installing just use standard plumbers putty on both the inside and out to control the curve fit of the body, I did the putty heavy as he had told me, the tight fit of the window and frame together controls the putty. Than sealed around the outside with a clear sealer that is for the metal contact. Looks and worked great. I just had $5 into the window and $9 in supplies.
You are using an out of date browser. It may not display this or other websites correctly.
You should upgrade or use an alternative browser.
You should upgrade or use an alternative browser.
Overland Van Build, GMC Savana
- Thread starter dar395
- Start date
Thanks for the reply, the hard part being the $4k self imposed budget for a budget build, some area's that I'm looking at like the tire's will run over $800 and if I install a rear tire carrier another $150. The budget forces the forward out look at a greater concern in a good build with a limit on funds.
Looking to Craigslist for the deals takes a lot of time so I've turned it around and I have been running my ad's as I'm looking for; (item) it's nice to find an email in your box with the needed item (cheap). I'm looking for tires right now, looking for "Take-off's" hoping some one spent $60k on a really nice truck and they just need the upgrade from some nice Goodyear Wrangler A/T's or such. Of course with less than 5K miles on them.
89s rule
Adventurer
The window worked out nicely, I had talked with an RV repair man before looking for a window and he said to look for one where the inside frame ring fits towards the van's inside body and that a smaller window would work better, than when installing just use standard plumbers putty on both the inside and out to control the curve fit of the body, I did the putty heavy as he had told me, the tight fit of the window and frame together controls the putty. Than sealed around the outside with a clear sealer that is for the metal contact. Looks and worked great. I just had $5 into the window and $9 in supplies.
I would like to see a closeup of the angle on the window. How much you had to fill with clear silicone. On Ford vans it would need to be a very small window (maybe 12" or shorter?) to not have a large gap. Wish it could work out but I don't want to have to make a shelf/ gap at the top.
Window Install
I don't know the curve of a Ford van but on the GM there is only about an 1/16 of inch of putty at the lowest point of the install on the 14 inch window, the rubber seal lays flat on the outside body panel with the deepest putty on the inside. I did tighten the bottom and top parts of the inside trim ring first, then lightly put in the screws on the side so not to distort the body metal. I was also told to use a fiber cutting wheel to keep the heat low at the time of cutting, this also was so not to distort the body panel. Sorry I don't have an inside photo of the window, I've now got the van at a friends barn for the rock guard install.
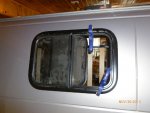
I don't know the curve of a Ford van but on the GM there is only about an 1/16 of inch of putty at the lowest point of the install on the 14 inch window, the rubber seal lays flat on the outside body panel with the deepest putty on the inside. I did tighten the bottom and top parts of the inside trim ring first, then lightly put in the screws on the side so not to distort the body metal. I was also told to use a fiber cutting wheel to keep the heat low at the time of cutting, this also was so not to distort the body panel. Sorry I don't have an inside photo of the window, I've now got the van at a friends barn for the rock guard install.


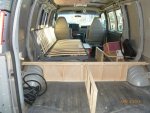
Mock up of the interior
It's hard to understand on your first build of all the items you wish to have in an overland vehicle and the real space that you have to work with. I had started to mock up the interior and come to understand it was not working out. We had purchased a folding style bed/couch from Ikea. We liked the bed as we found it and are going to use it. Other items such as cupboards and such we took them back to lets say just start over.
Today the better half had the idea of shopping the after season clearance sales, (shopping not my best) so off we go. First stop being Target Store' she had the idea that Christmas light and decoration storage boxes were a great idea, what do you know she might have something here, We did find some great one's and on clearance at 75% off just $4.00, now she says I can just build around them. Next door at Lowe's two tools sets, both Kobalt, 1 a wrench set (64 pcs) with both SAE and MM sizes the other being from drivers, tape, razor knife, hammer and lots of other items, both came in at $19 each, back in the flooring department 1 box of wood flooring for just $2 (reg price $54) and 2 trims for the same at $5 (reg $40 ea) some gray tile at .46cents a foot than we found some tile bull nose for just a quarter for 8 foot also we found some glue for $2 a can (Blue Hawk) it was $32 before clearance I hope to use on the insulation. Not a bad find trip. We now have purchased a bath vanity with four draws and 39" wide, we feel this will work better for the kitchen area and bath storage, we came up with this idea as the kitchen cupboards are 24" deep the vanity just 18" and then lower height also.
E-bay finds include a CB radio, two frame mounted battery boxes (GM), 12v switches, stereo speakers, RV outside shower mount with a broken door, RV PVC sink with a corner mounted fauset.
Then we took a trip to JoAnn's Fabric for the biggest sale of the year, what do you know it may pay to have a wife that can sew, we found fabric for the drapes between the cockpit and living area, we will have matching drapes on the windows too. Price marked on the fabric $48 per yard, red tag 50% off sales price just $4 per yard, classy for just $32 we're now going for a western look now I'm told.
All of my frame build up will be from 1x2's no 2x4's will be used, very limited use of 2x2 for two support areas all panels will bue 1/4 plywood with the bed box and counter support being from 1/2 plywood.
I think this idea of making such purchases will work for the mock-up and any item not able to be used may be taken back or at worst a little of the budget will be wasted.
The wiring is another area where there's much misinformation on, I'm starting with 10ga for the heavier use items and than 12ga for the lights and such for the 12v, I have not chosen the propane set up that will be used as well as disconnects for the power, but the mock up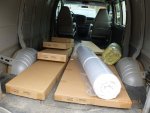 is started.
It's hard to understand on your first build of all the items you wish to have in an overland vehicle and the real space that you have to work with. I had started to mock up the interior and come to understand it was not working out. We had purchased a folding style bed/couch from Ikea. We liked the bed as we found it and are going to use it. Other items such as cupboards and such we took them back to lets say just start over.
Today the better half had the idea of shopping the after season clearance sales, (shopping not my best) so off we go. First stop being Target Store' she had the idea that Christmas light and decoration storage boxes were a great idea, what do you know she might have something here, We did find some great one's and on clearance at 75% off just $4.00, now she says I can just build around them. Next door at Lowe's two tools sets, both Kobalt, 1 a wrench set (64 pcs) with both SAE and MM sizes the other being from drivers, tape, razor knife, hammer and lots of other items, both came in at $19 each, back in the flooring department 1 box of wood flooring for just $2 (reg price $54) and 2 trims for the same at $5 (reg $40 ea) some gray tile at .46cents a foot than we found some tile bull nose for just a quarter for 8 foot also we found some glue for $2 a can (Blue Hawk) it was $32 before clearance I hope to use on the insulation. Not a bad find trip. We now have purchased a bath vanity with four draws and 39" wide, we feel this will work better for the kitchen area and bath storage, we came up with this idea as the kitchen cupboards are 24" deep the vanity just 18" and then lower height also.
E-bay finds include a CB radio, two frame mounted battery boxes (GM), 12v switches, stereo speakers, RV outside shower mount with a broken door, RV PVC sink with a corner mounted fauset.
Then we took a trip to JoAnn's Fabric for the biggest sale of the year, what do you know it may pay to have a wife that can sew, we found fabric for the drapes between the cockpit and living area, we will have matching drapes on the windows too. Price marked on the fabric $48 per yard, red tag 50% off sales price just $4 per yard, classy for just $32 we're now going for a western look now I'm told.
All of my frame build up will be from 1x2's no 2x4's will be used, very limited use of 2x2 for two support areas all panels will bue 1/4 plywood with the bed box and counter support being from 1/2 plywood.
I think this idea of making such purchases will work for the mock-up and any item not able to be used may be taken back or at worst a little of the budget will be wasted.
The wiring is another area where there's much misinformation on, I'm starting with 10ga for the heavier use items and than 12ga for the lights and such for the 12v, I have not chosen the propane set up that will be used as well as disconnects for the power, but the mock up
 is started.
I found a set of pull-off rims and tires with just a couple of thousand miles on them. Keep at the c/list! There out there.

Even managed a matching spare later.

Doing same with the bin idea. No built-ins in the van. Always cook outside.

It's not perfect but a work in progress. Enjoying your build.
Sent by wing, prayer & ATT

Even managed a matching spare later.

Doing same with the bin idea. No built-ins in the van. Always cook outside.

It's not perfect but a work in progress. Enjoying your build.
Sent by wing, prayer & ATT
david.lemke
Adventurer
I am following this build for sure
I know what you mean about the weather, my parents are in cass city and go your way all the time
have you thought about batterys as aux power? if so where do you plan to mount them as I have a 2003 also and hitting my head hard on where to mount mine
I know what you mean about the weather, my parents are in cass city and go your way all the time
have you thought about batterys as aux power? if so where do you plan to mount them as I have a 2003 also and hitting my head hard on where to mount mine
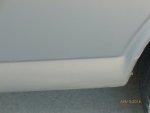
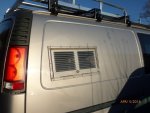 These photos show two things, the lower part of the body was done with Rock Guard and I came to like the colored look over the black version that we see a lot of the time, I felt that the colored product would allow for a little more ease of movement in the city area's of travel. If you look close you can see this very strong product.
On the post above I posted the small panels or hatches paint same color as van, this one shows larger panels were also repainted to somewhat hide the panel. This large panel is one of my Larger error on the build, if you think you wish to have a large item in your van think long and hard before cutting.
Last edited:
Similar threads
- Replies
- 50
- Views
- 12K
- Replies
- 11
- Views
- 4K
- Replies
- 16
- Views
- 3K
- Replies
- 3
- Views
- 1K

