A cheap ($15) multimeter from amazon or harbor freight and a couple youtube vids would quickly get to the bottom of the problem.It does have that switch, turned on and still getting no power to fan. And like you said, has enough power for the fan.
You are using an out of date browser. It may not display this or other websites correctly.
You should upgrade or use an alternative browser.
You should upgrade or use an alternative browser.
OVRLND CAMPERS ONLY : Post your OVRLND Camper build here or a link to your build thread to inspire others!
- Thread starter aaaslayer
- Start date
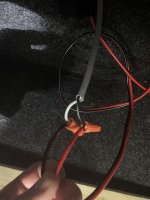
I have my fan connected to my Jackery. Did you try switching the wires? For me,the wires coming from the fan are black and white. Black fan wire is connected to the red coming from Jackery and the white from fan to the black/white wire, looks like you have them reversed.
Attachments
Dave in AZ
Well-known member
Like simple said, you have to press and hold a button on the Anker, to actually get power to all the ports, even dc! They are not "on" all the time, to save power.I’ll test out some other 12v items tomorrow to make sure the battery is working properly. The inline fuse was suggested by Ovrlnd but I’ll try it without tomorrow.
I thought it was simple but clearly I’m missing something here.
The maxxair fan pulls 2W to 35W, I have a writeup somewhere with watts at each setting 1 to 10. But the car port should be totally fine, it can do 120W.
Try pressing the dc button on anker to turn it on. The inline fuse is ok, 5A is correct, which would be 60W, plenty for your 35W fan. Just make sure it is seated well, maybe try powering fan without it to be sure it isn't wired bad.
I second what jamiec posted above-couldn’t get mine to work-ordered a new control board and
It still did not work. That’s when I noticed the polarity labels on the wiring-my previous try I had kept white (- or ground) to white and black to the red (+) on my existing wiring-worth double checking.
It still did not work. That’s when I noticed the polarity labels on the wiring-my previous try I had kept white (- or ground) to white and black to the red (+) on my existing wiring-worth double checking.
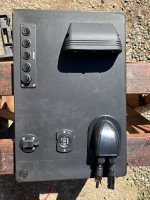
I finished up (mostly) my electrical panel and got everything working with the Bluetti AC60P. Still need to tidy up the wires. Next step is the panels for the sides followed by headliner.
Attachments
Toyotataquito
New member
This is what ended up working, switching the wires and it started right upI have my fan connected to my Jackery. Did you try switching the wires? For me,the wires coming from the fan are black and white. Black fan wire is connected to the red coming from Jackery and the white from fan to the black/white wire, looks like you have them reversed.
sea_weathered
Member
Hey man, I know I’m dating this specific post quite a bit, but do you have any photos of your rig with the 23zero awning deployed? I’m seriously considering going this route over a much larger 270° side mounted awning.We spent 12 days in early May up in the SR Swell and the Maze. the crazy UT spring winds were intense at times with two significant dust events. REALLY made me want to check the forecast. We were in several area where there was faint cell signals, but not strong enough to get a forecast. So, I did this:
View attachment 726099
View attachment 726100
I had Jay install the awning (shipped straight to him during the build) and they did me a big favor by not using the two mounts (10 lbs!) designed for roof racks that came with it. They made two light, but stout alu brackets:
View attachment 726101
There are two corresponding brackets on the awning:
View attachment 726102
The vertical wall sticking up has two holes and the two halves of the bracket mate when mounted and are secured with two bolts per bracket. Its a bit fiddly to take it down and put up, but not really hard. Great mounting system.
I made a bracket out of 2”x3” 3/16 alu angle I had left from another small project and made an antenna mount that bolted on to the back of the D side bracket on the awning using the top existing bolt from the awning and added two more. Like a dummy, I didn’t take a picture of that detail.
View attachment 726103
I attached a scrap piece of 1 sided track 8020 15 series and bought an 8020 15 series pivot hinge to mount to it. Used another piece of the 2x3 alu angle for the top bracket the antenna is bolted into. It’s all very heavy duty. Thought about using the Rhino Rack antenna mount, but it was $100 vs $25 for the 8020 and sold out everywhere. May switch to it later if needed. It’s marginally easier to use as it has a knob to tighten and the 8020 hinge needs an allen wrench or hex head bit, but otherwise the 8020 one is real easy to raise and lower.
View attachment 726104
Drilled a 3/8s hole with a grommet (circled on red in earlier picture) for the cable pass through. Went larger than the WeBoost cable needed to allow for stubbing out wires for a future flood light. I also tapped the four end holes in the 8020 flat extrusion in the mounting bracket to attach the flood …somehow.
Used 3m 4200 adhesive/caulk and Butyl tape inside on top to seal the hole. Was gonna use a cable gland for the pass through, but side entry ones bend the cable too much and the top entry one I did get was too thick to fit behind the awning and not crimp the cable, so went with the marine vent cover. BTW the ugly caulk job on the awning track is my doing, not Jay’s!
The antenna cable is just routed along my other wires under the bed rail and terminates at the booster box next to my batterybox. I decided not to try to take this into the cab. I may add a mobile router later.
I used both antenna exensions for a 43” reach to clear the camper top when raise. I don’t plan to drive with it raised, but guess I could, at least according to WeBoost.
My house has terrible cell reception. Trying it in my driveway, it was able to boost 1 bar to 3, and in multiple speed tests went from ~5 mbps speeds 4g/LTE to ~15- 20 mbps, so it works! It even works a bit with the antenna folded down. Should make some difference at times in the wild. YMMV!
dstefan
Well-known member
Here you go. Sorry don’t have a good one in real use, this is right when we got the rig.
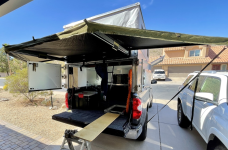
Short story: The awning is well made and has stood up well. Handles wind and rain fine. Con: can get hot. Would not buy it again due to the heat issue, but it’s manageable for me. For more specifics here’s mini review I wrote a while ago for another member. Look for a reflective coating if you live/go anywhere the sun shines and its more than75º. I find it hard to understand why an Aussie company would not make an awning that better handles the heat!
I definitely like the 180 on the rear better than a 270º for our rear door campers. It’s lighter and more manageable and puts the coverage where you need it. Darche makes a 180º and I’m sure others do too. Let us know what you get.
I’ve had one of these for the past 2.5 years and have used it a lot. It’s got both pros and cons.
Yes that’s true. It’s easy to set up quickly and put up quickly and doesn’t requite legs (which are also real easy to unclip and drop down and extend). IMO it handles mild to slightly brisk winds just fine in free standing mode. With the legs extended it can handle pretty gusty winds, especially with a line and stake or two. We’ll set up for just a short lunch break if we want the coverage.
Other pros: it's pretty robustly made, and yet fairly lightweight.The cover and all materials are high quality and have stood up very well to the brutal Phoenix sun. Mine is mounted on the back of my camper, but using some lighter weight custom aluminum brackets and the unit weighs 22 pounds. The supplied brackets for a roof rack are close to 10 pounds combined.
It's very rainproof and the fabric is very rugged and blocks light completely. One thing I really like is that there is a keder channel built into the back strip where it amounts against your camper. That allowed me to make a rain gutter with keder strip that would fit into the awning and mount to a keder channel on the back of my camper. One con re: rain is that there’s no flip up peaks to help channel rain off, so it can accumulate a bit. I made a hoop out lightweight tent pole material for the center of the awning that helps.
Cons: the biggest downside to this awning is how hot it gets in direct sun. It’s a dark green exterior with a black interior lining and can really heat up. Even when the outside temperatures are only in the high 70s if there's strong sun out, the underside of the awning can get up to the 130 -140° mark. No kidding. I have to put a reflective cover over the top if I'm going to leave it in the sun for long. The picture was from a very comfortable day in the mountains where the external temp was about 80º.
View attachment 804856
The other thing to be aware of is that the tensioning straps really should stay horizontal to the awning. Initially, I was attaching them to the end of my rock sliders on a diagonal, and that seemed to put too much downward force on the awning arms. It's not a big deal just something to be aware of.
The main other 180º awning I know about is the Darche, which you might look at too.
Not sure I’d buy this awning again due mainly to the heat issue living in the southwest, but I’ve figured out my work arounds and it’s not worth getting rid of either. In the PNW, it’s probably a pretty good unit to have.
sea_weathered
Member
Thank you! This information was exactly what I was looking for!Here you go. Sorry don’t have a good one in real use, this is right when we got the rig.
View attachment 825774
Short story: The awning is well made and has stood up well. Handles wind and rain fine. Con: can get hot. Would not buy it again due to the heat issue, but it’s manageable for me. For more specifics here’s mini review I wrote a while ago for another member. Look for a reflective coating if you live/go anywhere the sun shines and its more than75º. I find it hard to understand why an Aussie company would not make an awning that better handles the heat!
I definitely like the 180 on the rear better than a 270º for our rear door campers. It’s lighter and more manageable and puts the coverage where you need it. Darche makes a 180º and I’m sure others do too. Let us know what you get.
Dave in AZ
Well-known member
Good info. On my Tune, I used the duct insulation from US Energy, 5mm closed cell poly foam with mylar foil both sides. What would you think of using that somehow for an awning, for AZ? I have a bunch left over, seems pretty tough if I sewed cordura on edges.Here you go. Sorry don’t have a good one in real use, this is right when we got the rig.
View attachment 825774
Short story: The awning is well made and has stood up well. Handles wind and rain fine. Con: can get hot. Would not buy it again due to the heat issue, but it’s manageable for me. For more specifics here’s mini review I wrote a while ago for another member. Look for a reflective coating if you live/go anywhere the sun shines and its more than75º. I find it hard to understand why an Aussie company would not make an awning that better handles the heat!
I definitely like the 180 on the rear better than a 270º for our rear door campers. It’s lighter and more manageable and puts the coverage where you need it. Darche makes a 180º and I’m sure others do too. Let us know what you get.
dstefan
Well-known member
Actually, I use a 4x8’ roll of that stuff (though its the 3mm thinner version) on top of the awning when it’s hot in the sun. Really blocks the solar gain and cuts the heat dramatically in the inside of the awning. I just clip it to the edges of the awning with binder clips.Good info. On my Tune, I used the duct insulation from US Energy, 5mm closed cell poly foam with mylar foil both sides. What would you think of using that somehow for an awning, for AZ? I have a bunch left over, seems pretty tough if I sewed cordura on edges.
Not sure how it would stand up over time though as an awning — the mylar does start to delaminate from the foam over time as it’s handled. I don’t really think it’s tough enough to be a stand alone awning material with wind and rain impacts. But for a calm day shade, sure.
Toyotataquito
New member
Anyone care to share their heating setup? I live in CO, so was hoping for something weatherproof. Anyone have or seen any good ideas?
Dave in AZ
Well-known member
Diesel heater all in one, install inside bed, run combustion exhaust and intake outside.Anyone care to share their heating setup? I live in CO, so was hoping for something weatherproof. Anyone have or seen any good ideas?
K9LTW
Active member
The biggest determinant will be your budget. I have a Webasto (Air Top STC2000) gas-burning heater permanently installed behind my left wheelwell. Exhaust and intake go through a hole cut in the bed, and the fuel supply is tapped right into my gas tank. But my truck is set up as a full-time camper.Anyone care to share their heating setup? I live in CO, so was hoping for something weatherproof. Anyone have or seen any good ideas?
In the past, for an old trailer and my RTT, we had one of Planar's portable units that I got from Expedition Upfitter. Just carried a section of high-heat ducting with me and would run the controls inside. Worked like a champ, but took up a decent amount of space and you run the risk of spilling diesel inside (if you don't have a way to carry it outside). It was also a pain to carry three fuels with me (gas, propane and diesel). If you go the portable route, I used a 3" sewage flange you can find in any RV supply or on Amazon. Cut a 3" hole in the side of your camper, file the flange so it's flush on the back, screw it on, caulk around it, and then add your ducting flange to the inside wall for the duct to attach to.
If you're averse to taking a hole saw to your shell, some folks have made wedges with a hole in them for the duct hose that fit in a slightly open side hatch.
Some folks use Mr. Buddy heaters. Me? Nope. They produce a ton of condensation, require a decent amount of fresh air so you don't pass out, and aren't really an option to just leave running. I also have a wife and two dogs I'm keeping comfortable for days at a time while camping year round
Bergger
Explorer
I don't have an OVLND topper but do have an ATO Summit. Living at 10200 feet surrounded by 13-14k foot mountains a good heater was a must. We opted for a propane Truma Vario heater and do not regret it at all. It is pricey but is a permanent mount and does a fantastic job. I just saw that not only is ATO offering them but now Super Pacific has moved to this heater. Another option would be a Propex propane heater like the one Harker Outdoors uses in their toppers. I have no experience with that heater but I'm sure it would do a good job as well. That one you may be able to configure into a portable kit if you did not want to permanently mount it. But I love having a permanent mount for our heater. Both heaters take up so little room I'm not sure why you'd want a portable kit anyway for a topper.
I would lean towards a propane heater over a diesel heater. Propane is something you usually carry anyway to use for cooking and or a propane fire pit. No need to carry and store an additional fuel source. Also Propane burns much cleaner and there is really no maintenance to do on a propane heater, along with no smell or occasional smoke. Just stay away from the catalytic heaters. I have one that I used in the past, a Covea Cupid, and have pretty much stopped using it. For a catalytic heater it's a nice one but they do enter a lot of moisture into the space along with CO2. I've had my CO2 monitor go off in the past. If you end up using one just turn in on in the morning to warm things up a bit then turn it off, and ventilate the space very well.
I would lean towards a propane heater over a diesel heater. Propane is something you usually carry anyway to use for cooking and or a propane fire pit. No need to carry and store an additional fuel source. Also Propane burns much cleaner and there is really no maintenance to do on a propane heater, along with no smell or occasional smoke. Just stay away from the catalytic heaters. I have one that I used in the past, a Covea Cupid, and have pretty much stopped using it. For a catalytic heater it's a nice one but they do enter a lot of moisture into the space along with CO2. I've had my CO2 monitor go off in the past. If you end up using one just turn in on in the morning to warm things up a bit then turn it off, and ventilate the space very well.
Similar threads
- Replies
- 28
- Views
- 5K
- Replies
- 25
- Views
- 2K
- Replies
- 16
- Views
- 10K
- Replies
- 66
- Views
- 14K

