Plywood camper fabrication questions (thinking of idaSho)

rruff

Explorer
That was my thinking also. The cost isn't that high considering the benefits. Though to be fair, it seems that some people have good luck with very light campers using XPS with no core reinforcement, though some definitely have issues too. And the PVC will be ~0.3 lb/sq ft heavier with the same skins.

I've only use PVC with epoxy. Looks like PLP isn't even available in gallons? And buying the 28oz tubes in bulk costs ~$55/gal, so not much cheaper than epoxy. I used Ebond (slow cure) and like it a lot.

I think the best way to do it would be to coat the foam and ply with thin epoxy, let it cure for a few hours until it starts to harden, then bond the two together using thickened epoxy (fumed silica) that is troweled on.
 

IdaSHO

IDACAMPER
I casually considered a large press to manufacture the panels I would need.
At the end of the day it was simply too involved, too much hassle, and I really counldt afford the space it would require in my small shop.
I even considered a wall mounted (to hold the panels vertical) press, but just to much hassle.
Far easier for this guy to frame it and skin it. And its proven effective. ;)
 

renglekirk

Member
@ReluctantTraveler I've been following a few of the threads you've made recently and plan on following a similar path as you. I don't have a need for nearly as big of a camper as you, but I've got a Ram 3500 I plan on converting to a flatbed and building my own camper to go on top. The sticker on the door says I've got 4300 lbs of payload but I'd like to keep my dry weight around 2000 lbs. My original plans have been refined a bit since reading through a lot of what people say on here (mainly eliminating most steel and trusting the sandwiched panels to provide strength) but will likely use something like this:

Screenshot 2023-03-11 at 5.57.50 PM.png

This doesn't show the wet layup but covers to core of the structure. Everything is held together with glue, using brad nails and pocket screws as 'clamps' while the glue dries, and then I'll fiberglass the thing once it's assembled. I don't have the room to assemble giant panels so things will be framed and installed in place. This design still gives you something like 'studs' every 16" or so but limits the weight and thermal breaks a traditional wood stud would cause. You can use this same method around your windows to provide something easy to fasten to. These studs are soaked in glue and dropped into the foam before it's installed in the wall. I'm obviously still working out A LOT of details, but for a basic wall structure I don't think this will change much.
 

rruff

Explorer
These studs are soaked in glue and dropped into the foam before it's installed in the wall.

Have you thought about how you will cut these nice grooves in the wall? How about external hardpoints? Since the studs are not reinforcing the core, why not just glue interior cabinetry? I wouldn't recommend XPS alone in the core, especially if you are bonding the ply upside down and vertical, as it will be hard to get a uniform bond.

Regarding "giant panels" I don't know if this would help, but the panels could be stored on edge and separated enough that you can move them about. You need a helper whenever you move them though. You'd still need enough floor room for a panel... but not any more than it would take to frame it I think.

Also regarding the corner, you need some way to join your interior skins (not just the exterior) to a solid surface.
 

ReluctantTraveler

Well-known member
@ReluctantTraveler I've been following a few of the threads you've made recently and plan on following a similar path as you. I don't have a need for nearly as big of a camper as you, but I've got a Ram 3500 I plan on converting to a flatbed and building my own camper to go on top. The sticker on the door says I've got 4300 lbs of payload but I'd like to keep my dry weight around 2000 lbs. My original plans have been refined a bit since reading through a lot of what people say on here (mainly eliminating most steel and trusting the sandwiched panels to provide strength) but will likely use something like this:

View attachment 769281

This doesn't show the wet layup but covers to core of the structure. Everything is held together with glue, using brad nails and pocket screws as 'clamps' while the glue dries, and then I'll fiberglass the thing once it's assembled. I don't have the room to assemble giant panels so things will be framed and installed in place. This design still gives you something like 'studs' every 16" or so but limits the weight and thermal breaks a traditional wood stud would cause. You can use this same method around your windows to provide something easy to fasten to. These studs are soaked in glue and dropped into the foam before it's installed in the wall. I'm obviously still working out A LOT of details, but for a basic wall structure I don't think this will change much.

Nice to hear about your build! Glad my conversations have proven useful to you. I've had a LOT of help from folks here myself.

I like studs you have there in theory. I believe it's similar to what Total Composites does (though with aluminum) in their panels, from what I can tell from looking at some YouTube videos.

Like @rruff pointed out, though, I'd have no idea how to actually get those channels cut out into the foam. Seems like it'd be an awful lot of work!

What you've got in the corners probably works better if you frame => foam => panel than build the panels and glue them together. I'm not sure I fully understand why folks say framing is better if you don't have much garage space. Seems like you're ultimately using the same amount of space.

HOWEVER, I think I'm also leaning towards frame and then foam rather than panels and glue together as well, simply because it's more forgiving of a process.

I'm very worried about being off on a measurement and having a panel, window, or door not line up properly. Framing first let's you nudge-and-tweak things a bit more along the way, and mistakes can be more easily corrected.

Mostly a "know yourself" kind of thing for me. I'm better at big picture than small details, and as this is my first go at this, I know I'm going to miss something.
 

ReluctantTraveler

Well-known member
@ReluctantTraveler I've been following a few of the threads you've made recently and plan on following a similar path as you. I don't have a need for nearly as big of a camper as you, but I've got a Ram 3500 I plan on converting to a flatbed and building my own camper to go on top. The sticker on the door says I've got 4300 lbs of payload but I'd like to keep my dry weight around 2000 lbs. My original plans have been refined a bit since reading through a lot of what people say on here (mainly eliminating most steel and trusting the sandwiched panels to provide strength) but will likely use something like this:

View attachment 769281

This doesn't show the wet layup but covers to core of the structure. Everything is held together with glue, using brad nails and pocket screws as 'clamps' while the glue dries, and then I'll fiberglass the thing once it's assembled. I don't have the room to assemble giant panels so things will be framed and installed in place. This design still gives you something like 'studs' every 16" or so but limits the weight and thermal breaks a traditional wood stud would cause. You can use this same method around your windows to provide something easy to fasten to. These studs are soaked in glue and dropped into the foam before it's installed in the wall. I'm obviously still working out A LOT of details, but for a basic wall structure I don't think this will change much.

Oh, also... for the corners, I planned to use two 2x4's butted together for mine, to provide wood framing in both directions to screw and glue onto.
 

rruff

Explorer
Like @rruff pointed out, though, I'd have no idea how to actually get those channels cut out into the foam. Seems like it'd be an awful lot of work!

Or easy work and a horrendous mess! Sawing XPS makes a bazillion pieces of tiny weightless pink dust. If you have a way of keeping it contained it wouldn't be bad. You could make some sort of hot-wire appartus I guess, but I've never done that.

I think unless you are trying to build on the very cheap, PVC foam is definitely worth it. It's strong enough to not need core reinforcement if you have a good bond, and it bonds better, and thinner skins are viable. Maybe XPS would also be fine without reinforcement, but it doesn't give me a warm feeling.

Frankly we are all building "prototypes" and hoping for the best. I'd advise making lots of samples and test pieces and destruction testing them, if you have questions about your design.
 

ReluctantTraveler

Well-known member
I'd advise making lots of samples and test pieces and destruction testing them, if you have questions about your design.

I need to burn this into my brain. Every custom camper is an experiment, and the more R&D you do beforehand, the better!

Sawing XPS makes a bazillion pieces of tiny weightless pink dust. If you have a way of keeping it contained it wouldn't be bad... I think unless you are trying to build on the very cheap, PVC foam is definitely worth it.

Does PVC foam cut nicer?
 

rruff

Explorer
It cuts differently. Like I said earlier, the cells are much larger, and it's heavier so the dust doesn't fly around and stick to things as bad. They both cut fine with a knife; that's what I used... a saw is way messier.
 

renglekirk

Member
I'm essentially working out of my garage that's been converted into a woodworking shop, so true open floor space is basically 0. If I frame this thing up it can be done outside, in the driveway, or on the truck itself and not take up any valuable garage space. I live in San Diego so weather is not much of an issue.

I have a great table saw station and the plan would be to run everything through that - Just get a dado stack, hook up the vacuum to the saw and run a lot of foam through it. Admittedly I've never cut XPS like this so if it is a nightmare I'd look into other options. I was dissuaded from the PVC foam by the cost but if it make my life easier I'm not opposed to it.. When I start diving into this I'll likely make a lot of prototypes, if anything just to nail down the process before I try it on the actual rig.

Corner framing is flexible, I'd probably use something more like a typical CA corner used in home framing. I think the point I wanted to get across was using the pw studs. It is similar to what TC does, and it gives you the option to glue interior parts on while using screws to hold them in place while the glue dries. Or in the case of small things, ie coat hooks, paper towel holders, etc, you could simply screw them on and know they've got more than 1/8" of purchase in wood.

Also, This build will likely be years in the making, and I want to be able to use it in the meantime. It likely won't be as nice and integrated as a lot of campers you'd see here because I want it to be usable once the shell is complete. The plywood studs provide some flexibility with tweaks to interior layout.
 

Alloy

Well-known member
I need to burn this into my brain. Every custom camper is an experiment, and the more R&D you do beforehand, the better!


Does PVC foam cut nicer?


I used a 25mm razor blade knife on foams that are less than 1 1/2". Over that blades curve so the cuts aren't 90.

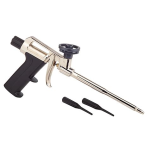
EPS is soft so cutting +1/16 will allow for press fit. Problem is things aren't built to a 1/16" tolerance. Its easier to cut the pcs 3/8"-1/2" small. Start by "gluing" the pcs in with latex caulking then fill the gaps with a low expanding canned foam. To make sure it is 100% air sealed ( insulation is R0 without it) fill the gap 1/2 way and then do a 2nd pass. Pro guns have a knob to adjust the amount of foam.
1678641298239.png
Easy to make a hot knife. Hardest part is getting a "hot knife transformer". I use to buy the high temp wire then switched to welding wire and sometime 1/32" welding rod. You'll also need a fan or a respirator.

Another option is a electric carving knife
 

ReluctantTraveler

Well-known member
It cuts differently. Like I said earlier, the cells are much larger, and it's heavier so the dust doesn't fly around and stick to things as bad. They both cut fine with a knife; that's what I used... a saw is way messier.

I still don’t think I’d want to cut channels out of it. That sounds like a nightmare!
 

IdaSHO

IDACAMPER
FYI on cutting essentially any ridged foam...

A band saw with a fence on it makes quick work with near zero mess.

Also, if you dont have the option of a band saw, a fresh blade on a utility knife does very good,
but doesnt get all the way thru, and snapping it may create an undercut. Finish the cut with a bread knife.
 

ReluctantTraveler

Well-known member
I'm essentially working out of my garage that's been converted into a woodworking shop, so true open floor space is basically 0. If I frame this thing up it can be done outside, in the driveway, or on the truck itself and not take up any valuable garage space. I live in San Diego so weather is not much of an issue.

I have a great table saw station and the plan would be to run everything through that - Just get a dado stack, hook up the vacuum to the saw and run a lot of foam through it. Admittedly I've never cut XPS like this so if it is a nightmare I'd look into other options. I was dissuaded from the PVC foam by the cost but if it make my life easier I'm not opposed to it.. When I start diving into this I'll likely make a lot of prototypes, if anything just to nail down the process before I try it on the actual rig.

Corner framing is flexible, I'd probably use something more like a typical CA corner used in home framing. I think the point I wanted to get across was using the pw studs. It is similar to what TC does, and it gives you the option to glue interior parts on while using screws to hold them in place while the glue dries. Or in the case of small things, ie coat hooks, paper towel holders, etc, you could simply screw them on and know they've got more than 1/8" of purchase in wood.

Also, This build will likely be years in the making, and I want to be able to use it in the meantime. It likely won't be as nice and integrated as a lot of campers you'd see here because I want it to be usable once the shell is complete. The plywood studs provide some flexibility with tweaks to interior layout.
That all makes sense! I am in a similar situation with garage space, but I live up in the northeast for the climate is a lot more variable.

I’ve been considering getting one of those outdoor tarp garages just to keep the rain off it.
 

ReluctantTraveler

Well-known member
FYI on cutting essentially any ridged foam...

A band saw with a fence on it makes quick work with near zero mess.

Also, if you dont have the option of a band saw, a fresh blade on a utility knife does very good,
but doesnt get all the way thru, and snapping it may create an undercut. Finish the cut with a bread knife.

Kenny, you’re a DIY angel!
 

Forum statistics

Threads
188,028
Messages
2,901,390
Members
229,352
Latest member
Baartmanusa
Top