POD: Homebuilt foam core fiberglass skin pop-up camper build thread

pods8

Explorer
This is the build thread steaming off my design thread: http://www.expeditionportal.com/forum/showthread.php?t=54664

General design concept picture:
Plan01.jpg


NOTE: First off this is a spare time project in my garage, I work full time and have a 10mo old son needing attention as well so folks will need to bear with in terms of progress, it'll be what it will be.

Personally I've always wondered the time spent doing some of the builds I've read about so I'm going to try and keep a running hours log going as I post updates (this doesn't touch on design/research time). A lot of my initial progress will likely be a couple hours here and there, which for the time being works since I have to wait for epoxy to cure. I'll just give a quick summary and a picture or two.

UPDATE #1 (5hrs in): A bulk order of epoxy was placed last week which should be arriving this Friday. This likely won't be enough epoxy to finish things off but will go a long ways while I refine the final number needed later on. Friday I picked up a load of foamular 600 that I'll be using as the core. Over the weekend I ripped a sheet of plywood into 2" strips to use in my core build, cut the bulk floor foam pieces and started putting them together. I still have some epoxy left from testing so I was able to get going this weekend with that. The first pieces I put together made me realize I needed some long pipe clams so I stopped after the first seam and picked up some clamps the next day to finish putting the other chunks together. After this cures I'll cut this into slices and add wood strips in the other direction to form a grid. I plan to sheet the floor core with 1/8" plywood which I'll epoxy and narrow crown staple down, then I'll glass over the top of it. Probably more robust than needed but off all things the floor needs to be strong.

I also made up four final test laminates since my earlier pieces were made with foamular 250, also I'm trying another fabric in there. I'll make a final decision after these pieces cure for a week or so and place my bulk fiberglass fabric order.
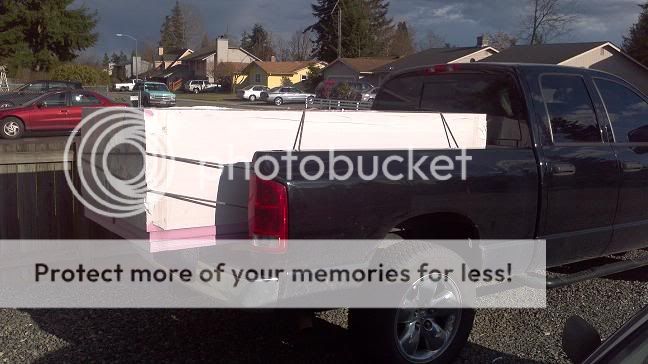
Foamload.jpg


Build001.jpg
 

windsock

Adventurer
It is good to see you go forward with this project. I will be watching with a great deal of interest. All the best.

Cheers,

Phil
 

Heifer Boy

Adventurer
Go for it pods8!!! :wings:

I'm really looking forward to watching your build take shape after all the design discussions. I'm sure you will change your ideas and refine others on the journey. It only gets better from here.

Do you fancy putting a time frame on this? :bigbossHL:

HB
 

pods8

Explorer
Go for it pods8!!! :wings:

I'm really looking forward to watching your build take shape after all the design discussions. I'm sure you will change your ideas and refine others on the journey. It only gets better from here.

Do you fancy putting a time frame on this? :bigbossHL:

HB

Well since half of the fine details are still in the air I'd definitely say stuff will change. ;) Juggling a bunch of details right now that need to start getting checked off the list to allow progress on the other sections. That is why I've started on the floor first, fairly straight forward. I'll have some extra hard point blocking to allow some mounting flexibility, etc. Plus I can likely utilized the floor up on some saw horses as a work table. :coffeedrink:

Timeframe? Well in my ideal world I'd like the shell done in early summer followed my the bulk interior frame in. I don't mind if the finer details of cabinetry, etc. carried into the fall/winter if needed. However as mentioned it will be what it will be and I just need to manage my expectations. In my excitement I had hoped to cut up the floor slices last night so one of the days this week I could run out and glue in the perpendicular wood runs. However it was dry outside (with rain predicted the rest of the week) so the lawn took priority and I was only able to trim up the edges*** on the test pieces I made up before I had to move on with dinner/family time. I still hope to knock some of this stuff out mid week. Again in my ideal schedule, I'd like to sheet the floor with the 1/8" ply this weekend.

*** Technical note for anyone wanting to learn about fiberglass work, when you're finishing cloth lamination on a edge of a piece an easy way to get a clean edge is to lay up the cloth with 1/4-1/2" overhang (too much overhang and it'll sag and potentially lift the cloth off the edge), then let it partially cure till the epoxy is no longer sticky but still has some pliability. At this point you can slice right along your piece with a knife to trim up the edge and then smooth it the rest of the way with a few swipes of a sanding block. However if you miss this window the stuff is MUCH harder to cut/sand. Since I'm working in cooler temps right now I fortunately am able to still be able to do this trim work 24hrs later.
 
Last edited:

eugene

Explorer
Your reason #1 is the reason I started with a fixer upper from craigslist. I have something that with a little bit of work can be used now even if its old and ugly. I can then work on replacing a part at a time over a longer period of time by building a new part then swapping it for the old. For example when I first got it i measured and duplicated the kitchen counter then swapped it out. Then did the roof one side at a time., then went on to the back door then the back wall then the floor and cabinets. I make each new section and then replace the old. So I have a pattern to copy off of and hold the new up against to check before removing whats there.
Yes I had a little more up front cost buying the old camper but I also was able to skip all the design and trial and error for the layout because I have an existing layout and can just make changes or improvements to it. And if I were in a state where i had to register a camper then i can show its still a repaired palimino bronco instead of having to go through any home designed paperwork,
 

pods8

Explorer
Your reason #1 is the reason I started with a fixer upper from craigslist. I have something that with a little bit of work can be used now even if its old and ugly. I can then work on replacing a part at a time over a longer period of time by building a new part then swapping it for the old. For example when I first got it i measured and duplicated the kitchen counter then swapped it out. Then did the roof one side at a time., then went on to the back door then the back wall then the floor and cabinets. I make each new section and then replace the old. So I have a pattern to copy off of and hold the new up against to check before removing whats there.
Yes I had a little more up front cost buying the old camper but I also was able to skip all the design and trial and error for the layout because I have an existing layout and can just make changes or improvements to it. And if I were in a state where i had to register a camper then i can show its still a repaired palimino bronco instead of having to go through any home designed paperwork,

No other older camper on the market would fit the bill as a doner. I don't want soft sides, I want it to fit a flat bed, side access door, etc. An older alaskan might be a really rough starting block but I'd end up redoing 95% of it so might as well start from scratch.

I should note I already have a FWC hawk so its not like I don't have a camper in the meantime, technically this project could take as long as it needs and I can still camp. My time frame goals are to free up the garage and put this new on to use! Once I'm satisfied in the status of this one I'll be selling off my FWC which will offset a portion of this build cost.

IMG_2377Small.jpg
 

pods8

Explorer
UPDATE #2 (16.5hrs in): Hoped to be a little farther along in general, and for the hours put in but the floor is one of the more involved chunks due to the grid and multiple hard point blocks installed. Now I have to wait for things to cure for a bit so I can sand the excess epoxy/filler off the top/bottom and level things out before I lay down the 1/8" plywood sheets over things. The cooler temps make for longer pot life time with the epoxy but also takes longer to set up, if I tired to move forward and sand right now it'd just get all gummy.

So what I have going here: 1/2" plywood grid which I'll attached the plywood sheets to (along with surface gluing to the whole floor pack), this serves to make sure the two skins stay well connected to each other and don't just relay on the bond to the foam alone. The corners have wood hard points that I can attach the eventual jack brackets into (the sides will have similar hard points in the corners for the brackets). There is also a plywood chunk in each corner to distribute the vertical load if I go with hydraulic rams. There is a 10"x10" 1/2" plywood chunk recessed into the foam to mount the table base to. The other 4 plywood chunks (forward set closer to the center, rear set farther apart) are in case I want to bolt through the floor to attach this to the flat bed. There is a 3.5"x3.5" 1.5" thick block centered under the 6"x6" 1/2" plywood. Right now I'll see about using the jack brackets to mount the camper but in case that doesn't work out I've got these bolt through points to fall back on. The 2" wide flat plywood strips around the perimeter is a theme I plan to carry through the interface points between all the various panels. I plan to screw the panels together while temporarily assembled, then strip apart to do the fiberglass work in the horizontal and then reassemble. They will again allow me to screw things together while the epoxy sets up joining things together, the screw holes will be filled and covered over when I lay down the fiberglass strips over all the joints which will really tie things fully together.

build002.jpg
 

windsock

Adventurer
Your many hours of research and investigation of method is paying dividends. Looking very thorough and well thought out. Liking what I see with the plywood inserted as you have done. You call it a grid. Great strength can be attained this way. We called them 'stringers' on surfboards. Multiple stringers = increased strength. I can see where 16 hours have gone for sure, no mucking around as you have achieved a lot.

What are you cutting the foam and plywood with between photo 1 and photo 2 in your posts above?

Once you start glassing over large flat areas, how are you going to sand flat over these large areas? When we worked on fairing the hulls of yachts we used what was colloquially termed an 'idiot' board. A long semi flexible board the width of a strip of sandpaper. The closest picture I can find online is here.

002-5.jpg


The top two were similar to what we used but were longer. In some cases they were so long it took two of us to wield them. The flexibility of the board was determined by the roundness of the hull to be faired and the location of the handles on the back of the boards. The length determined by the amount of area to be covered. In your case, a reasonably rigid board about one to one and a half metres in length with a rough grade of sand paper would knock the rough bits off quickly. If it gummed up we used a wire brush to clean up the sandpaper. Once fully cured, the sanding was easy but monotonous (hence the term 'idiot'). A far greater area was covered than you would be able to cover with a hand sander or orbital sander. It was also 'flat' depending on the flexibility of the board used. We found we could easily form depressions with small sanding instruments sanding a large flat area.

Keep up the good posts. Enjoying seeing your ideas formulate.

Cheers,

Phil
 

pods8

Explorer
With the foam core in there I don't know if they'd be called stringers in the traditional sense or not but whatever works. The function I'm using them for though is to ensure the two skins stay tied together as wood obviously has a much higher shear strength than foam (also the epoxy penetrates a little better so combined its hard to peel glass off wood than foam). A delamination of the skins from the foam starts giving up strength in this type of construction.

To insert the perpendicular "stringers" I went ahead and just cut up the whole floor into 4 strips since I'm not relying on the structural aspects of the grid, however just because it didn't take much extra time I did notch out a small chunk of foam on each side of the wood so I'd get an adhesive fillet between in and the new wood piece.

To insert the plywood pieces that are flush I'm using a router bit chucked into a rotozip (works great for the low cutting demands, easier to handle, and allows me to leave the router mounted on the router table).

The floor is my test piece on sanding since I'll be covering the bottom exterior in bedliner (will be forgiving in lack of fairness) and the interior will have some flooring over as well. Since I'm working with such flat stuff I'm going to see how my 1/4 sheet hand sander works out, if I need a larger surface area to fair things I'll end up using long board like you're talking about.
 

Heifer Boy

Adventurer
Nice work pods8. It's amazing how many things you have to think about for the future and ensure they are all in place now before you go and laminate it all together. Looks like you just have everything covered with your inserts.

I like your 'grid' idea. It's kind of like how the teardrop guys build a wall by framing on a piece of ply and then filling between with insulation. But in your case you have done without the outside wall and fibreglass instead while still have the hardpoints you need. Very clever.

@windsock

I watched some kayak builds on YouTube the other day and they were using these long boards for finishing off their fibreglassed externals. Looked really good and produced a beautiful finish on a curved surface. I was thinking of maybe using one on my build. I don't want to highjack pods8 thread but how flexible are the boards? Would they work as well on a flat surface or would I be better off with just a random orbital?
 

Forum statistics

Threads
187,707
Messages
2,897,035
Members
228,782
Latest member
kabobkabobkabob
Top