Post up your drawer/storage system

ert01

Adventurer
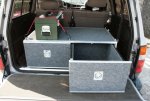
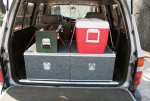
Here's my setup for my XJ. Still have to put on the finishing touches and finish my sub enclosure on the passenger side, but so far I'm pretty happy with it as a work truck/dog hauler/camping rig.

The box is a seperate piece from the dog platform. (The dog platform is where the rear seats used to be). I can still easily take out the dog platform and reinstall the rear seats in about 20minutes. Still have to build an expanded metal divider to keep the dog from trying to climb in the front with me :)

The space beside the drawer is for my amps (4channel and mono) and for my inverter and a small fuse block and whatever else I want to build in there in the future.

The handles to lift the front two storage lids are just plain old black webbing that are screwed on. You will also see the same webbing screwed down to the top of the drawer box. I wanted the handles to be flat so my dog doesn't have them digging into him when he's laying back there and the webbing on the drawer box lid is for tying down coolers/bags/etc so that in a rollover I don't have crap flying everywhere.


mararmeisto

New member
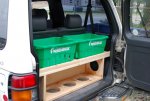
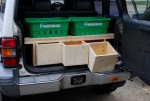
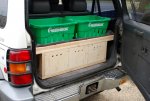
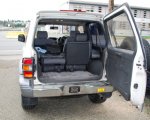
In the back of my '94 SWB Pajero

With a Shorty, there isn't much storage space BEHIND the rear seats; and because the seats are mounted right on the floor, there is no room UNDER the seats. So, this simple box and crate holder is just the thing to carry around those little things that are always rolling about in the rear. The Superstore crates are handy for those trips to the grocery store and can be left in for general cartage at other times.
 

Attachments

  • 01 Where it goes.jpg
    01 Where it goes.jpg
    137.7 KB · Views: 487
  • 06 Holding crates.jpg
    06 Holding crates.jpg
    112.1 KB · Views: 667
  • 08 Three boxes.jpg
    08 Three boxes.jpg
    111.2 KB · Views: 684
  • 10 Complete arrangement.jpg
    10 Complete arrangement.jpg
    123.9 KB · Views: 562

Oxcart13

Observer
ert01 - very nice design and install. It's funny what lengths we go to accomdate man's best friend in our trucks. Mark
 

gasman

Adventurer
Here's my setup for my XJ. Still have to put on the finishing touches and finish my sub enclosure on the passenger side, but so far I'm pretty happy with it as a work truck/dog hauler/camping rig.

The box is a seperate piece from the dog platform. (The dog platform is where the rear seats used to be). I can still easily take out the dog platform and reinstall the rear seats in about 20minutes. Still have to build an expanded metal divider to keep the dog from trying to climb in the front with me :)

The space beside the drawer is for my amps (4channel and mono) and for my inverter and a small fuse block and whatever else I want to build in there in the future.

The handles to lift the front two storage lids are just plain old black webbing that are screwed on. You will also see the same webbing screwed down to the top of the drawer box. I wanted the handles to be flat so my dog doesn't have them digging into him when he's laying back there and the webbing on the drawer box lid is for tying down coolers/bags/etc so that in a rollover I don't have crap flying everywhere.


very nice did you happen to make a set of plans ???
 

ert01

Adventurer
I actually do have some rough plans drawn up for the box. I'llclean them up and convert them to a PDF and then I'll post em here. Gimme a day or two.

Nothing for the platform since it was pretty much all mocked up with cardboard first then cut out of plywood after to get nice tight seams around the doors and over the transmission hump. I can post up some step by step stuff for how I did it but it really is pretty much just cut-n-fit.
 

ozarkroozer

Observer
Finished with mine - sort of- I plan on adding a hinged board the size of the top to fold out with short legs to level it with the tailgate as a work surface. Mine is not the largest but I didnt need it for sleep (RTT) and I needed it to be removable so I could haul extra folks when need be, usually kids to the creek. The bungees are just for the pics, ratchet straps are more secure. All was recycled from other projects, I think I spent less than $50.
 

Attachments

  • IMG_4518.JPG
    IMG_4518.JPG
    165.8 KB · Views: 480
  • IMG_4519.JPG
    IMG_4519.JPG
    169.7 KB · Views: 401
  • IMG_4521.JPG
    IMG_4521.JPG
    165.7 KB · Views: 386

jdholder

Explorer
Here's what I use:

Two Pelican 1560's on the left (Personal Items and Kitchen), stacked on the floor. Behind them is a plastic Flip Top conatiner (dry food storage).
4446409527_e0c07bb09e.jpg


The two 1550's (Recovery and Tools) are on a shelf above my Refer.
4447183024_878de9dec2.jpg


Spare parts are under all that in the old spare tire well. I have to unload the deft side to get to them, but they are seldom used items.

When I am camping I have two more soft duffels (Sleeping Bags and Tent) that get stacked on top of the 1560's on the left. All of that is separated from the occupants by a Range Rover Cage.

It works pretty well for stuffing the RR full.

I can't install a roof rack (this is my daily driver and I go into too many parking structures), so I bought a Sankey Trailer to bring other stuff, should I want to. Eventually the Sankey will have my Kitchen, Tent, and Sleeping Bags. I won't know what to do with all the room!
 

jdholder

Explorer
Jon, who built that bumper?

Castle Fab in Irvine. CLICK HERE

Another Jon is the owner and he does GREAT work. He did the work on my old Excursion, and has done this rear bumper, my sliders and the shelf for the rear.

I wanted the shelf so I could slide the refer in and out of the truck to grab something, without having to unload everything that was on top of it each time.
 

Goatdog

Member
Took out the middle seat of my 04 4Runner

img6266e.jpg


Evened the floor with some 3/4" plywood

img6272t.jpg


Covered it with automotive carpet using staples and spray glue

img6274j.jpg


Then cut a new rubber truck bed mat using the cargo mat and my plywood as a template

img6275k.jpg


Gave me a flat 7+ foot surface

img6281ipo.jpg


That I can still put the rear jump seats in.

img6284k.jpg


img6285f.jpg


Which can fold out of the way

img6286p.jpg


I have a "subfloor" for recovery items

img6304a.jpg


img6301n.jpg
 

Goatdog

Member
More "subfloor."

img6299z.jpg


Then I added my "sleeper."

img6434z.jpg


With hinged lids, also carpeted

img6435u.jpg


Seat down

img6437g.jpg


Seat up

img6434z.jpg


img6481.jpg


img6478e.jpg


Mattress and sheets

img6443pft.jpg


img6444f.jpg


I have a whole lot more storage solutions but I better not hog this thread.
 

ThomD

Explorer
Goatdog,

That's brilliant. Using that mat to provide a level surface has me re-thinking my plans. If you have more solutions, then hog away. I'm very interested in seeing them.
 

Every Miles A Memory

Expedition Leader
Yeah, that's the whole reason of this thread is to share ideas, so post away.

Love the way you were able to stain the wood so you still see the grain, but it has that black look to it...very professional!!
 

Forum statistics

Threads
188,173
Messages
2,903,161
Members
229,665
Latest member
SANelson
Top