Post up your drawer/storage system

s.e.charles

Well-known member
reminds me of the "cheap - fast - good" triangle analogy. since we do our own work and don't (usually) assign a dollar value to our time, I would change the wording to "expensive - heavy - dimensionally unstable". except I think it might end up as all three. especially in an uncovered truck bed = heavy.

edit: and after another look, I think in short time it would start binding up on itself and be a curse to extend more than the length of the tailgate height (when it's down - of course).

again: if I could lift 7 - 8' 2"x4"s PLUS a whole sheet of 3/4" plywood & a bit of hardware … well, I could certainly not do it at 25 so I wouldn't try it now, that's fer shur.

"good for Brad" I say, "good for Brad".
 
Last edited:
Just finished my Drawerless Drawer System with a Slide-Out Table.

vzMBxmpl.jpg


Full Build Video Here

-M
 

s.e.charles

Well-known member
Wow, so many tricky examples of camping storage, and all geared toward fair weather camping.
90% of the rigs posted here are only good for the summer months.

this is either a coefficient or exponent ( I get them confused) of a decision made early on with vehicle choice.

"you can't rollerskate in a buffalo herd, but you can be happy if you've a mind to"


Explorerinil

Observer
Her is my system, not the most organized but I know where everything is,
 

Attachments

  • 3E6D21E6-9750-4A2A-940E-3F9E0593C073.jpeg
    3E6D21E6-9750-4A2A-940E-3F9E0593C073.jpeg
    1.1 MB · Views: 320
  • E396FD67-2682-414B-81D6-640E8993E390.jpeg
    E396FD67-2682-414B-81D6-640E8993E390.jpeg
    1.1 MB · Views: 312

Scoutman

Explorer
Built another drawer system and instead of clear poly went with more black on this one.

a5829e4300681d59e63a7c3ad704275c.jpg
e3776db6decc47cbf30fe658ba33190d.jpg
76d4c20923463cec68d47172247d128f.jpg


Sent from my iPhone using Tapatalk

Very nice work there and I love the artwork.

I work with this extrusion stuff a fair bit at work and have a couple of questions for your drawer setup. Why did you use the angle brackets to secure the rails to the inside of the framework? Couldn't you just attach the rails directly to the inside track of the uprights of the frame? That would have eliminated 8 brackets and done away with the side wall cutouts. Also, what material did you use for your side walls and top plate or is that just ply that's been painted?
 

tetsuo69

New member
Mowerman, or anyone else that's used 1/2" Aluminium C-Channel for a slide out shelf, how does it hold up? Is it strong enough to put a bunch of items on the shelf and not worry about it bending/breaking?

I have finished my drawers in the back of my Disco 1, having studied this great thread and learned alot from it.
Ny need to make it removeable, retain the rear seats (for kiddie transport) and the rear door mounted storage bins meant that the effective length I had to work with was only 700mm.
I also needed to keep space above them for storage of my larger work tools, meaning my overall height was restricted to 230mm. Above the tools is a metal shelf that replaced the standard roll out tonneau cover, and this is where my dog spends the day! :)

Under-drawer side out shelf:-

IMG_0008res-9.jpg


IMG_0015res-6.jpg


The shelf just runs in 1/2 inch aluminium "C" channel, and is built to the bottom of the drawer so that when the drawer is opened it wont knock everything off the shelf.
 

jgaz

Adventurer
I figured this was a good place to post the storage system I just finished for my LJ.
It’s not really finished, probably more like a work in progress.

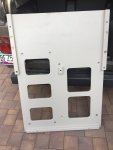
I started with a base board of 3/4 Baltic birch to give myself some flexibility in mounting or tying down a variety of options.
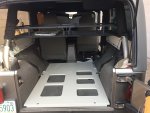
8B9EAD16-B089-4B04-89A8-B3347B4F13A8.jpeg
In this picture you can also see version 3 of my cargo basket mounting method. This basket has proven to be very handy for camping. It’s been one of my favorite mods. If anyone is interested I can provide the details on this basket.

In order to mount the base board I first removed the rear seat, seat mounting brackets, and center seat belt anchor, but left the carpet in place. I fastened 1” spacer blocks to the board in the appropriate places so that the base board is just barely resting on the carpet but mounted solidly to the tub.
51AC0EA0-6951-4E68-93E9-80C57E405CCC.jpeg
The board is secured to the Jeep tub in seven places using the factory threaded inserts. No new holes were drilled and replacing the seat is quite easy if I need or want to.

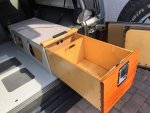
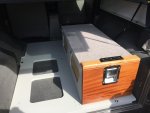
Here is the drawer and drawer outer box I built to hold the normal, everyday on and off road gear. The Jeep spends quite a bit of time at various hiking trailheads both popular and remote here in AZ. My idea was to keep the gear at least out of sight and a little more secure than just strapped down in the back.
44529925-99E6-45F0-9582-33DA8D01672C.jpeg

A0F7E8A2-C527-4706-9D10-053D66A9B740.jpeg

The center panel in the drawer is fixed to add strength while the rear divider is removable or adjustable. I decided not to use slides. The drawer rides on two runners of 1/8” hardboard that have been lubed with a spray, dry lubricant that I use on my woodworking machine tables. It slides very nicely even when fully loaded. In these pics you can also see the tie down rings on the sides of the drawer box. These can be adjusted to 5 different locations along each side to help tie down misc. camping gear if required.

Yeah, the Mahogany drawer front is overkill, but since I was kinda copying Rayra’s excellent suburban drawers I figured why not. I didn’t use a locking latch because, realistically, any security comes from the fact that even if someone breaks into the Jeep they still have to get the gate open. This “should” at least slow them down.

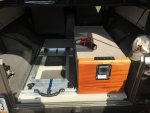
Here I’ve mounted the fridge slide next to the drawer box. The slide won’t ride in the Jeep full time, only when I use the Jeep for camping
309C9239-5A0B-4AB2-80C7-A8181289878B.jpeg
As I said before, this is a work in progress. Even though I have the tie down tracks available along the forward edges of the base board I may “steal” BritKLR’s idea and drill some 1” holes in various locations to allow camping gear to be secured with roller cam straps. These would be especially usefull if the fridge wasn’t installed. Next project is to build a simple box that will mount forward of the drawer box to hold a MWC or two.
Thanks to all for the ideas on my current storage solution.
 

s.e.charles

Well-known member
nice job. a question & a comment:

is the short piece located on the top door trim aircraft rail for hooks & eyes?

and from personal failure, (I've had one drop out of a really important fastener location), I suggest dabbing some epoxy on the backside of the T-nuts. when the screw is inserted & tightened, sometimes the T-nut turns a squidge clockwise before the screw is fully tight. that's fine, but if the screw needs to be taken out, the first half turn or so can move the insert counter -cw. still okay maybe, unless now it's less humid and the T-nut drops out of its hole and into the abyss . . . in this case you could retrieve it by lifting the base plate, but alas, I was not so fortunate.
 

jgaz

Adventurer
Thanks.
Yes, that is a short piece of tie down track. I will add another piece at the forward edge of the box when I see where it is needed to tie down whatever camping equipment I carry on top of the box.
I needed the trim piece anyway to accept the latch striker plate and the two 1/4-20 bolts mounting the track into tee nuts made it even more secure. The trim piece also keeps something tied on the box located forward enough that the rear glass won’t hit it.

Good advice on the tee nuts. I did seat them in a small amount of epoxy when I initialy installed them. I could however add more on the exposed back side.
 

jgaz

Adventurer
I haven’t figured out what containers I’m going to use on the top of the box for camping gear. The space is sized for an 8 gallon Rubbermaid action packer.
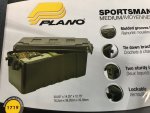
I did however also find this Plano product that I like the look of (and the $).
05740DB9-27B2-4081-862C-8D914F632E29.jpeg
This is the item, I think

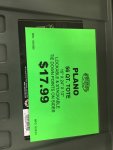
This is the size I’m looking to use
C71089C9-236F-41AE-A06A-38DF53763E75.jpegMore efficient use of space than the Rubbermaid and cheaper than the Rigid tool box that will also fit.
 

rayra

Expedition Leader
Hah, I see several familiar design elements! Looks good and also looks like it would work as a sideways seat / bench with a seat cushion, a la a Land Cruiser. Maybe a double top plate with a piano hinge and stadium seat cushions placed with velcro, two of them on top, or unfold the top into a backrest and have velcro there so one cushion becomes a back rest. You could carry a third person on a trail run, maybe.

I may have to go with the baseplate idea as well. My drawers are not anchored well enough and after enough braking and washboard roads they shift around a bit and wind up a bit cockeyed. I have to periodically loosen things a bit and hook a tie down strap to the front bread-bin lip and do a Strong Man tug of war impression to move things back where I want them. A baseplate would make for better attachment options and solve the clearance issues I am having trying to use the bottom of my drawer boxes as a mounting base too. And make the mounting much stronger overall.

I'm going to be re-working my 'power module' portion a bit in the coming months as I finally get down to my rooftop / folding solar panel kit integration. That will be a good occasion to dismount everything and work in a baseplate design


The suspended cargo basket looks like a great idea, great place to plop bulky bags / packs, hang a lot from it too.
 

Forum statistics

Threads
188,034
Messages
2,901,411
Members
229,411
Latest member
IvaBru
Top