Pro-Rig V2.0 - Home Built Compact Composite Pop-up

CoyoteThistle

Adventurer
Little more past work to share before getting caught up to real time...

Progress on the propane system. The forward storage area will hold two 10-lb propane tanks. Got the regulator in. Used copper tubing through a vapor proof thru-hull thingy to keep the propane storage area isolated from the cabin. Gauge is for leak checking.


My original plan was to plumb it all with the copper tubing.


I've never worked with this stuff before it turns out it's a total pain in the butt (in the tight confines of the camper at least). By the time I got it back towards the heater (and stove), the pretty shiny tubing looked like it had been run over by an Earthroamer, several times. I wasn't at all happy with it and didn't really trust that I hadn't compromised the tubing at some point. So, on to plan B. I cut the tubing after the thru-hull, added a shutoff valve and used a couple 3' Camco hoses with 3/8" female flare ends.


I'll add a support under the valve eventually.

First hose goes back to a tee.


The line from the heater awkwardly ties in to the tee as well. Propex says to use copper tubing and the compression fitting that they include. Most everything I've read on propane says to not use compression fittings but to use flare fittings. I'm going with Propex recommendation for now. Any thoughts or experience on this front greatly appreciated!

Other branch of the tee will head up to the stove eventually.

Next up, battery and electrical system - this is where it gets interesting :ylsmoke:
 

robert

Expedition Leader
First things first- I'm not a plumber.
Flare fittings should be used for gas lines (along with schedule K copper lines- not hardware store water line copper), not sure why Propex says compression. Flare fittings are more resistant to temperature changes and vibration and the sched K is thicker walled. The easiest thing to do is measure out what you need then go visit your local Hank Hill for propane and propane accessories (or an RV/marine dealer if you want to pay top dollar). An inexpensive Chinese flaring tool will work as long as the alignment is good on it. I've redone the lines in a couple of Westys and never had an issue. Ideally you want to use some sort of vibration absorbing clamps where you can to reduce movement; the easiest way is to slice some rubber tubing length-wise, slide it over the copper then secure with a conduit clamp.

Yellow Teflon tape is commonly used but isn't approved in some areas so use an approved thread compound with PTFE. It makes the connections go together better and is more vibration resistant as well. Make sure all of your threads are clean before assembly and be sure to check all of your connections for leaks.

If you kinked any of your tubing toss it and start over as you've created a weak point and may have a pinhole without seeing it. You can buy an inexpensive tubing bender from most hardware or auto parts stores or use something round to wrap it around carefully.
 

CoyoteThistle

Adventurer
First things first- I'm not a plumber.
Flare fittings should be used for gas lines (along with schedule K copper lines- not hardware store water line copper), not sure why Propex says compression. Flare fittings are more resistant to temperature changes and vibration and the sched K is thicker walled. The easiest thing to do is measure out what you need then go visit your local Hank Hill for propane and propane accessories (or an RV/marine dealer if you want to pay top dollar). An inexpensive Chinese flaring tool will work as long as the alignment is good on it. I've redone the lines in a couple of Westys and never had an issue. Ideally you want to use some sort of vibration absorbing clamps where you can to reduce movement; the easiest way is to slice some rubber tubing length-wise, slide it over the copper then secure with a conduit clamp.

Yellow Teflon tape is commonly used but isn't approved in some areas so use an approved thread compound with PTFE. It makes the connections go together better and is more vibration resistant as well. Make sure all of your threads are clean before assembly and be sure to check all of your connections for leaks.

If you kinked any of your tubing toss it and start over as you've created a weak point and may have a pinhole without seeing it. You can buy an inexpensive tubing bender from most hardware or auto parts stores or use something round to wrap it around carefully.

That's great information robert, thanks!

I'll have to check what grade of the copper tube I used - probably not the thicker-walled stuff though. I did get a bit of a kink in one spot so sounds like I should redo that section anyway. I used a cheap flare tool like you mentioned and after several practice runs am getting pretty good results.

This propane stuff makes me nervous - appreciate the guidance.

On another topic completely, what are folks using on their ceilings? Is it okay to just paint it or might that lead to condensation in such a small space? I see some smaller rigs use what appears to be indoor/outdoor carpet (looks like the stuff on the decks of bass boats). I think that was a Uro-Camper I'm thinking of. Other options???

matt
 

IdaSHO

IDACAMPER
FYI on the copper flare connections, a simple bottle of bubbles and a small pant brush is IMO the best way to check for leaks.

I keep a bottle on hand in the camper at all times, just in case.
That way when your LP detector alerts, you have a chance of actually finding the leak.

Also, don't be surprised when you think you are over-tightening the joints.
Copper flares can take some considerably pressure to seat and seal correctly.

Afterall, you are forcing two imperfect surfaces to together, in hopes of a seal. :)


super_bubble.jpg
 

Gunner207

Observer
Hey Matt, if there are concerns about condensation it is best dealt with through ventilation. A painted surface might be more apt to drip like the inside of a tent does, but a fabric or carpet headliner doesn't do anything to reduce condensation, the moisture you breathe out is there either way. On high end boats it is often painted, the old days of perforated headliners are mostly gone. If you like that look, headliner, rug, etc. by all means go for it, just deal with condensation head on.

I have windows that tip open at the bottom and a Marinco solar roof vent that will exhaust the complete volume of the camper about 7 or 8 times an hour. In the colder months the propex unit should help with condensation I think.
 

CoyoteThistle

Adventurer
I like the bubbles idea for testing leaks.

Hey Matt, if there are concerns about condensation it is best dealt with through ventilation. A painted surface might be more apt to drip like the inside of a tent does, but a fabric or carpet headliner doesn't do anything to reduce condensation, the moisture you breathe out is there either way. On high end boats it is often painted, the old days of perforated headliners are mostly gone. If you like that look, headliner, rug, etc. by all means go for it, just deal with condensation head on.

I have windows that tip open at the bottom and a Marinco solar roof vent that will exhaust the complete volume of the camper about 7 or 8 times an hour. In the colder months the propex unit should help with condensation I think.

That makes a lot of sense Gunner, thanks. I'm using Seitz windows which have a barely-open vent position. No current plans for roof vent but could easily add it later.

Just looked up the Marinco solar vents - they look like pretty slick little units. Wonder how they work in dusty environments?
 

Gunner207

Observer
I recommend buying them through West Marine and pay for the plus 2 (three year total) protection plan. If or when it dies bring it back and they exchange it.
 

CoyoteThistle

Adventurer
Okay, some progress in the last couple days...

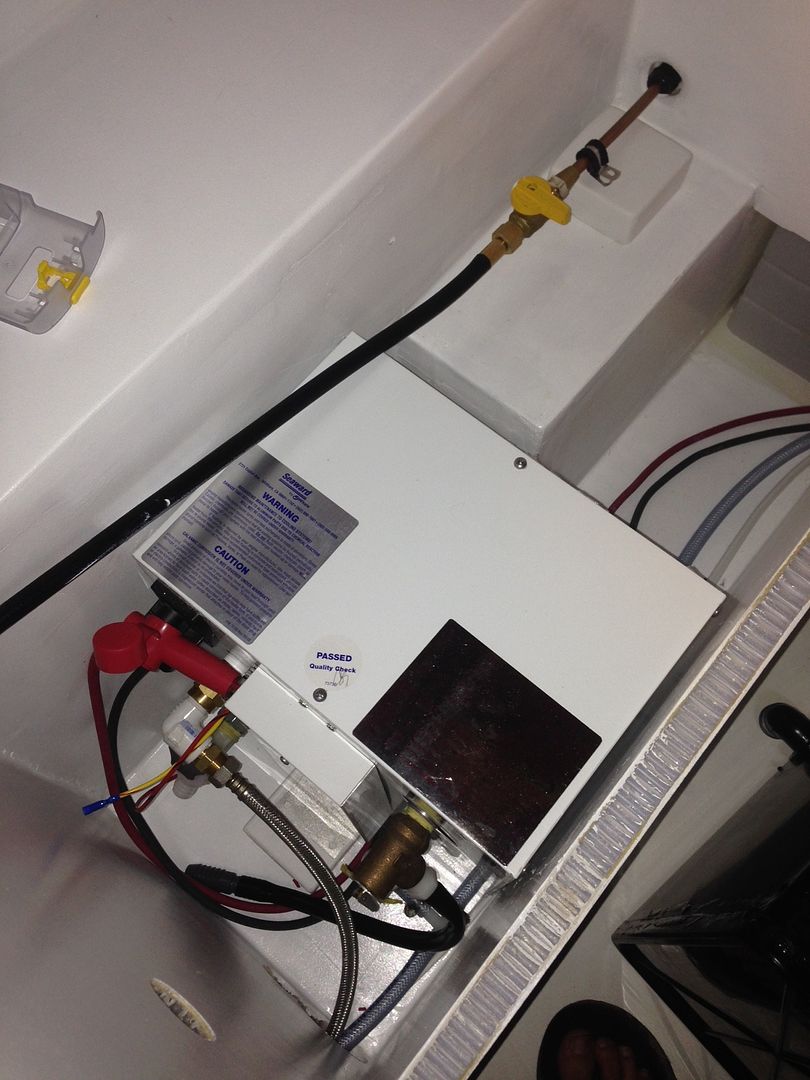
Working towards finishing the water system. Next item to get in is the hot water heater. After looking at lots and lots of options, we went with this:


That's a 12v 300 watt 3 gallon water heater by Whale. I was expecting to go with some sort of propane on-demand system but all the options out there had some significant down sides for this build. I'll run an on/off switch in to the truck and essentially heat the water "off the alternator" while driving. I also expect that in cases where the solar is really cranking, we'll be able to make hot water while camping.

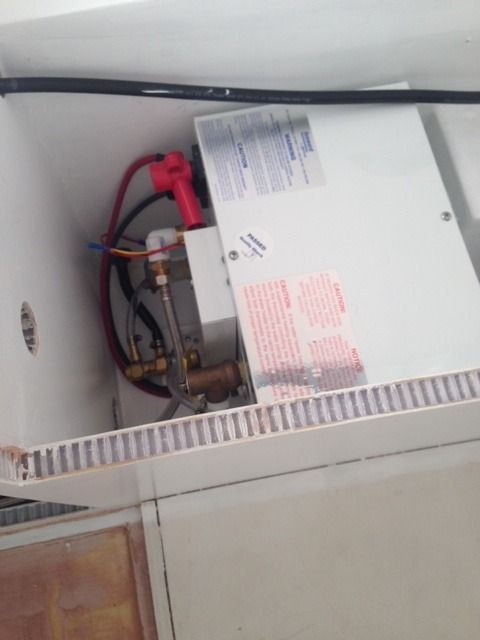
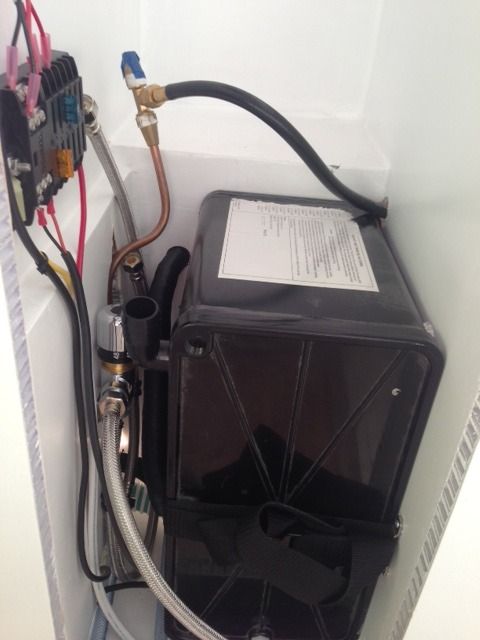
Here's the unit getting ready to be mounted under the seat.


Used 6 AWG wire to supply power. This unit heats the water to 140 degrees F - which is scalding. So we'll use an adjustable mixing valve. Not mounted yet but here's what it looks like:


Depending on the temperature of the cold water that is being mixed, the three gallons of scalding water should yield five or six gallons of nice hot water for showers and dish washing.

Also re-did the copper propane tubing today. Found the thicker walled stuff and it was not only way easier to work with, it gives me much more peace of mind. Will look forward to testing the system for leaks and hoping for the best.

Almost time to pull this guy out and get it hooked up:


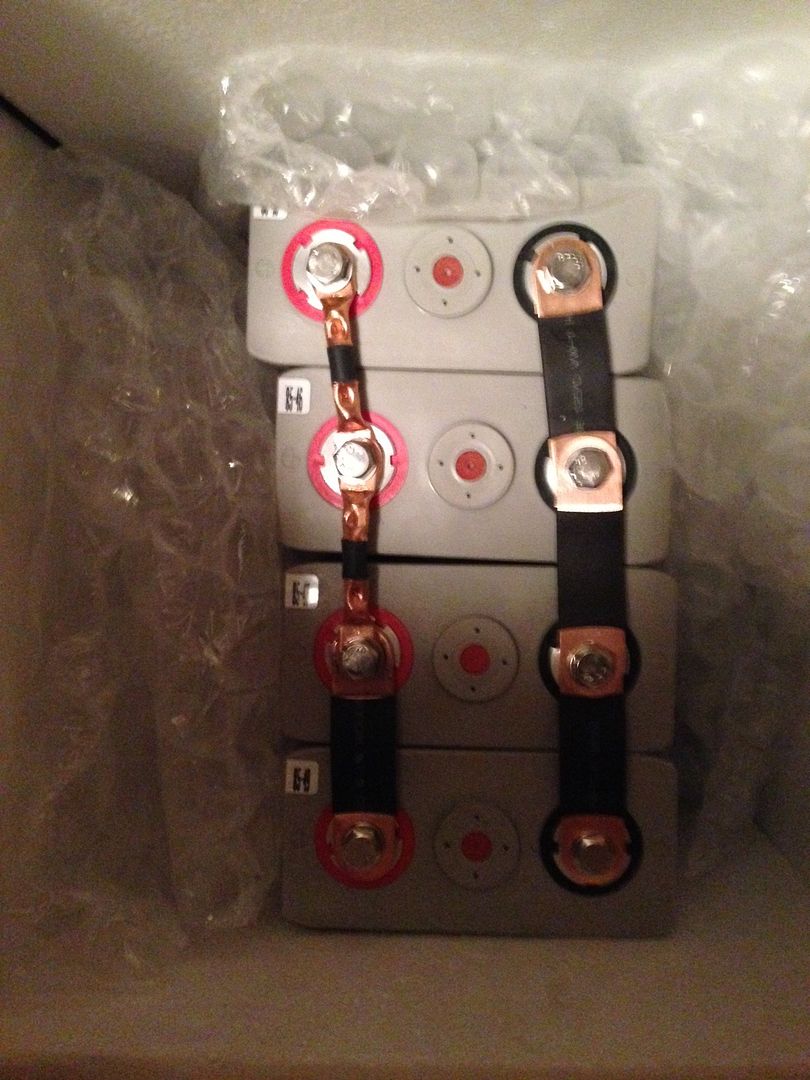
That's a 100 Ah LiFePO4 (LFP) battery. Here the four cells are being parallel balanced (they've been sitting like this for a few weeks). Lots of charging and protection doohickeys go along with using this. I'll dig in to that soon...

matt
 

java

Expedition Leader
Very cool, I looked at the electric heat options, but they seemed to have a large draw, that one isnt too bad, but still a fair bit. I went propane, we will have to compare notes when we are both up and running.
 

CoyoteThistle

Adventurer
Very cool, I looked at the electric heat options, but they seemed to have a large draw, that one isnt too bad, but still a fair bit. I went propane, we will have to compare notes when we are both up and running.

Yeah, I really tried to make propane work, I think it is the way to go. I like the idea of the $100ish on demand ones. A few brands are set up to run a flue and seem like they would work well vented through a wall. Searching this site and others I couldn't really find reference to anyone using one of those in a camper in a confined space but I'm sure it has been done. Problem for me was the lack of a space the right size next to a wall where a proper vent could be located - just couldn't figure a way to get it in there. Look forward to seeing what your setup is.

Once up and running I'll definitely give a report on the performance of the electric one. They claim 80 minutes to get water to 140 degrees F. They don't define the starting temp of the water though so not really sure what that means. Either way, 300w at 12v is about 25 amps. At 80 minutes that's about 33 amps. Easy for the alternator but that's more than a third of my battery capacity. Will be curious to see 1) how long the water stays hot in the tank when it's not on and 2) how much power draw it takes to keep the water up to temp after initial heating off the alternator.

matt
 

java

Expedition Leader
Yeah I ended up with the IW60 from suburban/airxcell. Its big, 12.5x12.5x20.5, but I hope it will work well. Only requires a 4" round hole for intake exhaust, so if it doesn't work out its not a gaping hole in the side. Its a 60k btu burner, so hopefully it gets hot quick.
 

CoyoteThistle

Adventurer
Yeah I ended up with the IW60 from suburban/airxcell. Its big, 12.5x12.5x20.5, but I hope it will work well. Only requires a 4" round hole for intake exhaust, so if it doesn't work out its not a gaping hole in the side. Its a 60k btu burner, so hopefully it gets hot quick.

Hadn't seen that one before. Very cool.

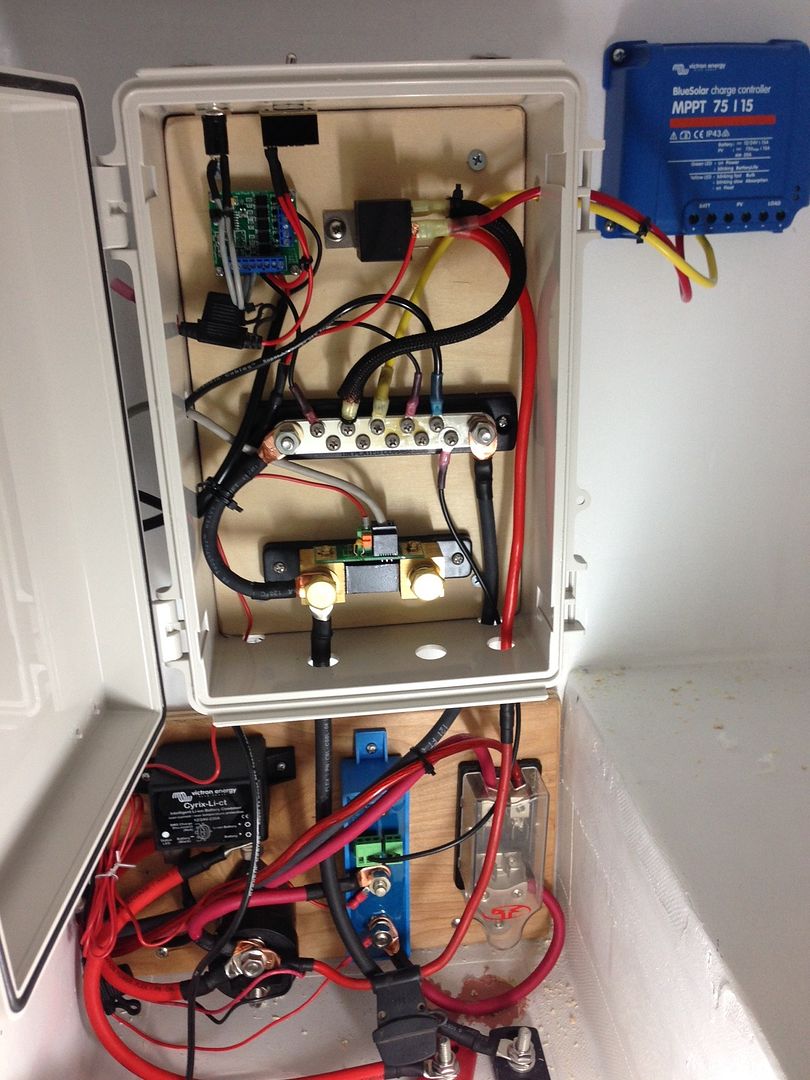
Okay, here's what's happening with the electrical system. This is mostly all to do with battery charge management and protection, some of which is very specific to using LFP batteries. LFP is great in a lot of ways but the key is to not over charge or over discharge them.

There's pretty spotty and not very consistent information out there on using LFP batteries in RV's and boats. Seems the package setups from Victron and others are well engineered and people like them, but, they are at least twice the price of buying your own cells and building your own setup. There are "drop in" LFP's too (Stark is one brand) but the jury seems to be out on just how long these will last as true "drop ins" with charging systems set up to lead acid specs.

So I did as much research as I could on a DIY setup and gave it a shot. I'm by no means an expert on this but for what it's worth, here's a look at what I came up with:


Not all finished with wiring or cable management and the battery isn't installed yet, but this is the gist of it. Happy to go in to details if anyone is interested. Will certainly be reporting on how it works once the system is up and (hopefully) running.
 

CoyoteThistle

Adventurer
Well, been distracted with other things for a while but did make some progress on a few fronts...

Finished installing and plumbing the hot water heater. The unit has a temperature/pressure relief valve and a drain valve. I plumbed those through a thru-hull drain. Rest of it was pretty straight forward.


Plumbing is now 90% done. Here's the chaos under the sink.


Hot and cold water lines ready to be hooked to faucet, thermostatic mixer, main fuse panel and fresh air intake (combustion) for the heater are all squeezed in next to the grey water tank. The tank is about 5 gallons. It's an ABS tank that I had that was too big for this space so I cut a few inches out of the middle of it and welded the ends back together (with ABS glue). Perfect fit now! Other nice thing about ABS is you can glue in fittings anywhere you want.

Got a few bits and pieces installed - heater thermostat, light switches, 12v outlet and USB outlet. Also got the drawer slides in for the kitchen drawer.


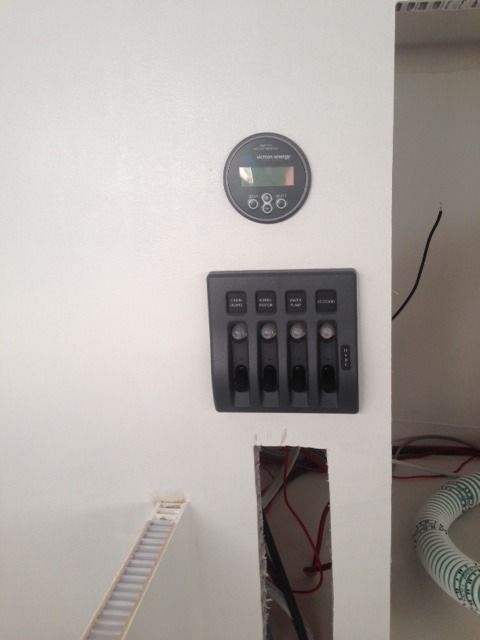
Main breaker/switch panel and display for the battery monitor went in too.


Today was spent sanding and painting the doors for all the cabinets.


Got a big shipment of aluminum trim for the doors and cabinets, that might be the next step...
 

CoyoteThistle

Adventurer
Progress on a few fronts since the last update. Biggest time-suck has been getting the battery and charging set up.

First step was getting the lithium battery "built" and installed and anchored down. Here's how it looks:


It's crowded in there but it all fits. Once I got the battery wired in, I started setting up the charging and protection circuits. I temporarily wired in the solar panel and went about setting up a custom charge profile. I got the Victron bluetooth dongle, it makes programming their stuff easy (via iPhone app). I set the solar charger to "absorption" at 14.0v and "float" at 13.6v. The idea is that the battery won't be charged above 14.0v and wont have a float charge (float charging seems to be a good way to slowly destroy lithium batteries). The profound lack of sun in sunny southern California this last week means I haven't tested how these settings work yet, stay tuned...

I also temporarily hooked up the system to the truck (via jumper cables). There are warnings out there that lithium batteries can kill alternators since they can take tons of current. Well, on first check, the alternator was charging at a whopping 7 amps at an uninspiring 13.0v :squint: A little research suggests that the "smart" alternator was the culprit for this slow charge rate and low voltage. The "smart" part is the trucks computer telling the alternator to not do much at idle or while accelerating and then kick in while coasting or braking - the idea is to save fuel. After lots of research, I managed to locate the fuse in the control circuit. I pulled it out and now the alternator puts out a steady 14.5 volts and was charging at a much better 15 amps. No warning lights or anything triggered on the dash. 14.5 volts is a little high for lithium but the battery combiner will disconnect the truck battery/alternator when the lithium gets to 13.9 volts. Solar will bring it up to 14.0 volts (95%+ charged I think). Of course this is all theoretical still...

Still not happy with the current. I think the culprit is another "smart" circuit that senses the load on the battery and adjusts the alternator output to (apparently) about 7 or 15 amps above whatever the load is (if i turned on headlights, A/C, etc. the amps would drop for a second and then come back up to 7 or 15). Next I'll try disconnecting the load sensing circuit and see what happens. Again, stay tuned!

matt
 

Forum statistics

Threads
188,356
Messages
2,905,843
Members
230,117
Latest member
greatwhite24
Top