Project "Autonomous" F-350

pappawheely

Autonomous4X4
Just made it through your entire build. Looking great! Some interesting ideas in here, keep up the good work.

thanks!

As you are invested in the CTEK universe, you might want to consider adding a SmartPass; would probably give you a much faster charge for your camper batteries, especially as you have invested in a 200A alternator. http://smartercharger.com/products/dcdc/ctek-smartpass/

The Smartpass is on my wish list; especially once I add another 200 watts of solar.
 

rayra

Expedition Leader
heh. I just have a LOT of years building custom crap, cars, dirt bikes, off road vehicles, home remodeling, scale modeling, sci fi prop replicas, all manner of one-off stuff. All about that improvise / scratch build. So I'm digging the whole 'build it from scratch' thing that you are working on.
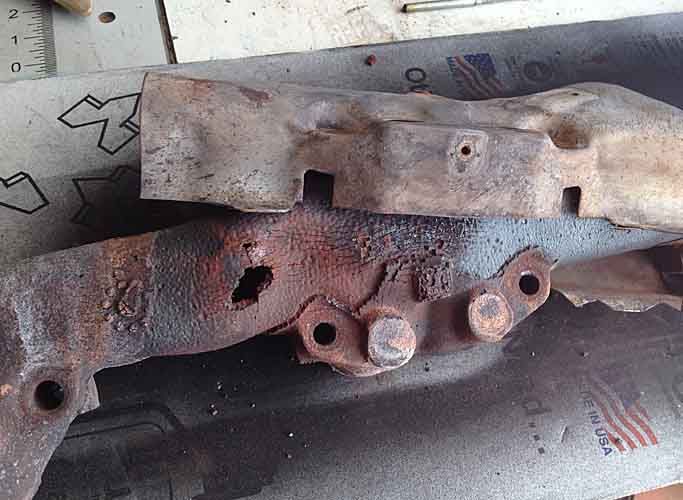
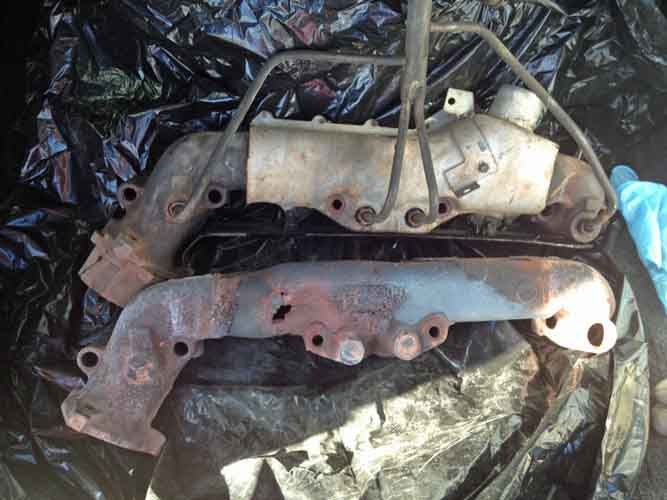
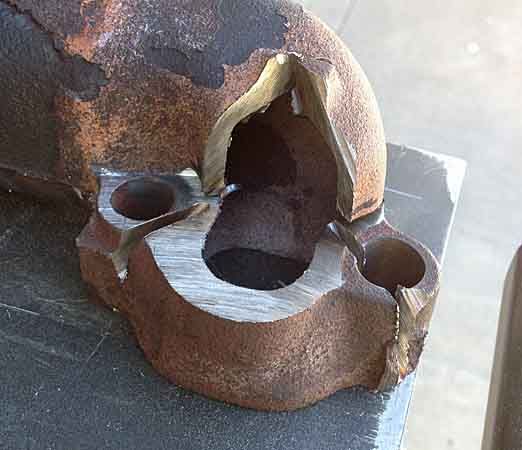
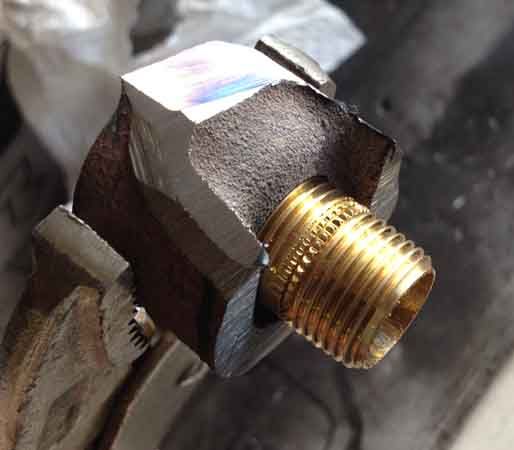
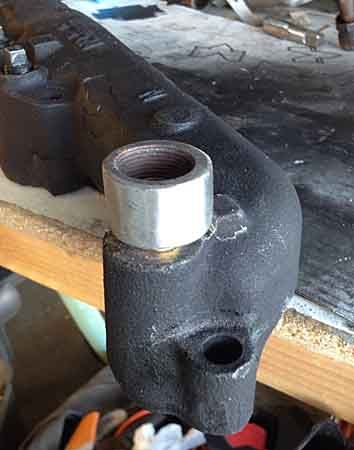
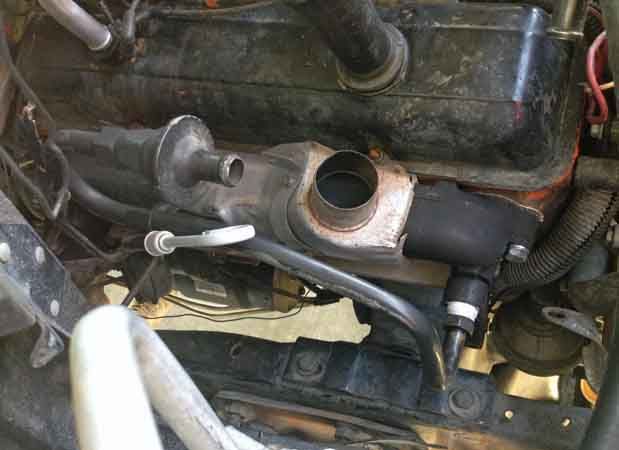
I just finished hacking up a blown out exhaust manifold on my pickup to making a custom fitting adapter for my smog equipment on a close-match junkyard replacement manifold. The 'new' part had four small smog pipettes, the original had one large one, I'm on a very tight budget so I had to come up with something and no joy finding a 5/8" fine thread fitting that would match my smog plumbing. So I chopped the port out of the old one and reworked everything with a brass 3/8" NPT close nipple fitting to tie it all together. I MacGyvered the crap out of that thing, running fine now.

engine12_zpstz5arwho.jpg
doggedjunkyard06_zpsgwswyk8x.jpg
exhaust26_zpsuzunfmbb.jpg
exhaust28_zpsojhwyxxq.jpg
exhaust30_zpsz7aj1sdz.jpg
exhaust32_zpsrd9me5hb.jpg


---

Are you taking any steps to control or direct the sag of the panel when you glass it? Once it gets heavy with resin it's gonna sag down onto your bracing, no matter how tight you make the dry fabric.
I once saw a guy glassing a custom sailboat hatch cover that was a similar perimeter frame as yours, he put together a sort of jig for it using hoola hoops, suspending the framework between and inside the layout so he could glass it, slop the resin around and then roll it over so the gravity sag would be in the 'up' direction (away from the framing) when the panel was installed. Once that slight bow was set on the first layer he took it out and worked it on a regular workshop bench.

Or you could stand the door in a vertical jig while it is setting up.
 
Last edited:

DiploStrat

Expedition Leader
thanks!


The Smartpass is on my wish list; especially once I add another 200 watts of solar.

Actually, the SmartPass doesn't do anything for your solar kit, its great advantage is that it adds an intelligent relay to allow your camper battery to connect directly to your starter battery, passing up to 80A from that upgraded alternator you installed. Once the camper battery finishes the bulk charge and the amp rate drops to 20A, then the SmartPass disconnects and the charge passes to the D250S. See page 20: http://smartercharger.com/wp-content/uploads/2010/11/D250S-DUAL_EN.pdf

CTEK have a great reputation, but their advertising is full of bafflegab so it can be hard to understand exactly how these products work. Remember, use large cabling and take advantage of temperature and remote voltage sensing. And remember to fuse everything, you don't want an arc welder under your truck.

I still prefer a simple intelligent relay, but the D250S could be a lifesaver if you have an older vehicle whose charge voltage is below 14v.
 

pappawheely

Autonomous4X4
Two things I really like about this website is the amount of people who build their own stuff and the first hand knowledge that is freely given. So many people here have both inspired me and guided me through this process.

DiploStrat, I was under the impression that the smart pass would charge faster regardless of the input; alternator or solar. Bafflegab is definitely apt.
 

DiploStrat

Expedition Leader
DiploStrat, I was under the impression that the smart pass would charge faster regardless of the input; alternator or solar. Bafflegab is definitely apt.

I had a L O N G exchange with a Tiger owner who installed a D250S/SmartPass combo. The "extra 80A" charge puzzled the stuffings out of me, especially as I actually understand how a B2B works, based on long conversations with Charlie Sterling, jr., of Sterling Power USA. Finally figured out that the SmartPass was an intelligent relay - they just don't want to admit it.

That said, the combo looks slick and overcomes most of my objections to B2B. (See my rants on the 12v Forum.)

Hope my comments have been accurate and helpful. Like you, I have spent a lot of effort building a camper that never needs to plug in.
 

calicamper

Expedition Leader
Fun read. Look at a foredeck sailboat hatch over your bunk for roof access. It can double as a open air vent on hot nights. Rig a simple cloth air scoop above it to pull fresh cool air in. Screens and shutters can be made or purchased easily. The downer foredeck hatches are pricy. But built to take abuse your rig wont be able to produce.
Always thought a hatch over the bunk for air flow or quick easy roif access would be a great option on cab over campers.
 

pappawheely

Autonomous4X4
Time Trials for the Polaris RZR Mint 400 presented by General Tire were yesterday. The race starts tomorrow at 6:00 a.m. Going to be a long day in the sun but beats sitting in an office.


pappawheely

Autonomous4X4
I have been quiet for a while; busy with work and building a rear door. I wanted to have a bump out in the rear similar to the aero tails on big rigs. Anything that might improve aero, I'll try

truck aero tail


I put together a frame that I will stretch fabric over and glass. I got real felt at JoAnn fabric. I happened to score a 50% off coupon at the grocery store so 10 yards of felt 72" wide cost me $26.00


It was not easy welding this on the floor. When it was done it had a little diamond in it. I tethered it to the back of the uhaul and used my Warn M10000 winch to pull it square. The M10000 is not real good for fine adjustments. I pulled it too far and then pulled it back almost to where it was when I started. argh! Anyways, here it is just clamped to the back of the box. It does not sit flush because there are bolts from the existing door that stick out now. I want to get a little farther down the road before removing the roll up door. The top third will lift up clamshell style. The lower 2/3's will get separated after I mount it giving me a 60-40 split barn doors. I have a seam that will get cut like I did with the top section. I must be crazy sometimes but I am hoping this will turn out better than it seems to be going so far. :yikes:


rayra

Expedition Leader
pneumatic arms to pop it open to max extension, or electrically operated screw drive?

At first it looked like it had a hatch in the middle (over the ramp), somewhat like a Merkava tank

ffe22f9d76101fecc8320467928ae328.jpg
 

pappawheely

Autonomous4X4
pneumatic arms to pop it open to max extension, or electrically operated screw drive?

I have some gas struts. I am figuring out which hinges to use. The rear of the box is an aluminum extrusion. I have to use some type of a nutsert and keep it theft proof at the same time.
 

pappawheely

Autonomous4X4
Peeled myself away from the computer for a little while today since the wind died down. I put a window in the bunk area.


:beer:
 

Forum statistics

Threads
188,154
Messages
2,902,784
Members
229,582
Latest member
JSKepler
Top