Project Hundy Build Thread - 2000 UZJ100 Land Cruiser

cruiseroutfit

Supporting Sponsor: Cruiser Outfitters
Kurt-

I'm contemplating the iron moose light bar to mont up on my rack. I was thinking of the flood option as you mention you have, as I'd like to light up as much as the forward path as I can.

Do you get any hood reflection with flood unit mounted up there?

Nope, negligible if any at all. I purposely mounted the light bar back and under the rack for this reason, the roof of the cab catches any rogue light before it hits the hood.
 

cruiseroutfit

Supporting Sponsor: Cruiser Outfitters
Update time!

The 100 has been serving me most splendidly, I've had it out on a dozen or so trips since my last update and each time I grow fonder of its cross-section of abilities and comforts. To further emphasize my absolute pleasure, I finally committed to selling my beloved Tacoma and it now resides with a new owner, more on that here. With nearly 180k on the clock and little service history beyond the minimal service records I could find in the glovebox, it was time for the 90k service including timing belt, water pump, thermostat, etc. I'm fortunate to have Toyota mastertech and 100 guru Will C. in my neck of the woods and was able to recruit him to rock-out the upkeep. He's done a grip of these services and makes quick work of the project. Thanks again Will :cool: 
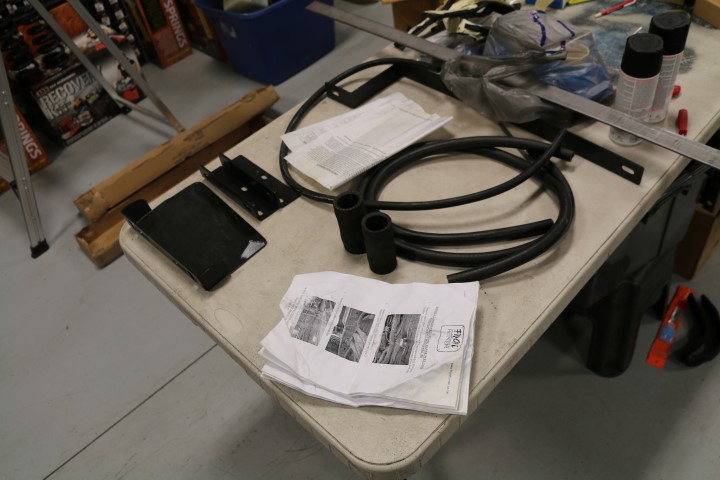
During that same time, I did some minor maintenance on the front end, lower ball-joints, upper ball-joint boots and sway-bar bushings & front links as mine were hammered.

100_aux_tank_1.JPG

Laying out the parts pre-install

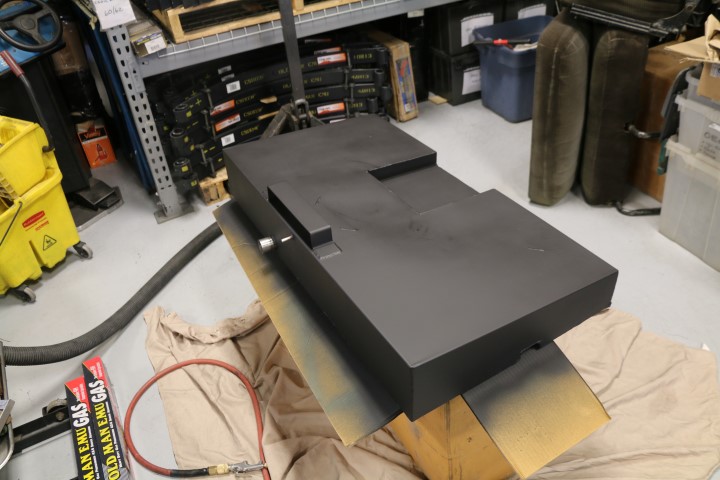
With that behind me I had a few other modifications in queue including the installing the Front Runner fuel tank I had picked up from one of the employees at Proffits Cruisers. Jeremiah had mentioned to me that Bob won a 100 aux. tank at the Cruise Moab raffle and after a few calls I figured out that it was the 62L Front Runner gravity feed tank that was originally donated to the raffle several years earlier by Paul May of Equipt Expedition Outfitters. Paul was confident in the tank as a practical and reliable solution so Bob and I were able to work out a deal and get it out to Utah. There it sat on the shelf in the shop for nearly 9 months as other more pressing projects took priority, all until this weekend. I had a Saturday morning to spare and I was able to convince Olly (my shop tech) and Jake (one of my past employees) to come spend some quality time in the shop, they took the bait. Olly and I had previously reviewed the instructions and anticipated the project taking just a few hours. We were very wrong. Between a couple of missing parts and some shall we say 'lacking' instructions, it took the better part of the day on Saturday and a few hours this morning to finish it up. In the end the extra day worked out as I was able to get some good paint coverage on the parts. The stainless steel tank's original paint was flaking bad and the more I roughed it up with scotch-brite, the worse it became to the point 1/4 or more of the paint was gone. Between the scotch-brite, fine-grit sand paper and compressed air, I as able to get the failed paint off and start priming the bare areas with a self-etching primer. I applied a couple coats of primer and then 2-3 good coats of flat black paint. I'm less than optimistic that the paint won't blow back off with the pressure washer but at least I started with a fully painted tank and access is reasonable if I need to touch it up on occasion.

100_aux_tank_2.JPG

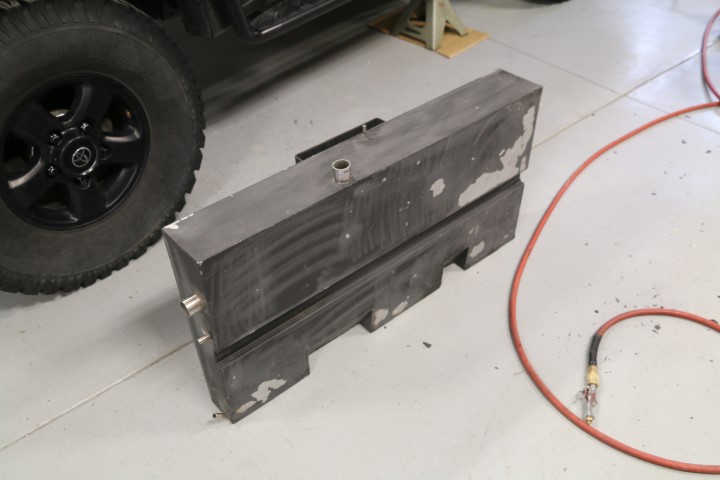
Prepping the tank for re-paint

The tank mounts in place of the factory spare tire carrier and includes provisions for lowering the stock tire carrier in the event you choose to run it. I've got my spare tire on the bumper and had taken off the factory tire winch and cross-member during the original build. So while I could have utilized a much larger tank, I weighed all the options in my mind and really 62L (16 gallons) is going to work out well for my needs. Additionally, I won't be too much weight to the already heavy rear end or losing any ground clearance. A full aux tank and the additionally weight of the tank itself is roughly 150 lbs, well within the load capacity of my current springs given I'm now going to carry two less 20L Scepter fuel cans. If I find myself wanting for more fuel in the future, Long Range has a 160L auxiliary tank.

100_aux_tank_6.JPG

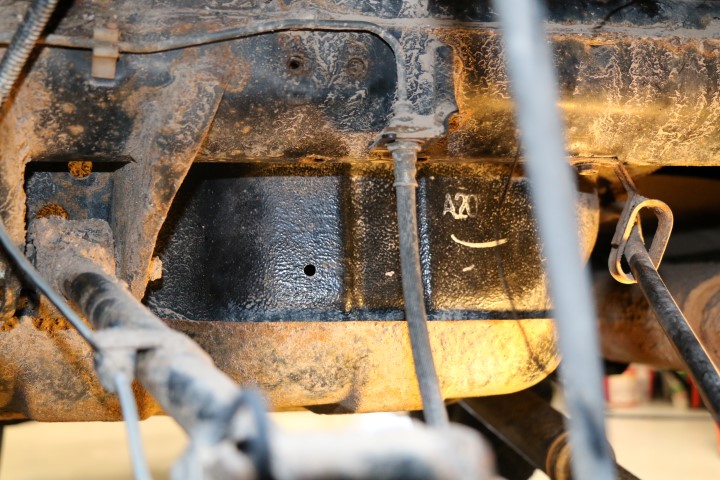
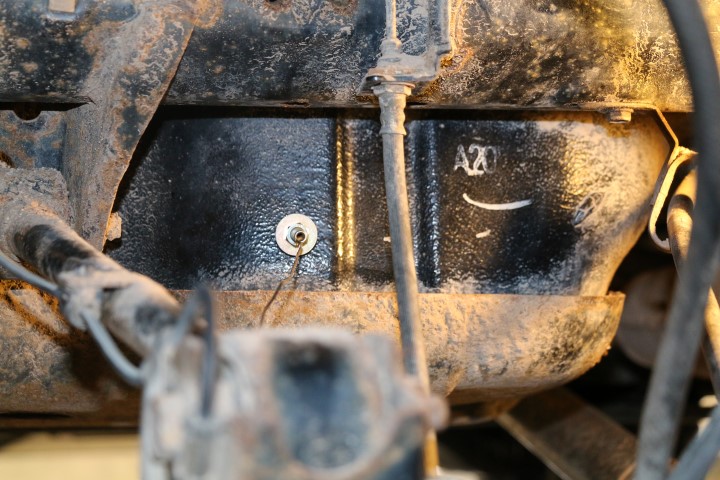
8.5mm hole in the factory main tank

100_aux_tank_7.JPG

Balance fitting in place

Mounting the tank was straightforward but required we clean out and re-tap 4 holes in the bottom of the body, one of which is directly above a frame cross-member leaving very little room to access the hole. The part of the project that took the most time was plumbing, more specifically adding a balance line into the lower portion of the stock tank. Front Runner includes a specialized fitting made for this application and the instructions state that it must be inserted from the inside of the tank and secured on the outside with a nut. However the inlet of the factory tank as a spring loaded 'flapper' 6-8" down the tube so even trying to fish it through with a wire proved impossible. Perhaps the non-US diesel tanks don't have the flapper and thus the lack of detail in the instructions? We ended up pulling the entire inlet/vent assembly from the tank by removing 6-7 8mm bolts and carefully separating the gasket. With that removed we had better access and could fish some bailing wire and glide the fitting it place. In hindsight, I'd likely drop the entire tank which would provide easier and safer access. We cut the factory fuel neck as directed by the instructions even adding a 1" or more of 'cushion' room as a second cut is always easier then too short. However when we went to test fit the filler system, the provided hoses were not going to work as they were shorter than the instructions part list specified which was already 1/2" shorter than we wanted ideally. It simply wasn't going to work. Fortunately NAPA had a 12" section of fuel fill hose in stock and we were back on track, thanks for making a quick parts run Jake! Somewhere along the transport, one of the mounting brackets for the tank came up missing. Its design wasn't anything difficult to duplicate but it took some time to recreate the bracket using our sheet metal brake and weld gussets into place for a near identical mount. With that behind us we went back to watching paint dry, literally. :D

100_aux_tank_3.JPG

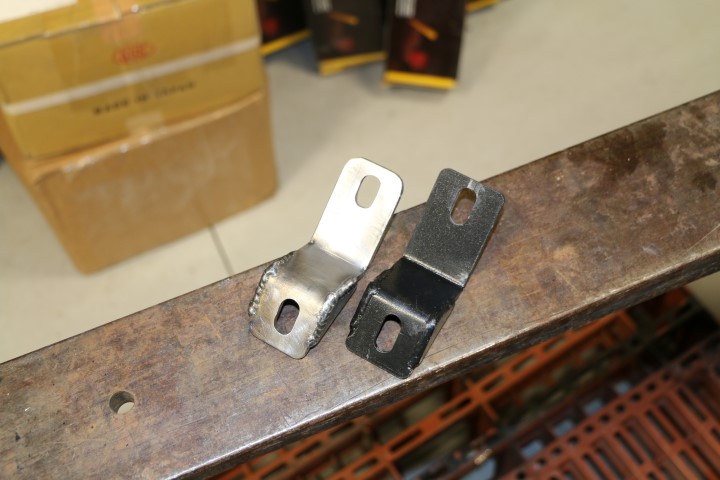
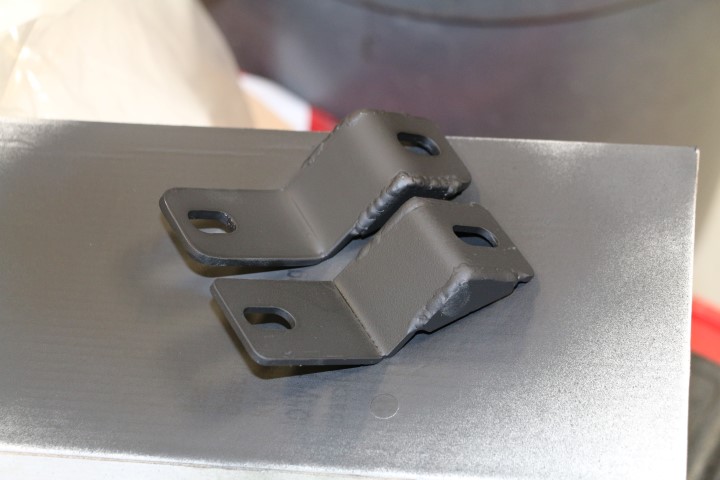
Reproducing the the tank bracket

100_aux_tank_4.JPG

Painted to match

This morning we were ready to rock and roll and in just a couple of hours we had the tank mounted, finalized the plumbing and were cleaning up tools. Thanks again for spending a couple of your days off helping Olly :cool:

100_aux_tank_5.JPG

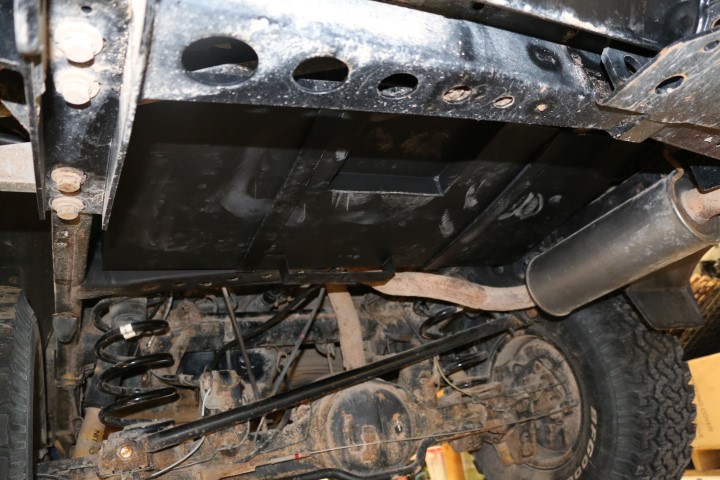
Tank paint completed

I drove the Cruiser out of the shop and off to the first big fill, adding ~32 gallons before the machine clicked off at $100. :D I considered adding a few more to fully top off the tank but figured if there was a leak or and issue with the system, I'd rather have as little as possible to remove. I ran a few errands with it this afternoon and at each stop inspected the connections for any signs of leaking, so far it is bone dry. I'll go ahead and top off the tank tomorrow and again continue checking for any system leaks.

I am a bit worried about the proximity of the tank to the exhaust pipe, if nothing else the paint will fail and the cushion material between the tank strap and the tank might get baked? I'll likely fab up a little heat shield to help protect the tank. I'm headed out on a long road trip with a fair amount of bombing down dirt roads, it will be a great time to see just how hot the tank gets near the exhaust.

100_aux_tank_8.JPG


The biggest con, the total cost at the fuel pump :D
 
Looking good. I like to see builds that represent the spirit of what this site is all about by promoting vehicle-dependent exploration. Adding a long rang tank or additional fuel supply is definitely on my hit list.
 

Chris Boyd

Explorer
Wow, this thread keeps my wallet aching! The long range AUX tank is defiantly on my list. Nice job Kurt (and team).

Any details on how this tank operates on the filler neck? Is there a mechanism to divert during fill? Also, how does the fuel get transferred? I see the discussion about the balance line, is that it? No transfer pump?

If it doesn't have those things, I'm much more interested as the LRA and OEM sub tank installs I've read about seem to be even more involved than you got into here.
 

cruiseroutfit

Supporting Sponsor: Cruiser Outfitters
Chris, the system is very simple, all gravity feed. The aux tank is now in line with the stock filler system, basically once it is full it has a 1-3/8" outlet (same as stock) that then fills the stock tank. As the stock tank drains down it is continually fed by the balance tube until the aux tank is empty and at that point your gauge will start reading. The benefit is simplicity, no transfer pumps or dual filler necks. The con is less capacity (which is a legit factor to some) as well as you can't tell how much you have in the aux tank. Your gauge will read full from 25-41 gallons. Fine by me as I'm comfortable knowing the basic range. Clear as mud? :D
 

Chris Boyd

Explorer
Kurt, cool. I would love to see my gauge read full for more than 30 miles, like it does now! Not being a huge tank is at least good for the rear load and handling. What springs are your running?

This is certainly a much more simple design that the dual filler neck/ transfer pump method. But I could see why toyota being toyota would design their OEM system that way.

Good luck with the trip to KOH... Give us a report on the range. I know my bladder wouldn't outlast the 41 gallons!
 

cruiseroutfit

Supporting Sponsor: Cruiser Outfitters
I'm running 864 (2864) springs in the rear. With full tank and 3 gents and gear it is sitting nicely and riding smooth. I'll report back on total range.
 

cruiseroutfit

Supporting Sponsor: Cruiser Outfitters
The tank proved very useful this past weekend en route to KOH and to and from the pits. Whereas my comfortable mixed on/off-road range (without cans) was approx. 200-250 miles, I'm now at 350-400, perhaps as much as 500+ on the highway figuring 12-13 mpg. The real world improvement is less stops, whereas the 1500 mile round-trip would have needed 6-7 fuel stops, he had just 4. Time saved is time earned. :D
 

cruiseroutfit

Supporting Sponsor: Cruiser Outfitters
As crazy as this sounds, the aux. fuel tank is proving to be one of my favorite mods thus far. Obviously it doesn't make driving X miles any cheaper, I mean one can argue they fill-up a little cheaper and less often, what it does do is save time and time does equal money. I ran down the the Swell a few weekends ago, filled up in Green River, ran home camping through the Swell and still had a full tank when I got to the bottom of Spanish Fork Canyon :D

Now, back to mods for the hundy. During our quick Swell trip, I pulled a total rookie move landed on a control arm. I was making a 3-pt turn and rolled a rear tire up on top of a rock, wasn't centered up on it perfectly and I slid down, landing on my control arm with a heavily laden 100. All 4 tires were firmly on the ground but it was just enough anchor to require a quick tug. Low and behold I bent the control arm so it was time for an upgrade. It just so happens Old Man Emu released control arms for the back of the 80/100 Series recently and I had a set sitting on the shelf :D

Swap was super easy, 4 bolts. It literally took more time to pull it in the shop than it did to swap them.

The 'incident':

1798449_10151921069822097_1194880664_n.jpg

The aftermath:

IMG_5386 (Small).JPG

Stock on top, bent in the middle and the new HD model on the bottom. While the HD unit is actually a slightly smaller diameter, it's solid HD metal and uses poly bushings and a sleeve versus the stock rubber bonded style.

The finished product:

IMG_5387 (Small).JPG
 

Sempertoy

Explorer
Hey Kurt, I've been eyeing some replacement lcr's but those don't look quite as stout as the stock units. Upgrade in metal density?


Sent from my iPad using Tapatalk HD
 

cruiseroutfit

Supporting Sponsor: Cruiser Outfitters
Hey Kurt, I've been eyeing some replacement lcr's but those don't look quite as stout as the stock units. Upgrade in metal density?

Correct, absolute upgrade in density and material. While the HD unit is actually a slightly smaller diameter, it's solid HD metal and uses poly bushings and a sleeve versus the stock rubber bonded style. Hold the two side by side and I'd guess the stockers are 30% lighter? I could weigh them to be certain.
 

Sempertoy

Explorer
Correct, absolute upgrade in density and material. While the HD unit is actually a slightly smaller diameter, it's solid HD metal and uses poly bushings and a sleeve versus the stock rubber bonded style. Hold the two side by side and I'd guess the stockers are 30% lighter? I could weigh them to be certain.

Solid copy on that. That makes sense. I will have to wait for my wallet to recover from my recent purchase of gears and such from you guys before I look into upgrading my lower links.

On a separate note, I saved that picture you have of the spiral jetty out at the great salt lake and I keep wanting to take a similar picture. This summer I am going to come visit SLC and I plan on driving the 80 up and going out there for a similar picture.
 

cruiseroutfit

Supporting Sponsor: Cruiser Outfitters
Solid copy on that. That makes sense. I will have to wait for my wallet to recover from my recent purchase of gears and such from you guys before I look into upgrading my lower links.

Say when :D

On a separate note, I saved that picture you have of the spiral jetty out at the great salt lake and I keep wanting to take a similar picture. This summer I am going to come visit SLC and I plan on driving the 80 up and going out there for a similar picture.

Right on. Give me some heads up when your heading out, if my schedule allows I'd love to show you around out there. Lots of neat stuff to see:

Spiral Jetty
Lucin
Transcontinental RR
 

Forum statistics

Threads
186,509
Messages
2,886,808
Members
226,515
Latest member
clearwater
Top