Pugsly's FG rebuild thread

pugslyyy

Expedition Vehicle Engineer Guy
Oh Noes! Loose lug Nuts!

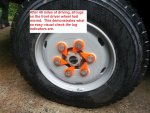
After 40 miles of driving the new wheels, this is what I saw when I went to check whether my lug nuts were tight (this was only the front driver side, others were fine). Really illustrates how easy the indicators make to check whether everything is staying in place or moving on you.

Since all the lugs had moved, I figure the wheel wasn't quite seated when I torqued them the first time.

loose lug nuts.jpg
 

matthewp

Combat Truck Monkey
That's a nice accessory to have!

After 40 miles of driving the new wheels, this is what I saw when I went to check whether my lug nuts were tight (this was only the front driver side, others were fine). Really illustrates how easy the indicators make to check whether everything is staying in place or moving on you.

Since all the lugs had moved, I figure the wheel wasn't quite seated when I torqued them the first time.

View attachment 178547
 

gait

Explorer
I now have some wheel nut indicators. After one nut on a rear wheel came loose after 8,000 km, the stud sheared, followed by a second then a third before I noticed.
 

whatcharterboat

Supporting Sponsor, Overland Certified OC0018
I now have some wheel nut indicators. After one nut on a rear wheel came loose after 8,000 km, the stud sheared, followed by a second then a third before I noticed.
Hi Julian, as you would know, wheel nut indicators are compulsory on any vehicle entering a mine site or pipeline construction road in Australia but we were at mining expo a few weeks ago and there was a new thing that is trying to be pushed..... A lock ring that captures each nut and prevents them from coming undone. Requires a special tool . One time use ...so not reusable but they weren't that expensive.

Kind regards
John.
 

pugslyyy

Expedition Vehicle Engineer Guy
I now have some wheel nut indicators. After one nut on a rear wheel came loose after 8,000 km, the stud sheared, followed by a second then a third before I noticed.

I was quite amazed to see that much movement in such a short distance - and this was on paved secondary roads to nothing rough or particularly high speed.
 

gait

Explorer
thanks John,

I wasn't aware of the mine requirement (I worked downstream).

I was aware of the locking rings (there are a few types). For my use the thought of more "consumables" and a special tool got in the way. Perhaps personal, also a single incident a long while ago in which a bearing locking ring let a shaft walk.

Still a bit of a shock though. I only detected the loose wheel when I started going uphill. A slight to and fro motion. Just enough to get my attention and have me stop.
 

pugslyyy

Expedition Vehicle Engineer Guy
Install moving along - first coat of paint and caulking. This is stitch welded (not seam welded) to hold up better under movement, but requires quite a lot of caulking.

Passenger Side

paint and caulk passenger.jpg

Driver Side

It's surprisingly complicated to notch a 3 compartment box and insert a fender into it!

paint and cailk driver front.jpg
paint and caulk driver mid.jpg
paint and caulk driver rear.jpg

I had hoped to get the electronics back together today (Xantrex relocated and mounted) but my right angle drill smoked instead of turning when I pulled the trigger this morning and it took me a large part of the day to get a replacement. I tried to work without it, but a right angle drill can be one of those tools that is almost impossible to work around not having - that was the case today.

I did mount the outside grill in a much more satisfactory fashion using 1/4" aluminum plate and some custom brass spacers, but too late to take photos. It was mounted to plywood in a way that was causing a lot of flex (the lid was not lining up correctly) so it is a much better solution now.
 

dhackney

Expedition Leader
I did mount the outside grill in a much more satisfactory fashion using 1/4" aluminum plate and some custom brass spacers, but too late to take photos. It was mounted to plywood in a way that was causing a lot of flex (the lid was not lining up correctly) so it is a much better solution now.

This is very good news.

The grill was the very first thing I did on the truck and the design and install reflected the years it had been since I'd done anything with my hands.

I wish I could say that the plywood was just a prototype and pattern for the never-finished aluminum version, but I actually designed and built it originally as a permanent solution.

It is probably a miracle that it held up for so long in such rough conditions.

Doug
 

pugslyyy

Expedition Vehicle Engineer Guy
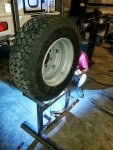
So having obtained these big honking tires (Toyo M608Z 285 70 R 19.5)and rims, I no longer have a good place (any place) to carry the spare. Time to fabricate a rear tire carrier. Having a truck camper (rear entrance) makes it a little more complicated - it is a tight envelope to work within.

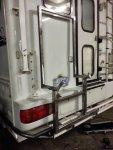
Fab was done by Bill Muetze owner of RTE Welding and Fabrication. Bill has plenty of experience with expedition vehicles - almost 100% of what he builds is bumpers, sliders, underbody protection, and tire carriers. Great to work with an experienced fabricator who understands off highway stress and what will work / what won't.
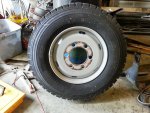
04 SRW tire carrier - Toyo M608Z 285 70 R 19.5.jpg

Constraints are =
  1. Need to be able to attach steps.
  2. Need to be able to open basement doors.
  3. Need to not obstruct lights.
  4. Need to have it be removable in case I want to take the truck camper off.
  5. Need to still be able to open the camper door.
  6. Need to still be able to use the rear awning.
  7. Don't want to obstruct the rear window.

First task was to add a second 2" receiver to the sub frame.
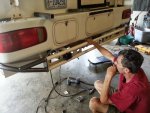
09 SRW tire carrier - second rear receiver fitment.jpg

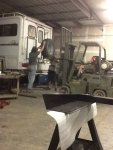
Having a forklift to position the wheel is key. The basic idea was to use the forklift to hold the wheel where we wanted it mounted and then build the mount around it. Notice how close the tolerance is to the awning stay. It ends up being about 0.25" at the closest point - but this is only during deployment, it is not this close when rolling down the road.
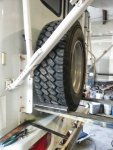
14 SRW tire carrier - cradle bars.jpg

Planning the positioning of the upright supports. We ended up deciding to obstruct the left backup light (not a road worthiness issue)
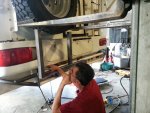
15 SRW tire carrier - uprights.jpg

See how we worked around all the critical boxes, etc.
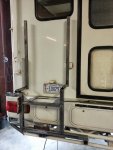
26 SRW tire carrier - tire cradle and backrest.jpg

Once everything is tacked, removal for welding and grinding.
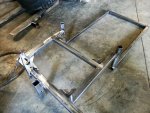
37 SRW tire carrier - grinding.jpg

Welding on tie down tabs.
47 SRW tire carrier - tabs.jpg

Final fab mounted.
50 SRW tire carrier - fitment.jpg

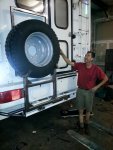
Final fit testing.
51.1 SRW tire carrier - final check.JPG

Big wheel!
52 SRW tire carrier - big tire or small bill.jpg

Since I won't be taking the forklift with me to help pull the wheel off the rack, I plan on installing a 2000 pound utility winch (same model as I use to load the motorcycle) from the top bar.

It's at the powder coater now.
 
Last edited:

pugslyyy

Expedition Vehicle Engineer Guy
Winch installed today but the electrics are still temporary. I'm actually not sure whether I want to permanently wire up the winch or just run a cable to it when I need it - simpler and stops people messing with it.

I've decided I'm going to put some vibration isolators at the top of the tire rack between the rack and the camper, probably with aluminum backing plates on the camper side. There is a pretty good moment to the weight of the tire and I think this will help control things.
 

pugslyyy

Expedition Vehicle Engineer Guy
How much larger than stock are your new shoes?

The SRW 285/75R19.5 Toyo's are 35.4" diameter.

Stock 235/85R16 are 31.7"

When you consider that changes you from 100" of travel per revolution to 111", it effectively changes the stock final gearing from 4.875 to 4.365.

As a result I can now cruise down the highway 60 mph at 2300 rpm.
 

Overland Hadley

on a journey
The SRW 285/75R19.5 Toyo's are 35.4" diameter.

Stock 235/85R16 are 31.7"

When you consider that changes you from 100" of travel per revolution to 111", it effectively changes the stock final gearing from 4.875 to 4.365.

As a result I can now cruise down the highway 60 mph at 2300 rpm.

Thanks.
 

pugslyyy

Expedition Vehicle Engineer Guy

My general comment (consistent with what others have gone this route say) is that going to the larger tires gets you the gearing that the Fuso should have come with from the factory (given the limitations of a 5 speed transmission - would be much better with a real truck transmission but that's another story!)
 

Forum statistics

Threads
188,605
Messages
2,907,805
Members
230,758
Latest member
Tdavis8695
Top