dereckmnielsen
Observer
So I've done some looking around but I have not seen a thread based on the removal of the running boards for an LR3. I decided to remove mine today after going on a trip to Crown King here in Arizona up the back way which can be somewhat of a difficult trail if you pick the right spots. The process was relatively easy but is a little time consuming. There was only 1 section of the trail where I could not drive up due to my running boards causing me to high center on a rock ledge and so I had to take a bypass route. This was particularly embarrassing due to the fact that my brother had just completed the obstacle in his FJ Cruiser and so I didn't want him to show me up lol. Oh well, overall that was the only time I got hung up. The rest of the trail was full of good sized obstacles but I never bottomed out once. The LR3 is a great machine. Okay, on to the removal! You will need a socket wrench with a 10mm, and 1/2in sockets. You will also want to use a small pry bar or some sort of trim removal tool and a phillips head screwdriver.
So the first thing I did was remove the steps on one side of the truck and let that be sort of the trial and error part. Learning from the first side, I decided to jack up the truck in the rear and remove the rear tire, this makes it much easier to remove the two phillips screw just in front of the rear tire.
Step 2. Underneath the running board, there are a total of 6 bolts in these spots. The bolts are 10mm in size. Remove the 6 bolts. (These hold the actual step to the steel brackets)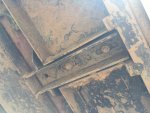
Step 3. with the bolts removed, simply lift up the step and pull it out and set it off to the side. This is the easiest part of the job!
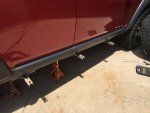
Step 4. Remove the two phillips head screws at the rear wheel well that hold the plastic trim to the well.
Step 5. Remove the phillips screw at the front of the rocker panel just to the rear of the front tire.
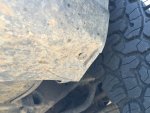
Step 6. Using the pry tool, there are 3 plastic inserts that need to be removed from the plastic. 1 at the front, middle and rear.
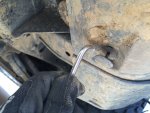
Step 7. Using the half inch socket, remove the exposed bolts holding the steel bracket to the truck.
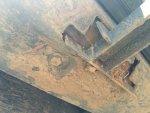
Step 8. At this point, you can either remove the plastic panel from the truck or leave it on as you remove the steel brackets. (There are bolts underneath the black plastic that also hold the brackets to the truck. with the plastic out of the way, remove all remaining bolts with the 1/2 inch socket. At this point all steel brackets can be removed and out of the way.
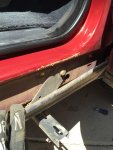

Step 9. Now that the brackets have been removed, line up the plastic panel with the yellow pop in tabs on the truck. I started from the rear of the truck and just worked my way forward.
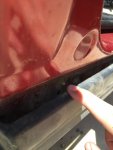
Step 10. I think it is optional but I did put all of the half inch bolts back into their slots even though they don't secure anything. However, once the plastic is back on, There are a couple of the half inch bolts that do hold the plastic to the truck, make sure these bolts are put back in. Re-insert the black plastic inserts into their slots, they also hold the plastic to the truck. Last, put all of the phillips head screws back into there spots. All done!!
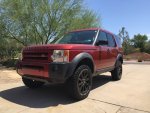
Hope this post helps anyone who was looking for a breakdown of what this process involves. All in all it took a few hours messing with everything. Enjoy
So the first thing I did was remove the steps on one side of the truck and let that be sort of the trial and error part. Learning from the first side, I decided to jack up the truck in the rear and remove the rear tire, this makes it much easier to remove the two phillips screw just in front of the rear tire.
Step 2. Underneath the running board, there are a total of 6 bolts in these spots. The bolts are 10mm in size. Remove the 6 bolts. (These hold the actual step to the steel brackets)

Step 3. with the bolts removed, simply lift up the step and pull it out and set it off to the side. This is the easiest part of the job!

Step 4. Remove the two phillips head screws at the rear wheel well that hold the plastic trim to the well.
Step 5. Remove the phillips screw at the front of the rocker panel just to the rear of the front tire.

Step 6. Using the pry tool, there are 3 plastic inserts that need to be removed from the plastic. 1 at the front, middle and rear.

Step 7. Using the half inch socket, remove the exposed bolts holding the steel bracket to the truck.

Step 8. At this point, you can either remove the plastic panel from the truck or leave it on as you remove the steel brackets. (There are bolts underneath the black plastic that also hold the brackets to the truck. with the plastic out of the way, remove all remaining bolts with the 1/2 inch socket. At this point all steel brackets can be removed and out of the way.


Step 9. Now that the brackets have been removed, line up the plastic panel with the yellow pop in tabs on the truck. I started from the rear of the truck and just worked my way forward.

Step 10. I think it is optional but I did put all of the half inch bolts back into their slots even though they don't secure anything. However, once the plastic is back on, There are a couple of the half inch bolts that do hold the plastic to the truck, make sure these bolts are put back in. Re-insert the black plastic inserts into their slots, they also hold the plastic to the truck. Last, put all of the phillips head screws back into there spots. All done!!

Hope this post helps anyone who was looking for a breakdown of what this process involves. All in all it took a few hours messing with everything. Enjoy
