Rusty762's Project Overlander TJ 8

Rusty762

Adventurer
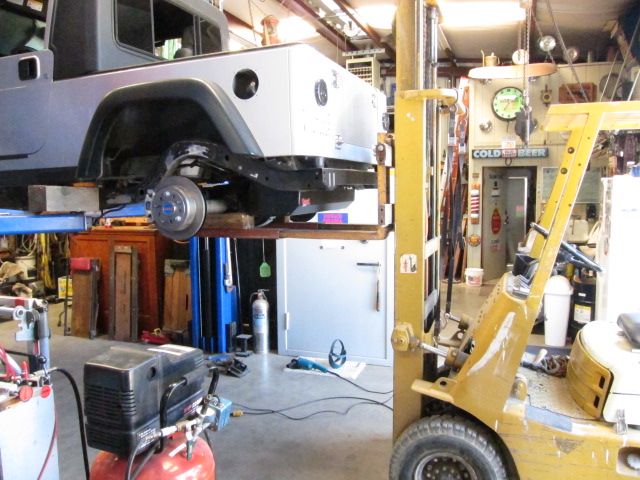
Started on the rear 4 link this last weekend, had to get a little creative to support the rig and have full access to the frame rail to look at some different length arm options and to be able to slide the 4 link mounts back and forth on the frame.


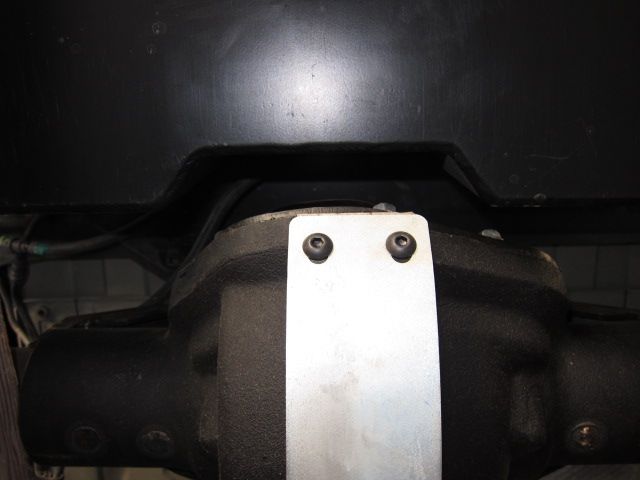
Building the 4 link at full bump, first thing to do was check the UCA mounts on the truss for clearance with the tub. Took some measurements from the nut serts on the frame to check the axle was centered, also took some measurements from the top of the axle to the frame for future reference. I had read that the ideal pinion angle with a double cardan was zero degrees, the pinion should be pointing at the output shaft of the transfer case. There was some difference of opinion on this with my pops and it would cost me a little time later on but more on that later..


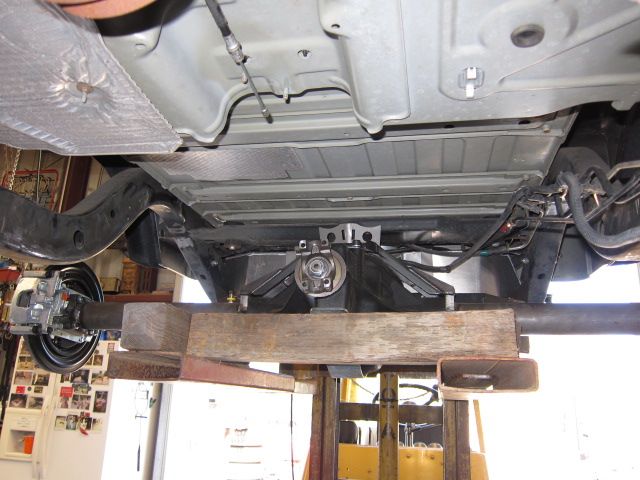
Also moved the axle back, roughly 4 inches from the stock rear axle and still have an inch of clearance with the Genright Crawler EXT tank.


Next up was figuring out where to mount the 4 link front mounts, I started off 3 inches forward of the nut serts on the frame. Clamped them in place and held my DOM inline with the mounts to see what my clearance looked like for the lowers by running them over to the centerline of the axle.


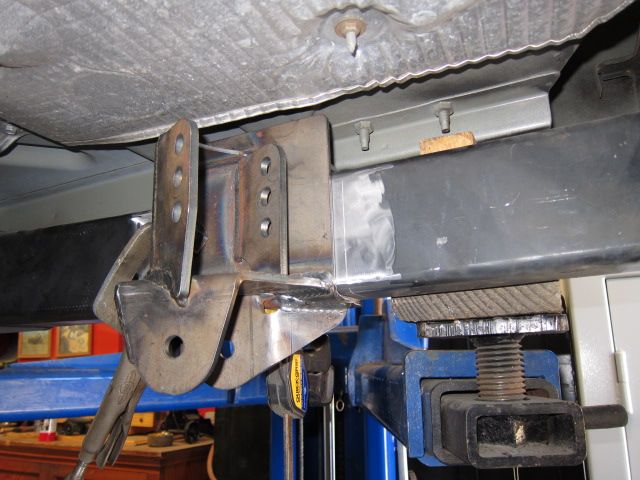
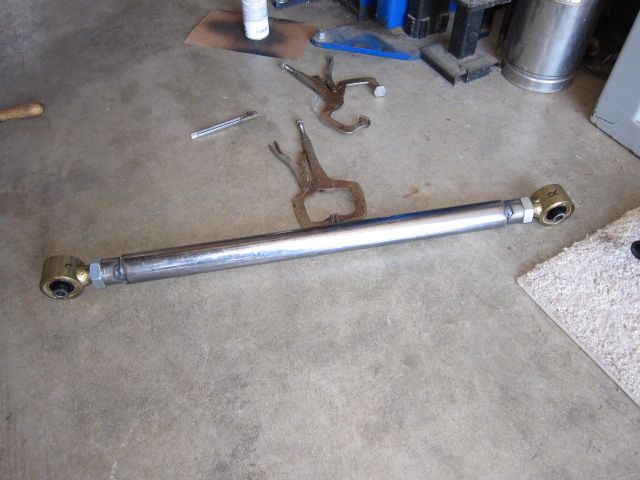
Once that looked good I measured out an equal distance on both side of the axle and tacked the LCA mounts into place. I then set the Metalcloak joints into the DOM and slid bolts into place to see how the angles and clearance looked, then tacked the bungs into place on the DOM. I ordered right and left hand threads to make adjustments easier later for dialing in the pinion angle. To determine the DOM length I put one of the durojoints in at the front LCA mount and then ran the pipe back to the LCA mount on the axle where I had the other duroflex joint bolted in and made a mark on the DOM, pretty straightforward.


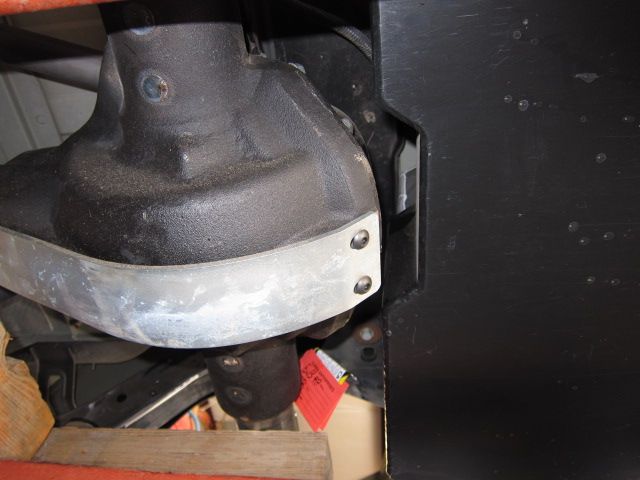
Rear LCA mounts tacked in


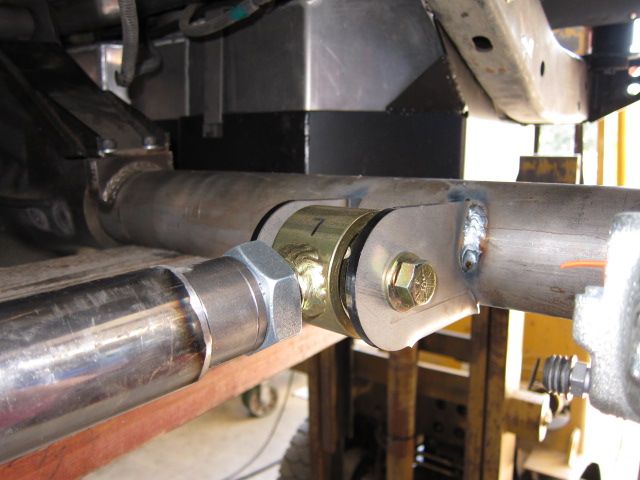
LCA's with bungs tacked

 
Last edited:

Rusty762

Adventurer
Checked the UCA arms and tub clearance with the Rock Jock at full bump, lots of clearance at the frame so I am going to run the bigger DOM that the uppers use on the lowers too.


Next up I tacked the UCA mount to the truss, used the flex joints to get the spacing correct.


Bolted everything up and cycled it


also threw a tire on at my estimated ride height :D

 
Last edited:

Rusty762

Adventurer
Front axle is sleeved, 5:13's are in and ARB with RCV axles is good to go, Synergy HD ball joints check, installed my Barnett diff cover, then wire wheeled the whole thing and wiped it down and painted it.


I was on a mission this weekend to get it done and did not take many pictures, it was 110 degrees at my dads shop in Yosemite! Painted the front shock towers, 4 inch currie coils are in and Fox resy's with Waynes special sauce.


Drilled the drivers side knuckle for the Jeep Co Op tie rod flip, need to install my currie correct lync steering next weekend and finish up the front brakes.
 
Last edited:

Rusty762

Adventurer
Only had one day this weekend to work on the heep, finished buttoning up the front end, installed currie trac bar, currie steering, set the toe in, checked clearances on everything and looks good. One item that is a little perplexing is the steering wheel is 180 degrees off from where it was stock. Going to pull it and reinstall it centered, need to first make sure this wont screw something up with the computer?


Couple weekends ago I screwed up and did not set the pinion angle, removed the LCA mounts and tacked them up proper this time with correct pinion angle, also replaced the upper DOM with 2", same as the lowers. Next weekend installing rear coilover mounts, frenching bump stops, trimming the rear crossmember and installing rear AR.


My dads shop doubles as a museum, here is some boom stick porn. Fully functioning MG 34 with anti aircraft sight, also can use belt fed ammo.

 
Last edited:

Rusty762

Adventurer
To make up for the Boobie tease, one of my favorite over landers. It would be awesome to own one of these someday. This particular one is on a 2004 LJ chassis!


Rusty762

Adventurer
Got a bunch of stuff done this weekend, first on the list was to notch the rear crossmember to allow the Rock Jock 60 to go up another two inches at full stuff. Dropped the gas tank, going to be doing a lot of cutting and welding and no need to put my fire fighting skills to use.


Crappy picture but once we removed the chunk, we slid a piece of 3/8 stock inside which had to be tapped into place with a hammer and then welded the face. Its stronger then it was before.


Next on the list, get the rear anti rock sway bar mounted. Took some measurements for clearance on the upper control arms, c clamped everything onto the frame and installed the torsion bar with arms to check for clearance in the back with bump stops and shock towers.


Next up, after lots of measuring, trying to establish the correct ride height and triple checking everything then doing it again. We cut the rear frame for out boarding the shock towers, my dad had the great idea of using a skilsaw which went through the frame like butter and allowed us to set the correct depth of the cut so we did not cut through the back of the frame.


I was able to move the shock towers back considerably and still leave the EVAP canister ledge in place, California does visual inspection of this device and even though mine is disconnected I want it there to pass smog.


With the tower clamped in place, we tacked the lower rear shock mounts into place on the axle and I bolted the coilovers in place sans coils to check some clearances. Then we tacked a small piece of angle iron onto the back on the one tower, this gave us the angle of the frame and I transferred this measurement over to the other tower so we knew they were the same on both sides.


Albert likes the progress so far!


Threw the coils on, seeing this got me pretty excited I can almost taste that sierra dirt...


I think the dogs are as excited as me!

 
Last edited:

Rusty762

Adventurer
Pushed it out of the shop and put it on the fork lift to check out some flexing.


Chewey always seems to find the unsafe place to be...

 
Last edited:

locrwln

Expedition Leader
Great build. You have defintely done your homework and are installing some great parts.

Jack
 

Rusty762

Adventurer
Looks nasty. Very nasty. I feel dirty

I wish I could get it dirty, couple more weekends!

Chewy...
the Baca dog of danger.!!!. ;)

Shes a handful, got bit by a rattlesnake last weekend, no access to a vet but she pulled through.


Great build. You have defintely done your homework and are installing some great parts.

Jack

Thanks Jack, I spent the better part of a year gathering all of the parts. Cannot wait to get her out on the trail.
 

Rusty762

Adventurer
Interesting weekend at Yosemite, temps were 108-110 over the weekend. There has been an arsonist the last 5 weeks I have been visiting my folks place, fires have been very close to the mountain they live on. My dad has the 30 acres they live on flail mowed so they are safe but some homes have been lost, long story short they caught the fuc**** this weekend, turns out it was a local guy and his wife. Friday night our Queensland healer was bit by a rattlesnake, this is the fourth time she has been bit on the nose, it was late at night and I could not find the snake to determine size, no vets around so we gave her a couple of benadryl. She was looking pretty bad but made it through the night and is doing fine now, if its not the snakes its the Coyotes...

Welded on a couple of Poly mounts for my King reservoirs with adjustable compression, these will allow easy access to the compression knobs and keep them out of harms way.


After talking about several options for bump stop mounting, we came up with a pretty slick and incredibly simple solution. We made a bracket that sits directly in front of the out boarded shock towers that are slotted and a Daystar Poly bump mounts to that. Sorry no pics this weekend, the heat kept the camera out of use for most of the day. Heres a couple of the remaining mounts for the rear anti rock, limit straps and bump mounts, just have to burn it all in this week.


We discussed some options for the rear brake line routing, my dad and his brothers have been building custom hot rods/dragsters since the 70's and my dad has some great ideas for brake line routing. It will keep everything tucked in tight and hidden as much as possible.

http://www.snowwhiteltd.com/index.html


I have the rear Dana 44 from my Rubicon for sale, let me know if your interested. Its in excellent shape with 15,000 miles on it and was never wheeled on other than the one trip I took to Hollister. Includes the stock upper control arms, trac bar, sway bar and Black Magic Wizard brackets that are already installed which allow you to flip the rear brake calipers to the front of the axle if your planning to outboard the rear shocks.


Also have 5 Rubicon wheels with Goodyear MTR's, the spare is brand new never seen pavement. The other tires are 10-15%, four of the wheel are painted Satin black the spare is the stock silver. $500 takes all.


Last edited:

shocku992

New member
First off: as a Diver and Caver my whole life I must say your video's are amazing and I'm jealous of the places you have had the ability to visit!
Second: your build is both incredible and inspirational.
Third: My poor little white LJ Rubi is very jealous of all the attention and building your's is getting. :D
 

Rusty762

Adventurer
First off: as a Diver and Caver my whole life I must say your video's are amazing and I'm jealous of the places you have had the ability to visit!
Second: your build is both incredible and inspirational.
Third: My poor little white LJ Rubi is very jealous of all the attention and building your's is getting. :D

Thank you shocku992, I am incredibly lucky to have visited all of the places I have traveled to so far. My favorite place to be underwater is still in a cave though! Hope you get to start tweaking your Rubi soon, they are very capable rigs stock but do not need much to become incredibly capable vehicles. It has been almost 15 years since I have driven the trails in the Sierras I grew up in and I am counting the days until the rigs done!
 

shocku992

New member
Thank you shocku992, I am incredibly lucky to have visited all of the places I have traveled to so far. My favorite place to be underwater is still in a cave though! Hope you get to start tweaking your Rubi soon, they are very capable rigs stock but do not need much to become incredibly capable vehicles. It has been almost 15 years since I have driven the trails in the Sierras I grew up in and I am counting the days until the rigs done!

I've never had the opportunity to mix caving and diving. It's always one or the other, but it's a dream I hope to one day fulfill.
My little Rubi is getting there. Not anywhere close to yours, I'm still using the standard D44's with chromoly axles shafts sitting on 35's. They are extremely capable little rigs and I'll continue to look to your's for inspiration.
 

Forum statistics

Threads
188,464
Messages
2,905,353
Members
230,428
Latest member
jacob_lashell
Top