Schutt Industries - Xventure Owners

Russ Chung

Observer
In order to remove the water heater from an XV-3 with a slide out galley,
1. Pull the slide out,
2. Disconnect the water lines and the gas line from the bottom of the heater,
3. Remove the top cover from the front box (there are 20 screws holding the cover to the box)
4. Remove the four screws that attach the heater to the slide (two on top bracket and two on bottom bracket)
5. Lift the heater out the top.
To install the new heater, reverse the steps.
Before you buy a new heater, take the cover off the heater and see if the leak is due to a irreparable crack or if it is simply a loose fitting where the water pipe connects to the heat exchanger.
 

Superpanga

Active member
In order to remove the water heater from an XV-3 with a slide out galley,
1. Pull the slide out,
2. Disconnect the water lines and the gas line from the bottom of the heater,
3. Remove the top cover from the front box (there are 20 screws holding the cover to the box)
4. Remove the four screws that attach the heater to the slide (two on top bracket and two on bottom bracket)
5. Lift the heater out the top.
To install the new heater, reverse the steps.
Before you buy a new heater, take the cover off the heater and see if the leak is due to a irreparable crack or if it is simply a loose fitting where the water pipe connects to the heat exchanger.

Starting in on it tomorrow, unless it is freezing cold! Had a hell of a time getting a wrench to those fittings. Schutt said I might have to take the whole galley slide out! I may have to cut the pex lines and replace! I am also adding a blow-out fitting to let me blast air through the system whenever I want to safeguard it. Still haven't decided if it will go back in the same way or less "permanent". At the least, probably go with quick release fittings so that swapping the new unit out, when it fails will be easier! And no matter what I want a bypass to just run water to the faucet.

And the current unit is definitely busted- the top coil bend is completely split. Keep you posted!
 

Superpanga

Active member
Wrestled the unit out without having to remove the galley box as Schutt suggested. After careful consideration I have decided to cut out the whole system, simplify the plumbing to be a cold-water only feed to the faucet with a quick disconnect for serviceability and winterization. I spent the day cutting out the damaged hoses, again, and unrouting the propane and water hoses. If I decide to incorporate hot water, it will likely be as a stand-alone/portable system, connected via quick connects to the feed.

Really disappointed in the systems design here, again. If I was going around again- I'd order the nose box with a door for the galley, and design it from scratch. When I get it re-built I'll share the new system here.

Hoping to get things at least functionally stable for a departure in 4 days! Too cold to be doing this in a NY driveway though!! Brr!
 

03tahoe

Member
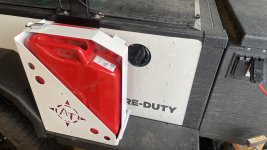
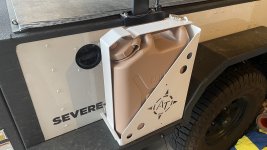
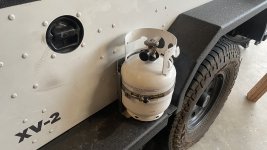
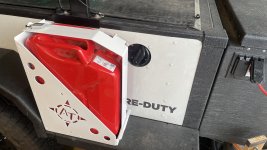
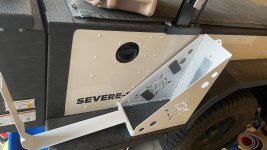
Added on a AT Overland NATO can and Scepter can holder on the front part of the fender. Also move the 5-lb propane tank mount from PowerTank off the RIGd Ultraswing and onto the back side of the passenger side fender. These changes will let me put the LOLO 6-place bike rack on the back of the trailer. This will make it so when I don't have the LOLO bike rack in the hitch receiver the XV-2 tailgate will be clear to open. I'm selling the RIGd Ultraswing as it's just not been as versatile as expected. The big issue has been that the RIGd swing out doesn't clear the XV-2 trailer tongue. I talked with RIGd and even their version that has the swing out offset up more from the hitch receiver still isn't up enough to clear the XV-2 trailer tongue unless you used a drop hitch. However, I need about a 24-inch hitch height for the trailer to be level (thanks the all the ground clearance of the XV-2). I also managed to get the 285/75R17 full size spare squished under the Tahoe. This required deflating the spare and pulling it towards the hitch bar with a big ratchet strap (more on this over on my build thread. Anyhow, I'll be putting the RIGd Ultraswing up for sale. Now for the photos:

AT Overland NATO can holder painted white and bolted down to the fender. Added more foam to the side and some on the bottom to keep the can snug.
YnE5TxfasSBOLVxFs0ud_KHe30l9QWfDIqNpo7gFFvhNZQp6y9Fj-V61WzkJpF8bjxDgAcV4UXRTMThtSDbvIXaypDHEiQeKO1PclxSA7T0QvNB_m4qErLkTxeBpSmETrIHO9P9YUykRGtimARIilkgJlcWyIMUxhZ9g7pVRXz94hDIxdBPlm-6L0WsqWVKrIyDvCtCsLwMyDRJCeR4p0U6V5PK-0jVbjjKnycgGYYzU_8AZXdh9Dm910eIk05FXgL-yzXoE58qpdadJ1uNW03sI4DYu73BHF8GStD3rjxNkOswBnAApA0OSt6h0C4cS1kaajPGJTaq3le1owS0ETSXxahkundZsXChDazCkh90Oj0GWbqC7x_BmH5mKfCkwnN5glOA4ziEVYn9epB8GZISwHiI7kIHRHBYaVLw4srFU-1mvP62cmSjfipIVvm1nB1ILJRlFNve6wo7Ig6WSF44QyZkxQ7YL4vTY7frVNke5rjNQ8pZWr_ZqzqzHAqaIf9sOlH049fgXIffWCy9zAOYK6vQtbAzKuuprru_X6MYT7hGsMR2iiFkLK9bQ7OcK4yLMAUlKo09Kcg_Hd381YAe_JIq9vMIwE3E6HWRgrO7YqpiNxrBNIkukRlNDRTZi3sYnJK2_XA3oiULMHXDKkPZr0vh82-162LtQj6w0AMl8okE_08ITxwO1ueoGW4sHqKUNz2519N_5aKUN1aNwzox12yDRBPtDaD-e-UeZWgLSGB2lc75HtefyUsylJw=w1572-h885-no
IMG_4068.jpg

Cans in and locks on
IbdS_PjEEDaPQWqpwW2mgXE_QrSjl_oThAcSbP8cHvQeI74HusvYVXnN_rpJC8QWR8zpvmVndsukQlfQ93N63HjguNBbGgZiMv_x0zTRZnli2Os4wOGJvW02oYvg8SuXgrow6Crufo7r5k_9Noef1q1sajtH0znUxHGcMN-9ieqEYgmZTGGOd6MZFljVUD0Frd6vWNCq9fDja4tzc5uXTKXhnU2xURsnf94Ao0TBbGpdnUV9-IoeLhgL-tCa3UaUhaLhiJzQ2IIeVjcwIutCz8q3RU6uhHo9DvLNaVK_ez9Jlln2Tft2cQUOdgtaLPlfQf46JBu7KqLfra9NOl0RCc-uMtIBLjH-aQtNWZwfscizzS9qAgX4OSohnbYXEq2GlHB7ppU0W7Q5DA0vDT5nlGj3f4rYF39ubGn40l-etJDXZ83oYBWdObBWLIoMKbHP6DbB7EGS-Ym_EvZXhHAtxOO3-9vc68jq0Y7p4mGhAuYfvRjgfMG0bfVBS3WR283mpe6EVlA4c1UNzKkn50k85hLd0_SW9vFNdW-2CldgHZuCovOYWm-wgWrU1olMkSGjE1U-BanCD0ve_MwUyiggvMUxhu8x-QBOhnS_IMph5Cy_CytVeIQIRJFglh3caR66o1Y1S7bkCmIdNpuLo1iAk58ej69a43xsOxvAkjFbBvT3khdEV9OHhVDUi38sbKQ0TF7DQSNLqvSalIlOvj8s-TWCEUlsqZKlELaPjgPDF623Zkdj6WXZRUB3aYgJMA=w1572-h885-no
IMG_4069.jpg
IMG_4070.jpg

PowerTank 5-lb propane holder behind the passenger side fender
IMG_4071.jpg
SDb2HBLZL4vDQ6f95ci-ZerQnuMsp4JjBy3wTSJ_auzavXxGQM6oAcnLF7MCiQPobv6t2DfhScduioo5BtrZ83xgDSABp-yBGgCHaknj-U0V0ajqWDx6YJap7yKBmZv4qWAGDHmHZhPJK4dDM7bQm2gUF6045Bew34AjNx5F2GFAOnJtiAgz7f1Lcb2c4kEWr0MNy3QddqKc0F0k4stEKU4JmYiXcZREMKvufX81_KzGuh8nkGmJqRiSNg_XhKuHWnS2yvh6gR9CiXojuBqwr_67jSohntvYFSkPmO5L4xkwbx6Z7CrZZmkHvJhEzutqFA-i2jMOj-gB7dUPr1jFYiqlTnhZqVy9MGlcAqysGWhG2taBvj6ZZ-a_2SppF864GFX2q62QXjeAY6Kxtk9kCt_wPmuiCL0wKTlB3vJo8WVqqGvbJW0mOnrCNgZCHbySq32GwZm8EWNk9s2IwaehhOAAOfw6_J2_RQGclXpiGIn7ZMuhGkRbwQaKssQCyOoY5bhQMuFN5Tks4Z9jODx_q7RHvJB90m0876btmxWfuAvOJG7pv7wAtHJTm2eHlcp1f_HpitWlzB8Uu-INFWgj9LgUKt-wx53_IKd_IoBRqZcLtk-5-8xYHM3lkLeceSPQ9BrUzEJdClvs3u6sdq_dEn2ne0L65AAaR6jWV_4C3DQS62F2Zxa01a5VDPy2pRXvvL45iY5GBB06GBXRH0vdt4NQGMpwUZCP9jNSWXtSjUiCldR7kQdZJJn--_l59w=w1572-h885-no
 

Attachments

  • IMG_4069.jpg
    IMG_4069.jpg
    2.9 MB · Views: 2
Last edited:

Dcliddy

New member
Wrestled the unit out without having to remove the galley box as Schutt suggested. After careful consideration I have decided to cut out the whole system, simplify the plumbing to be a cold-water only feed to the faucet with a quick disconnect for serviceability and winterization. I spent the day cutting out the damaged hoses, again, and unrouting the propane and water hoses. If I decide to incorporate hot water, it will likely be as a stand-alone/portable system, connected via quick connects to the feed.

Really disappointed in the systems design here, again. If I was going around again- I'd order the nose box with a door for the galley, and design it from scratch. When I get it re-built I'll share the new system here.

Hoping to get things at least functionally stable for a departure in 4 days! Too cold to be doing this in a NY driveway though!! Brr!
I would like to know how to bypass the hot water feature and just get cold water. I have a 2019 Xventure, purchased 9 months ago, and have all ready replaced the water heater. Wondering if you took any pictures of the rebuilding of the water system. I have no plans on how the trailer is plumbed and no experience in retro fitting propane. Any information would be greatly appreciated.
 

GrifnOg1

New member
Hello,
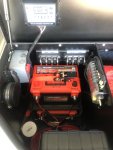
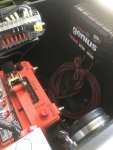
I’m new to this Xv-2 trailer and want to add a second Odyssey AGM battery. Wondering if anyone can help with some correct wiring for a dual battery setup? It has the Zamp solar charge controller and the Genius mini2 battery charger. The Genius mini2 obviously has a second set of positive and negative cables for the 2nd battery, but Is that all you need to do is connect those to your second battery? Or do you also need to use a pair of jump cables to also connect the batteries together? I’ve attached a couple photos for reference.

Any help for the electrically impaired would be greatly appreciated!

thanks,
Darin
 

Attachments

  • 250E9E80-194E-4764-854C-2111073F91F3.jpeg
    250E9E80-194E-4764-854C-2111073F91F3.jpeg
    687.7 KB · Views: 31
  • 2AA5688D-587F-4E3D-931F-88F37F02F539.jpeg
    2AA5688D-587F-4E3D-931F-88F37F02F539.jpeg
    619.6 KB · Views: 28
  • FE07A7CA-BAB6-4E72-A89E-507776A141B8.png
    FE07A7CA-BAB6-4E72-A89E-507776A141B8.png
    2.1 MB · Views: 22
Hello,
I’m new to this Xv-2 trailer and want to add a second Odyssey AGM battery. Wondering if anyone can help with some correct wiring for a dual battery setup? It has the Zamp solar charge controller and the Genius mini2 battery charger. The Genius mini2 obviously has a second set of positive and negative cables for the 2nd battery, but Is that all you need to do is connect those to your second battery? Or do you also need to use a pair of jump cables to also connect the batteries together? I’ve attached a couple photos for reference.

Any help for the electrically impaired would be greatly appreciated!

thanks,
Darin
Hey, my XV-3 came with a dual battery setup. I’ll look at your photos and check my battery setup in the morning. I’ll get back to you with what I find.
 

harryx46

New member
I would like to know how to bypass the hot water feature and just get cold water. I have a 2019 Xventure, purchased 9 months ago, and have all ready replaced the water heater. Wondering if you took any pictures of the rebuilding of the water system. I have no plans on how the trailer is plumbed and no experience in retro fitting propane. Any information would be greatly appreciated.
I am interested in doing this too. Did you find any answers or solutions?
 

JBSTRD

New member
I have a 2015 XV-2. It has the older design, dual 11-gallon water tank rather than the 22 gal single tank they offer now. When I have used a little over half of the water in the tank, I have to either refill the water or Jack the front end of the trailer up to make it so the pump can pickup more water (poor design which is why they have changed to the single tank).

Anyway, I was wondering if anyone has retrofitted from the dual tank to the single tank design on an older XV-2? It is my understanding that I should be able to do this fairly easily since the dimensions should all be the same. Let me know, just curious if this is as easy as it sounds.
 

bbauer

New member
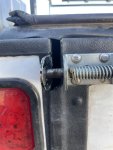
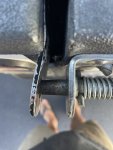
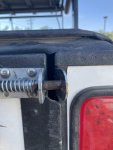
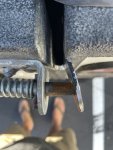
I rented an XV2 because I wanted to try before buying. Camped near Zion then on to Taylor Park Reservoir for 7 days. The firm who rented it to me suggested I use a ratchet strap to hold the tailgate in place as the latch pin plates were bent outward. I’m glad I did because, after an 8 hour drive, the pins unseated and the strap was the only thing holding the tailgate up. I have no idea how old the trailer is, how many times it’s been used, whether the plates got bent due to one event, or heavy use over time.
.EFC8FE6B-A289-42ED-9DAB-78BC8C9943D1.jpeg3E91F51E-CC16-4360-8DD8-3B4F506CAD12.jpeg15D62D87-B6CA-4748-ACDE-85AA4B8E0BD5.jpegAD34F1ED-B62C-40B6-9B20-2B9898994E2D.jpeg

Anyone have any issues with their tailgate latches?
 

Forum statistics

Threads
188,072
Messages
2,901,827
Members
229,418
Latest member
Sveda
Top