Summer of '69- Econoline Poptop Resto-Mod

Wes!

Member
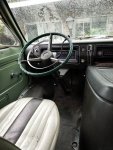
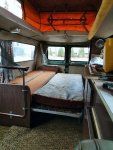
Well, so far it seems like the issue with the landlords daughter so far is a bunch of smoke and mirrors. NO letter yet, and no visit from them, so its back going full steam ahead working on this thing. As requested, enjoy some shots of the inside of this beast, I think the layout of the bed in the back will stay similar to what it is now, as it will give me room under the bed for a water tank and possibly the house battery. The cabinets are going to be redone in gray melamine and rearranged to add in a fridge and cooktop. Currently it has an icebox and a hand pump faucet and sink.
29663153727_61acecc023_z.jpg43882282134_5c3484c30d_z.jpg

As for progress on the engine, crossed the following items off the list:
  • Convert Distributor points to a Pertronix system
  • New hotter coil setup
  • 9mm plug wires and some new plugs. The plugs are basic copper ones for now, will be swapping over to a better setup after its been on the road and burnt some of the crud out
  • Painted and installed new Water pump
  • Painted and installed new thermostat and housing
  • Installed freshly rebuilt carb
  • Cleaned and painted Valve covers and installed with new gaskets
  • Pulled off alternator brackets and wirewheeled the rust off before hitting them with a coat of chassis black
  • Wirewheeled and painted the oil fill tube
  • Installed new start solenoid
  • cleaned and repainted the air cleaner housing and installed new air filter
  • installed new PCV valve
Things left before test firing:
  • Replace starter
  • Check Timing
  • Drop oil pan to clean and paint.
  • Put in new oil with some MMO
  • Install new battery and battery Cables
Im hoping this next weekend I can mostly button up the engine enough to pour some marvel mystery oil down the cylinders and try turning it over to see if it fires. Unfortunately the lady I am getting this from is declining in health, so I really want to atleast get it running for the first time since 1994 for her to see. Its very apparent this vehicle was well loved by the family, as not only do I have handwritten records of every oil change and all the work done since 1971, but when I cracked the valve covers off the clean them I was amazed at how clean the engine was. Zero traces of any gunk buildup or sludge at all, it looked like a brand new engine.
 

Wes!

Member
Old vans are just plain cool. Hope you get 'er back on the road soon.
Thanks, it definetly seems to get alot of love. And I'm hoping things continue moving fast, although I will be a little bit at the mercy of weather since I dont have a garage. Unfortunatly they are forecasting a good amount of rain and thunderstroms in seattle this weekend, so instead of being outside working on getting it running I may be stuck inside bending new brake lines and designing up the cabinet layout in CAD.
 

Abitibi

Explorer
Hopefully you can bring this old girl back to life! I have a couple very similar vans. Got a 69 and a 70 Econoline, both with popup roof. But just like you, mine are projects for when I'm not too busy.

Good luck!
 

Wes!

Member
Well, Its been a hot minute and I haven't been keeping up with updates on this thread. So here's where everything stands currently.

Got a letter from my landlord (turns out it was actually his daughter pretending to be him, but didn't know at the time) with a doctored copy of my lease included rules against more than one vehicle and prohibiting even washing your car. I wanted to fight it at first considering I had a copy that excluded such rules, and also since they totally screwed up and put the wrong name down when they "forged" my signature (Guess my names Bob now) but I was offered a spot next to my buddies shop on his property so I just took the easy road and moved it.

Since then I have made some really good progress, most importantly the old girl runs and drives now! After sitting since the early 90's we have since made it up to a whopping 35 mph. It would have happened sooner, but there was a major roadblock with the gas tank. It was stored with about 10 gallons of gas in it, so the tank was a hellscape full of rust and varnish. Unfortunately I guess nobody wants to make gas tanks for second gen Econolines anymore, so first attempts were made at using acetone and distilled white vinegar to clean the tank. At first it looked good, but later turns out it only took off one layer of crud, and the wonderful cleaners in gas today loosened up another layer and filled the carb up and clogged it.

Luckily the 3rd gen tanks are a fairly close fit, so with a bit of custom fab a new tank will be going in this weekend, so I don't have to drive around with a boat tank strapped to the front.

The brakes have also been fully gone through, and I was lucky enough to source the bracket to install a brake booster, so its less of a deathtrap now. The 11 inch drum brakes from and rear are actually pretty decent now.


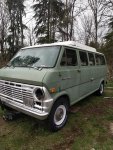
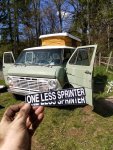
Since I know that such posts are never complete without pictures, here is a couple pics off my phone of how she currently sits.

48359033162_e9c57c7f61_z.jpg48358897776_d220c25f72_z.jpg


And as I was writing this, I got an email with a tracking number for the paint. I have a full week off in august, and will be respraying the outside to something a bit better than the current faded and oxidized paint. So stay tuned for more here soon.
 

eblau

Adventurer
Very cool, I'd love to see that original paint saved but at least your giving this van a new life.
 

TomsBeast

Member
Very cool project.... I love the old conversion vans, and yours has a story! Having rescued a few older vehicles myself, I might have suggested a different set of priorities (I like to get them fired up asap, then make my list but you are on the right track.
 

Wes!

Member
Very cool, I'd love to see that original paint saved but at least your giving this van a new life.

I was also hoping to be able to just buff it and have it look good again, but unfortunately there are some dents that I need to pull and a few places where some surface rust is visible on the paint.

Thankfully I was able to find a decent green metallic that matches the original color pretty well, so it will be staying a similar green. But I have seen a few of these vans that were done up as a two tone on the body, and I became a fan of the idea, so under the main style line that runs the length of the van about a third of the way up will be painted with Ford Whimbleton White, and then green on the upper body. The roof will also be resprayed back to white as well. I want to try and keep the exterior styled ina classic car way, but the interior will be getting some updates to modern equipment for livability.

Very cool project.... I love the old conversion vans, and yours has a story! Having rescued a few older vehicles myself, I might have suggested a different set of priorities (I like to get them fired up asap, then make my list but you are on the right track.


Thanks! It has alot of story to it. Not sure if I mentioned it before but the people who bought it lived the OG vanlife. They worked for a local university and basically took every chance they could to take it out, running on a budget that they usually stayed withing a few dollars of. They took it all over, including driving up to Alaska on the Alcan.

And I was able to get it running pretty fast after getting it, they took insanely good care of it for all the years they owned it up until they got too old to use it anymore and stored it in a barn. I have detailed records of every oil change or work done on the van back to 1970. I guess it was the first major purchase they made after immigrating over to the US from Germany, so there was alot of pride held in owning it.
 

dgoodsy

New member
I'm following along as I am about a year behind on a very similar project. The van I bought is the same color, but has a fiberglass high top rather that the turtle top. I look forward to updates here!

Sent from my SM-G930W8 using Tapatalk
 

Abitibi

Explorer
Since you like the 2 tones and are getting ready to paint here's a picture of a couple of my vans! :D
c4c12307d9d2629820ecdce65aa2b420.jpg


Sent from my SM-G955W using Tapatalk
 

Wes!

Member
Since you like the 2 tones and are getting ready to paint here's a picture of a couple of my vans! :D
c4c12307d9d2629820ecdce65aa2b420.jpg


Sent from my SM-G955W using Tapatalk


Wow, those things are pretty sweet. I really like that blue color, if I was going to go for a full blown color change respray I probably would have gone down that road.

And well, Im in for a hectic week here soon. Bunch of stuff is showing up every day and the list of things Im trying to pack into that 9 day stretch is growing. Besides just doing the paintjob Im going to take advantage of my buddies lift and do the axle pivot and radius arm bushings, rebuild the leaf springs, and lay down sound deadening and carpet in the cab.
 

Abitibi

Explorer
Wow, those things are pretty sweet. I really like that blue color, if I was going to go for a full blown color change respray I probably would have gone down that road.

And well, Im in for a hectic week here soon. Bunch of stuff is showing up every day and the list of things Im trying to pack into that 9 day stretch is growing. Besides just doing the paintjob Im going to take advantage of my buddies lift and do the axle pivot and radius arm bushings, rebuild the leaf springs, and lay down sound deadening and carpet in the cab.

That's gonna be a full week! I'd save the sound deadening for last as it can be done at any time. Looking forward to your updates!
 

Mwilliamshs

Explorer
...Besides just doing the paintjob Im going to take advantage of my buddies lift and do the axle pivot and radius arm bushings, rebuild the leaf springs, and lay down sound deadening and carpet in the cab.

The "all-thread bushing press" is a major time and pain saver. Especially for axle pivots and leaf springs.
 

Wes!

Member
That's gonna be a full week! I'd save the sound deadening for last as it can be done at any time. Looking forward to your updates!

Yeah, Im sure there will be plenty of caffeine needed to pull it all off, especially since I pulled the trigger on a front swaybar kit this morning. And will probaly swap out the steering rag joint to be safe since it looks the original rubber from 1969. But Im still sort of young enough to pull off a few all nighters. At the very worst I can just pull the bed out and pass out as needed. Just once the booth clears of all the solvents though.

And yeah, the only sound deadening that I will be for sure changing is the stuff on the firewall around the "engine bay". I'm spraying the firewall under the hood with a satin black chassis paint to encapsulate any rust (nobody took the battery out when it was stored, so it casued some mild corrosion) and to refresh it. Since I'm already going to be in there I want to swap out the original insulation mat with some new stuff. Take care of it now whiles its easy instead of waiting for it to start sagging bad and then having a headache taking it all apart. The doghouse will also get the same treatment on the inside.


The "all-thread bushing press" is a major time and pain saver. Especially for axle pivots and leaf springs.

Yeah, I already used the leftover allthread I had from making new brake linkages to make a press. I'm hoping the metal sleeve is in decent enough shape so I dont have to also chisel that sucker out. But atleast the moog replacements I got have it as well just in case.
 

Forum statistics

Threads
186,866
Messages
2,888,834
Members
227,437
Latest member
Top Jimmy
Top