Summer of '69- Econoline Poptop Resto-Mod

Mwilliamshs

Explorer
...Yeah, I already used the leftover allthread I had from making new brake linkages to make a press...

Allthread is generally ungraded chinesium garbage. No way I would use it for brake linkage without grossly oversizing it and reinforcing it with sleeves.
 

Wes!

Member
Where is this awesome rig in WA? Can't wait to hopefully see it cruising around!

I live in Burien, but currently the van is stored in Carbonado (If you dont know it, its a town of 600 people right next to rainier. Its where I grew up)

As for seeing it cruising around, during the winter you will see it out on the Skagit or the OP chasing steelhead. During the summer it will be all over the state chasing trout on tiny blue lines, with a few excursions to some bigger rivers if they are fishing good. I might make it to a few overland events in Washington next year just for fun.

Allthread is generally ungraded chinesium garbage. No way I would use it for brake linkage without grossly oversizing it and reinforcing it with sleeves.

The main part of the brake rod is a internally threaded steel shaft from mcmaster. The threads are blind cut about 1 1/4" deep and the rest of the shaft is solid steel. Unfortunaly the original 6in one I ordered was too long, and the next smallest length is 3". So to add a bit more length (it should be right at 5" overall length) I got some 5/16" threaded rod. Between the clevis on one end, the heim joint on the other, and the jam nuts there is maybe 1/4" of exposed threaded rod. I will keep an eye on it but so far I have a feeling that it will hold up from bending pretty well.
 

Mwilliamshs

Explorer
...and the next smallest length is 3". So to add a bit more length (it should be right at 5" overall length) I got some 5/16" threaded rod. Between the clevis on one end, the heim joint on the other, and the jam nuts there is maybe 1/4" of exposed threaded rod. I will keep an eye on it but so far I have a feeling that it will hold up from bending pretty well.

Really hard to believe you added a heim to one end, a clevis to the other, and didn't exceed a 2" overall increase in length, much less jam nuts and a gap. The garden variety 5/16" threaded heim is 1-3/8" from center-of-the-eye to its base and a "short" clevis is 1.26" and a standard is 1.89", again base-to-eye-center. Assuming a short clevis, that's 2.635" without jamnuts, which are typically 0.180", so a pair of them brings the total to 2.995". Amazing that you shaved ~1.24" off that. Didn't you need 4 jam nuts?

I've built a lot of linkage. 5/16" is the typical size for Harley Davidson shifters.
 

Myvanisbetter

Observer
I live in Burien, but currently the van is stored in Carbonado (If you dont know it, its a town of 600 people right next to rainier. Its where I grew up)

As for seeing it cruising around, during the winter you will see it out on the Skagit or the OP chasing steelhead. During the summer it will be all over the state chasing trout on tiny blue lines, with a few excursions to some bigger rivers if they are fishing good. I might make it to a few overland events in Washington next year just for fun.

I live about 20 min from there! Spent many a night up the logging roads at the end of town!
 

Wes!

Member
I live about 20 min from there! Spent many a night up the logging roads at the end of town!


Oh nice, yeah those logging roads are a favorite old stomping ground. My parents property growing up was on the highway just past town, so we were backed up to the hill that they were on the top of. In fact I think there are still a few old mountain bike and motorcycle trails I blazed when I was younger up there.

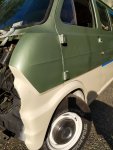
And well, I almost finished the paint this past week, but on sunday I had issues with my paintgun and had to call it before I could get the last coats. But I do have a bit of a teaser as to what the final product will roughly look like:

48631829246_1eaed9ce9f_z.jpg

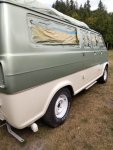
The "Looks like tan but its supposed to be Ford Whimbleton White" has been fully sprayed. But the green metallic only has a single coat on it in this picture. You can still see some of the gray primer under it showing through, so with more coats the "blotchy" look of the metallic will even out and the color will darken as it gets more coverage. It's def not a super quality type of paintjob, but it will work pretty well for a camping vehicle. Some work with a polisher after the single stage paint has cured will also bring out some more gloss to maybe make it more of a 5ft paintjob instead of a 10ft one.

if that doesn't work I will just make sure to only take photos of it while there's a really nice backdrop,so people aren't just focused on it ?
 

Abitibi

Explorer
Paint looks great as is! Can't wait to see it all done for sure!!! Do you have a front chrome grill for it?
 

Wes!

Member
Paint looks great as is! Can't wait to see it all done for sure!!! Do you have a front chrome grill for it?

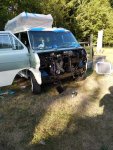
Thanks, and yes I have the chrome grill with extensions instead of the painted one. I need to give a good cleaning and some polishing before I put it back on there, but otherwise its in good shape.
 

Wes!

Member
Well, both colors are on the van now. The only thing left to do will be to add in some gold pinstripe along the two tone shift line once the paint has cured for a couple weeks, and then hit it with a DA polisher. It may be a bit before that happens since I really want to get this on the road, and that's less of a critical item to achieve that.


48673220117_6c19fd923c_z.jpg


I also tore down the front end to brush on a couple coats of some chassis black paint to cleanup the firewall area. Next step in assembling it will be to add in replacement sound and heat insulation (The old glass mat was starting to detach and droop) and then wire in the relay setup for cooling fans for the radiator and the trans cooler ot the sensors I installed.

48673047291_85938c3248_z.jpg


the last major hurdle with getting this road trip worthy in my eyes will be a new exhaust system. Im wokring on planning something out that will help the engine breathe better (also helps with mpg on older 302's) but not cause a huge amount of in cabin noise. Im also debating back and forth on going with headers, and possible a dual plane intake manifold to add a bit more power (The doorjam tag states it was rated for 148hp to the wheels from the factory)
 

Mwilliamshs

Explorer
...Im wokring on planning something out that will help the engine breathe better (also helps with mpg on older 302's) but not cause a huge amount of in cabin noise. Im also debating back and forth on going with headers, and possible a dual plane intake manifold to add a bit more power (The doorjam tag states it was rated for 148hp to the wheels from the factory)

Never seen a to-the-wheels hp number from Ford in this era. That's probably a gross hp rating, being pre-72 and would be just the engine on a dyno, no accessories, unlike the post-72 net hp figures.

The factory intake is already a dual-plane manifold.

Headers are louder than manifolds inside the cabin.

A single 2-1/2" exhaust will support your engine's full potential, even upto 225hp so long as the bends aren't anything way out of the ordinary. There's a great new video on muffler comparisons on MotorTrend On-Demand's Engine Masters show.
 
Last edited:

Wes!

Member
Never seen a to-the-wheels hp number from Ford in this era. That's probably a gross hp rating, being pre-72 and would be just the engine on a dyno, no accessories, unlike the post-72 net hp figures.

The factory intake is already a dual-plane manifold.

Headers are louder than manifolds inside the cabin.

A single 2-1/2" exhaust will support your engine's full potential, even upto 225hp so long as the bends aren't anything way out of the ordinary. There's a great new video on muffler comparisons on MotorTrend On-Demand's Engine Masters show.

Its totally possible I misread it, I will try and grab a pic of the door tag this weekend.

And I do alot of pre-planning tasks for work, so sometimes that blends into personal projects. Half of me is leaning the direction of trying to do everything I can now to increase the drive-ability of the van, but the other half is just wanting to button it up and get it on the road and sort it out later. The concern about the power output is due to how Washington is just laid out. There are lots of great places to go on the east side of the state, but to do so you have to go over any one of a few mountain pass highways. So adding a bit of power to it is appealing because I wont be that guy in the far right lane driving an under-powered and overloaded vehicle causing issues.

I also managed to stumble upon a local shop that has a distributor machine, so I can have them test and recurve it so that I am getting full advacne at around 65-70 and have the proper timing at idle and startup. I know for sure this will happen because it will be a big help when it comes to how it drives and cold starts. I am dealing with a strictly manual cable choke on this guy so she can be a cold blooded beast at times.

As for the exhaust the plan starting to form is to go with a 2.5" dual back from the manifolds to a flowmaster super 50 and then leaving the muffler to a single 2.5" exit. Funny you mention engine masters, cause that show and roadkill definitely helped a bit when it came to this project.
 

Mwilliamshs

Explorer
You would only want "full advance at 65-70" under high vacuum (low load). Advanced timing while climbing a grade on the highway is a terrible idea. Advance is increased by rpm and vacuum, not mph, nor even relative to mph. #eyeroll

You're not going to get enough additional power from that drivetrain to matter much but consider this, if it could climb the hills and drive cross-country in 1969, it could do it today. Just needs to be maintained to its original standards. If you want it to do more or do it faster than in 69, you should consider the whole package. More power needs more cooling. Higher speeds need better brakes. And so on and so on.

In a totally stock but well-tuned v8 Ford van loaded to the gills, you'll pass semis, VWs, RVs and boats going up the hills. That should be plenty.
 
Last edited:

Wes!

Member
You would only want "full advance at 65-70" under high vacuum (low load). Advanced timing while climbing a grade on the highway is a terrible idea. Advance is increased by rpm and vacuum, not mph, nor even relative to mph. #eyeroll

You're not going to get enough additional power from that drivetrain to matter much but consider this, if it could climb the hills and drive cross-country in 1969, it could do it today. Just needs to be maintained to its original standards. If you want it to do more or do it faster than in 69, you should consider the whole package. More power needs more cooling. Higher speeds need better brakes. And so on and so on.

In a totally stock but well-tuned v8 Ford van loaded to the gills, you'll pass semis, VWs, RVs and boats going up the hills. That should be plenty.

You are correct, you want your timing to be most advanced when your vacuum is high and when your under a light load, like cruising along on a highway. But it needs to back off when you put your foot in it and the vacuum drops. Good thing the distributor has a vacuum advance on it, and even better they will tune that for me when they re-curve the distributor. And yes the mechanical advance will be based upon engine rpm not road speed, but most people also probably don't know what the cruising rpm is for a van that's setup like mine (if your curious at 70mph with the non-OD C4, the 3.5:1 gears in the rear end based upon the axle tag, and the tire size I'm running it will be at 3k rpm) so I said a mph figure instead. The other advantage is that they can set the initial timing to a better number and still have the proper amount of total advance. Sure I'm going off of what they recommend, but I feel comfortable considering the shop has been run since the 30's by the same family, and they seem to usually have a pretty good lineup of old cars in for work (based off the facebook) coming in for service.

Cooling has already been fairly well addressed, the old radiator was laying on a table outside for years so I swapped it for a heavier duty aluminum unit. I also found a re-pro 6 blade fan to replace the old 5 blade so more air is getting moved. I also have a thermostatic switch (220 degree on and 185 degree off, the thermostat installed is a 180 degree unit) installed into the t-stat housing so I can put an auxiliary pusher on the front as well. I also ditched the old transmission cooler that was in the radiator and installed a B&M supercooler on the front. There is also a thermo switch in the pan that will kick on a 6in fan that I will be adding to the front of the cooler as well to keep the C4 happy. Other than that all the other components have been fully replaced, and I have run some thermocure through the system and flushed it out to get rid of any gunk and rust that I can(short of having the block hot tanked)

Brakes have been addressed by adding in the booster, before they were all manual drums. Like the cooling system the brakes have pretty much been fully replaced, including lines, from front to back. I haven't had a chance to fully bed the shoes in yet, but in the small amount of driving I have done around the property its stored on if you stand on the brakes at about 20-25 it feels like the back ends about to come off the ground (Could be the fact your sitting over the axle). The eventual plan is to use a kit from scarebird brakes(uses calipers from an AWD Astro and rotors from a GMC truck) that allows you to convert the fronts to disc. The front drums are the swedged on style from ford, and I don't really want to have to carry around spare wheel-studs and a swedging tool. Not to mention that the front drums are getting harder to come by, and I'm willing to gamble the vast majority of brake shops wont have a clue how to get the hubs off properly. If I had known about the conversion kit like 9 months ago when I did the brakes I would have just went straight to that setup.

And sure, I know it didn't have any issues in 1969, but things have changed a bit since then. The original camper build-out was super simple. There was no onboard storage for water, propane, or a house battery of any kind. It had an icebox instead of a fridge, and no cooking equipment of any kind. It basically was just some cabinets and a bed. So there will be some weight added to the setup over whats in there now. Sure, you could argue I don't need to add in stuff like a electric fridge, tanks for water and propane, and a cooktop. But I would end up just bringing that stuff along with as extra gear taking up storage space anyways. And in talking with the lady who was the original owner, so mentioned how it just cruised great over the pass doing the speed limit, which at the time was 55, nowadays the speed limit is 70...

And yes, I'm planning on addressing how adding in weight will effect the suspension. There is a shop nearby that can build me custom spec leaf springs and coil springs. So once I get the buildout done I just have to get the corner weights and send them what I want ride height and quality wise. I also measured the extended and collapsed shock lengths and looks like I can get some Fox 2.0 units that will fit, so I can get a full set on all corners valved as well.
 

Mwilliamshs

Explorer
Initial advance is set by rotating the distributor in the engine, not on a distributor machine. The number of fan blades has less impact on how much air is moved than the pitch of the blades. The transmission will be unhappy in cold weather without the radiator's in-tank transmission loop.

Good luck with this cool and interesting build. Enjoying this thread!
 

Wes!

Member
Initial advance is set by rotating the distributor in the engine, not on a distributor machine. The number of fan blades has less impact on how much air is moved than the pitch of the blades. The transmission will be unhappy in cold weather without the radiator's in-tank transmission loop.

Good luck with this cool and interesting build. Enjoying this thread!


Yup, I will see what they recommend and will set the initial timing at that. The adjustment of the curve from there is what I'm more wanting. I think stock they put it at 6-8* of initial, but I have been seeing a lot of recommendations to run more in the range of 12* initial. If they take that into consideration when modifying the curve then they can make sure I wont get too much mechanical advance early on in the rpm range by changing springs and bushings so I don't have issues with pinging under heavy load. The fan is based off one that ford put in vehicles that had AC back in the day. It was designed to move more air to accommodate the extra load on the engine from AC and to also push more air to make sure the AC condenser had sufficient airflow.

I'm curious about the trans thing, are you saying that I will have issues with the fluid staying too cold for the trans to work properly? I know people have had issues when they put a big oil cooler with no thermostat on an engine and they burn up bearings because the oil never gets to a proper temp. With ATF is the concern over it being too cold and effecting the viscosity? Or is it that the trans is expecting a certain amount of fluid expansion at temp to bring the level up in the system (kind of like how they instruct you to check fluid level when its at operating temp instead of while cold)


And thanks, its been an interesting ride for me so far. Lots of learning and discovering as i go. Sometimes I get frustrated with having so much to do just to drive the damn thing, but I'm holding out hope it will feel better to have something built by me instead of buying it off the rack(At least until something I totally screwed up blows up on me,)
 

Forum statistics

Threads
186,865
Messages
2,888,833
Members
227,437
Latest member
Top Jimmy
Top