Suty's 5 Gal Air Tank Mod. UPDATED 1/16

Suty

Adventurer
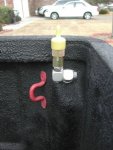
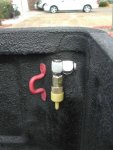
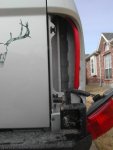
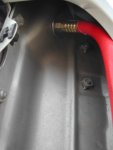
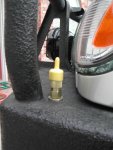
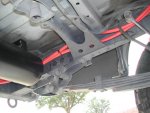
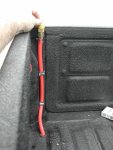
OK Gang, I am laid up at the Casa with Pneumonia, Too many fires and too little sleep I guess. Anyways, I finished the Tank setup and wanted to get pics out to ya. I now have two air ports, one on the front bumper and one in the rear. My Extreme Air Compessor puts out 150 to the tank @ 4 cfm. I was wondering if anyone had a better idea for my rear air port? Let me know what ya think....Tu Compadre, Suty PS. Yeah, I know I need a new tailpipe.
 

Attachments

  • Air Tank Mods 001 Quick e-mail view.jpg
    Air Tank Mods 001 Quick e-mail view.jpg
    73.5 KB · Views: 108
  • Air Tank Mods 002 Quick e-mail view.jpg
    Air Tank Mods 002 Quick e-mail view.jpg
    83.4 KB · Views: 144
  • Air Tank Mods 004 Quick e-mail view.jpg
    Air Tank Mods 004 Quick e-mail view.jpg
    81.4 KB · Views: 118
  • Air Tank Mods 005 Quick e-mail view.jpg
    Air Tank Mods 005 Quick e-mail view.jpg
    93.3 KB · Views: 104
Last edited:

flyingwil

Supporting Sponsor - Sierra Expeditions
Looks Good!

Looks Good Suty!

As for Ideas for the rear, I tend to with tamper free locations. I would follow the gas filler tube on up and make your connection on the plastic pice behind the filler door (Its where I ran my dif breather... Plenty of room in there for the fitting. Or since the Lic. Plate is centrally located (Depending on the length of your hose) you could mount it behind one of the flip up lic. plate brackets, and recess the fitting, then it is hidden away and tamper free.

Either way looks like a great set up! :clapsmile


Wil
 

p1michaud

Expedition Leader
Great work.

Suty said:
I was wondering if anyone had a better idea for my rear air port? Let me know what ya think....Tu Compadre, Suty PS. Yeah, I know I need a new tailpipe.

Suty,
Take it easy and get better. I had seen this mounting solution for the quick disconnect at the rear. It’s not tamper proof, but then again if you don’t leave your system charged all the time what can somebody mischievous do with a quick disconnect? It would be convenient to access. It might be prone to damage if you tend to use your rear bumper as a step as well. Just another option for you. The info was taken from this thread.

Do you know how long your air tank is out of curriosity?

Cheers:beer: ,
P
 

Suty

Adventurer
P1, I will have to time it for you. When I initially filled it to check for leaks it did'nt seem to take but maybe 3-4 min. I will time it. The only thing I am worried about with the bed mount, will be when I am loaded and things sit on it or hit it,it being the air hose. I'm thinking on this though.... Tu Compa, Suty
 

The BN Guy

Expedition Leader
Looks pretty snazy! Never have I seen red air line before. Anything special there?

BTW, I noticed no easy way to drain the tank. Do you have a filter on it or just unbolt it, rotate it, and then drain?

Flyingwil - can you explain what you mean with the flip-up plate? I'm in a design rut on my rear license setup and could use some ideas.
 

datrupr

Expedition Leader
Suty, nice clean install, looks good. I think you will want to move the rear to a different, more secure location, as under load something in the bed might crimp, cut, or damage the air line. On another note, hope you are feeling better soon.
 

Scott Brady

Founder
As always, a very clean installation.

Did you have room on you rear bumper to mount the chuck? My rear chuck mounts inside the tool box, as my front chuck location and length of hose allows filling of all four tires.

I love the output of the ExtremeAir. All four tires from 22 to 40 psi in 12 minutes. :victory:
 

njtaco

Explorer
Open to sugestions?

The tank looks great! I'm jealous. :eek:

I like the front location, as long as the cap will stay on. Can it be tethered to prevent loss?

I agree with the others about the rear location, need to guard it somehow. I like the license plate idea. Might even be able to attach right to the center port on the tank, so no need for hose at all.

A low-point drain should probably be part of the plan, like BN Guy said. Maybe weld a point on the bottom with a pipe plug with a hex key? :confused: (So it sits flush.)

Would 90 degree fittings coming out of the tank take some of the stress off those hoses in the rear? :confused:

Does anyone use valves to isolate a damaged line, to avoid rendering the air system useless, or at least have pipe plugs/caps the right size to remove said damaged line?

I hope this doesn't come across as critical... it isn't! Just what came to mind.

Hope you get well soon. :)
 

Suty

Adventurer
Rear Air Port Issue Fixed?

Ok, Everyone I fixed the rear air port I think? Let me know what you think of this setup, cause it's the one I am going with. I will take care of the other issues one at a time. As far as the yellow caps go, they come on our scott Air masks for the FD so I have lots of them in case of loss. Yeah, I know I need to work om a drain system and cutoffs. I'll get there.....Let me know what ya think of the improves. Tu Compa, Suty
 

Attachments

  • Air Tank Mods 009 Quick e-mail view.jpg
    Air Tank Mods 009 Quick e-mail view.jpg
    92.5 KB · Views: 87
  • Air Tank Mods 006 Quick e-mail view.jpg
    Air Tank Mods 006 Quick e-mail view.jpg
    95.8 KB · Views: 86
  • Air Tank Mods 007 Quick e-mail view.jpg
    Air Tank Mods 007 Quick e-mail view.jpg
    62.2 KB · Views: 79
  • Air Tank Mods 008 Quick e-mail view.jpg
    Air Tank Mods 008 Quick e-mail view.jpg
    52.8 KB · Views: 69

p1michaud

Expedition Leader
Tank size/length

Suty said:
P1, I will have to time it for you.

Suty,
I meant how long is the tank (i.e. tank size in inches) as opposed to fill time.

I like the new rear quick disconnect. Looks great and functional as well.

Cheers :beer:,
P
 

Suty

Adventurer
P1, Gotcha now, it is 34" long 7" in Dia with 6 1/2" ports and 1 1/4" port. I hope this helps. made by Firestone and bought on Ebay. I like the New rear port idea I came up with much better. Tu Compa, Ken
 

erin

Explorer
:clapsmile :clapsmile

Very slick going behind the rear lights. Gives me some ideas as to how I might set up mine when the time comes.
 

njtaco

Explorer
Rear port

The new rear port looks slick!:clapsmile That fitting swivels in "all" planes, right? I used them on air tools in the shop. They really kept the kinks out of the lines. Did you use a bulkhead fitting, or does the line stay put without it? Either way, nice install. (Hope you don't mind if I copy it someday...);)
 

Suty

Adventurer
njtaco said:
The new rear port looks slick!:clapsmile That fitting swivels in "all" planes, right? I used them on air tools in the shop. They really kept the kinks out of the lines. Did you use a bulkhead fitting, or does the line stay put without it? Either way, nice install. (Hope you don't mind if I copy it someday...);)
Copy Away my Good Man, That's what this place is for. Hell, I'm still trying to COPY,well let's see: Scott, Bajataco, Flyingwil, etc,etc....
 

Forum statistics

Threads
188,456
Messages
2,905,182
Members
230,428
Latest member
jacob_lashell
Top