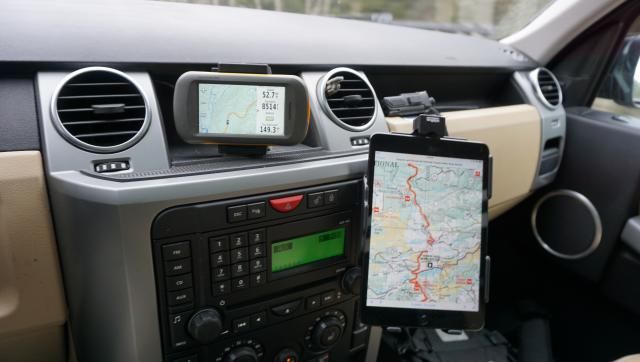
Tablet mount in an LR3

DiscoCO

Observer
Has anyone mounted anything to the small shelf in front of the factory NAV/cubby and on top of the stereo of an LR3? I was looking at screwing a Ram mount on the 2"-ish shelf and mounting an iPad mini to it for NAV. I have seen someone mount the mini in place of the factory NAV, and I realize there are other mounts to the side of the stereo/climate control, but was looking to mount it just a bit higher on the dash. I don't think the mini and the mount would be more than a pound so weight shouldn't be an issue.

Thanks for any advice!
 

Derel1cte

Adventurer
I use this space for an iPhone 6 mount but I am thinking about upgrading it to an ipad mini to stay in the truck permanently. I bolted a 1" ram ball inside the cubby. I went straight threw the rubber mat. The holes I drilled in the mat are small enough that if I remove the mount you won't be able to tell it was there. I also cut a hole in the back of the cubby at the bottom to route power and audio cables. I think it looks pretty clean. here are some photos and a parts list:

http://www.amazon.com/RAM-Mounts-RAM-B-238-2-43-Diamond/dp/B002KO5XVU/
http://www.amazon.com/Mount-Composite-Double-Socket-1-Inch/dp/B005KWPJ04/
http://www.amazon.com/RAM-HOL-AP18U-RAM-Specific-Cradle-iPhone/dp/B00UAJ28GA/


Parts I'm ordering for the ipad upgrade:
http://www.amazon.com/Mounts-Flat-Surface-Mount-RAM-B-202U/dp/B000WJ6X4G/
http://www.amazon.com/Ram-Mount-EZ-ROLLR-Specific-RAMHOLAP14U/dp/B00B7OE4DW/
 

jerdog53

Explorer
Brad you know I have my Garmin Montana resting in that cubby space, not attached to anything but the rubber mat keeps in place rather well.

DSC00587_zps6919c4e5.jpg
 

DiscoCO

Observer
Derel1cte - that's exactly what I was looking at doing only without the cubby space. Do you think the smaller mount base you use for your iPhone would handle the Mini? Just curious why you are looking at the larger base? Thanks for the photos!
 

Derel1cte

Adventurer
That base i linked is actually to attach to the back of the iPad mini cradle. The mount I already have bolted in the cubby wont change. It is very solid, I'm not worried about it handling more weight.
 

Derel1cte

Adventurer
There's no where to suction one of those in the cubby. Plus your iPad would go flying the second you hit a bump with a magnet mount.

Leave the magnets and suction cups for your rental car.
 

Derel1cte

Adventurer
Finally pulled the trigger on my ipad install.


instead of using the iPad cradle I bought a ruggedized case that had a similar asthetic to the rest of the LR3 interior so that I could leave the iPad in there permanently and not worry too much about it. I figure, as long as it looks similar to the rest of the interior and not just like an iPad sitting in the open, people will just assume it the build in nav and not bother trying to break in.

Full list of parts used for the install:
iPad Mini 2 w/ATT
iPad Mini Case
Anti-glare screen protector <-- Very important to make the iPad screen visible in the truck
Ram Mount Base (attached inside cubby)
Ram Mount Base (attached to iPad case
Ram Short Arm Connector
Apple Lightning to 30-pin adapter <-- Required to get the analog audio signal out of the lightning port.
30-pin Audio & charge cable
Added Charging socked behind the dash
3-port USB charger
Aux audio and USB jack <--to replace 1 of the 2 12v jacks up front with an additional aux port
Audio Y-splitter <-- allow for input from iPad or new Aux jack
Audio 1/8" to RCA stereo adapter
RCA Cable to be cut and spliced into the back of the stock stereo

^^^ Probably more than I needed to include but if you want to duplicate my steps it makes building your amazon shopping list pretty easy.

The install process is pretty simple. there is a ton of room behind the center console fascia to stuff any extra wires. I used some standard home depot bolts, nuts and washers to attache the Ram base inside the cubby AND to the back of the iPad case since i wanted a semi-permanent install. Adding Aux wires to your stereo is pretty simple, just splice/soldier your RCA input cables onto the Blue (Right channel), Red (Left Channel) and Black (ground, obv.) wires on the back of your stereo.

To add power. I spliced into the power wires leading to the right hand 12v socket, and then replaced the 12v socket with the above USB and aux thing.

The last tricky part to the install that isn't 100% necessary but I wanted to do to get a clean "factory" look was to modify the apple adapter so that it bent and an angle and could be hidden behind the iPad. Kind of a lengthy process that involves cutting the white plastic off of the adapter, flexing the lightning plug at an angle, then using some black SUGRU to hold the angle in place and protect the exposed circuit board.
 
Looks like a great install. I am running my IPAD Mini on GoPro mounts in the cubby. I plan to splice/relocate the audio jack and power source from the second row to the dash/cubby area to allow plug in for audio direct off the Mini.

My only apprehension is I use my Spotify on my phone and plug in there and if I was plugged in with the mini as well, would there be feedback or would they talk over each other. Honestly, I do not use audio on my Ipad for my offroad nav, but want it plugged in for those "sleep in the back nights" im on the second battery and want audio for movie time.

I like the GoPro mounts/arms because they articulate nice like the Ram mount, but they clip in a bit easier for quick install/removal. Also, the 3M tape is easily removed if I want to take off the mount but sturdy enough that the Ipad is completely secure.

I would love to see how you modified the IPAD 30 pin jack because that seems like a one-plug option at the dash for audio and power.

Thanks,

E


Finally pulled the trigger on my ipad install.


instead of using the iPad cradle I bought a ruggedized case that had a similar asthetic to the rest of the LR3 interior so that I could leave the iPad in there permanently and not worry too much about it. I figure, as long as it looks similar to the rest of the interior and not just like an iPad sitting in the open, people will just assume it the build in nav and not bother trying to break in.

Full list of parts used for the install:
iPad Mini 2 w/ATT
iPad Mini Case
Anti-glare screen protector <-- Very important to make the iPad screen visible in the truck
Ram Mount Base (attached inside cubby)
Ram Mount Base (attached to iPad case
Ram Short Arm Connector
Apple Lightning to 30-pin adapter <-- Required to get the analog audio signal out of the lightning port.
30-pin Audio & charge cable
Added Charging socked behind the dash
3-port USB charger
Aux audio and USB jack <--to replace 1 of the 2 12v jacks up front with an additional aux port
Audio Y-splitter <-- allow for input from iPad or new Aux jack
Audio 1/8" to RCA stereo adapter
RCA Cable to be cut and spliced into the back of the stock stereo

^^^ Probably more than I needed to include but if you want to duplicate my steps it makes building your amazon shopping list pretty easy.

The install process is pretty simple. there is a ton of room behind the center console fascia to stuff any extra wires. I used some standard home depot bolts, nuts and washers to attache the Ram base inside the cubby AND to the back of the iPad case since i wanted a semi-permanent install. Adding Aux wires to your stereo is pretty simple, just splice/soldier your RCA input cables onto the Blue (Right channel), Red (Left Channel) and Black (ground, obv.) wires on the back of your stereo.

To add power. I spliced into the power wires leading to the right hand 12v socket, and then replaced the 12v socket with the above USB and aux thing.

The last tricky part to the install that isn't 100% necessary but I wanted to do to get a clean "factory" look was to modify the apple adapter so that it bent and an angle and could be hidden behind the iPad. Kind of a lengthy process that involves cutting the white plastic off of the adapter, flexing the lightning plug at an angle, then using some black SUGRU to hold the angle in place and protect the exposed circuit board.
 

Derel1cte

Adventurer
I would love to see how you modified the IPAD 30 pin jack because that seems like a one-plug option at the dash for audio and power.

Yeah. I wish I had taken photos of the process but I was in the zone. Step 1 is to cut the white plastic part off of the apple adapter. I did it by using a file to cut the wide flat side of the adapter until you can see the grey plastic under the white. Here is an image where the person cut the sides.
30-pin-adapter-teardown.jpeg

I think my way was easier, but same result. Once this is done, you can see the lightning connector is on a ribbon cable connecting to the 30-pin circuit board, this allows it to an almost 180 degree angle.

Next step was to modify the case a little bit. I cut the cover flap for the lightning port off of the rubberized back and used a razor to cut the hard black plastic face plate where it surrounded the port. Marked in red here:

This made just enough room to connect the adapter and flex it over so that it was nearly flush with the back. To finish it off, I stuffed a bunch of SUGRU into the port and completely covered the adapter. After waiting 2 days for the SUGRU to rubberize, i sanded it down so that it was more flush and angular:


This solution is semi-permanent since the SUGRU is pretty well bonded to the ipad case. I can still remove the ipad, but its not as simple as just pulling out the plug. I'm sure if i hand used some plastic wrap around the case/port I could have made it removable.

The final step to the whole thing was to add bolts to the ipad case from the inside out, then use nuts to secure the RAM ball mount. I had some 3M adhesive tape between the mount and the case, but since this thing is going to see extreme heat and cold, I didn't want to risk it falling off.


As an added note, one of the best things about using the Apple adapter is that it somehow FIXES THE LINE STATIC PROBLEM! Every other wiring configuration or audio adapter I've tried in the LR3 always ends up with crazy alternator humm. Something in the chips on the apple adapter fix this, even without a iphone/ipod/ipad attached!
 
SOLD me! I'm gonna do the same thing. Thanks for the information and tutorial. One last question? The 30 pin adapter charges and audio for the Ipad correct? I will no longer need the headphone jack for audio if I use this Apple Adapter?

I ask because I seem to have one adapter that does not charge but it is NOT an Apple one, just one I picked up on the road once when I needed it quickly.


Yeah. I wish I had taken photos of the process but I was in the zone. Step 1 is to cut the white plastic part off of the apple adapter. I did it by using a file to cut the wide flat side of the adapter until you can see the grey plastic under the white. Here is an image where the person cut the sides.
30-pin-adapter-teardown.jpeg

I think my way was easier, but same result. Once this is done, you can see the lightning connector is on a ribbon cable connecting to the 30-pin circuit board, this allows it to an almost 180 degree angle.

Next step was to modify the case a little bit. I cut the cover flap for the lightning port off of the rubberized back and used a razor to cut the hard black plastic face plate where it surrounded the port. Marked in red here:

This made just enough room to connect the adapter and flex it over so that it was nearly flush with the back. To finish it off, I stuffed a bunch of SUGRU into the port and completely covered the adapter. After waiting 2 days for the SUGRU to rubberize, i sanded it down so that it was more flush and angular:


This solution is semi-permanent since the SUGRU is pretty well bonded to the ipad case. I can still remove the ipad, but its not as simple as just pulling out the plug. I'm sure if i hand used some plastic wrap around the case/port I could have made it removable.

The final step to the whole thing was to add bolts to the ipad case from the inside out, then use nuts to secure the RAM ball mount. I had some 3M adhesive tape between the mount and the case, but since this thing is going to see extreme heat and cold, I didn't want to risk it falling off.


As an added note, one of the best things about using the Apple adapter is that it somehow FIXES THE LINE STATIC PROBLEM! Every other wiring configuration or audio adapter I've tried in the LR3 always ends up with crazy alternator humm. Something in the chips on the apple adapter fix this, even without a iphone/ipod/ipad attached!
 

Derel1cte

Adventurer
SOLD me! I'm gonna do the same thing. Thanks for the information and tutorial. One last question? The 30 pin adapter charges and audio for the Ipad correct? I will no longer need the headphone jack for audio if I use this Apple Adapter?

I ask because I seem to have one adapter that does not charge but it is NOT an Apple one, just one I picked up on the road once when I needed it quickly.

The official apple 30-pin will charge and play audio through the adapter. No need to use the headphone jack. The audio cable I linked also supports both charging and audio: http://www.amazon.com/gp/product/B00GI9OLW0
 

Forum statistics

Threads
186,636
Messages
2,888,316
Members
226,767
Latest member
Alexk
Top