Tacoma rear bumper fabrication.

p1michaud

Expedition Leader
Tacoma rear bumper build up.

Hi folks. I'm in the process of researching my rear bumper build and would like your advice.

Criteria:
  • Weight is a concern, so I want to find a balance between strong yet no too heavy.
  • Versatile. My rig is used as a DD, for exploring, camping, hunting, fishing, sometimes towing ( a few times a year perhaps). I need it to be functional yet versatile.
  • I don't want to remove the spare from the stock location.
  • Location to carry Scepter Military cans (Fuel and Water) would be a benefit and they must be lockable..
  • Location to mount Hi-Lift would also be a benefit and it must be lockable.

I was fortunate enough to pick up a set of Demello Off-Road bumper mounting brackets. These things are beefy. Pictures were taken by KStacoma over on TTORA (I bought the brackets from him).
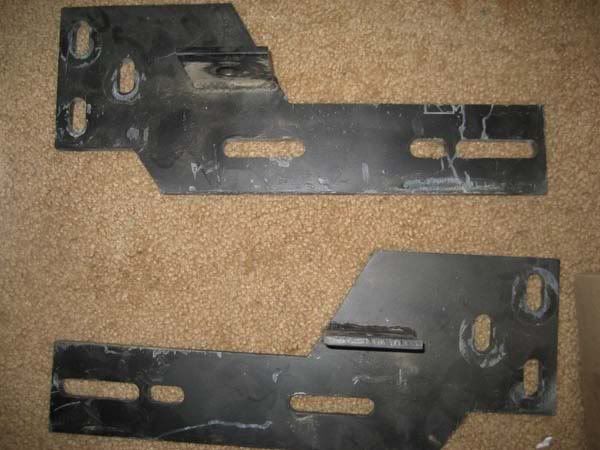
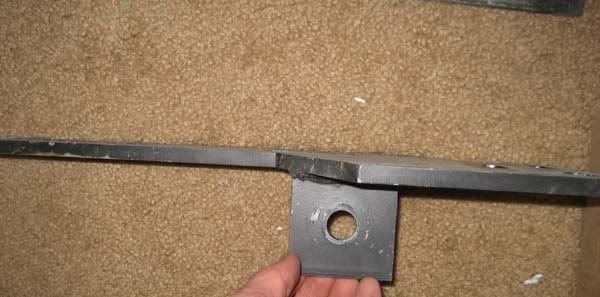
Picture066.jpg


Picture067.jpg


Here is what I have in mind.

My plans are to use a 2" x 4", 3/16" thick for the main piece. My reason for choosing this thickness is that I'd like to build in the receiver into the main piece as shown here. I will also gusset the back side and provide a location for trailer chain hook ups such as this:
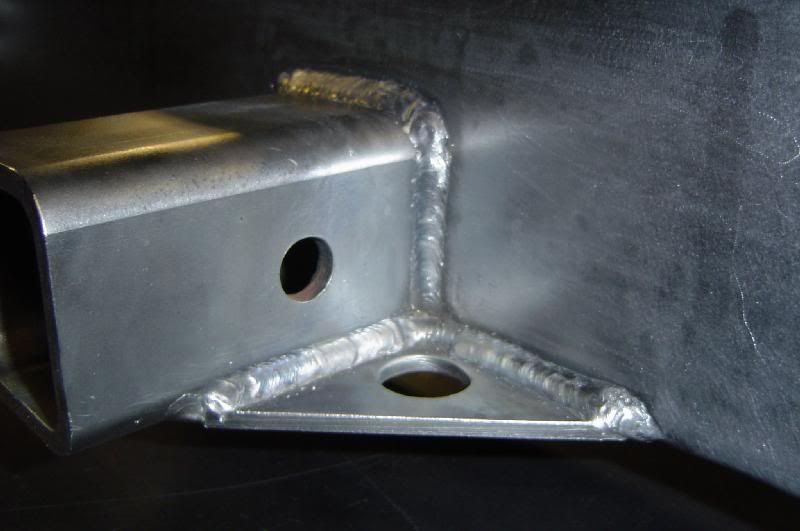
2243990900098279709IwZKZO_ph.jpg


Alternatively, I could go with a 1/8" thick 2" x 4" but re-inforce it on the back side to allow for towing. Perhaps build in a piece of 2" x 2" x 1/4" for the with of the frame rails and brackets. I have to do a bit of match to consider if the weight savings would be worth it.

I will cut through both sides of the 2” x 4” piece and run a piece of 1/4 by 4” flat bar narrowed to suit that goes through and weld that in place on both sides. These will be the brackets that are used to bolt onto the Demello frame mounted brackets. They will also serve a shackle mounting brackets. They will have a 7/8” or 1” hole in them. I will double the thickness of the shackle mounting brackets by welding an additional piece of 1/4" pre-drilled plate to them. This will do two things: prevent the possibility of pulling the brackets through the bumper under load and provide a larger contact area for improved force distribution during recovery operations using a shackle (i.e. force distributed on 1/2" of metal vs. 1/4").

I really like the idea of what Zsazbo has done over on TTORA.
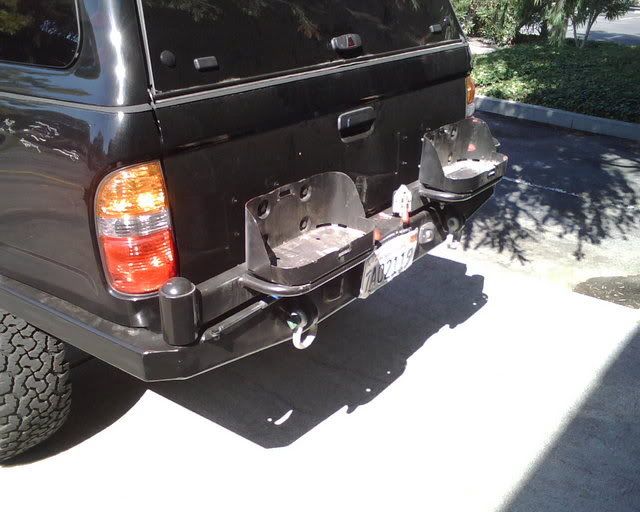
img00294xx9.jpg

More pictures can be seen in the Rear bumper Rear bumper thread. This approach would allow for minimal weight when extra fuel or water is not required.

I'm thinking of doing a very similar variation except I'd use the Adventure Trailers Can Holders with them laying on their side as shown here.

Here is a very poor photochop job of what I mean:
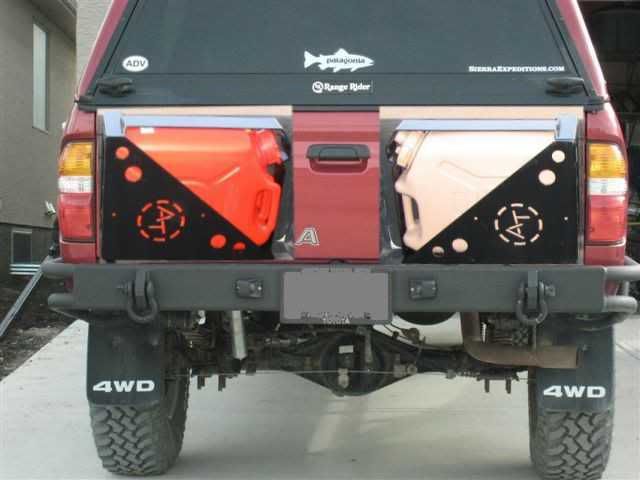
Dual_Swing_Out.jpg

I’ve butchered moutainpete’s rear bumper picture hope you don't mind.

Rear quarter panel protection may or may not incorporated. I’ve not decided yet but really like the Demello Off-Road hybrid design. The other alternative is to cut the bed similar to what Will has done:
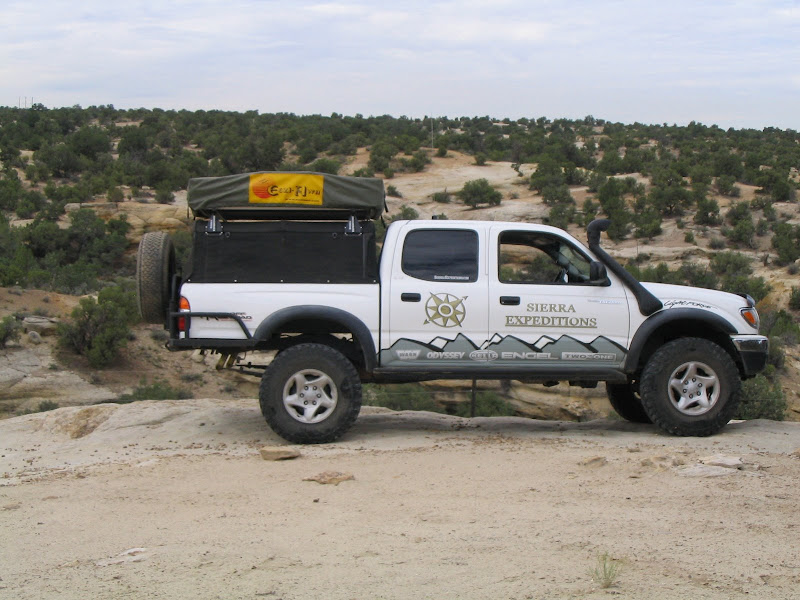
IMG_2235.JPG


I'm still torn with respect to side protection. I don’t have a problem removing some sheet metal but my wife thinks that looks ugly! :costumed-smiley-007. The other issue with going this route, it’s not reversible. The bumper would have to be sold with the truck when I change. If I don’t cut the bed, the bumper could be transferred to the next vehicle assuming they are compatible.

So, here is your chance to provide some input. Let’s hear it!

Cheers :beer:,
P
 
Last edited:

Desertdude

Expedition Leader
Shouldn't this be moved into the new "Expo Fab Shop" section :victory:


I like your ideas (and not cutting the fenders up in case you sell)

Not entirely sure you need the full steel for the reciever. [edit] (I would think you would need it solid for the can carrier) I have Demeloos tube bumber and have pulled an overly stacked M101 out of the forest full of wood and a well loaded 4x8 trailer full of tools for 6 years back and froth from AZ to CA - and have never felt uncomfortable about the reciever hitch.

Sorry the plate covers the reciever, but you can see the basic tubing build.

Tacomarearbumper.jpg
 

p1michaud

Expedition Leader
Move it, move it, oh it would not have a home yet!

Desertdude said:
Shouldn't this be moved into the new "Expo Fab Shop" section :victory:

This is exactly the project that got me thinking about it!

Thanks for the feedback!
Cheers,
P
 

p1michaud

Expedition Leader
From away.

Ursidae69 said:
I like it. Have you seen how VikingVince has his cans mounted on his stock bumper?

I've never seen any close up shots. Everything was from far away. If anyone has any, post them up.
 

p1michaud

Expedition Leader
Latches, pins and gas struts.

I have not completely made up my mind yet, but for the swing outs, I'll be using either the the typical pull action toggle clamp or a spring loaded quick release weld in pin in a T-handle or Ball handle.

I'm considering the following possible configurations:
  1. Toggle clamp swing end and spring loaded pin swing end. If you look at the very last picture from Slee Off Road's site, you can see that they have incorporated both a pull-type toggle clamp and spring loaded pin.
  2. Toggle clamp swing end and spring loaded pin hinge end. Toggle clamp swing end and spring loaded pin swing end. If you look at the second picture from the bottomSlee Off Road's site, you can see this configuration.
  3. Spring loaded pin swing end only.

What would you choose and why?

Mc-Master-Carr part numbers:
Pull-Action Toggle Clamp: 5071A58
T-handle spring loaded pins:90222A112
Ball handle spring loaded pins: 90222A415

If you look closely at the pictures of the dual can swing out in the Rear bumper thread you can see that he used gas struts on each swing out. I thing that this is a really neat feature and will try to incorporate is as well.
 

ntsqd

Heretic Car Camper
Not long ago there was a thread with a pic of a Demello bumper installed & I commented on the mounting. I think Demello missed a significant thing with that little 90* tab.

Most every bumper mfg makes a big deal out of gusseting the receiver socket to the main body of the bumper. Then they promptly fail to laterally gusset the main bumper body to the frame. What is the point in that? You end up with a socket that can't flex laterally relative to the main bumper body, so instead the whole bumper moves laterally relative to the frame. This works the mount brackets & sets up a fatigue cycle. (Think: leaf spring laid on it's side.)
To offset this some use thick plate for the mounts. That is crude, only somewhat effective, and isn't very efficient use of materials. In basic structures geometry will always result in a stiffer part than will simple mass.

If that little tab were instead a flange that extended from the bumper forward up the bottom of the frame some distance, and had mounting provision on the bumper & met various new or existing frame holes, then the mount bracket would better laterally locate the bumper.

Ideally there would be a pair of diagonals extending from far up the frame back and in to bumper at the receiver socket. In a case where you're using a load distributing type hitch nothing less is good enough.
Such a hitch really isn't likely necessary in overland travel, so losing that under vehicle storage space isn't a compromise that needs to be made.

Though I've no experience with them off road, Carr-Lane & De-Sta-Co both offer versions of their over-center latches with a secondary lock. They do work very well for securing engine dyno engine carts to the dyno itself.
I would design the latch placement to pull in a compound direction, i.e. forward and down or similar. Pull the swinger into it's stops in two directions or it will vibrate in the one not chosen.
 
Last edited:

BigAl

Expedition Leader
p1michaud said:
What would you choose and why?
I have used the toggle style twice in the past with mixed results. They are fast and convenient but I think they allow more vibration. I used this from AtoZ Fabrication on my current tire carrier. It takes an extra few seconds to open, but it is bombproof and really reduces vibration. My buddy has a WARN with the push button t handle. It is really fast and pretty solid too. The WARN has a rubber seat too.
thandle.jpg
 

ntsqd

Heretic Car Camper
Setting aside the old school fabricator's standard of not welding on hardware (worth adhering to IMHO), what I personally don't like about such a design is that there is a loose part that I can loose. And sooner or later I will loose it!
 

BigAl

Expedition Leader
ntsqd said:
Setting aside the old school fabricator's standard of not welding on hardware (worth adhering to IMHO), what I personally don't like about such a design is that there is a loose part that I can loose. And sooner or later I will loose it!

Agreed, I've been meaning to add a verticle piece of pipe to the face of the bumper to act as a holder. I've dropped the T in the leaf litter already.
 

p1michaud

Expedition Leader
Material thickness and geometry

Gents,
Very good points about proper load distribution and material thickness. A few other items to keep in mind with respect to the 95.5'-2004 Toyota Tacoma frames:

  1. The frame at it's thickest point (main C-channel, not the boxed part) is only 1/8".
  2. These trucks are only rated to tow 3500 between 5000 lbs depending on your model. I personally would not want to tow this much weight on a continuous basis. I may need to tow 2000 lbs one a year. If you need to tow large loads on a regular basis, a Tacoma is probably not the right vehicle choice for you. Time to re-evaluate your vehicle selection.
  3. For overland travel, your bumper should provide protection and solid recovery points (assuming you don't tow a trailer that is).
I had not seen that T-handle from AtoZ Fabrication. Interesting design. To make sure you don't loose it, you could tether it vith a piece of wire or chain that could swivel so it does not get tangled up. Wil's rear bumper had a very similar closing mechanism from CBI Off Road.


ntsqd said:
Such a hitch really isn't likely necessary in overland travel, so losing that under vehicle storage space isn't a compromise that needs to be made.

Very true, you don't want to loose potential storage space as a result of your rear bumper design. In my case that would go against my 3rd requirement.

  • I don't want to remove the spare from the stock location.
 

p1michaud

Expedition Leader
It's a matter of weight...

p1michaud said:
My plans are to use a 2" x 4", 3/16" thick for the main piece.

...

Alternatively, I could go with a 1/8" thick 2" x 4" but re-inforce it on the back side to allow for towing. Perhaps build in a piece of 2" x 2" x 1/4" for the with of the frame rails and brackets. I have to do a bit of match to consider if the weight savings would be worth it.

Ok, just for kicks I compared the above two options except that I went with 2 1/2" x 2 1/2" by 1/4" vs 2" x 2" by 1/4" because I had the numbers handy.

So for a 60" piece of 2" x 4" by 3/16" at 6.87 lb/ft you get 34 lbs.

For a 60" piece of 2" x 4" by 1/8" at 4.58 lb/ft you get 23 lbs. Re-inforce by adding a piece of 40" long (the approximate width of the frame) 2 1/2" x 2 1/2" by 1/4" at 4.32 lb/ft you get 14 lbs for a combined weight of 37 lbs.

So, it would pretty much be a wash between both options IMO. I guess I'm going with 3/16" thick then!

Cheers :beer:,
P
 

ntsqd

Heretic Car Camper
Given the frame's ~1/8" thickness I would limit the mount bracket (were it a clean sheet design) to 3/16" max. So often I see 3/8" or 1/2" plates bolted or welded to such a frame rail & I wonder what they were thinking.
Given that the Demello parts are thicker I advise rolling over the edges that mate to the frame. This to keep that sharp edge from trying to act as a cookie-cutter. Simply done with a sanding disc on a small grinder.


Have you given any thot to where to put the trailer light socket?
I prefer to mount them behind the bumper, with the opening pointed down. I try, and don't always succeed, to place it such that the plug's tail end is higher than the bottom of the bumper. The point of this is to allow water to drain rather than sit captured in the socket, and to put the socket someplace well protected.

I'll also offer the below as a possible alternate for attaching the safety chains. Orient the long slot in the direction of pull. I intend to try this in the next bumper that I build. Note that the bolt is only needed when the plate is horizontal. I outright stole the concept from the local power company trucks, whose plates are vertical.
 
Last edited:

Forum statistics

Threads
188,026
Messages
2,901,330
Members
229,411
Latest member
IvaBru
Top