The Back Country Camper Build, small & simple

Gunslinger1

Observer
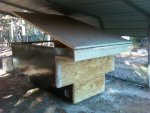
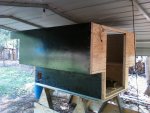
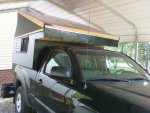
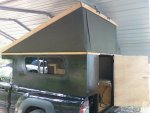
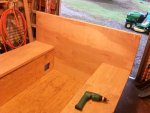
I have a camera full of pics but having trouble uploading. Hopefully I will have them posted soon. I have started putting resin on the outside panels and sanding and sanding and sanding. Im not to good at bodywork so Im sure I will waste some resin trying to get a car like finish. I had rather sand now than have a bad finish when done. I have a palm sander, a belt sander and a 5" pad that goes on a drill but not sure which one is working better. I think maybe the little electric palm sander leaves the best finish with out making dips, just takes a lot of time. The resin leaves a pretty good finish and I am sanding between coats for adhesion. The resin should make the plywood last forever. I think I will stop by Advance Auto and pick up a cheap DA sander like the paint body shops use and see how that works. I put all the panels together Sunday with just two screws each for a mock build and it looked great. I want to get 95% of my paint work done with the panels laying flat. Should make it a lot easier and a better finish.
 

pods8

Explorer
Be careful buying an air powered DA sander (if that is what you were thinking) if you don't have a large compressor they are hungry, the electric DA's aren't too bad, I'm using a cheapie from harbor freight successfully so far in my work (haven't gotten to finish work yet).
 

Gunslinger1

Observer
and here are some pics in progress

This is how the walls are made. 1/4 plywood out 2x4 middle then luan inside. 2x2 studs 16" center glued and screwd in and out. Then as I assembled the panels to each other I glued them and screwed togeather using 4" coated decking screws on everything. At this point I can pick up one side pretty easy.
 

Attachments

  • camp1.jpg
    camp1.jpg
    241.7 KB · Views: 115

Gunslinger1

Observer
more pics

This is as far as I can assemble in tool shed next its going outside for the side panels then to start on the roof.
 

Attachments

  • camp2.jpg
    camp2.jpg
    300.7 KB · Views: 113
  • camp3.jpg
    camp3.jpg
    345.7 KB · Views: 120

Gunslinger1

Observer
Loading/unloading

Has any one tried to load these small campers just by sliding them in off of a table or saw horses. That is my biggest concern right now. I checked Harbor Freight last night for trailer jacks that I could modify to work and came up with $250.00 for three 2" square truck bumper receivers $16.00 each, 3 side handle trailer jacks $29.00 each that have a pull pin drop foot. They are not tall enough but I could extend the leg then weld a 2x2 hitch tube to the side of it so I could just slide it into the bumper receiver mounted on the under side of the camper and jack it up just enough to drive out then let it down on saw horses. That way the jacks could just pull out and off so as not to stick out to far on the sides of the camper. The other option that I hope will work is jacking up the side of the camper with my high lift slide a piece of pvc under each side and slide it off by hand. YIKES what you guys think ?
 

Heifer Boy

Adventurer
Has any one tried to load these small campers just by sliding them in off of a table or saw horses.

Yup :)

That's exactly how I get my camper on and off my truck. I built the table the same height as my tailgate so on flat ground it just slide on a off on the runners fixed to the bottom. The table has wheels on it so I can then just move the whole thing around for storage.

To get the camper 'on' the truck I attach a pulley to the front of my tub, pass the winch cable under the camper, through the pulley and back to the camper and winch it on. To get it 'off' I just hook it to the front of the camper and start winching. My camper is a bit smaller than yours but the principle should still apply.

I haven't quite finished the set up yet but will document it in my thread when done. I've bought the boat winch and tested it and it all works ok. I just need to mount it to my table with a roller for the cable and make up the hooks etc. My campers about 250kgs and I bought a 500kg 5:1 winch. It moves it easily.
 

Gunslinger1

Observer
water sealing

Has anyone figured out how to seal the hinge from water intrusion on the front of a pop up like the one in the pic.
 

Attachments

  • camp4.jpg
    camp4.jpg
    345.8 KB · Views: 172

pods8

Explorer
I'd be inclined to see about just putting a piece of rubber membrane material or something of that nature over the hing area, it'd flex fine and seal it. Another alternative would have been to use a different kind of hinge, either a solid plastic one or a "hurricane hinge" that some tear drop campers use. That's off the top of my head.
 

Gunslinger1

Observer
the build gos on

Thats an idea, I think I will try a bike rubber tube, cut it and place it behind the hinge. It will only have to move a small amount. At his point I am working on the prop poles for the pop up top as well as the rear door. See pic. Progress is getting slow at this point because of all the small details that has to be worked out as I go along. The weight issue that I thought was going to get me has turned out very light. I can still pick up one side of the camper and stand it up on the other side with the top on. Only item left for the shell is the door. I guess it weighs about 350 to 400 lbs. It only set the Tacoma down about an inch when I test fit it. I dont think I will even need a OL spring or air bag.
This build method seems like it will be trail tough. It is solid as a rock and with the wood frame it can flex with out cracking a weld. I built the top with luan both sides and 2x2 frame. It is more solid than I thought and I have decided to build on a removable rack that attaches to the side wall frame "which is super strong with 2x4s in all corners" and put a cross bar front and rear that can haul a deer stand or small boat. Once you unload then remove the cross bar and pop the top for camping. I have 6ft plus head room at the back when the top is up. My plan is to have a couch on one side that flips out to a double bed and counter top with storage under on the other side. Maybe a sink and a portable stove so it can go outside when needed.
 

Attachments

  • camp5.jpg
    camp5.jpg
    391.9 KB · Views: 141

pods8

Explorer
Rubber roofing material might be a thicker alternative to a bike tube if you're going that route. A bike tube might be a bit thin and wear. Is your final camper going to be black like it's mostly currently painted? If so the membrane on the outside of the hinge (or both sides wrapped over the top) would probably blend in well enough and the external piece would probably rub less on the hinge.

Some other sort of flat weather seal product might be out there too.
 

eugene

Explorer
The rubber seal for the bottom of a garage door, you could slit it open and put it on the outside of the hinge, or put it behind the hinge so it compresses just like when the garage door is down.
 

Gunslinger1

Observer
Getting Close

Planning to take the first trip in the poptop this weekend. The canvas looks good and inside the camper works well for two adults. Just got the bed finished last night that fold out from a couch to a bed and installed one 120 voly outlet to run the small window unit going in next week. Will take some pics this weekend and post next week. Looks like to tacome only sit down about one inch and its about loaded and ready to roll.
 

Gunslinger1

Observer
pics

Only sits the Tacoma down a couple inches. Yahoo dont need OL springs. Camper is loaded ready and to roll.
 

Attachments

  • campertruck1.jpg
    campertruck1.jpg
    372.8 KB · Views: 69
  • campertruck2.jpg
    campertruck2.jpg
    335 KB · Views: 81

Forum statistics

Threads
188,563
Messages
2,906,953
Members
230,666
Latest member
Cvonruex
Top