The Cactus Red mod thread.

crawler#976

Expedition Leader
AirAid SynthaMax non-oiled air filter update:

Installed the system on Christmas day last year. Haven't touched it since, so after another weekend in intensely dusty conditions, I decided to pull the filter and see what's up!

I'm please to say that the big filter and pre-filter passed absolutely no dust as far as I can tell. The inside of the intake shows no, none, zip, nada, zero fine dust particles. And after a good rinse with water from the inside out, and a night to dry, back on it went for another 9 or 10 months!

I've used K&N in the past, and there was always some fine dust in the intake.
 

crawler#976

Expedition Leader
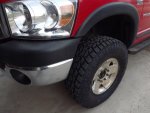
After slicing a sidewall on a Nitto Trail, I had Discount Tire replace it under warranty with a new Toyo Open Country A/T2 Xtreme 35/12.5-17 E rated tire. I'm more than a little impressed - this is no typical all terrain. The tread is much closer to a M/T, yet the shoulder is closed , and should provide a much quiter tire over an open lugged M/T. I'm gonna be real intersted to get the truck shod with a full set! Anyone want to buy a slightly used set of Nitto Trails?

They have a 50K tread wear warranty, and weight 69.9 lbs each. Tread depth is listed at 17/32.

Price before the road hazzard warranty was $344.44. Add on the $51.75 for the warranty plus the $6.89 environmental fee, and they aren't cheap...

Before putting it under the bed as the spare, I took some photos.

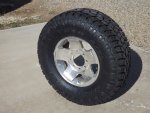
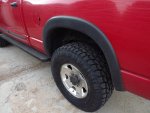
Here's a shot of the whole tire on a factory Power Wagon 8x17 rim:
toyo open country at2 xtreme.jpg

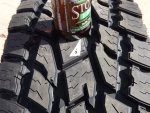
I had a Stone IPA to use as an item for comparison:
close up of tread.jpg


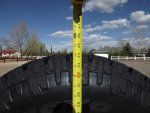
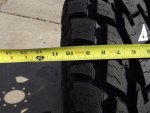
Unloaded diameter is 34.25 inches.
unloaded diameter.jpg


Unloaded section width is 12.0 inches.
section width on stock 9x17 power wagon rim.jpg


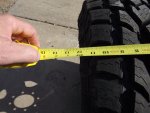
Top of the tread measures right at 10 inches. It also shows how wide the voids are - these should perform really well!
width across top of tread.jpg


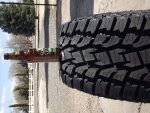
..and one more close up of the tread.
tread with a Stone IPA for scale.jpg
 

crawler#976

Expedition Leader
All I can say is WOW!

They are actually round.

The worst tire took 3oz to balance, and that's on a rim I bent and had repaired.

Compared to all the previous tires on the truck, they are virtually silent.

GPS shows them to be 4% off on the speedo, slightly less than the MT/R, BFG, and Nitto 35's.

No pull left or right. Cactus Red tracked straight ahead with hands off the wheel.

I'm really looking forward to seeing how they do in dirt!
 

Attachments

  • toyo at2 rear.jpg
    toyo at2 rear.jpg
    123.7 KB · Views: 42
  • toyo at2 front.jpg
    toyo at2 front.jpg
    473.7 KB · Views: 43

crawler#976

Expedition Leader
Forgot to add the final price per tire.

Since Discount Tire isn't a Toyo dealer, they said they would match the best pricing I could find including shipping. The tires came in at $245.00, so with shipping, road hazard, Enviro Fee, lifetime rotate and balance, and tax at 10.1%, it came out to $350.00 each on the truck. That seems reasonable to me.

Still haven't got the first tank of fuel on'm yet, but from what I'm seeing, the range has gone from 350 or so on the Nitto's to 410, and that suggests an improvement of nearly 2 MPG. I'll get some hard numbers over the next few weeks.

The truck tips the scales at a little over 8K. After adjusting tire pressure to get them to run edge to edge, I've got the fronts at 42 PSI, the rears at 40. That makes sense since the tires are rated for 3195 lbs each at 65 PSI. The ride is great - way softer than the Nittos. Now that they are running edge to edge, there is a slight hum, I'd say less that 50% of the road noise of an M/T.
 

crawler#976

Expedition Leader
UPDATE:

MPG has been above 12 consistently - best yet was nearly 13.

With the Jeep seeing most of the trail time, I decided it was time for the new tires to get some dirt on'm. The road I took is a typical mesa top lava infested, creek crossing, rough in places trail. Nothing that requires 4x4, but using the swaybar disconnect certainly helps.

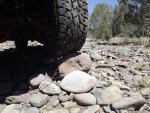
Aired down from 45 PSI to 22 PSI, and took some photos to show how the tires did.

At 45 PSI, the tread showed some flex, but didn't wrap around much. You can see the daylight around the tread.
45 PSI.jpg

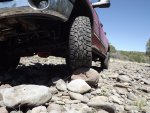
Still at 45 PSI
22 PSI #2.jpg

At 22 PSI, it's starting to conform to the rock. Not nearly as much daylight.
22 PSI.jpg

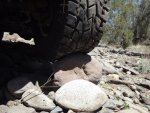
It's wrapping around the rock nicely
45 PSI #2.jpg

Decent sidewall bulge.
22 PSI #3.jpg

______

After a few miles of 22 PSI, I brought the front tires up to 25 PSI - they were almost too soft. At 25, the ride was still real nice.
 

redthies

Renaissance Redneck
I'll look forward to any reports you can give us on snow traction. The regular Toyo ATs were ok in snow, but not stellar. These look much better.
 

crawler#976

Expedition Leader
Can't see the tires in action, but I can report they did a great job yesterday. To keep the diffs out of the rock, I left the tires at street pressure - 50 PSI, and they never skipped a beat. Did the Martin Canyon section of the Great Western Trail (AKA Smiley Rock) solo. The Power Wagon had no problem and sustained no damage. An 8K truck with the front sway bar disconnected gets to sloshin' a bit...

I'm also very glad to report that even after nearly three years, the repairs done by the Expo are still intact. http://www.expeditionportal.com/forum/threads/47533-Martin-Canyon-Smiley-Rock-Trail-Rehab


Short video of the rocky section:
[video=youtube_share;7xy6RI4Pqfc]http://youtu.be/7xy6RI4Pqfc [/video]
 

Attachments

  • Mr Smiley Rock himself.jpg
    Mr Smiley Rock himself.jpg
    363.5 KB · Views: 40

crawler#976

Expedition Leader
Still kinda dark out when I got to the shop...
 

Attachments

  • IMG_20130709_055145_323.jpg
    IMG_20130709_055145_323.jpg
    282.5 KB · Views: 52
  • IMG_20130709_055136_747.jpg
    IMG_20130709_055136_747.jpg
    272.6 KB · Views: 52
  • IMG_20130709_055123_503.jpg
    IMG_20130709_055123_503.jpg
    256.8 KB · Views: 50
  • IMG_20130709_055112_109.jpg
    IMG_20130709_055112_109.jpg
    162.3 KB · Views: 55

crawler#976

Expedition Leader
The Power Wagon stock rear leaf springs are fully rated for 3/4T capacity. But, that doesn't happen without causing considerable sag in the rear. The first few inches of travel are very soft, and while it's great for off highway use, with the added weight I carry (roughly 1000 lbs of shell, sleeping platform, fridge and gear), when we hook up the trailer, it drops the rear by almost 3 inches from stock height.
.
There are several options to correct this. The best is to replace the factory springs with a set of either Thuren or Carli long travel springs. The second is via air bag, and up until recently, the only good option for off highway use was the Carli long travel system. It's expensive, and requires modification of the exhaust system to clear the bags.
.
So, I was pleased to see a new player in the market, Daystar! Daystar is known for their polyurethane bushings, body mounts, and other products like the Hi-Lift jack handle isolator. Daystar has introduced a new method of using a standard 6" Firestone Ride-Rite air bag by using a cradle to free the bottom of the bag from being attached to the axle tube.
.
.
Pretty impressive! Sure would be nice to have a set of those Kings on Cactus Red!
.
So, I decided after several of my Power Wagon brethren have used and approved the new system to give it a go. All parts were sourced on Amazon.com for less than $380.00 including shipping. That's less than half of the cheapest spring or Carli long travel bag system.
.
Firestone W217602299 Ride-Rite Kit for Dodge Ram 2500/3500 $278.95
.
Daystar KU09140BK Air Bag Cradle $72.46
.
Install is very straight forward, and should take less than two hours. After checking to make sure all the parts are supplied per the parts list, which in my case was missing the two male 1/4" NPT to 1/4" air line fittings, the assembly went as follows:
.
Pre-assemble the cradle to the lower mount, pre-assemble the upper bracket, install the 1/4" NPT to 1/4" air line fitting to the bags.
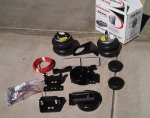
kit.jpg
.
Jack and support the vehicle. Remove the stock bump stops.
2.jpg
.
Install the Cradle and upper bracket. The cradle bracket has two sides, wide for the diesel, narrow for the gas application. The cradle mounts to the wide side so the narrow end will fit between the u-bolts. After installing the cradle mount, the excess threads were removed with a hack saw.
3.jpg
.
The bags are installed with the stud orienting the bag to the upper bracket. Decide where you want the air lines to be accessed - I ran mine out the sides of the license plate. Routing of the line is real easy on the drivers side. There is a wiring loom that runs along the frame I used to zip tie the line to. The Passenger side is a bit more difficult due to the exhaust, so choose the routing to avoid it, and use the supplied heat shield for the airline and the air bag when installing it. The plastic covers supplied for the valves are cheesy, so I used the same type I have on the truck. One of the valve stem cores supplied with the kit leaked, so it was replaced with one of the spares I carry.
6.jpg
.
Flex check - the d'side bag is loose in the bucket, the passenger side fully compressed. The bags were filled to 10 PSI after install.
5.jpg
4.jpg
.
So, now comes the testing to see how they do. We'll be towing the trailer next weekend, and I'll be leading a trail ride for the Overland Journal/Adventure Trailer Open House on the 7th of Sept that will give them a good work out for off highway use.
.
And a side note on Firestone...
.
The two fittings that were missing caused me a week in delay on getting the system finished. I called Firestone on Monday and asked to have the parts shipped in time for this weekend. I was told by a less than helpful representative that they won't ship parts Red label, and the earliest they would ship replacement parts was by Thursday via standard shipping. So, to complete the project, I ordered parts from Etrailer.com via Blue UPS. I'm not to happy with Firestones customer service...
.
Mark
 
Last edited:

crawler#976

Expedition Leader
Had the truck in for service, and had a chance to see how much droop there is:
 

Attachments

  • full droop.jpg
    full droop.jpg
    297.9 KB · Views: 49

1leglance

2007 Expedition Trophy Champion, Overland Certifie
Nice work and something I might adapt to my rig down the road....
I like the idea of softer springs with an airbag for the heavy load times.
 

Forum statistics

Threads
188,176
Messages
2,903,366
Members
229,665
Latest member
SANelson

Members online

Top