You are using an out of date browser. It may not display this or other websites correctly.
You should upgrade or use an alternative browser.
You should upgrade or use an alternative browser.
The Camp 4x4 Bus - 1973 Suburban 8.1 Swap & Build
- Thread starter camp4x4
- Start date
Larry
Bigassgas Explorer
Looks like you are making quick progress Aaron! That is great you have a nice place with plenty of room to work as well.
I know you’ve read over my 8.1L Resource Thread over on CK5 but there is a lot of material there to digest. Here are a few important things people forget from that thread that generate a lot of emails and PM’s on various forums. Forgive me if you already touched on some of these things…
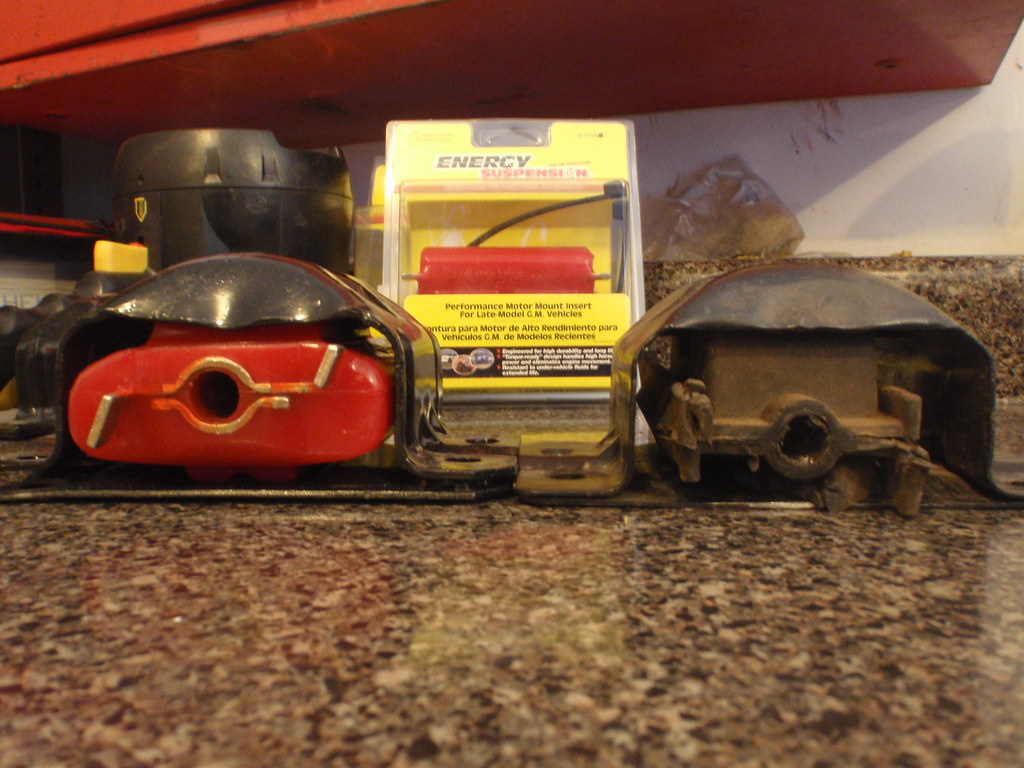
On the driver’s side of the engine you’ll need to grind down the center boss in order for the older engine mounts to sit flush. You mentioned the ORD engine mounts as well but the original 1973 clam shells will work fine proving you threat them to a set of Energy Suspension inserts (my Polar Bear Burb still has the 5.7L clams fitting with Energy inserts). I’m not a big fan of the popular competition type engine mounts that are out there as they will feel like solid mounts and shake your teeth out. Too much engine harmonics with those type mounts for my liking. Either way, you will need to grind this center boss down regardless which engine mounts you go with
Grind down the center boss
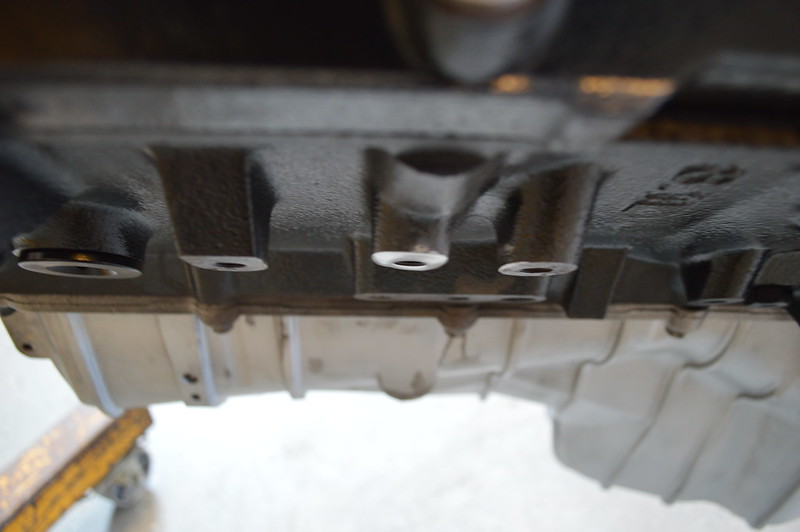
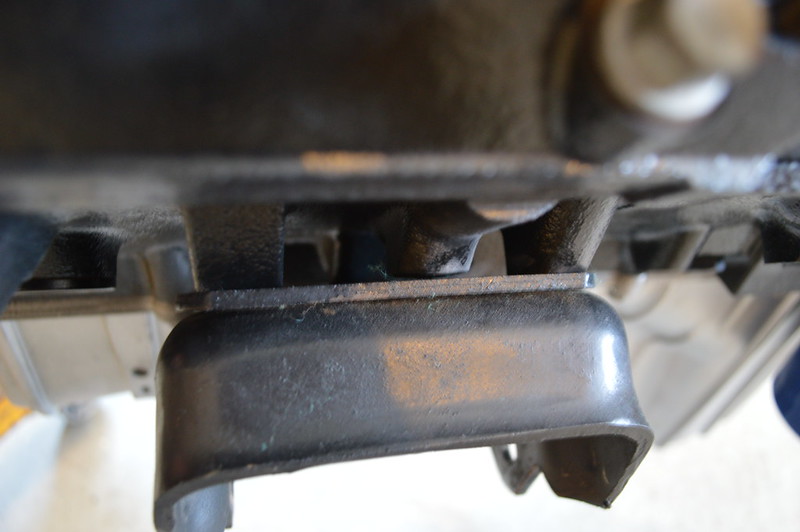
Energy Suspension inserts in original clams
Knock Sensors
You can use the original knock sensor on the Passenger’s side (AC Delco 213-2829) but on the Driver’s side you’ll need a 213-298. This sensor has smaller threads that will need to be screwed into a different hole in the block as the engine mount will be in the way.
Throttle
You mentioned you’d like to keep drive by wire. From experience having 8.1L’s on cable and one in my stock Silverado with electric, the cable operated throttle body is much more off-road friendly as the pedal feel is more accurate and easy to feather in tight off-road spots. I would not recommend electronic throttle for an off-roadster although with a slush box trans it may not be as noticeable. BTW, keeping drive by wire is not the only way to get cruise control. I can give you my thoughts on cruise control if you decide to go with a L29 cable operated throttle body. The cable operated TB is also much more durable. The Throttle Actuator Module on the 8.1L's (TAC module) where not known to be a durable piece. Speaking of cruise control, a later model steering column (84-91) is not a direct bolt in as the wiring at the base of the column is different and the stub shafts where the I-shaft connects is different. The early columns are splined while the later columns just have square stock on the bottom. Both issues are easy to overcome though. Just throwing that out there in case you were thinking it was a bolt for bolt and plug for plug swap..
Exhaust
Do not use the manifolds on your donor engine as they will not fit in the frame. Don’t be that guy that hacks up a square body frame for manifold clearance. As you are probably aware, any BBC manifold or header will fit the 8.1L
Hydrobooost
Didn’t notice any mention of your plans with brakes or if you plan to do hydroboost anytime soon but the 8.1L coil packs cleared the vacuum booster on my 78 K10 without any issues where I ran vacuum brakes for a few years after the engine swap before swapping on hydroboost. However, #5 coil pack absolutely would not clear the vacuum booster on my 89 Suburban. Not sure why as the firewalls and frames between the two are pretty much the same. That said, be prepared as you may end up having to swap on hydroboost sooner than later if you run into a clearance problem. That was an expensive surprise for me on the Polar Bear Burb as I had not budgeted in a hydroboost swap into my plans at the time of the engine swap
Harness
I read where your donor engine came with the harness. Personally, I would sell that harness to some other sucker or just keep it for parts. I consider myself above average with wiring but reworking stock harness is more of a hassle than it is worth. The absolute best $600-$800 you can spend on a late model engine swap is to start with a fresh stand-a-lone harness from someone like Howell, etc. There are lots of good engine harness suppliers around these days to pick from.
Oh, and hood clearance. There is plenty of room between the air intake and hood on 73-80’s. 81-91 is a bit tighter. This elbow does slightly rub the hood on my 89 Suburban but not on the 78 K10.
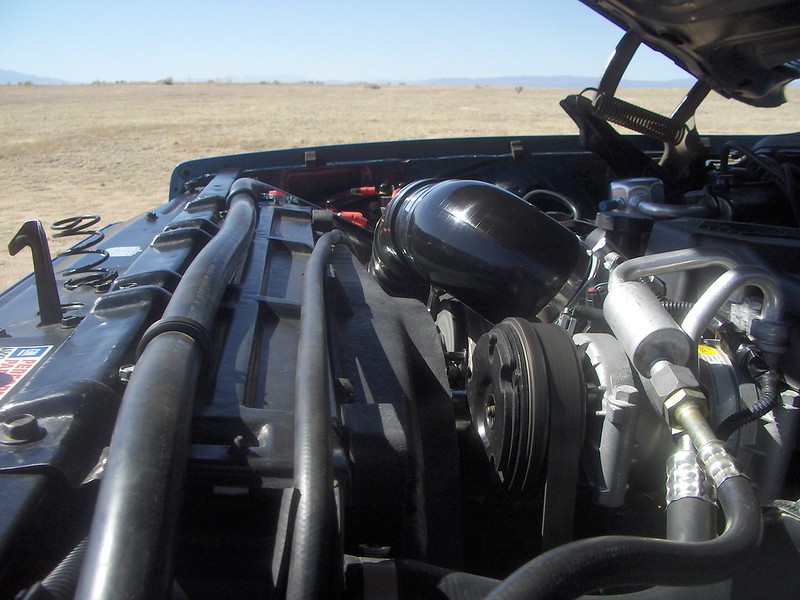
Lastly, make sure you replace the crank sensor with a fresh GM sensor before you drop the engine in. Don't skimp on a cheap aftermarket sensor either. Get the genuine GM sensor. Part number 12575172. You may even consider replacing the front and rear main seals now as well. If they are not leaking now, they will soon
Anxious to watch your project progress. Wish you were closer as I would swap that NP205 input gear and reseal the entire thing real quick. 205’s are a piece of cake to rebuild but it takes on or two to get good at them. Definitely buy the modified shift rails from ORD so you can run the front and rear independently
I know you’ve read over my 8.1L Resource Thread over on CK5 but there is a lot of material there to digest. Here are a few important things people forget from that thread that generate a lot of emails and PM’s on various forums. Forgive me if you already touched on some of these things…
On the driver’s side of the engine you’ll need to grind down the center boss in order for the older engine mounts to sit flush. You mentioned the ORD engine mounts as well but the original 1973 clam shells will work fine proving you threat them to a set of Energy Suspension inserts (my Polar Bear Burb still has the 5.7L clams fitting with Energy inserts). I’m not a big fan of the popular competition type engine mounts that are out there as they will feel like solid mounts and shake your teeth out. Too much engine harmonics with those type mounts for my liking. Either way, you will need to grind this center boss down regardless which engine mounts you go with
Grind down the center boss


Energy Suspension inserts in original clams

Knock Sensors
You can use the original knock sensor on the Passenger’s side (AC Delco 213-2829) but on the Driver’s side you’ll need a 213-298. This sensor has smaller threads that will need to be screwed into a different hole in the block as the engine mount will be in the way.
Throttle
You mentioned you’d like to keep drive by wire. From experience having 8.1L’s on cable and one in my stock Silverado with electric, the cable operated throttle body is much more off-road friendly as the pedal feel is more accurate and easy to feather in tight off-road spots. I would not recommend electronic throttle for an off-roadster although with a slush box trans it may not be as noticeable. BTW, keeping drive by wire is not the only way to get cruise control. I can give you my thoughts on cruise control if you decide to go with a L29 cable operated throttle body. The cable operated TB is also much more durable. The Throttle Actuator Module on the 8.1L's (TAC module) where not known to be a durable piece. Speaking of cruise control, a later model steering column (84-91) is not a direct bolt in as the wiring at the base of the column is different and the stub shafts where the I-shaft connects is different. The early columns are splined while the later columns just have square stock on the bottom. Both issues are easy to overcome though. Just throwing that out there in case you were thinking it was a bolt for bolt and plug for plug swap..
Exhaust
Do not use the manifolds on your donor engine as they will not fit in the frame. Don’t be that guy that hacks up a square body frame for manifold clearance. As you are probably aware, any BBC manifold or header will fit the 8.1L
Hydrobooost
Didn’t notice any mention of your plans with brakes or if you plan to do hydroboost anytime soon but the 8.1L coil packs cleared the vacuum booster on my 78 K10 without any issues where I ran vacuum brakes for a few years after the engine swap before swapping on hydroboost. However, #5 coil pack absolutely would not clear the vacuum booster on my 89 Suburban. Not sure why as the firewalls and frames between the two are pretty much the same. That said, be prepared as you may end up having to swap on hydroboost sooner than later if you run into a clearance problem. That was an expensive surprise for me on the Polar Bear Burb as I had not budgeted in a hydroboost swap into my plans at the time of the engine swap
Harness
I read where your donor engine came with the harness. Personally, I would sell that harness to some other sucker or just keep it for parts. I consider myself above average with wiring but reworking stock harness is more of a hassle than it is worth. The absolute best $600-$800 you can spend on a late model engine swap is to start with a fresh stand-a-lone harness from someone like Howell, etc. There are lots of good engine harness suppliers around these days to pick from.
Oh, and hood clearance. There is plenty of room between the air intake and hood on 73-80’s. 81-91 is a bit tighter. This elbow does slightly rub the hood on my 89 Suburban but not on the 78 K10.

Lastly, make sure you replace the crank sensor with a fresh GM sensor before you drop the engine in. Don't skimp on a cheap aftermarket sensor either. Get the genuine GM sensor. Part number 12575172. You may even consider replacing the front and rear main seals now as well. If they are not leaking now, they will soon
Anxious to watch your project progress. Wish you were closer as I would swap that NP205 input gear and reseal the entire thing real quick. 205’s are a piece of cake to rebuild but it takes on or two to get good at them. Definitely buy the modified shift rails from ORD so you can run the front and rear independently
camp4x4
Adventurer
I know you’ve read over my 8.1L Resource Thread over on CK5 but there is a lot of material there to digest. Here are a few important things people forget from that thread that generate a lot of emails and PM’s on various forums. Forgive me if you already touched on some of these things…
I appreciate the recap! I have been over it a few times, but it is dense, and there's a lot. So I appreciate the refresher.
On the driver’s side of the engine you’ll need to grind down the center boss in order for the older engine mounts to sit flush. You mentioned the ORD engine mounts as well but the original 1973 clam shells will work fine proving you threat them to a set of Energy Suspension inserts (my Polar Bear Burb still has the 5.7L clams fitting with Energy inserts). I’m not a big fan of the popular competition type engine mounts that are out there as they will feel like solid mounts and shake your teeth out. Too much engine harmonics with those type mounts for my liking. Either way, you will need to grind this center boss down regardless which engine mounts you go with.
I've been going back and forth on this. I think you've convinced me to keep the stock clams and get the ES inserts. I have them on the '87 already and they're great. I can certainly imagine the "competition" mounts being a lot more harsh than these. So,
Knock Sensors
You can use the original knock sensor on the Passenger’s side (AC Delco 213-2829) but on the Driver’s side you’ll need a 213-298. This sensor has smaller threads that will need to be screwed into a different hole in the block as the engine mount will be in the way.
There you go! See, I had forgotten about that bit! Thx! Adding to the Rock Auto cart now...
Throttle
You mentioned you’d like to keep drive by wire. From experience having 8.1L’s on cable and one in my stock Silverado with electric, the cable operated throttle body is much more off-road friendly as the pedal feel is more accurate and easy to feather in tight off-road spots. I would not recommend electronic throttle for an off-roadster although with a slush box trans it may not be as noticeable. BTW, keeping drive by wire is not the only way to get cruise control. I can give you my thoughts on cruise control if you decide to go with a L29 cable operated throttle body. The cable operated TB is also much more durable. The Throttle Actuator Module on the 8.1L's (TAC module) where not known to be a durable piece. Speaking of cruise control, a later model steering column (84-91) is not a direct bolt in as the wiring at the base of the column is different and the stub shafts where the I-shaft connects is different. The early columns are splined while the later columns just have square stock on the bottom. Both issues are easy to overcome though. Just throwing that out there in case you were thinking it was a bolt for bolt and plug for plug swap..
I think for now I'm gonna stick with the DBW. I'll keep my cable pedal, so if I find it's just not sensitive enough or if the TB sensor fails too quickly I can swap back. as for the column, yeah, I'm aware they're different. I actually WANT the newer, unsplined version so I can get one of the HD, non-rag-joint slipshafts.
Exhaust
Do not use the manifolds on your donor engine as they will not fit in the frame. Don’t be that guy that hacks up a square body frame for manifold clearance. As you are probably aware, any BBC manifold or header will fit the 8.1L
Yep! First thing I got was the different brackets and an older BBC set of exhaust manifolds!
Hydrobooost
Didn’t notice any mention of your plans with brakes or if you plan to do hydroboost anytime soon but the 8.1L coil packs cleared the vacuum booster on my 78 K10 without any issues where I ran vacuum brakes for a few years after the engine swap before swapping on hydroboost. However, #5 coil pack absolutely would not clear the vacuum booster on my 89 Suburban. Not sure why as the firewalls and frames between the two are pretty much the same. That said, be prepared as you may end up having to swap on hydroboost sooner than later if you run into a clearance problem. That was an expensive surprise for me on the Polar Bear Burb as I had not budgeted in a hydroboost swap into my plans at the time of the engine swap.
Definitely something I'll be pulling from the '87. I did that swap a year ago and love it.
Harness
I read where your donor engine came with the harness. Personally, I would sell that harness to some other sucker or just keep it for parts. I consider myself above average with wiring but reworking stock harness is more of a hassle than it is worth. The absolute best $600-$800 you can spend on a late model engine swap is to start with a fresh stand-a-lone harness from someone like Howell, etc. There are lots of good engine harness suppliers around these days to pick from.
Yep, already got the Howell harness and PCM!
Oh, and hood clearance. There is plenty of room between the air intake and hood on 73-80’s. 81-91 is a bit tighter. This elbow does slightly rub the hood on my 89 Suburban but not on the 78 K10.
Good to know!
Lastly, make sure you replace the crank sensor with a fresh GM sensor before you drop the engine in. Don't skimp on a cheap aftermarket sensor either. Get the genuine GM sensor. Part number 12575172. You may even consider replacing the front and rear main seals now as well. If they are not leaking now, they will soon.
Got it, adding to the Rock Auto cart as well... actually, the GM one is out of stock. ACDELCO okay?
Anxious to watch your project progress. Wish you were closer as I would swap that NP205 input gear and reseal the entire thing real quick. 205’s are a piece of cake to rebuild but it takes on or two to get good at them. Definitely buy the modified shift rails from ORD so you can run the front and rear independently
Thanks. I read a rebuild step-by-step and they do seem fairly simple. I've done a steering box before, so I figure this looks similar... and without those pesky ball bearings! According to, I believe, ORD, the NP205 housing will have to be machined to get the bigger bearing in there. Is that your experience as well?
Larry
Bigassgas Explorer
I've been going back and forth on this. I think you've convinced me to keep the stock clams and get the ES inserts. I have them on the '87 already and they're great. I can certainly imagine the "competition" mounts being a lot more harsh than these
Smart move
I think for now I'm gonna stick with the DBW. I'll keep my cable pedal, so if I find it's just not sensitive enough or if the TB sensor fails too quickly I can swap back. as for the column, yeah, I'm aware they're different. I actually WANT the newer, unsplined version so I can get one of the HD, non-rag-joint slipshafts.
Okay, but keep in mind there are some pinout and tuning differences between DBW and DBC. You can't just easily switch back and forth. It's one of those things you need to make up your mind before you lay down money on a harness. If you've already got your Howell harness you're probably committed to DBW if that is how you spec'd it. For shame…..I think you will regret it, but then again….with an automatic trans it may not be that noticeable since the torque converter will soak up some of the wonkey pedal feeling
Yes, AC Delco is the same but be careful where you buy it as AC Delco is one of the brands that is so often counterfeited. Someone like RockAuto should sell genuine AC Delco parts but Ebay and Amazon not so much.Got it, adding to the Rock Auto cart as well... actually, the GM one is out of stock. ACDELCO okay?
I've done several 205 builds but never had to machine the front bearing on any projects but it sounds easy enough for just about any machine shop to do. The last one I built for my K10 was a later model round pattern unit but it came to me with a rear slip yoke and short 32 spline input. Had to get a ORD long 32 spline input then convert the rear to a fixed yoke. Also did their shifter rails while I was there. I love the twin stick with the these shifter rails. Pretty cool to work them independently but yet there is a failsafe that prevent you from running one end in high and the other in low. It looked sweet when done tooThanks. I read a rebuild step-by-step and they do seem fairly simple. I've done a steering box before, so I figure this looks similar... and without those pesky ball bearings! According to, I believe, ORD, the NP205 housing will have to be machined to get the bigger bearing in there. Is that your experience as well?
camp4x4
Adventurer
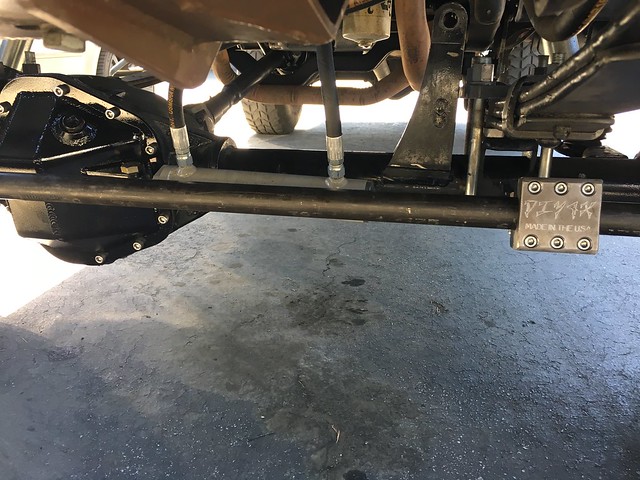
Really didn't make any progress on The Bus this weekend. Allergies had me practically incapacitated on Sunday, but Saturday I spent re-working the hydro-assist cylinder mount on the Dana 60 on my '87. The mount I'd previously used from DIY4x was hitting the engine crossmember when the driver side got stuffed (you can see it still there in the picture, to the left of the spring perch). Gotta find the sawsall to get that thing outta there... it was welded on well! In addition, the high steer tie rod was interfering withe the drag link at some steering angles because I'd move the axle forward an inch. The solve for both was to simply ditch the high steer, moving it back to the stock location, and picking up a Chassis Unlimited D60 diff cover, on which I welded some mounting tabs. The tie rod is a beefy sumbitch, so I'm not terribly worried about damaging it on the more rocky trails. And it protects the cylinder pretty well. All in all I'm happy with the outcome. I have a different clamp on the way. I think the DIY clamp is a little too beefy, so I have a PSC one coming. Also have a longer tie rod coming since this one was cut to the shorter distance between the high steer arms. Otherwise all seems well, and I'm hoping to take it out to Hollister next weekend to see how it does. I do plan to switch one of the hoses sometime this week since the one attached to the passenger side of the cylinder is stretched just a little too tight for my liking. Waiting on some fittings to come tomorrow for that.
New hydro mount
Otherwise the plan is to start yanking out the driveline on The Bus this week, and start putting the new accessories and sensors on the 8.1.
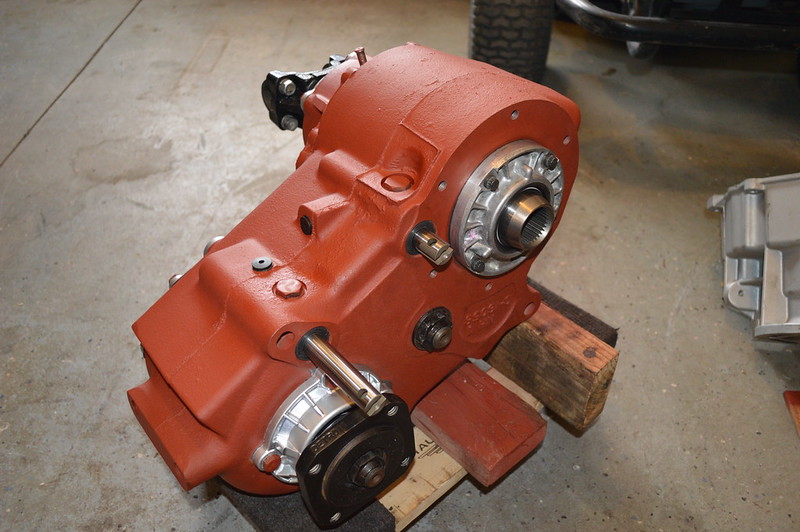
I did hear back from Kris over at Northwest Fab Works. He says their Fig. 8 to round 6 adapter works with the short 32 spline input shaft and the stock 4l80e transfer case mount. So I think I'm going to go that route. The input shaft is $190 with a full set of new seals from ORD, and NWFW's adapter is $250. So about $500 total with shipping. I'm looking into whether or not I should be buying NWFW's small bore or large bore adapter plate. I'm not sure what the difference is. I have a small bore 205, but I'm going to be making the bore large to fit the new female input shaft... we'll see what Kris says. I'm hoping I need the large bore version 'cause it's $175 vs $250. It appears that the large bore just doesn't include the conversion parts, which is fine because the ORD kit includes those. So hopefully I'll only need the $190 ORD conversion kit and the $175 NWFW adapter plate. Keeping it under $400 would be great.
Northwest Fab Works adapter plate

ORD 32 Spline short input shaft kit

New hydro mount

Otherwise the plan is to start yanking out the driveline on The Bus this week, and start putting the new accessories and sensors on the 8.1.
I did hear back from Kris over at Northwest Fab Works. He says their Fig. 8 to round 6 adapter works with the short 32 spline input shaft and the stock 4l80e transfer case mount. So I think I'm going to go that route. The input shaft is $190 with a full set of new seals from ORD, and NWFW's adapter is $250. So about $500 total with shipping. I'm looking into whether or not I should be buying NWFW's small bore or large bore adapter plate. I'm not sure what the difference is. I have a small bore 205, but I'm going to be making the bore large to fit the new female input shaft... we'll see what Kris says. I'm hoping I need the large bore version 'cause it's $175 vs $250. It appears that the large bore just doesn't include the conversion parts, which is fine because the ORD kit includes those. So hopefully I'll only need the $190 ORD conversion kit and the $175 NWFW adapter plate. Keeping it under $400 would be great.
Northwest Fab Works adapter plate

ORD 32 Spline short input shaft kit

camp4x4
Adventurer
Okay, but keep in mind there are some pinout and tuning differences between DBW and DBC. You can’t just easily switch back and forth. It’s one of those things you need to make up your mind before you lay down money on a harness. If you’ve already got your Howell harness you’re probably committed to DBW if that is how you spec’d it. For shame…..I think you will regret it, but then again….with an automatic trans it may not be that noticeable since the torque converter will soak up some of the wonkey pedal feeling
Gotcha, then yeah, I'm already committed to DBW since I have the harness in hand. C'est la vie.
I am curious what's so great about having front and rear H/N/L separate on the twin sticks... when is that useful?I’ve done several 205 builds but never had to machine the front bearing on any projects but it sounds easy enough for just about any machine shop to do. The last one I built for my K10 was a later model round pattern unit but it came to me with a rear slip yoke and short 32 spline input. Had to get a ORD long 32 spline input then convert the rear to a fixed yoke. Also did their shifter rails while I was there. I love the twin stick with the these shifter rails. Pretty cool to work them independently but yet there is a failsafe that prevent you from running one end in high and the other in low. It looked sweet when done too
camp4x4
Adventurer
Alrighty... got the NP205 parts ordered. As I suspected, the other, more expensive adapter from NWFW included a bunch of parts to adapt the small bore case to the large bore input shaft. However, Kris said that the adapter bearing would decrease the strength of it. So, upside: no machining. Downside: weaker. I don't like that downside, so I'll go the machining route. Picked up their adapter plate, and picked up ORD's full short input 32 spline kit with all the seals. Certain I can find a machinist around here to bore that out for me and I expect I can do the rest myself.
RikFlairWoo
Observer
This is an awesome rig, subscribed
chilliwak
Expedition Leader
Looks like a cool set-up Aaron but I am running a Dana 60 with 37 inch Toyo muds and my old school stock worn out pump and steering box has no problems turning those big tires. I like the upgrades but I am just wondering if you really need them. Love your build as does everyone else here at Expo. Keep up the good work. Cheers, Chilli..
snowblind
Adventurer
Lastly, make sure you replace the crank sensor with a fresh GM sensor before you drop the engine in. Don't skimp on a cheap aftermarket sensor either. Get the genuine GM sensor. Part number 12575172.
Just to add a little to this. GM changed the Camshaft Position Sensor in 04to a more durable design. The original 01-02 sensors are getting expensive and many don't last 100k miles. You can upgrade the earlier engines to use the newer sensors but you also need to swap in newer timing set and also timing covers I think. Raylar Engineering has info HERE.
On my truck I did crank position sensor, timing set and water pump all at the same time.
Matt
Last edited:
Larry
Bigassgas Explorer
Just to add a little to this. GM changed the crank position sensor in 03-04 (I think) to a more durable design. The original 01-02 sensors are getting expensive and many don't last 100k miles. You can upgrade the earlier engines to use the newer sensors but you also need to swap in newer timing set. Raylar Engineering has info on this on their site.
On my truck I did crank position sensor, timing set and water pump all at the same time.
Matt
How very well I know…. The company I work for consumed more L18's than GM did. I dealt with a lot of them. Those early sensors were a mess but the early and later part numbers have been superceded to the later design. Failure rate of the first design was sky high and they had O-rings at the top and bottom of the sensor so when you tried to change them the sensor broke in the block to boot. That sensor is like 8” long too. Talk about sticking it in and breaking it off! That happened on my 2001 truck when it had 48K on it. GM even recalled the early L18's for that issue
Anak
Stranger
Just to add a little to this. GM changed the crank position sensor in 03-04 (I think) to a more durable design. The original 01-02 sensors are getting expensive and many don't last 100k miles. You can upgrade the earlier engines to use the newer sensors but you also need to swap in newer timing set. Raylar Engineering has info on this on their site.
On my truck I did crank position sensor, timing set and water pump all at the same time.
Matt
I think (but I could be wrong, please clarify if I am wrong) that you are talking about the Camshaft Position Sensor, not the Crank Position Sensor.
I went looking for details (I own an '02 8.1L and am always looking to stay ahead of potential problems) and came up with this: http://www.raylarengineering.com/vortec8100-camshaft-position-sensor-camshaft-gears.html Does that coincide with what you have in mind?
snowblind
Adventurer
I think (but I could be wrong, please clarify if I am wrong) that you are talking about the Camshaft Position Sensor, not the Crank Position Sensor.
I went looking for details (I own an '02 8.1L and am always looking to stay ahead of potential problems) and came up with this: http://www.raylarengineering.com/vortec8100-camshaft-position-sensor-camshaft-gears.html Does that coincide with what you have in mind?
YES! Sorry about that. I will fix the earlier post.
Matt
Larry
Bigassgas Explorer
I think (but I could be wrong, please clarify if I am wrong) that you are talking about the Camshaft Position Sensor, not the Crank Position Sensor.
I went looking for details (I own an '02 8.1L and am always looking to stay ahead of potential problems) and came up with this: http://www.raylarengineering.com/vortec8100-camshaft-position-sensor-camshaft-gears.html Does that coincide with what you have in mind?
Actually it was both…. they changed the crank sensor to a more duarable design first. Then the cam sensor and reluctor changed a few times over the years. What Larry Hofer at RayLar has on his website related to the cam sensor and gears is good info.
The Crank Sensor is what caused a lot of heartache and forced GM into a Product Safety recall (06083), not the cam sensors. Also, the story from GM Powertrain back in the day was the cam sensor and cam gears changed to better precisely control ignition timing. The cam sensor and gear changes had nothing to do with durability
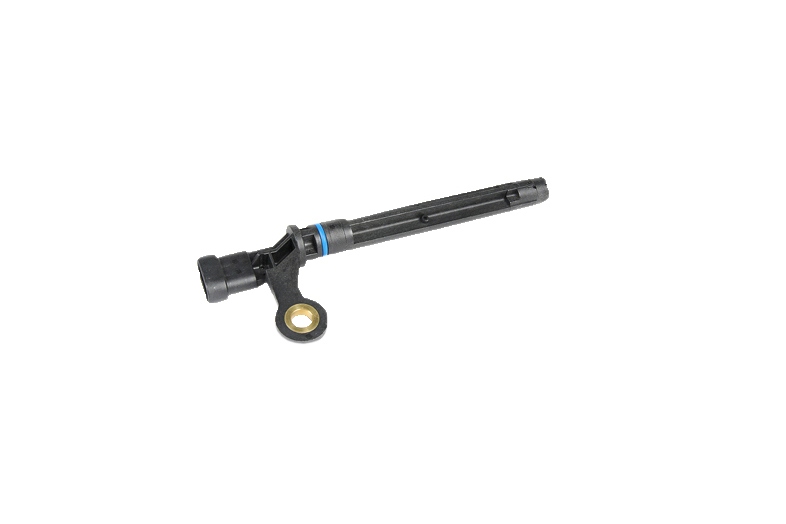
This is the early design Crank Sensor with the two O-rings

This is the later design Crank Sensor without the lower O-ring. There were more updates internal to the sensor other than O-rings but the lower O-ring is the best way to tell them apart. If you find a sensor with a lower O-ring, toss it in the trash….if you can get it out of the engine in one piece.
Last edited:
Similar threads
- Replies
- 10
- Views
- 847
- Replies
- 5
- Views
- 384
