The Memorial F150 Craptor.

dbhost

Well-known member
Okay it's not much, but I got some shots of the work being done without catching the rest of the house...

So the electrical cabinet, I laid out the mount for the solar charge controller / DC to DC charger and drilled, / countersunk the holes in the plywood, and ran the screws in. #10 24 I think they are... And my largest countersink apparently is a nudge too small but there it is.

ChargeControllerMount.jpg

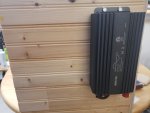
And of course the charge controller / DC to DC charger was mounted up on the board. I laid the top holes 2" down from the top of the 2x2 so there really isn't a lot of room to get fingers and a wrench in there to install those nuts...
ChargeController.jpg

Not pictured and be glad it isn't. I am NOT using my table saw on any of this, just a circ saw freehand so things aren't super square and are kind of ugly, but I got the top installed and put a simple hasp on it. Planning on just using a spring carabiner to keep it latched. I have a few of them laying around so why not?

I have realized the way I need to route the wires for the 12V ports etc... I will need to extend the positive and ground leads as they will need to go down the lid, to the hinge, and down, back across and to the battery posts. Probably 36" total. Oops... Pics of that once I get the lid drilled for those ports and the ports / switches installed I would put them in the front / face of the cabinet but I wouldn't be able to get the battery past them...

I tell you what. I will install the ports etc... extend the wires, and get the battery in position and take some beauty shots of that setup tomorrow. I should have something worth showing off then...
 

dbhost

Well-known member
Dangit, just couldn't leave well enough alone...

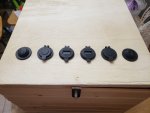
Don't say I didn't warn you about it not being square. More importantly for THIS build, I don't care. On the outer edges obviously are the on / off switches. Next in are the 12v outlets, and in the middle are a pair of USB chargers with voltometers which are not anywhere near accurate. One will always read .1v lower than the other. The one that reads high matches my multimeter so I guess there is that. Going to have to plug them back in to figure out which is which. Will likely just tape over the bad one. No the box isn't out of square, nor is the bead board messed up. It is the lid that was badly cut out of scrap. Again just didn't care so that is the result...

Anyway, the idea is plug the CPAP in, plug my charging cables in. I need to mount the inverter to the outside here but not sure where yet. The inverter will provide power to the Type C charger for the laptop. Need to clip the ends, strip back, extend to get to the battery and I should be good there. I want the battery connections at the front here, not sure why I do, but I do. I need cable clips and I should be getting some 1/2" split loom in tomorrow on Thursday. I have 3/8 but that is a little small for what I need to do. I think...
ElectricalCabinetOutletsInstalled.jpg
 

badm0t0rfinger

Raptor Apologist.
Truck is in the shop, and I am not shooting pics inside the house. I know it might sound funny but it is something my wife did NOT like so I guess old habits and all... As soon as the truck comes back, the camera comes out... Running out of daylight. I might be able to drag the cabinets outside and snap pics in the yard tomorrow...

I understand.
 

dbhost

Well-known member
So the FB Marketplace seller that has the Pop up truck camper flaked on me. I guess no shock there. So I continue with my micro camper build. A little disappointed, there were only 2 things I wasn't super fond of with that camper. #1 roof AC, meaning a minimum 13K BTU unit no way my 1KW generator is running that, and it is a teeny tiny space. A 5K BTU unit in the back wall and insulated sides for the canvas are all I need, even here in TX... And no oven. Ovens are super rare in pop up truck campers, but lacking that, I am forced into using my Dutch oven instead of optional. No biggie. The camper shell camper forces me to use the dutch oven for baking...

I went ahead and ordered a couple of sets of 12V / USB powered LED strip lights for interior lighting of the camper shell. One set per side going down front to back. The idea is to have plenty of lighting, and I got the kind that I can do lots of funky colors with so I can have a little fun with it...

I don't want to push the shop, but curiosity is killing me on how the engine swap progress is going. I doubt it will be done this week, but that leaves the next question. How do I get the thing when I am working the new job? Heck even without. The shop is something like 15 miles away from me, and, well I don't have a tow dolly for my car, so I guess I call a friend, or an uber to go to the shop.

Oh the funny angle you see on the electrical box. The plywood side on the right side is taller than the framing and the lid doesn't quite clear it. I need to trim it down. I either take the router and flush trim bit, but I only have bit 1/2" routers, and that makes a mess, OR I whip out the Dozuki saw and flush cut it... Probably go the Dozuki route. I like using those Japanese pull saws anyway...

About to get after the wiring for the 12V outlets here, extending it and all. Just not super motivated at the moment.

The weather is perfect last few days, and I am without the truck / camper not done. Driving me absolutely nuts actually... So I guess I better get after it so I can be ready for the next trip opportunity.
 
Last edited:

dbhost

Well-known member
Definately NOT going to snap any pics until I do some cleanup now. BUT... Got the wiring extended for the 12V output. I am trying to figure out where my romex staples are. Once I get THAT pinned down, I can move on to the next item. Running the wire charge controller to battery connection. And then the inverter. Still haven't even thought about the inverter. I think I might need some more screws / nuts for that.

By the time I get the truck back, I should electrically speaking, just need to install the new head unit / backup camera, and run the wires from the main battery to the dc to dc charger, I already have the harness mostly set up for that with a fuse inline on the positive side.

The idea is when I get to camp. I can pull out the solar panels, plug in, and get to charging.
 

dbhost

Well-known member
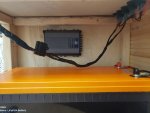
Okay so electrical cabinet is done, more or less. Still need to wire the charge controller up, but the outputs are there now.

Outlet ports seen under the lid, charge controller / DC to DC charger on the side, and you can see the wiring at the battery. Not super clean, but way bettter than pretty much every factory job I have seen. No split loom is in use here, that goes under the truck for other applications. The wire gauge used for the connection is MUCH larger than needed. I went with what was recommended by the MFG of the inverter. The outlets are oversized as well just because, well I had bigger wire on hand...
ElectricalCabinetInterior.jpg

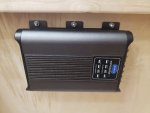
It's not huge, it doesn't have to be. My inverter is a Bestek 500w pure sine wave inverter. Bolted to the front panel of the cabinet. I will likely regret at some point the 110V outlets pointing up, but it is how I opted to do this for now... This should allow me to easily and directly plug in the laptop charger and really, that is the only purpose to this.
ElectricalCabinetInverter.jpg

Something to note. Like I said, I don't care about it being pretty or perfect. I am using cheap, or better free because I have them building materials to minimize my cost. I was more interested in being able to replace my ancient modified sine wave inverter with a pure sine wave model, put funds into a bigger battery even though I could have gone bigger, that isn't in the budget for now. Anyway you might notice I cobbled a pice of beadboard together out of 2 scraps. I didn't have enough long enough pieces to do it, but I DID have cutoffs sitting on my miter saw bench, and a gallon of Titebond 2.

What is left to be done electrically?

Wire up the charge circuit to the truck, solar panel input port, and battery.

Source up, and wire in 1 12V outlet port for in the cab of the truck.

Once that is done, and it is all verified and works as expected, still not certain about the charge controller / DC to DC charger and lifepo4 battery, I can still use the factory provided charge controller only unit and run solar only for now. Not ideal but either I fork over more budget than I am comfortable with right now, or I figure out how to get the model with the Lifepo4 profile shipped from Australia since they do NOT sell that one in north America... Kind of a dumb omission but whatever.
 
Last edited:

dbhost

Well-known member
Not a single bit of progress today. Unless you count grocery shopping at Walmart for box dinners, and canned meats for the pantries for the camper. FWIW. I use a pair of 5 gallon buckets with Gamma Seal lids, one for canned stuff that will destroy soft stuff, and one for soft stuff. Between this and the fridge I can keep a couple going for 2 weeks easy between stops but I would have trouble with water / black water...
 

dbhost

Well-known member
Trimmed the side of the electrical cabinet. The lid still looks wonky, I used the factory edges of the plywood to line it up, and discovered the panel from the factory is not quite square. Oh well, it sits flat now. Used the Dozuki just because I wanted to. Cleaned it up and relieved the edges with my orbital sander. Will take the same approach with the bed cabinet. I have a gap due to non square materials for the bed cabinet I am planning on using a piece of corner stock, but I am not happy with th ecorner stock I have.
 

dbhost

Well-known member
Dragging the bed platform out to the yard to do some sanding to relieve the edges on the ply so that my sleeping bag etc... don't get snagged on it. Probalby take a shot of it out there. I do need to trim the corner of the thing. Mind you. The corners of the front at each corner bow out due to the mending plates. I did NOT relieve any stock for them and so they push out the bead board. Very unconcerned about that. I know its ugly. Don't care...
 

dbhost

Well-known member
No pics yet, still fiddling with it. But for interior lighting in the camper, I am going to use a pair of interior accent light sets. https://amzn.to/3yZvFJq Basically 4 interconnected 12" LED light bars that are USB powered and offer a variety of color, intensity, and yes even music responsive strobing variations. I know dumb, but hey, they were cheap, are easy to install, and offer plenty of light that I will not be killing myself moving about the truck. I also have a couple of LED fan / light combos that have adjustable / aimable lights that would make a good reading light, battery powered...

Did the sanding on the edges of the plywood, everything is relieved and nice and smooth now. That is always a plus.

Anxious to get my truck back from the shop. I have a bit more to do to get ready for the maiden voyage. I may go a bit incomplete. Just get the tires swapped, bedrug in, wiring in / camper interior in, load up and go. I don't know if I will have enough time before my first scheduled trip.
 

dbhost

Well-known member
Funny story, I have been looking for cot storage organizers on line and finding ones that are only half length. No thanks. I wanted a full length one.

I stopped at Cabelas in my errand running, and found what they call a cot side nightstand, and yes I would have just called it a cot organizer but whatever, it is full length and has loops to hang it on the ends and the middle, which coincidentally is also where my camper shell mounting clamps are located, I am planning on hanging them from the drivers side clamps. May have to rig up some kind of way to clip onto them, not sure...

Anyway, after all of that and I am just kicking back watching Youtube videos last night, I came across the same idea by one of the youtubers I subscribe to "Crazy Quady". He is way more State park gotta have shore power type camping than I am wanting to do, but for what he does, cool setup...

Anyway apparently he already had this idea, but he used J bolts and drilled his truck for them. Before I did that I would probably try heavy duty 3M command hooks!

Anyway here is his video on the idea. Might be worth for you to look into if you are building one of these...

Crazy Quady adding more storage to his truck camper.

Took some 1" nylon webbing and fabbed up a pull strap for the camper shell hatch. Basically cut and singed a 20" strip, punched a hole for a grommet, singed that so it doesn't fray from the grommet hole, and installed the grommet. Planning on pop riveting it to the bottom of the hatch frame with a fender washer.
 
Last edited:

dbhost

Well-known member
For those of you following I'm sorry to disappoint but I'm not going to have a whole lot to update until this upcoming weekend the truck is still in progress and I've more or less gone as far as I can with the the cabinet built.. I do need to figure out how how to come out of the access port on the backwall of the cab I'm pretty sure I need to remove the back seat seat back And then figure out how I can use that as a password for the wiring for the 12 V socket socket for the refrigerator.
 

dbhost

Well-known member
As you can see in the photos from the thread I replaced the front bumper with a heavy duty off road bumper, But apparently the 2004 and 8005 is different from the 2006 to 2014 model her bumper and it hooked him out up and there is no aftermarket support for my model year.

So I have a blacked out grinkly front bumper and a nice shiny bear mopper with a couple of dents from where the previous owner backed up too far trying to look up a trailer.

I know there's a different manufacturers don't care which one but I don't want one that I need a dedicated spray gun whore or no so I am going or at least I think I'm going to try to strip the Chrome off the factory rear bumper and apply spray on bedliner to make it match the front.

I believe all of the local auto parts houses have the Rustoleum In the stock and ready to go.. So I will probably be working on that this weekend if it isn't raining.
 

dbhost

Well-known member
Well ******k.

Called the mechanic this morning. It's been kind of radio silence since last week, and I REALLY wanted the truck in my possession this week, it was supposed to be done, so I can finish the camper build, or at least get it semi functional in time to get it ot TX Ren Fest for Veterans Day weekend camping.

He doesn't even have the original engine completely out yet.

Apparently he cannot manage to spin over the engine enough to unbolt the torque converter from the flex plate. I knew the engine was knocking, not siezed up. Yay Ford 5.4 3V oiling!

So he is pulling the engine / trans in one piece because and I know this personally, you can't really drop the pan in the truck to drop the bearing caps so you can turn it and get the engine and trans separated. Actually I believe you should be able to unbolt the bellhousing and slide the torque converter off the input shaft of the tranny once it is out of the truck, Even with the radiator out, there isn't enough room in the engine compartment to pull the engine complete with the converter.

So yeah, a big slowdown.

Honestly. I kind of think he might just be chugging along doing bits here, bits there kind of thing.

But I am going to look at it from the plus side, and there are 2.

Number one, it makes him getting to all the little breather hoses a LOT easier, in particular the breather for the tranny. Heaven help me as long as it has sat I hope the trans is in good shape. He knows how long it has sat and to check it all... So we SHOULD be allright.

Once he looks at the trans pan, he will know it has been worked before. I welded in a B&M magnetic drain plug last time we were in there so fluid changes could be done more easily without raining ATF on my head quite so much...

The second advantage is that we are upgrading the alternator. The stock alternator has a little under 117K on it, they are kind of know for failing, well 17K miles ago or so. I took the opportunity to upgrade to a high amp 220 amp alternator and proper cabling. That should give me plenty of overhead for the winch, DC to DC charger etc...

For now, I am getting what I can done for wiring harnesses, soldering in fuse holders inline, adding the ring terminals on the known ends so I can be ready to route my cable as quickly as possible.

The bed cabinet, and electrical cabinet are done, mostly. I still need to figure out how to keep the battery in place down bumpy roads, and I need to add the 3rd side to the electrical cabinet which will end up being 2 pieces of scrap ply because, it is what I have...

Came across a 600w flexible solar panel kit for less than I paid for my 300w suitcase, I believe I could mount those panels on the topper roof with no overhang, but I am not 100% certain. But even if I could GENERATE more electricity, I would still need to figure out, and that part is not easy, how to store more. I could add a 2nd 200 amp hour battery, but we are getting into dropping another grand here. Not sure I like that idea, would rather use the $$ for travelling or possibly needed repairs on the road...

You haven't seen as many posts from me for the last week because, as I believe I mentioned previously, I was unemployed and living off of life insurance money. Well I started my new job and had the last week as my first week, yet another reason I seriously wish my truck was road ready already, actually a while ago.

At the pace we are going, I am going to miss my targeted maiden voyage, and it was kind of an important one, but I am trying to stay positive and look for the next one. I may end up having to do my shakedown trip to Crystal Beach on Bolivar Peninsula instead of TX Ren Fest. It's still good. If I have good 4G signal and lots of sun, I might end up doing it during the week on my remote work days and just work from the camper during work hours, and then do my big activities after work... We will see how that goes. Not sure I am ready for my Zoom calls to have the inside of the camper as the initial background everyone sees.
 

dbhost

Well-known member
Trying to keep things moving forward as best I can without the truck in my hands. I have taken care of the starter battery end of the DC to DC charger connection, added the fuse holder and installed a 25amp fuse (should never draw more than 20, so if it hits 25 I want the fuse to blow), and started behind the fuse holder installing the wire into split loom. I am using 10ga as per spec and slightly overkill, but certainly not enough when I upgrade to say 600w and 40 amp solar / DC to DC charging, but I digress. The idea here is route it all already in split loom, and trim away the excess oncce the routing is done and it gets into the camper / connected at the charger.

Sifting as it were, through my camp cooking gear. I would like a small propane stove, not isobutane so that I can cook IN the truck cap should the weather force me into that. I would like to keep the same fuel for as much as possible. Honestly if the old Coleman heaters had low oxygen shutoff, and the on demand hot water heaters worked on Gasoline, I would go entirely with ethanol free RUG so that I had ONE fuel source for truck and appliances. That just didn't pan out though. ALTHOUGH, heat water in a pan and use a small shower pump to take my showers, which would use FAR less space than my Camplux, and just be smart and keep a window open / install a roof vent and keep it open with the hatch propped and the tendency for camp heaters to overheat truck shells should be mitigated along withe the oxygen / carbon monoxide concerns, and yes I have a smoke and CO detector for the camper.

Planning on heading out to somewhere I can get fabric today. Honestly if my late wife hadn't thrown them out, we used to have some chocolate brown blackout curtains in the living room that would be perfect fabric donators for turning into truck curtains. I am horrible at sewing. I can FUNCTIONALLY sew but it is massively unpretty. So I am planning on setting out a pattern, cutting the fabric and using that iron on banding stuff to keep the edges from fraying. And then use fabric adhesive to bond velcro to the outside edges. I have no real way except for the hatch door to mount curtain rods of any sort, and the angles are wierd anyway, so I am just doing, well, Velcro covers. And then Reflectix inset panels to insulate the glass.

I have recently come across 1200w flexible solar panel kits. They are basically 2 600w kits and some Y cables to make it all work. The price is REALLY good, and I can use the entire kit on my Project M type pop up build down the road, and mount 2 of the 4 panels to the roof of the topper meaning I would have permanent mount of the panels instead of remember to set them up suitcase panels. HOWEVER, I like to camp in shady spots, so the suitcase panels and the long cable I have really do serve a purpose.

Yes my big concern is that is 300w solar that I have really enough for what I need. I am going to set it all up and test it out, but for now, it will have to do. This begs the issue that the Dokio suitcase panels do not have any kind of built in kickstand to orient them to the angle of the sun, so I need to rig something up. I have seen an interesting rig done with PVC pip that I might copy if I can figure out how to attach the Dokio to it...
 
Last edited:

Forum statistics

Threads
188,411
Messages
2,907,009
Members
230,176
Latest member
Arcadia1415
Top