The replacement - 2004 HDJ100R Landcruiser

Bulldust

New member
Thanks for that info Pierre,

If you have a spare second would you be able to measure the distance between the mounting channels on the back of the ARB awning for me?

Cheers,
Jeff
 

p1michaud

Expedition Leader
Thanks for that info Pierre,

If you have a spare second would you be able to measure the distance between the mounting channels on the back of the ARB awning for me?

Cheers,
Jeff

The distance between the mounting channels on the ARB awning is 47-48 mm.

Photos of the bracket I made up. I've also put a piece of 4 mm rubber between the bracket and roof rack to clear the lower edge of the outer lip of the roof rack if that makes any sense.

P1020488.jpg


P1020489.jpg


Cheers,
P
 

Bulldust

New member
Thanks for those pics Pierre, looks like a good solution for mounting the awning and getting over the step of the edge of the rack.

Cheers,
Jeff
 

Jeff Wanamog

Off Road Camper Guy
Here is the final product:

P1020121.jpg


P1020123.jpg


P1020124.jpg


P1020125.jpg


I can travel without concern for the lower control arms now. :sombrero:

There are a few other items to be addressed before an arduous trip to Cape York but that will be the next instalment.

Are those brackets available for sale or is that just something you fabbed up?
Thanks.
Jeff
 

p1michaud

Expedition Leader
Mickey Thompson SSS Winch series Round 3 - LandCruiser Mountain Park QLD Australia

A bit out of sequence with respect to the build but you have to get out there and have a play every now and then. So on the weekend of the 23rd November a few friends (or mates for the Aussie folk) decided to meet up a Land Cruiser Mountain Park - a spectacular 4WD park in South East Queensland Australia. After slinging a bit of bs while sitting by the fire during the first night we decided it was time to dust off the old cob webs and have a play in the cruisers.

My mate Paul in his very nicely set up 1995 FJZ80R with a manual transmission, 33" tires, 4" lift and ARB lockers at both ends had a try at a particularly hairy climb and this was the result:

IMG_4844.jpg


So not to be outdone, I had to see what the HDJ100R would do with very similar set up and this is what happened:

DSCF4057.jpg


It put a smile on both our faces. We continued down several tracks for the morning on our way to watch the competition. This 4WD park has 250 Km's of tracks. Plenty of variety and lots of opportunity to get in trouble. Plenty of easy stuff as well. Very well suited for a mixed group.

Another few friends accompanied us for the day. Too many photos for here but one nice shot of the 1984 BJ42 having a play.

IMG_4763.jpg


We finally made it to the main event to watch the last round of the Mickey Thompson "Triple S" winch series for the season. The aussies sure love their 4WD's, build them tough and push them hard. This series is mostly winching but there are a few high speed sections as well as a GPS stage. Total 10 stages for the weekend, total highest score for the weekend takes the prize. A sample of the vehicles in action:

IMG_4797.jpg


IMG_4821.jpg


Hope you enjoy. :sombrero:
Cheers,
P
 

p1michaud

Expedition Leader
The remainder - mods, refinements and using the vehicle

I've been busy with life of late (lame excuse I know) but that being said we have managed to squeeze in some adventures along the way. I've been catching up here on ExPo and realised that this poor old thread is out of date. Mostly because I read other builds ups and realised how far along I'd gotten but never got to get this thread up to scratch. So in a effort to reflect current Cruiser configuration, here we go!

There were a few items that needed to be addressed before going to the cape that I did not post up so here goes. The one thing most people who own a 100 know is that the sheet metal is expensive to repair if you damage it. First, was to add some protection to the big cruiser in the form of sliders and a skid plate.

For the sliders, I decided to once again call the Australian 100 series expert, Auto-Craft. Darren is an avid Toyota fan but even more of an expert for the LandCruisers. He's responsible for setting up some of the best 80 and 100 Series in Australia. He's even been moving to building 80 series in the USA and has been recently been spotted at Slee Off Road but I digress. The sliders are a combination of round and square tube covered by some stainless steel with their company logo cut out. They bolt to the frame and incorporate provisions (tapped holes) to be used as air tanks. They are a stout piece of protection and have some heft to them. That is their only down side compared to other designs but given that their primary function is to protect the vehicle from damage I can live with the weigh compromise. They have served me very well especially up in Cape York in July 2012 when they coped the full brunt of a loaded cruiser tackling the Old Telegraph Track. Sliders got scratched but the Land Cruiser escaped undamaged!

Here are a few shots of the goods on the cruiser:
P1010788_zpsbcccbbf4.jpg


P1010735_zps37cd2bba.jpg


Along with the sliders I ordered a skid plate. I did quite a bit of research here and this particular design incorporates a steel sub frame for strength but aluminium skin to offer protection but keep the weight down. All drain plugs and u-joints are accessible with the skid plate on. Overall smart design that managed to balance protection, access and weight very well.

Close up while installing it.

P1010770_zps66015aa1.jpg


Another showing it under the vehicle.

DSCF4057.jpg


Both of these additions have served their purpose very well.
 

p1michaud

Expedition Leader
Australia - The diesel engine experts part 2

Now for all of you that have had the opportunity to visit or even live in Australia, you will quickly understand that this is a country that has a love affair with diesel engines. They do love their petrol (gas) engines as well but be warned there is no better way to start a full on debate by the camp fire than asking a questions seemingly innocent as: "What 4WD engine is best, diesel or petrol?". Put on your flame retardant gear and stand back!

Seriously though, I had never given much thought to playing with engines to gain additional performance. I've now changed my view on this or perhaps I've just been in Australia too long now... :sombrero:

I approached these modifications similarly to any others:
  • Seek out professionals in their respective fields.
  • Use only quality gear (even if you want to cry at the price tag).

I was fortunate enough to pick up this vehicle with two very important upgrades already included:
  • 3" exhaust system
  • Steinbauer performance chip

IMG_0473_zpsa5771941.jpg


The next items that were installed:
  • Autron boost and Exhaust Gas Temperature gauges (more on this later)
  • Larger intercooler

Each of these items helped the big diesel breath better, get more fuel into the engine, monitor engine conditions and keep cool when pushed hard.

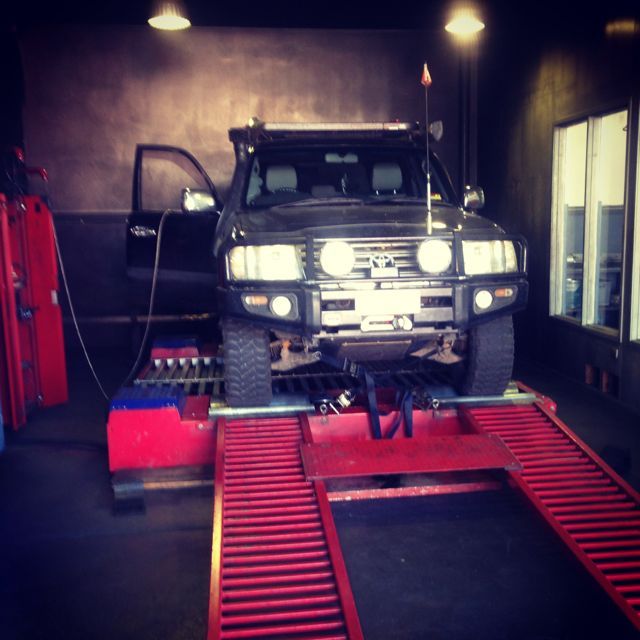
The final and most crucial step for this round of modifications was to spend time with a diesel tuner. Again, after quite a bit of research I was off to Toowoomba QLD to meet the crew at Diesel Care. I had met Andrew Bourne the Director of Diesel Care previously at the Brisbane Camping and 4WD Show. He's a wealth of knowledge and has been working in the diesel engine repair and performance industry for 30 years. Diesel Care also happen to be the Australian importer for Steinbauer performance modules. I knew that the Cruiser would be in good hands. We spent some time discussing my application, requirements and what I was hoping to achieve out of the tuning session. The overarching principle was to maintain reliability as this vehicle is used in remote areas of Australia. It is also used for towing and for 4WD duties. So what was the outcome you ask...

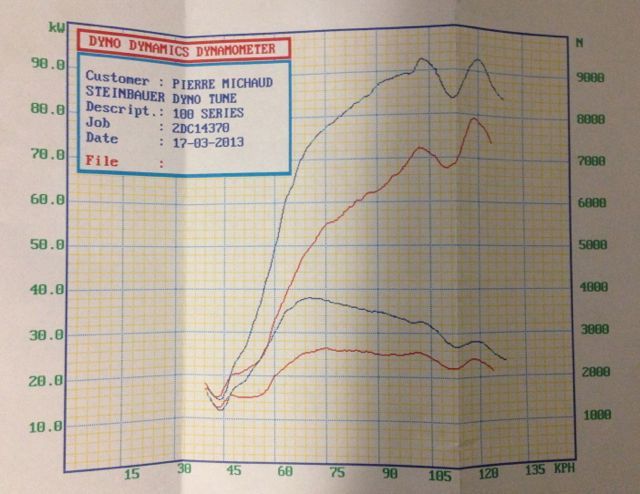
The power measured at the wheels changed from 79 Kw (107 Hp) to 93 Kw (126 Hp) for peak values. The torque changed from 430 Nm (317 ft-lb) to 575 Nm or (424 ft-lb) again for peak values. The biggest gain was in the middle range up 40% in power some areas over stock. I've attached a bad photo of the dyno results below.

IMG_0834_zps3a7bb6d6.jpg


The really funny bit was the conversation Andrew and I had afterwards. That is best summarised by the two pieces of advice he gave me before I left:
  1. Use your cruise control on the way home because you would not be the first person to get a speeding ticket after a dynotune.
  2. Don't watch your fuel consumption for the next two weeks because you will be using more fuel than you would normally.

All I can say that after leaving the shop and going on a test drive, I could not keep the smile off my face. :wings:
 
Last edited:

p1michaud

Expedition Leader
How do you top off a great day after a dynotune?

If that was not enough to put a smile on my face, I was fortunate enough to meet a legend in the Australian 4WD world. None other than MR 4x4 himself (aka Pat Callinan). We had a quick chat about 4WD's, travels (he was heading to Canada) and what he was up to. As part of their DVD series, they were installing a Steinbauer chip and having the vehicle dynotuned. His magazines are of very high quality as well, up there with Overland Journal.

IMG_0450_zps8cca4cc4.jpg


Cheers,
Pierre
 

Forum statistics

Threads
188,612
Messages
2,907,860
Members
230,758
Latest member
Tdavis8695
Top