The War Wagon: A 2005 Toyota Tundra AC's transformation to Overlanding Rig

brian1991

New member
I've got the wheelers add a leaf on my 05 tundra. Seems to work well. I only keep about 100lbs in bed usually. Also I tow a teardrop with a 500lb motorcycle and they did not droop much at all. I secretly think about alcan or deaver all the time though. Haha
 

sologeek

Observer
Can't go wrong with 5100's. I have had spacers, 5100's, Icon Coilovers, then back now to 5100's and OME 885 springs. Either the 885, 886 OME springs for the 2nd gen Tacoma's (05+) have great reviews for our trucks, and is pretty new for us 1st gen owners. 885s have a lower spring rate, 886s are higher. This setup will give you around 3 inches of lift leaving the spring perch on the 5100 at the first or second notch, no higher. The ride is great and what i wish I did in the beginning. For rims and rubbing I'd fine a wheel with a 4" BS, but that doesnt mean your tire will not rub, I feel it varies from truck to truck. You can trim the pinch weld which helps alot. Check out tundra solutions as well, lots of info there. Where in the Bay Area are you?
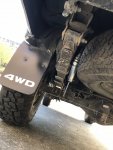
Yup, agreed, I've run the same thing for years on other builds with no problems. I recently went to Icons with OME dakars

Underbackoftruck rear springs.jpg
 

CrewServed

"That" guy
I've been largely absent from this thread for quite some time. Haven't done a whole lot to the rig except to drive it all over creation and keep up with maintaining old and failing parts. I ran my Nitto Terra Grapplers down to the tread wear markers and replaced them with a complete set of the same tires. 85,000 odometer miles ain't nothing to sneeze at, you know? The guys at Big O think doing 5-tire rotations helps achieve this kind of mileage, too. This makes for the third set Nittos, and I think I'll be sticking with that tire until the wheels upon which they are mounted fall off my truck.

Steering rack had play and was leaking, so I went ahead and dropped that guy out and replaced it with a refurb. Total cost was about $800 and nine hours of crawling around underneath the truck. Steering pump was noisy as all get-out after refilling the power steering fluid, but after about 10 minutes of working the steering back and forth it quieted down significantly, and by the next day everything was back to normal as I was driving to the alignment shop to get everything tidied up again. Speaking of the power steering, I found a cracked and leaking hose at the junction with the power steering cooling assembly. It was a messy job, but it got done and saved me the hassle of replacing a burned-out pump.

I installed some backup lights in the rear bumper using some cheapie, chineseum lights from Amazon. I wired the lights on their own switch independent of the OEM reverse lights, figuring I didn't want to overload the factory wiring, nor do I want to blind people when I'm backing up in a Target parking lot. Works well, flood light pattern throw and spill is as desired, and it will be useful both as reverse lights and as camp lights for setting or striking camp. 3 amp draw means I won't be using them as general camp lighting.

While installing these lights, it became much more clear to me how woefully ignorant I am of 12VDC systems, so I started doing a lot of reading. End result is that I am taking on a new project to clean up my electrical work and to consolidate all of my fuses, relays, and leads into a Bussman 1500 Series RTMR. I figured buying and installing an sPOD doesn't cure my ignorance, so here we go.

I've completed the learning and research portion of this project and am currently collecting parts, tools and supplies. So far the cost is comparable to buying a commercial off-the-shelf fuse block and switch kit but after it's all complete I'll be finishing with more knowledge of my truck and some pretty sweet additions to my tool cabinet.

If anybody is curious and silly enough to try making your own, I'm using this tutorial as a guide. I don't plan on using all of the fancy connectors and terminals he's using, though. That's outside the scope and budget of this project. If the mood strikes me, I could perhaps consider retrofitting, but most likely won't.

Okay, stay tuned gang. Build updates coming in the next couple of weeks as I piece together my project.
 

Kpack

Adventurer
Paul, did you feel any difference with a leaking steering rack? Mine is leaking around the driver's boot but steering seems fine and I'm not loosing any PS fluid. It'll have to be done eventually I'm sure, but if everything is working does it need it now? I don't have time to spend all day under the truck so I'll have to pay a shop to do it.

I'm interested to follow along with your electrical work. I would like to eventually get either an SPOD or something like what you are doing once I start installing more accessory lighting. Right now I don't need it but I eventually plan to have backup lights, ditch lights and possible camp lighting. All in good time.

-Kevin
 

trailscape

Explorer
When my mechanic spotted mine leaking he told me it would eventually need to be replaced, but it could wait. I think I waited a year. I needed new tires and didn't want the rack to screw them up.

Paul, did you feel any difference with a leaking steering rack? Mine is leaking around the driver's boot but steering seems fine and I'm not loosing any PS fluid. It'll have to be done eventually I'm sure, but if everything is working does it need it now? I don't have time to spend all day under the truck so I'll have to pay a shop to do it.

I'm interested to follow along with your electrical work. I would like to eventually get either an SPOD or something like what you are doing once I start installing more accessory lighting. Right now I don't need it but I eventually plan to have backup lights, ditch lights and possible camp lighting. All in good time.

-Kevin
 

CrewServed

"That" guy
Heya Kevn -

After I installed the new rack, the inadequacy of my old rack was very noticeable. Over the years the rack and had developed some play which I had learned to drive with. Since that change was incremental in nature, I didn't notice it until after the repair was made. I had previously noticed that there was what is known in the military as a "Class I* leak" around the driver's side boot about a year before performing the replacement. I was a tank crewman in the Army, and we treated Class I leaks as something to keep an eye on but to otherwise not worry about it.

What prompted me to do the job was that the guys in the alignment shop noticed the play and couldn't get my truck to track straight. Just like trailscape, I didn't want to ruin a new set of tires with poor alignment, so I got to work fixing things.

Otherwise, depending on the severity of your leak, you might could push it off a bit. I am not a mechanic, but I play one on TV. Take this advice with a grain of salt.

*Leak definitions:

Class I Leaks: Class I leaks are identified by a wetness or discoloration not great enough to form drops. It is more of a seepage than a leak.

Class II Leaks: Class II leaks are identified by a flow of fluid great enough to form drops but not great enough to cause the drops to fall from the leak point.

Class III Leaks: Class III leaks are identified by a flow of fluid great enough to form drops that fall from the leak point.
 

CrewServed

"That" guy
SNITCHES GET SWITCHES.

Or something like that. Anyway, the switches arrived. I ordered all these parts from OTRATTW.com.

1.jpg
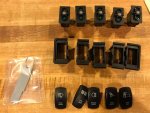
Switches are all single pole, single throw, which is what I needed as a simple on/off switch. Lower LED (green) is independent and will be tied in to my dash lights, meaning they will always be on so long as the dash lights are on, and will also dim with dash lights. Upper LED (amber) is dependent, meaning when the accessory is energized, the light will illuminate.

2.jpg
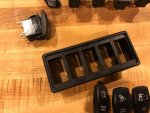
My fuse and relay box will accommodate 5 fused & switched circuits (with relays) and 5 fused circuits (unswitched). Most pre-made switch holders come in multiples which won't work for me, such as single, double, triple, and a mysterious jump to 6 (sextuple??). I need five, so I purchased some snap-in brackets composed of 3 "center" brackets and two "end" brackets. This way I don't have to buy a blank to fill unused switch locations.

3.jpg
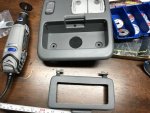
Next up, I removed my overhead console, removed the sunglass holder, and put blue painter's tape on it. I laid out the assembled switch holder atop the sunglass holder, using a pen to mark my cut lines. Using a plastic cutting disc on a Dremel, I lightly scored inside my layout line, then followed with a deep cut on the scored line. This meant my switch holder would not fit until I came back through with a file until proper fitment was achieved. I know this is preaching to the choir, but make your holes undersized with the gross cutting tool, and enlarge them to fit with a finer cutting tool. Under most circumstances, you can't put back material once you've lopped it off.

4.jpg
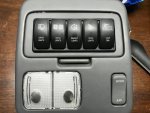
After installing the switches in the switch holder, I took a picture and then noticed I'd put the switches in oriented the opposite of what I intended. So dumb. So, so dumb. That took some doing to get the switch holder out, since each bracket had its own pair of locking tabs. I had to negotiate 10 locking tabs in total to remove the switch panel, reorient, and then reinstall.

5.jpg
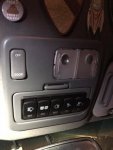
Reinstalled the overhead console as a dry fit for now. My order of wire hasn't arrived yet, so I can't even make jumpers. The angle isn't perfect. From the driver's seat I can see the top of the switch and the unilluminated icon on the switch. The illuminated text is not visible until the switch is in the "ON" position. I'll decide later if I want to make something to adjust the angle of the switches, or if I'll be okay with keeping things just as they are.

That's it for now. More posts in the future as the rest of my parts come in.

Parts List:
-Snap-In Switch Bracket, Center
-Snap-In Switch Bracket, End, Set of 2
-SPST ON/OFF Switch, Lower Independent Light
-Contura V Rocker (with customizable text)
 

CrewServed

"That" guy
Yup, that’s the Dremel wheel I used. It kicked a lot of little flecks of plastic at my face. Eye protection for a solid win.

I’m planning to cut away the inside of the console to give me clearance for jumpers and such. I’m thinking I’ll need to get some 90° quick disconnect terminals to account for tight quarters, and have my jumpers feed in from center instead of from the end.

Supposing this turns out to be an awful idea, what was your solution for angling your panel downward? I’ve got some spare Kydex from a project that trickled my fancy a few years ago that I can probably make work for this project. With the judicious use of fasteners and paint, I might could have a decent-looking install.


Sent from my iPhone using Tapatalk
 

SportsmanJake

Adventurer
I also looked into 90 degree connectors but could find none that bent in a direction so as to not block another terminal.

I am using a 6 switch panel and am just going to angle it so that the top is flush with sunglass holder and the bottom sticks out an inch. Appearance wise it is not perfect, but I dont think it looks bad. I thought about kydex or some type of mold but decided it would not be worth the effort.
 

trailscape

Explorer
I just angled mine and eventually smoothed it out and filled it with some plastic filler and then painted it over with bedliner spray, then paint to match.

c09045b29d4724d6ee66e647120fedc7.jpg


I also looked into 90 degree connectors but could find none that bent in a direction so as to not block another terminal.

I am using a 6 switch panel and am just going to angle it so that the top is flush with sunglass holder and the bottom sticks out an inch. Appearance wise it is not perfect, but I dont think it looks bad. I thought about kydex or some type of mold but decided it would not be worth the effort.
 
Last edited:

CrewServed

"That" guy
I just angled mine and eventually smoothed it out and filled it with some plastic filler and then painted it over with bedliner spray, then paint to match.

c09045b29d4724d6ee66e647120fedc7.jpg

That's nice looking. Thanks for the idea!

I also looked into 90 degree connectors but could find none that bent in a direction so as to not block another terminal.

I am using a 6 switch panel and am just going to angle it so that the top is flush with sunglass holder and the bottom sticks out an inch. Appearance wise it is not perfect, but I dont think it looks bad. I thought about kydex or some type of mold but decided it would not be worth the effort.

I've got some spare kydex sitting around the garage from a previous project that struck my fancy. I could cut you off some and send it your way. Save you a buck or two.
 

CrewServed

"That" guy
Some shipments arrived and I had a couple of hours to spare to work on wiring.

860951a6f65e2ecdd98fb6c274e1a92e.jpg

I'll be using these as jumpers to connect relays to positive bus.

7332e55d0644c50790c825f492eb423b.jpg

These harnesses will lead to a terminal block for both switched and un-switched circuits.

ff7c90c1b5783e875d0dcc110624af3d.jpg

I didn't want five spools of 10 AWG in different colors that I'd probably never use again, so I instead bought printable heat shrink tubing for my Dymo label maker. Odds of crossing wires are minimal now, and this will serve double duty to identify circuits at the terminal block.

ffafc53ed8debce50f03d50c3804b6da.jpg

This wire harness will feed through the firewall up to the switches. I may have been premature in terminating the interior end of these cables. Will probably end up cutting them off and re-terminating so that I can push the harness through the firewall.

9c25b0513347c04f0b08f6516579a61c.jpg

Color-coding is good. Color-coding and marking is better.

2fa68ce6aaaea7fd4505acb26122cd4b.jpg

I don't own the [probably expensive] crimper for these terminals, so I did the best I could with the crimping tools I have. I tugged hard on each terminal after crump to make sure I had a good crimp. I'll decide before assembly if I'll flow some solder down into the crimp.


Sent from my iPhone using Tapatalk
 
Last edited:

bkg

Explorer
I envy people who can do clean wiring. As much as I try, it's clearly not a skillset I possess.
 

Forum statistics

Threads
188,059
Messages
2,901,659
Members
229,411
Latest member
IvaBru

Members online

Top