Trestle 2022 Ram 3500 Cab/Chassis Build Thread

Trestle

Active member
Rear Spring Install

The replacement rear spring pack has been sitting in the garage for over a week, and we wanted to get it installed before heading out to Memorial Day. Between prepping the house for paint, a stop over at Expo West, and some libation with friends, this ended up being a Monday evening project.

I think I mentioned the springs were 143 lbs each, but looking at the shipping document indicates 147. Me weighing just over 140 lbs wet, they were a handful to say the least. Some expletives may have been projected, but no smashed fingers or damage. Not sure how much the ones that came off weigh, but it has to be darn close so the vehicle weight shouldn't have been eaten into much more than with the factory units.

One reason for the custom packs is to get things back to level. We've achieved that. Another reason is to reduce axle wrap.

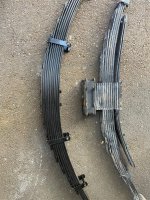
Replacement unit on left, factor unit with 2" spacer added on the right.
Spring Compare 1.jpg

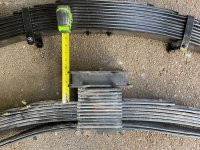
There is 4.25" of spacer when you combine the block and factory mini-leafs. Think about how much axle wrap is sent back to the springs when accelerating in dirt. All of that leverage twisting and releasing over and over yields a rough ride, loss of traction, fatigues the springs more than necessary, and adds to washboards.
spring compare 2.jpg


Now the axle sits directly under the new pack with no spacers at all. Add to that more leafs in a more linear package, vs. the secondary load setup from the factory.

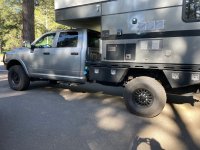
The truck was rear low, and now sits slightly rear high. We have mostly empty water tanks, and are sitting at about 1/3 fuel capacity, so this would work out well when things are topped off.
Spring installed 1.jpg

There is quite a bit of room, but remember that the wheel fenders are removed. Some trimming is required to clear the tool boxes, then we'll remount the fenders. They should help to give it a more balanced look, and protect the truck and other vehicles from rocks etc.
spring installed 2.jpg

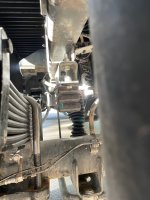
Before, the rear bump stop was about 1.25" off the axle, and now it is right around 4" or slightly more. The replacement springs were specified with 2" lift and another 800# capacity between the pair over stock.
Bumpstop clearance.jpg

We have not driven it yet, so curious to see how it rides, how the rebound works out now that it is not bouncing off the bump stops, and my guess is that we will have fewer cars flashing their high beams at us now that our headlights are not pointing higher than they should.

Will report back once we've had some time with her on and off the road.
 
Last edited:

ExpoMike

Well-known member
I did the same thing on my '97 Ram 2500 with FWC on it. Custom pack without any lift block. Road so much better, both on street and in the dirt. Great decision.
 

Trestle

Active member
Trip report, Durango and Moab.

We ventured away from home for a week starting on Memorial Day weekend. The plan was to stay in the vicinity of Durango for a week, work through the week, and play on the weekends.

It started out with me being under the weather, having picked up whatever my wife had the preceding week. We made it there just fine, but didn't get to hit the trails on the MTB as much as we wished. Due to the amount of snow the Western side of the Rockies received this year, a lot of camp locations were closed, and trails blocked by snow drifts. We looked for camp spots between Durango and Silverton, with a brief stop at Molas lake. This is a lake sitting atop Molas pass that we've stayed at before, but we wanted to find some wild camping if possible.
Molas 1.jpg

We dropped down into Silverton with a brief stop at Purgatory parking lot to wait for the Iron Horse Classic bike race to finish so they could open the road. Then proceeded to Silverton for a bite to eat. Not feeling the restaurants with an off stomach, we moved thru the town to see what things looked like toward Animas Forks. The wife has an aversion to shelf roads which foiled by plans to explore parts of the Alpine Loop backcountry byway, so we lingered a bit, read about some of the mining activity, and had lunch at one of the stops along the way.
alpine loop map.jpg

Rather than continuing on toward Ouray, we back tracked to a side road we saw near Molas pass. We ended up in a decent spot not too far off the highway with no-one else around. It was a bit chilly, but the heater kept up with things without issue.
Molas 2.jpg

We headed back toward Durango, and explored Lime Creek road entering from the North end. This was the first real test to see how the suspension performed off road. At some point we put it into 4 low and slowly explored. We ended up running into a few snow drifts where I expected a few attempts to push through. Since we were going up hill, I expected to move into the bank until we started to spin, then use gravity to assist us backing up, then hitting it with more momentum...then go from there. What happened was a bit of a surprise. The truck simply compressed things down, and tractored through with no slip of the wheels or drama. This happened over and over as we ran into snow banks from 10 to 18 feet in length. Past experience with these tires on snow has been very favorable, and they did not disappoint. Here is one of the more scenic, non-challenging parts of the road.
Lightner 1.jpg

Eventually we came to a point where snow banks were significant enough to turn is back. A Marine and his family were exploring via a well built Wrangler. He was stationed at Camp Jejune in NC, and I spent a number of years in NC, so we BS'd about things a bit and he provided some trail beta. It turns out there was a rock slide along the trail if entering from the South end, so had we made it through the unending snowbanks ahead we would have had to turn around anyway. He also pointed us to another small road above that led to a nice spot for us to spend the night.

After a little bit of excitement the next morning where my wife saw a small bear cub approaching our camp, and worried about our dog outside the truck not knowing where mama bear might be, we made a lot of noise and eventually packed up to head back out for the day. I never did get so see it or mama bear, having heard all the commotion while exploring a waterfall just out of site of camp.

We headed back down to Durango to settle at a campground in town for the week. We've worked at this campground before, and there was enough 4G to get by at this camp site. This time we had the cell booster, so we figured things would be that little bit better. Not so much. Data was worse than experienced even a few months ago, and the booster did not help. With frequent video calls, it was unusable. So each day, we packed up and moved to a location with better data. Usually by a busy road, or adjacent a park. It gets frustrating paying for a camp site each day to ensure we can work, only to have to move anyway each day. We could have camped in some more interesting spots for free, without being saddled up with another 100 of our "best friends" next to us.

By mid week, we had enough, and made the roughly 3-hour drive to Moab abandoning the RV site we paid for as it was next to useless for our work purposes. Views from our work camp...nary a soul around.
Moab Horizon.jpg
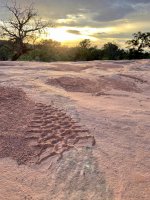
Moab Tire Track.jpg
Moab Lounge.jpg

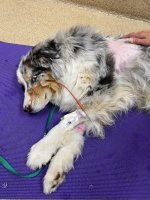
Thursday our 11 year old Australian Shepherd was a bit off. Not interested in walking much, and low interest in food. Hopefully it would be a passing issue, we bedded down for the night only to have him seemingly in pain panting non-stop. A 2am trip to the emergency vet to see what he had eaten that hopefully wasn't creating some type of obstruction or other. Diagnostics didn't show any obstructions, but pointed to a possible spinal compression. An injection to help with pain, and some meds to make him feel better until we could get him home. With near loss of his rear legs it was back to the vet a few hours later where he spent the next two days/nights. We were able to transport him the 7-hours back home on Sunday with an IV drip. Then to our local vet...then to a Neuro vet where they ruled out the back issue and discovered liquid around the lungs, then to an emergency vet in Phoenix where he had fluid drained from the lungs, then subsequently from around the heart. We were ultimately able to bring him home one week from the day this all started. How does a dog go from fine to near death so quickly with a myriad of possible issues? Valley Fever. A spore in the soil of the Southwest that is ingested into the lungs during dust storms. Typically in and around Phoenix/Tucson, it does range further throughout this region. It affects the neuro system, lungs, and other associated areas...in this case building up fluid around the heart to the point where it cannot expand and short strokes...limiting the volume of blood, thus oxygen to things like one's stomach and legs. This is how he looked, with a very expensive and very bad haircut, when we picked him up late Thursday.
Aussie Post Ops.jpg

Surgery to follow in a few days to remove the sac around the heart, then continuation of the standard meds he is on to rid the body of Valley Fever are the next steps. Apparently people can get Valley Fever too, so be careful in dust storms in the Southwest.

With all that said, how did the truck perform?

On the road, we often find that the transmission is a bit off in its tune. It wants to upshift to save fuel consumption and is reluctant to downshift soon enough. Then once it does downshift it often has to drop two gears to compensate for how much momentum has been lost due to its own reluctance. Hit the tow/haul button and it is the opposite. Aggressive to downshift, and reluctant to upshift. Also aggressive to downshift when coming to a stop or slowing. It works OK, but in the day to day we end up manually pushing it down to 5th in order to avoid losing momentum then the big jump to 4th. Keep in mind we're hovering at or close to GVWR.

Take it into a more extreme environment and it starts to make sense very quickly. It is apparent that this transmission is made to not only work, but work hard. Steep long grades with Tow/Haul are easy. The truck is currently around 12k depending upon how much fuel and water we are carrying. It manages heat no problem. On the descents, with both tow/haul on and the engine brake on auto, it is like cruise control on the downhill. These were very steep and windy mountain passes, and we used the brakes on long descents maybe 5% of the time. Mostly to que the engine brake into slowing us down vs. holding a speed while descending. What was a bit annoying, was now it in its element.

On gravel roads the suspension exceeded expectations. Axle wrap was not detectable, and washboards were heavily mitigated. It was very impressive and capable.

On rougher tracks the truck is best suited to lower speeds due to both its mass as well as us preserving the contents of the camper. It simply tractors its way along and is predictable. The only time we experienced any significant wheel spin was when we moved to the side of the road into mud to let a group of rigs pass. Reversing in mud up to the hubs, with the associated drag from the large differential required moving forward then trying again with more momentum. Our Marine acquaintance showed us a spot that with a long tough of water, with an unknown base. His Wranger pushed through, but he had to drain water that entered via the door jambs. He also used a bit of momentum. We did slightly more than an idle through it, without any wheel spin or water entering the cab. No issues at all.

Fit - this thing is 24' long, and turning around or pulling off for traffic has to be planned. The power steering does not like high friction surfaces when doing multi point turns in 4wd. Rather than forcing the turning, if you add a slight amount of forward or backward movement, it helps to ease the burden on the power steering.

The hood is tall, and sticks way out there. We have yet to move the second rear camera to the front, but it NEEDS to be done soon.
 
Last edited:

Trestle

Active member
Quick update:

It’s been a while. The dog is…well let’s just say he will have many good days before one bad one. We should all be so lucky.

The truck is…well its been with Ram getting warranty work for weeks. We started a trip on the 4th of July, noticed some knocking. Since we just had the wheels/tires rebalanced, I thought it might be a wheel weight hitting a caliper or something. Jack up, spin, all four wheels, no issues. Drove again, same sound. Had someone walk next to it and narrow down the corner…front passenger side. Pull the tire and inspected, only to find one of the four caps for the U-joint was missing. The c-clip was gone. It 4200 miles, and with no more than 20 miles in 4x my guess it it was not installed when built.

Ram could not fit us in for weeks. We dropped it off early just in case they could get us in. Showed them pics if the specific issue to get ahead of the issue. Two weeks later, during our scheduled appointment, they tell us the issue is exactly as we documented and showed them. Parts on order. It will be two weeks. Seriously was like ******, you could have ordered them two weeks ago. As of when typing this, parts showed up and it should be ready for pickup tomorrow. Not super impressed. For $300 in parts and a tool, I could have done it myself in an hour or three.

Tool box for the tunnel is in transit, and will have to be powder coated before install. LED headlights to be installed, and lots of other little items…but we should be able to take this thing out soon.

More to follow. Hope you’re all out there doing it like we hope to be soon.
 

Trestle

Active member
Some pics of the offending steering u-joint. The c-clip is on the inside. Guessing one was not installed when the truck was built, or at least not fully seated. No issues since.
missign cap 1.jpgmissing cap 2.jpg

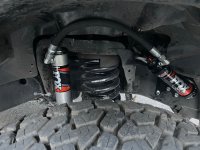
The front Fox shocks showed up, and were subsequently installed. The ride is now more matched between the front and rear. Would like to add boots to reduce any seal damage, but forgot to order them. Installation was easy peasy. Other than tuning for weight, these were factory fit type kit vs. the repurposed nature of the rear shocks.
F shocks loose.jpgF shocks mounted.jpg

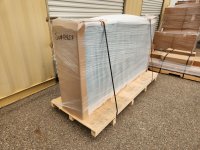
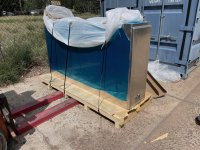
Tunnel box finally done and shipped. Here it is awaiting freight.
packed tunnel box.jpg

It seems we built up some bad shipping karma. After it sitting for longer than it should, investigation reveals it is sitting at one of the 300 Yellow Freight terminals in the US due to their bankruptcy. I was able to get all the info and pass it along to the shipping entity for them to arrange a "rescue" shipment. We'll see how long that takes, or if it ever happens at all.
 
Last edited:

Trestle

Active member
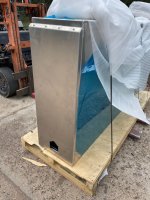
Team effort for the win! With a bit of team effort we were able to locate, liberate, and rescue this piece of stranded cargo from one of Yellow's terminals. The tunnel box arrived and is sitting at the powder coater.
tunnel box 1.jpg

Gull wing style doors.
tunnel box 2.jpg

Prepped for powder coating involves removing the latches, bulb seals and support shocks. Things that don't do well in an oven at 400F.
tunnel box 3.jpg

Should have it in about a week.
 
Last edited:

Kingsize24

Well-known member
Just an FYI. Not sure how you are uploading pictures. But they never come through. I'd love to see them, it just doesn't ever show.

Screenshot_20230818-121828_Chrome.jpgScreenshot_20230818-121834_Chrome.jpg
 

Trestle

Active member
I've noticed that none of the pictures that showed from day 1 of this post are showing, let alone the most recent ones. If I click on them I get to see the full picture, but none of the thumbnails. I figured it was something on the Expo site that needs to be addressed because I have seem similar issues with other's posts lately too.

I simply hit attach files, and keep them to 1mb or less. Them post the thumbnail option instead of full size pics (the only two options shown for attached files). Worked up until about a week ago, so not sure what gives.
 

Kingsize24

Well-known member
The size doesn't matter anymore since migration. And don't select thumbnail. Select full size, or select add multiple, check the box, and then add full size if it's a group.
 

Kingsize24

Well-known member
FYI- I see them just fine on Tapatalk.


Sent from my iPhone using Tapatalk

Well it's good to know it at least works on something. On both my laptop, I pad, and my cell phone I see nothing. But admit I do not use apps for forums. Maybe the thumbnail option is only native on Tapatalk?
 
Awesome thread and write upon your build! Pix are available if clicked on but thumbnails are not displayed. No big deal in my book. Rig is looking great.
 

Trestle

Active member
Well that is unfortunate about things not fully carrying over after a migration, but full size pics going forward I guess. Will see how this one posts.

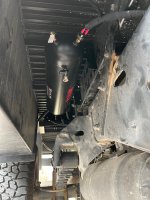
Compressor System - We purchased a Viair twin compressor system with 2.5 gallon tank at Expo West. Ryan had show pricing which saved us a little coin and is much appreciated. Up until now we had a single compressor ARB unit that comes in the little tackle box. It did not have the necessary punch needed for four 37s. The kit was fairly complete minus a few fittings needed to remotely mount the air intakes. We welded up some brackets, and took the better part of a day getting everything mounted and dialed in. It is tied into Aux switch #6 on the truck, and can only run when the engine is running. Only took two pics of the results. We've only done testing to confirmed the system works. We will have to get some average air up times and see how it performs in the field soon.

We have an air over hydraulic bottle jack, and have now added an impact gun for removing/installing tires. Zip them off/on, then hit them with the torque wrench. Should save a bit of time in the event of a tire swap.

This also freed up space in one of the tool boxes having mounted on board air vs. a portable system.

Viaair 1.jpgViair 2.jpg
 

Forum statistics

Threads
188,028
Messages
2,901,390
Members
229,352
Latest member
Baartmanusa
Top