Get your tickets to THE BIG THING 2026!
You are using an out of date browser. It may not display this or other websites correctly.
You should upgrade or use an alternative browser.
You should upgrade or use an alternative browser.
Unimogadventures - Our build and travel thread
- Thread starter Iain_U1250
- Start date
Iain_U1250
Explorer
Yes, levers work well, it is all about technique. My wife can change the tyres on our truck, she had a practise go a while ago, just in case. She wants to do a video of her changing the tyre next time we go out bush.
Iain_U1250
Explorer
New wheels are finally on the truck. Don't think they will be this shiny for long
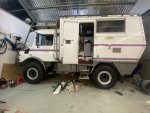
Getting the old tyre off was hard work, fitting them onto the beadlock wheels was a lot easier.
I also needed to swap out the wheel studs, as the hubs on the aluminium wheels are very thick compared to the steel ones.
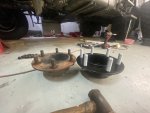
Now to make something that protects the valve stem, the are two little holes tapped into the wheel for that already. It is reasonable protected by the beadlock nuts - they are about 25mm further out then the valve, but I'd like something just in case.
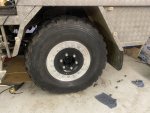

Getting the old tyre off was hard work, fitting them onto the beadlock wheels was a lot easier.
I also needed to swap out the wheel studs, as the hubs on the aluminium wheels are very thick compared to the steel ones.

Now to make something that protects the valve stem, the are two little holes tapped into the wheel for that already. It is reasonable protected by the beadlock nuts - they are about 25mm further out then the valve, but I'd like something just in case.

Iain_U1250
Explorer
I just borrowed the bathroom scale, and did a few measurments whilst Trish was at the shops.  The new wheels with the internal beadlocks are 39.7 + 4.8 = 44.5kg each. I had a pair of 11x 20 SDC "Super" wheels which are 38.2kg each on the rear so they were 5.9kg lighter, and a pair of 11 x 20 32,8kg "Standard" wheels on the front, 11.7kg lighter. The spare was also a "Standard" 32.8kg wheel.
All up I have added an extra 46.9kg to the overall weight of the truck for the five new wheels, which was not exactly the plan, was trying to go lighter, but these new wheels are rated for much higher weight than even the "Super"wheels, so should be a lot stronger. They should are increase the track width by 10mm to 1680mm - which will help a tiny bit with the sideslopes, bringing the overall width from outside to outside of the tyres to 2005mm
All up I have added an extra 46.9kg to the overall weight of the truck for the five new wheels, which was not exactly the plan, was trying to go lighter, but these new wheels are rated for much higher weight than even the "Super"wheels, so should be a lot stronger. They should are increase the track width by 10mm to 1680mm - which will help a tiny bit with the sideslopes, bringing the overall width from outside to outside of the tyres to 2005mm
Iain_U1250
Explorer
How to change your tyres - I worked up a bit of a sweat getting them off the old wheels.
Iain_U1250
Explorer
Just a short video on our canvas window cover protectors.
Iain_U1250
Explorer
And Trish also finished making the new spare wheel cover as well. I'll make a plywood insert to fit over the top of the wheel, so than I can stand on it without falling into the hole.

 fb.watch
Not sure if Facebook videos work here - let me know and I'll find a way to post it.

Just finished making our new spare wheel cover | By UnimogadventuresFacebook
Just finished making our new spare wheel cover
 fb.watch
Not sure if Facebook videos work here - let me know and I'll find a way to post it.
Last edited:
Iain_U1250
Explorer
and whilst I was in the mood for making some short videos, here is a quick "Chalk Test" I did in the driveway. Seems like the Mercedes Handbook and the Chalk test correspond - 43PSI for the front and 50PSI for the rear seems to be right for my Michelin 365/80R20 XZLs.
Now I need to do some high speed road testing.
Now I need to do some high speed road testing.
Last edited:
Iain_U1250
Explorer
Might as well add our latest video to this thread. This is one is a bit different, about the vehicles we had before the Unimog.
Iain_U1250
Explorer
Iain_U1250
Explorer
Here is a graph of the fuel consumption against the mileage. The Sat Nav has also recorded where were have driven on these trips. The last few trips have been long distance highway trips, traveling from , Melbourne to Townsville ( 2700km) , Townsville to Brisbane ( 1400km) and back again. The lower mileage ones were a couple of Outback trips, (1600km). We used our jerry cans on some of these trips to avoid refueling in the remote towns due to the prices. We also did one 1400km trip from Townsville to Brisbane when in lockdown, and found fuel at $1.00 per litre, so filled up both tanks and all the jerry cans as well. Still got one jerry can of that cheap fuel left, saving it for a special occasion. 

I added another column for a five point rolling average, still some strange results.

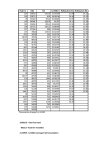

I added another column for a five point rolling average, still some strange results.


Iain_U1250
Explorer
It has been really quiet here on the forum, so here is just something I made for my truck. The exhaust brake on my truck is activated by a foot switch, and on a long downhill, keeping you foot hard on the switch gets a bit irritating.
I decided to make another way of activating the exhaust brake. I have an air switch on the gearstick left over from the Claas overdrive with I removed when fitted the new transmission.

I decided to use a shuttle valve I was given a long time ago, this allow two sources of air to work with one out put. The valve closes the opposite source, so that mean I can use either the foot switch or the gearstick swtich to activate the exhaust brake. Both switches are vented, to release the exhaust brake, so not having the shuttle valve would not work.

After a bit of re-pluming the air lines, with a new t-piece, and some 6mm air line, it was ready to test.
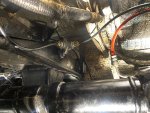
This is it in action. You have to have the sound on to hear the exhaust brake activating with either the gearstick switch or the foot switch.
I looked at way to make it automatic, so that it would come on if I took foot off the accelerator, but the problem was always how to make it disengage when I was stopped at a traffic light, I have no sensor on the gearbox that says it is in neutral, and rigging a microswitch would be very difficult and just not worth the hassle. I could have made this work with a solenoid and electric switch as well, but I had the air switch on the gearstick spare already.
I decided to make another way of activating the exhaust brake. I have an air switch on the gearstick left over from the Claas overdrive with I removed when fitted the new transmission.

I decided to use a shuttle valve I was given a long time ago, this allow two sources of air to work with one out put. The valve closes the opposite source, so that mean I can use either the foot switch or the gearstick swtich to activate the exhaust brake. Both switches are vented, to release the exhaust brake, so not having the shuttle valve would not work.

After a bit of re-pluming the air lines, with a new t-piece, and some 6mm air line, it was ready to test.

This is it in action. You have to have the sound on to hear the exhaust brake activating with either the gearstick switch or the foot switch.
I looked at way to make it automatic, so that it would come on if I took foot off the accelerator, but the problem was always how to make it disengage when I was stopped at a traffic light, I have no sensor on the gearbox that says it is in neutral, and rigging a microswitch would be very difficult and just not worth the hassle. I could have made this work with a solenoid and electric switch as well, but I had the air switch on the gearstick spare already.
Iain_U1250
Explorer
I decided to do some testing to see if it was worthwile cutting a hole in the bonnet to allow the hot air inside the bonnet to escape.
This is for those interested in a bit of scientific evidence, not just opinions.
Test method:
I have a digital manometer, with with dual inputs, one input I put on the outside of the bonnet, and the other one on the inside of the bonnet, just behind the radiator.

This i quite a precise little instrument, measuring fr0m 0-5psi with an accuracy of 0.001 psi. It is meant for air conditioning balancing in building, so needs to be able to show small differences.
The next thing I did was put some wool on some tape all over the bonnet. I just wanted to see where the airflow was going.

Then I did a run down the highway, from 0 - 100kph, and did if in both directions to see if there was any headwinds or tailwind effects ( there was a little bit of a breeze, that all)
I did two runs, a few days apart. The first time I did it, I'd set the pressure gauge to the wrong setting, and it didn't read anything. The second time I got it right.
The Results
The pressure inside the bonnet was always lower or equal to the pressure on the outside. The maximum difference was 0.060 PSi according to the gauge.
The wool tufts showed pretty clearly that close to the windscreen, the wool went inside the engine bay, through the gap between the bonnet and the cowl.
At speed, the wool was blowing backwards, away from the windscreen at theback of the bonnet, and blowing towards the windscreen in the front of the bonnet
I did a bit of a video:
My conclusions.
The fact that the pressure inside the engine bay than outside the bonnet is to be expected. The radiator etc all added to the wind resistance. I have an electric fan, which did not come on for the test, and even when I switched it on manually, I could not see much of a difference on the gauge. When the truck is not moving, the gauge does not read any difference with it on or off.
Putting a hole closed to the windscreen would make things a lot worse, as you would be getting more positive pressure inside the engine bay, which is the opposite of what you want if you want as much airflow through the radiator. I now have a rubber seal on the back of my bonnet to stop the air getting into the bonnet from the high pressure zone in front of the windscreen
A hole just behind the radiator like on the UGN trucks, does not seem to be worthwhile with my style bonnet and grill, as there is more pressure outside where they cut the hole than inside the engine bay. I think the grab handle will have a positive effect, but here are much better aerodynamic ways to get it so suck air out the bonnet.
In the end, the goal is to reduce the pressure inside the engine bay are much as possible, so that there is the biggest differential between the front of the radiator/ grill and the inside of the engine bay, so as to maximise the airflow through the radiator. Anything that increases the pressure inside the engine bay is opposite is what you want, and I think that cutting a hole in the bonnet will actually increase the pressure inside the engine bay, not decrease it.
I theory you could put the reverse scoop on, using the aerodynamics to create the low pressure needed to pull the hot air out the engine bay, but the airflow says it should be at an angle to work, and it would look pretty ugly though, I am not sure it is worth it.
I have an electric fan, so maybe having the big steel fan running all the time may shift more air, but switching on both pusher and puller fans made no difference on the gauge at all, either when driving or stationary.
This is my civil engineering view, if there are some aeronautical engineers around who can point out what's wrong with my conclusions, then feel free. IF you have a hole in your bonnet, and believe it is working, then do a simple test, just stick some wool in front of the hole, if the wool blows out, then there is air coming out the hole and the vent is working, but if the wool gets blown into the hole, the you have made things worse and should plug the hole to maximise airflow through the radiator.
This is for those interested in a bit of scientific evidence, not just opinions.
Test method:
I have a digital manometer, with with dual inputs, one input I put on the outside of the bonnet, and the other one on the inside of the bonnet, just behind the radiator.

This i quite a precise little instrument, measuring fr0m 0-5psi with an accuracy of 0.001 psi. It is meant for air conditioning balancing in building, so needs to be able to show small differences.
The next thing I did was put some wool on some tape all over the bonnet. I just wanted to see where the airflow was going.

Then I did a run down the highway, from 0 - 100kph, and did if in both directions to see if there was any headwinds or tailwind effects ( there was a little bit of a breeze, that all)
I did two runs, a few days apart. The first time I did it, I'd set the pressure gauge to the wrong setting, and it didn't read anything. The second time I got it right.
The Results
The pressure inside the bonnet was always lower or equal to the pressure on the outside. The maximum difference was 0.060 PSi according to the gauge.
The wool tufts showed pretty clearly that close to the windscreen, the wool went inside the engine bay, through the gap between the bonnet and the cowl.
At speed, the wool was blowing backwards, away from the windscreen at theback of the bonnet, and blowing towards the windscreen in the front of the bonnet
I did a bit of a video:
My conclusions.
The fact that the pressure inside the engine bay than outside the bonnet is to be expected. The radiator etc all added to the wind resistance. I have an electric fan, which did not come on for the test, and even when I switched it on manually, I could not see much of a difference on the gauge. When the truck is not moving, the gauge does not read any difference with it on or off.
Putting a hole closed to the windscreen would make things a lot worse, as you would be getting more positive pressure inside the engine bay, which is the opposite of what you want if you want as much airflow through the radiator. I now have a rubber seal on the back of my bonnet to stop the air getting into the bonnet from the high pressure zone in front of the windscreen
A hole just behind the radiator like on the UGN trucks, does not seem to be worthwhile with my style bonnet and grill, as there is more pressure outside where they cut the hole than inside the engine bay. I think the grab handle will have a positive effect, but here are much better aerodynamic ways to get it so suck air out the bonnet.
In the end, the goal is to reduce the pressure inside the engine bay are much as possible, so that there is the biggest differential between the front of the radiator/ grill and the inside of the engine bay, so as to maximise the airflow through the radiator. Anything that increases the pressure inside the engine bay is opposite is what you want, and I think that cutting a hole in the bonnet will actually increase the pressure inside the engine bay, not decrease it.
I theory you could put the reverse scoop on, using the aerodynamics to create the low pressure needed to pull the hot air out the engine bay, but the airflow says it should be at an angle to work, and it would look pretty ugly though, I am not sure it is worth it.
I have an electric fan, so maybe having the big steel fan running all the time may shift more air, but switching on both pusher and puller fans made no difference on the gauge at all, either when driving or stationary.
This is my civil engineering view, if there are some aeronautical engineers around who can point out what's wrong with my conclusions, then feel free. IF you have a hole in your bonnet, and believe it is working, then do a simple test, just stick some wool in front of the hole, if the wool blows out, then there is air coming out the hole and the vent is working, but if the wool gets blown into the hole, the you have made things worse and should plug the hole to maximise airflow through the radiator.
RoamIt
Well-known member
That's great Lain, I'm going to do something similar. When I drove my truck, I kept stepping on the button on the floor with my heel when I shifted my feet around, quite annoying. I'm going to move it up on the floor board to the left of the steering column.
Right now there's a big red button and a small pedal, that I have no idea what their for , but they are disconnected, so their coming out. I'll be able to use one of the existing holes that way.
Right now there's a big red button and a small pedal, that I have no idea what their for
Similar threads
- Replies
- 6
- Views
- 1K
- Replies
- 7
- Views
- 388
- Replies
- 0
- Views
- 2K
- Replies
- 7
- Views
- 3K

