Yep, a brief inspection revealed that super thin plasticy looking ducting!!! One more thing to add to the list!!
.
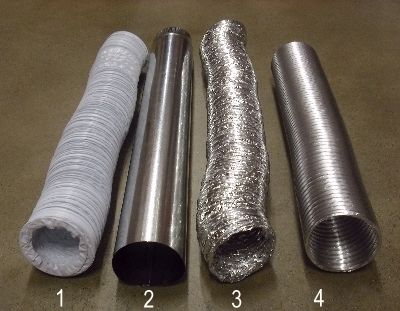
There are 4 types of vent ducting. Because it's a common size (4") and typically used on dryers, thus widely available at hardware stores, etc, that's how I tend to refer to it, as dryer duct. The good and bad I'll discuss here are strictly furnace related, so no lint, moisture, etc. The picture below shows the types. #1 is plastic wrapped around a coiled wire, like a slinky toy shoved into a bread sack. The convulutions create air turbulence which is bad for flow and the plastic itself causes friction which leads to static electricity. The plastic doesn't hold up well to the 200* output temps and dries out, cracks, and leaks or even delaminates into different layers which trap the air. #2 is a rigid steel pipe. It's stiff and smooth both inside and outside. It flows ideally. It lasts basically forever. It's is basically perfect but does typically have a seam that must be taped. #3 is similar to #1 except that it's metal foil instead of plastic, still a flimsy flexible shell wrapped a coiled wire. It shares all of #1's shortcomings except that it withstands high temperatures better so it lasts longer. #4 is semi-rigid. It's as close to #2 as you can get but still be some-what flexible. It's all metal construction (and not just foil) lasts and lasts.
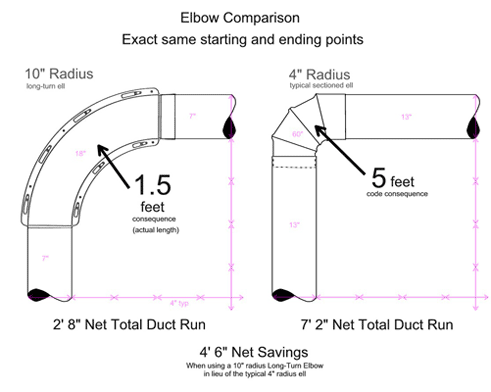
The advantage to the flexible duct (besides being cheap) is that you don't need fittings to use it. If you need a 90* bend you just bend the duct and keep moving. Anything other than a perfectly straight run of duct will impede flow so you want to minimize the number of bends and you want to maximize the radius of the bends as seen below. I'm not saying you have to buy that specific fitting (called a long turn ell), but it's a good idea to make any bends as gentle as possible. Building codes dictate maximum lengths of dryer vents. Most say 25', and you have to deduct lengths for fittings, 5' for typical (sectioned) elbows. If you had one of the sectioned elbows you could only use 20' of straight duct because that one fitting has as much restriction as 5' of regular duct (more recent testing suggests it's more like 15' of straight rigid duct = 1 sectioned elbow). That's what the numbers in the picture below are about.
When hooking up your duct it's a good idea to tape all joints between parts like furnace-to-duct, duct-to-elbow, etc but also the seams of any fittings as seen below. They're all just stamped sheet metal so they're likely to leak a bit of air when new and after being man-handled during installation then bouncing down the road for a few thousand miles, leaks are inevitable if not sealed up so better to use a good duct sealing tape from the beginning. We're not talking about the grey tape with strings in it, inspite of what they call that stuff, but rather what's often called "foil tape". There are different kinds of this too and rather than getting too deep into it, I'll just say I prefer 3M or Nashua "foil mastic" tapes and Nashua 360-17 especially. These tapes are metal foil like the others but add to it a rubber backing (butyl I think) and super-sticky adhesive that sticks and seals and stretches and flexes like mad. Good good stuff just to have around but especially for duct work!

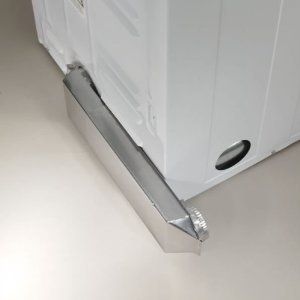
One very cool little trick I suggest is using what's known as a periscope fitting. Here's a pic of one installed to show how they work in general.
and here's a drawing of how you can take them apart, shorten them, and/or re-assemble them to flip their output 180*.
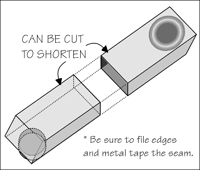
Periscope fittings are great where space is a concern and go from 4" round to about 6x2" rectangular (50% wider than round but 50% thinner) then switch back to 4" round. They're available in lots of lengths, offsets, etc but none are very expensive and they're at every ACE, Lowe's, HD, etc.
under $20 at Amazon. With your van in particular, Jb1rd, where the furnace is on the passenger side and the secondary outlet is forward of the furnace, I'd use the periscope fitting to connect directly to the furnace, run back to the outside wall, then run straight forward with rigid duct. This gives you the best flowing, most compact system there is. Depending on how far above the floor level your outlet is and whether it's in the end or the face of the cabinet, you may use another periscope or an elbow, etc. If you found a way to actually use the extra 2" of space inside the cabinet like with deeper drawers or something you could use rectangular duct (like the periscopes) for the whole run too. I highly recommend strapping or otherwise securing the duct very well so it doesn't move around. This will keep it leak-free and prevent damage to the vents, furnace itself, etc but also keep it nice and quiet if you strap it a little closed-cell foam so blower vibrations are isolated. It'll also keep it from making noise as you drive. Hope this information is helpful to you or someone else. I often find little things like the periscope dryer vent that I didn't know existed by reading forums and use them in some way they're not necessarily intended, like furnaces

.
On a more "Van Furnace" specific note, you should make sure there's adequate intake air flow available to the blower on the discharge (vents) side of the furnace. The best furnace in the world will fail to perform if installed improperly and Atwood demands,
.
"NOTE: If zero clearance* is maintained from furnace to cabinet structure, a 4˝ x 4˝ air intake cutout must be provided to blower wheel side of furnace at air intake opening"
*When furnaces are installed to minimum clearances, an additional 16 in2 of return air must be provided to blower side of furnace, or a 2˝ clearance the full length and height on blower side must be maintained.*
.
So if your furnace when installed is closer than 2" to the cabinet on its left it should have a 4" square opening next to the blower on that side to keep it from starving for air. Starving will reduce output, kill efficiency, and increase noise. Try cupping your hand over a shop-vac hose sometime and listen to the motor. That's what happens to any blower in cavitation. I've seen lots of these furnaces (wish I could go back in time and grab one) installed, mostly in old ice huts, and most of them are zero tolerance with a square hold jig-sawed in the adjacent cabinet. Back then they were Hydro-Flame furnaces (later bought out by Atwood I guess). Some were without cabinets, just set in open-air with the exhaust butted against the wall and that's it. If the jigsaw guy was sick the day your van was at Airstream, or if they just plain didn't perform that step, it could certainly explain your furnace's poor performance.
.
http://www.livinlite.com/pdf/service/furn/Atwood7900EverestSeries2.pdf <-Everest Star Manual


