Team Ball's Out
Adventurer
If you are like most who have a horizon tralier with the water tank the cheep hand pump works fine but is limited on the amount of water per stroke. Well I came up with a better solutiion.
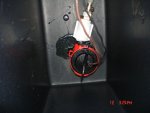
I was looking for a waterproof pump that would take the the trail beating from bouncing around quite a bit. I came up with and used a bildge pump for a boat. I have a boat as well and never had one fail and it takes a beating and it's waterproof!:wings: It is made by Johnstone and was around $50.00.
Well I did not want to drill any holes for screws so I used a 5 min set epxoy to mount the pump. Now before you ask how can you replace it if it fails? The motor cartrage is replaceable just a quick twist and the whole motor of removable. Just squirt a puddle of epxoy and place the pump in it and wait for 5 mins and it is set in place. You will notice in the picture the pump is not in the center of the puddle it is now you just grab it and place it in the epxoy. Connect your hose using SS worm clamps to prevent rust and you are done with mounting the pump. When you connect the hose to the facuet make sure you are about 12 to 18" longer than you need so if you need to remove the facuet for any reason you have plenty of hose to work with. You can find all of the hose and fittings at Home Depot.
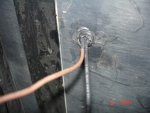
Next is the wires that I ran through the top of the tank. If anything was going to leak I wanted it to leak from the top not the bottom. I used a marine sealent and a rubber grommet that problem was taken care of. I also did not want to have a electrical / butt connectors in the water so make sure you have plenty fo wire to run through the tank to the out side I had @ 8" left and that was plenty.
Push your wires through the grommet when you have about a 1" of wires left to pull through coat the last remaining 1" with the sealant and pull the wires through snug and wait for the sealent to dry, next place sealant on the wires out side of the grommit and wait for that to dry as well. If you done it right you should be waterproof.
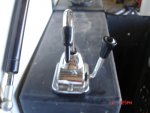
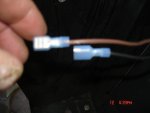
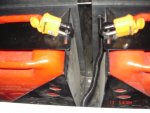
Next I used two male and female connectors seen in the picture note: one is longer than the other Why? when you use the wire loom to cover and protect the wires you can cover the connectors very easy and you will not have a big lump in the wire loom and every thing looks nice and uniform.
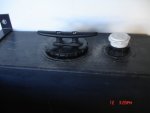
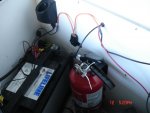
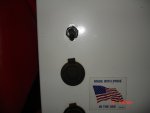
Drill a hole in the utility box nice and high as to keep water out when crossing a stream or creek. Open your utility box and see where the lid hits when its open and mark the back side of the lid where it hits the box. measure down about a inch and drill your hole. Insert our grommet and run your wires than seal them if you want I did. Next find a place where you want to mount your switch drill you hole make sure its a nice fit, silcone the back side of the switch to keep water out, push it through the hole and install the waterproof cover tighten and you done with that. Connect your wires to the switch with a fuse, I used a waterproof fuse holder, it's the thing with the orange wires sticking out of it and mount it where you have easy access. I mounted it on the back of the utility box, next run your wires to your batteries and your pretty much done. Wire loom all of your wires to make it look nice and also when other people see it it looks like you know what you were doing. Fill your tank with water and pour about a cup of bleach into the tank and let it sit for a few hours just incase there is any funny taste from the epxoy. Don't empty your tank by the drain hole but turn your pump on to flush out your new system and your done! I just took pictures of the wires in the last few pictures just to show you where thet ran to. They are now covered up by wire loom and everything is bundled up very nicely. Not a hard project to do Out of 5 hammer I would rate this a 1.5 or 2 pretty easy stuff.
I was looking for a waterproof pump that would take the the trail beating from bouncing around quite a bit. I came up with and used a bildge pump for a boat. I have a boat as well and never had one fail and it takes a beating and it's waterproof!:wings: It is made by Johnstone and was around $50.00.
Well I did not want to drill any holes for screws so I used a 5 min set epxoy to mount the pump. Now before you ask how can you replace it if it fails? The motor cartrage is replaceable just a quick twist and the whole motor of removable. Just squirt a puddle of epxoy and place the pump in it and wait for 5 mins and it is set in place. You will notice in the picture the pump is not in the center of the puddle it is now you just grab it and place it in the epxoy. Connect your hose using SS worm clamps to prevent rust and you are done with mounting the pump. When you connect the hose to the facuet make sure you are about 12 to 18" longer than you need so if you need to remove the facuet for any reason you have plenty of hose to work with. You can find all of the hose and fittings at Home Depot.
Next is the wires that I ran through the top of the tank. If anything was going to leak I wanted it to leak from the top not the bottom. I used a marine sealent and a rubber grommet that problem was taken care of. I also did not want to have a electrical / butt connectors in the water so make sure you have plenty fo wire to run through the tank to the out side I had @ 8" left and that was plenty.
Push your wires through the grommet when you have about a 1" of wires left to pull through coat the last remaining 1" with the sealant and pull the wires through snug and wait for the sealent to dry, next place sealant on the wires out side of the grommit and wait for that to dry as well. If you done it right you should be waterproof.
Next I used two male and female connectors seen in the picture note: one is longer than the other Why? when you use the wire loom to cover and protect the wires you can cover the connectors very easy and you will not have a big lump in the wire loom and every thing looks nice and uniform.
Drill a hole in the utility box nice and high as to keep water out when crossing a stream or creek. Open your utility box and see where the lid hits when its open and mark the back side of the lid where it hits the box. measure down about a inch and drill your hole. Insert our grommet and run your wires than seal them if you want I did. Next find a place where you want to mount your switch drill you hole make sure its a nice fit, silcone the back side of the switch to keep water out, push it through the hole and install the waterproof cover tighten and you done with that. Connect your wires to the switch with a fuse, I used a waterproof fuse holder, it's the thing with the orange wires sticking out of it and mount it where you have easy access. I mounted it on the back of the utility box, next run your wires to your batteries and your pretty much done. Wire loom all of your wires to make it look nice and also when other people see it it looks like you know what you were doing. Fill your tank with water and pour about a cup of bleach into the tank and let it sit for a few hours just incase there is any funny taste from the epxoy. Don't empty your tank by the drain hole but turn your pump on to flush out your new system and your done! I just took pictures of the wires in the last few pictures just to show you where thet ran to. They are now covered up by wire loom and everything is bundled up very nicely. Not a hard project to do Out of 5 hammer I would rate this a 1.5 or 2 pretty easy stuff.
Attachments
-
 waterpump 001.jpg137.7 KB · Views: 26
 -
 waterpump 002.jpg144.3 KB · Views: 33
 -
 waterpump 003.jpg128.5 KB · Views: 23
 -
 waterpump 004.jpg127.5 KB · Views: 22
 -
 waterpump 005.jpg113.1 KB · Views: 18
 -
 waterpump 006.jpg132.5 KB · Views: 12
 -
 waterpump 007.jpg141 KB · Views: 22
 -
 waterpump 009.jpg138.1 KB · Views: 24
 -
 waterpump 010.jpg148 KB · Views: 18
Last edited:
 )
)