Get your tickets to THE BIG THING 2026!
You are using an out of date browser. It may not display this or other websites correctly.
You should upgrade or use an alternative browser.
You should upgrade or use an alternative browser.
xovrlnd s/c xterra build
- Thread starter lostinalberta
- Start date
lostinalberta
Observer
Sea Foam
Really small update. I've been super busy the last couple weeks. Between writing for a new website, kind of moving and waiting for good weather, I managed to do a quick intake system clean with the spray type Sea Foam.
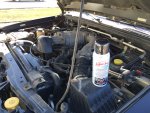
Super simple. The can actually had clear instructions. Warm motor up to operating temp, shut off. Open up the intake right before the throttle bottle, feed in the straw, close intake back up. Start the vehicle up, have someone hold the rpm at 1500, or just guesstimate and use the throttle pulley inside the engine bay like I did. Spray entire can, should take about 5 minutes. You'll see smoke start to come out of the exhaust, this is OK. After you empty the can turn the vehicle off and let it sit for 10 minutes. Start back up and drive aggressively until smoke clears up. All done!
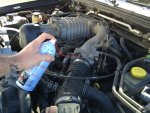
As far as noticing any improvements, I didn't really. It did idle better, but no noticeable performance gains. Which I wasn't expecting anyway haha.
I have a pretty large job starting up around Friday that'll take about 2 weeks. After that I'll be doing the lift and front locker, girlfriend is letting me use her garage! Woohoo!
Really small update. I've been super busy the last couple weeks. Between writing for a new website, kind of moving and waiting for good weather, I managed to do a quick intake system clean with the spray type Sea Foam.

Super simple. The can actually had clear instructions. Warm motor up to operating temp, shut off. Open up the intake right before the throttle bottle, feed in the straw, close intake back up. Start the vehicle up, have someone hold the rpm at 1500, or just guesstimate and use the throttle pulley inside the engine bay like I did. Spray entire can, should take about 5 minutes. You'll see smoke start to come out of the exhaust, this is OK. After you empty the can turn the vehicle off and let it sit for 10 minutes. Start back up and drive aggressively until smoke clears up. All done!

As far as noticing any improvements, I didn't really. It did idle better, but no noticeable performance gains. Which I wasn't expecting anyway haha.
I have a pretty large job starting up around Friday that'll take about 2 weeks. After that I'll be doing the lift and front locker, girlfriend is letting me use her garage! Woohoo!
lostinalberta
Observer
Great stuff man. I got the same rig, you are inspiring me with a few ideas. I have really debates over what tires to get next, please let me know how you like the KO2's
Right on! Glad to hear it! I'm heading out into the bush for work on Friday, I'll be gone a couple of weeks, but I'll be getting everything done when I get back. I'll let you know how I feel about the tires!
Awesome man. I was torn over the KO2, duratracs and Hankook MT's. I think I am going to go Hankook MT's this go around. I have had them before and they were excellent. Good on pavement, quiet, excellent off road, and I got over 100,000 km on them.
But really interested the ko2's, so would love to hear your thoughts
But really interested the ko2's, so would love to hear your thoughts
lostinalberta
Observer
Little bit of an update!
Finally have a few weeks off from work, so I'll be starting the lift on the X here in the next few days. Just moved as well so I have a bigger garage to work in which will be nice! Can't leave you guys without a picture of some sort, so I stopped in Dawson at the start of the Alaska Highway.
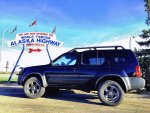
Finally have a few weeks off from work, so I'll be starting the lift on the X here in the next few days. Just moved as well so I have a bigger garage to work in which will be nice! Can't leave you guys without a picture of some sort, so I stopped in Dawson at the start of the Alaska Highway.

lostinalberta
Observer
Calmini Upper Control Arms
So today I finally got around to starting on my lift!!! Finally some decent updates!
I started off pulling into my garage (previously my girlfriends garage , but I moved in. So that's an update too haha.) Anyway, pulled in, got out my little 2 ton jack stands, barely big enough to hold the xterras front tires off the ground. First I let everything soak in PB Blaster for around an hour. I've also been spraying PB on everything, everyday for about a week. I feel like that helped a TON!

Then I started taking off the front sway bar, all goes perfect until I get to the driver side end link. The long collar spacer between the bushings was seized on there pretty good. Good enough that I brought out a little angle grinder and zipped it right off.
 .
.
After that I had a good look at the upper control arm and ball joint. I decided I should run to the parts store and buy a pickle fork just in case. I snapchatted my buddy on the way to princess auto and asked if he wanted to help. He said yes and just to go to his shop. Plus he had every tool I could ever need, since he is a heavy duty mechanic. So I flipped around and headed over to the beer store, grabbed some brews, then went to his shop. We get everything torn down, starting with the passenger side. I couldn't believe how easy it was, especially after reading about everyone's trouble with the cam bolts. It took us MAYBE 40 minutes to jack it up, get the tire off, get the stock control arm off, get the new calmini one on, get everything greased and aligned and put the tire back on.


I wish I could say the driver side went as easy as the passenger side. Unfortunately that was not the case. It took us almost two hours. We were still pretty lucky considering only one cam bolt was seized. We tried everything. Fire, BFH, cold chisel, 3 inch peanut grinder, anything we could thing of. Nothing we did would get it off. I head over to the tool box to brainstorm and I notice that the mounting hole for the 6 inch angle grinder disks aren't much bigger than the 3 inch for the peanut grinder. So we fabbed up a washer type thing, that held the bigger disk to the peanut grinder perfectly! That gave us just enough extra length to zip through the cam bolt. Finally out came the other stock control arm!


Then we installed the new arm, greased everything up, torqued everything, tire back on and went for a test drive. Absolutely perfect! The hardest part of installing the lift is done! Tomorrow I'll be busy with trying to find a new career, then baseball that night. So Wednesday I'll be finishing off the lift. Then when I get some spare coin, I'll have the tires mounted and get a professional alignment. I'm very excited with the progress that happened today. More to come!
So today I finally got around to starting on my lift!!! Finally some decent updates!
I started off pulling into my garage (previously my girlfriends garage , but I moved in. So that's an update too haha.) Anyway, pulled in, got out my little 2 ton jack stands, barely big enough to hold the xterras front tires off the ground. First I let everything soak in PB Blaster for around an hour. I've also been spraying PB on everything, everyday for about a week. I feel like that helped a TON!

Then I started taking off the front sway bar, all goes perfect until I get to the driver side end link. The long collar spacer between the bushings was seized on there pretty good. Good enough that I brought out a little angle grinder and zipped it right off.
 .
.After that I had a good look at the upper control arm and ball joint. I decided I should run to the parts store and buy a pickle fork just in case. I snapchatted my buddy on the way to princess auto and asked if he wanted to help. He said yes and just to go to his shop. Plus he had every tool I could ever need, since he is a heavy duty mechanic. So I flipped around and headed over to the beer store, grabbed some brews, then went to his shop. We get everything torn down, starting with the passenger side. I couldn't believe how easy it was, especially after reading about everyone's trouble with the cam bolts. It took us MAYBE 40 minutes to jack it up, get the tire off, get the stock control arm off, get the new calmini one on, get everything greased and aligned and put the tire back on.


I wish I could say the driver side went as easy as the passenger side. Unfortunately that was not the case. It took us almost two hours. We were still pretty lucky considering only one cam bolt was seized. We tried everything. Fire, BFH, cold chisel, 3 inch peanut grinder, anything we could thing of. Nothing we did would get it off. I head over to the tool box to brainstorm and I notice that the mounting hole for the 6 inch angle grinder disks aren't much bigger than the 3 inch for the peanut grinder. So we fabbed up a washer type thing, that held the bigger disk to the peanut grinder perfectly! That gave us just enough extra length to zip through the cam bolt. Finally out came the other stock control arm!


Then we installed the new arm, greased everything up, torqued everything, tire back on and went for a test drive. Absolutely perfect! The hardest part of installing the lift is done! Tomorrow I'll be busy with trying to find a new career, then baseball that night. So Wednesday I'll be finishing off the lift. Then when I get some spare coin, I'll have the tires mounted and get a professional alignment. I'm very excited with the progress that happened today. More to come!
Last edited:
lostinalberta
Observer
Great looking xterra. Always like seeing more of them on hear, especially northern BC Alberta area. If your ever coming through PG with some time to spare, let me know.
Can't say I've ever been down to PG! I've never had a reason to go, but wheeling with another Xterra sounds like good enough reason to me!
lostinalberta
Observer
Finished My Lift
So over Wednesday and Thursday I finished lifting the Xterra. After the control arms I decided to do the leaf packs next, putting in the Nisstec add a leaf. All very straight forward and simple to do. After the leaf pack I put on my AC shackles and Bils. Before the suspension settled, I had gained 5.25 inches haha. Now that it's settled a bit more it is sitting around 4 inches of lift in the rear. Extended break lines are on the way.


Then I moved onto swapping out the torsion bars and setting the ride height. I'm still fine tuning this part, currently having some issues, but it looks good! Will look even better with my new tires mounted!


So over Wednesday and Thursday I finished lifting the Xterra. After the control arms I decided to do the leaf packs next, putting in the Nisstec add a leaf. All very straight forward and simple to do. After the leaf pack I put on my AC shackles and Bils. Before the suspension settled, I had gained 5.25 inches haha. Now that it's settled a bit more it is sitting around 4 inches of lift in the rear. Extended break lines are on the way.


Then I moved onto swapping out the torsion bars and setting the ride height. I'm still fine tuning this part, currently having some issues, but it looks good! Will look even better with my new tires mounted!


lostinalberta
Observer
Test and Tune
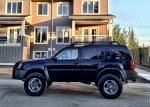
Finally got my new tires installed and had some free time to give everything a quick test. The test wasn't anything crazy, just enough to stretch its legs and get a feel for it. Over all I'm very happy with how thing preformed. SUCH a huge difference over stock. The only thing I need to do is work on a little bit of tire rub I get at full lock. Here are a few pictures and a video!

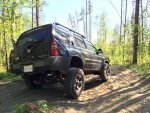
https://www.youtube.com/watch?v=lD6VgSg_lk0
Finally got my new tires installed and had some free time to give everything a quick test. The test wasn't anything crazy, just enough to stretch its legs and get a feel for it. Over all I'm very happy with how thing preformed. SUCH a huge difference over stock. The only thing I need to do is work on a little bit of tire rub I get at full lock. Here are a few pictures and a video!


https://www.youtube.com/watch?v=lD6VgSg_lk0
Similar threads
- Replies
- 9
- Views
- 1K
- Replies
- 29
- Views
- 1K
- Replies
- 2
- Views
- 1K
- Replies
- 1
- Views
- 412
