Yet Another Skamper Build...

Bill_G_62439

Observer
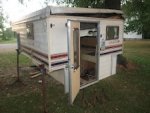
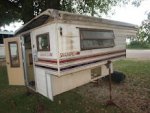
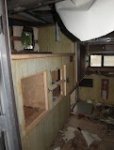
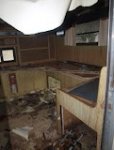
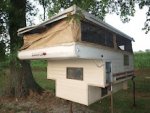
Wow! Just got home at 1:30 am from picking up a sweet deal on a not so sweet Skamper 080 that was on Craigslist. The price was irresistible, so I had to go get it even after it had been unclaimed on Craigslist for over a week. I drove 150 miles to get it. The roof has some major rot and will need total plywood replacement, but the rest of the unit is not too bad. At least nothing that can't be repaired as good as new.

I would post some pictures, but my family and I are off to Seattle, WA in our '79 Cameo Hard Sider tomorrow morning for a month-long trip. I actually just paid for it today, also, having had it in my possession for several weeks. I guess it's not every day you buy two TC's--one of each variety!

I'll start on the Skamper when I get back to Illinois in a few weeks. The job will sure be a lot easier with all the info you all have contributed to ExPo.

Thanks!
 

Bill_G_62439

Observer
A month later...

Just returned home from a one month, 6500 mile, 12 state tour of the Northwest. Wow! What a trip! And all 5 of us (me, my wife and 3 teenagers) did it all in an 8 foot hardside TC that sleeps 3 comfortably!

Now I'm ready to begin tackling the Skamper.

P7187613.JPG

She's pretty rough now that I've actually had a chance to look at it. But I definitely want a pop-up over the hardside model. Although, the hardside worked out perfectly for our trip, it's just too heavy for my truck. And I'm looking forward to some overnight jaunts.

P7187617.JPG

The complete roof is going to have to come off and be rebuilt. The interior has absorbed a lot of moisture, especially the particle board. I imagine ianything particly board will be ripped out. Also, some plywood in the box has rot, so it will be replaced. It hasn't been cleaned yet, so the junk inside is mainly rotten wood bits from traveling home with a rotten roof.

P7187615.JPG

P7187616.JPG

Here it is with the roof up. Surprisingly, the walls and windows appear to be in good shape.


P7187619.JPG

By the way, the original manuals came with the unit, so if anyone needs any info from them, let me know.

This is the first time I've posted photos,and google+ has taken over in Picasa since I last used it, so I hope they come through.

Thanks to everyone, especially SLO, for all the good Skamper info. You have all inspired me to take on this rebuild.
 

Attachments

  • P7187614.JPG
    P7187614.JPG
    12 KB · Views: 1,571
  • P7187617.JPG
    P7187617.JPG
    15.1 KB · Views: 1,545
  • P7187615.JPG
    P7187615.JPG
    6.5 KB · Views: 1,541
  • P7187616.JPG
    P7187616.JPG
    6.9 KB · Views: 1,529
  • P7187618.JPG
    P7187618.JPG
    16.3 KB · Views: 1,534

SLO_F-250

Explorer
Bill,
Thanks for the compliment! Looks like a great project! Please keep us posted and post picts! We'll answer any questions we can! Glad you are on the forum! Good luck with the build. Looking forward to seeing it progress!

The interior will be easy. The roof is slightly more complicated. Looks like the main frame and cab-over are in good condition. GREAT! Clean it out and seal it up ASAP.
Cheers
Paul
 

Willymutt

New member
Wow, I thought my roof had issues. If I did it again, I would use al for the roof frame. That and get any mold out now while it is still not finished.

Sent from my ADR6400L using Tapatalk 2
 

Bill_G_62439

Observer
Willymutt, I was just looking at your thread on your sagging roof to get ideas for mine. I just took a break and went outside to ponder the roof situation. While there I must have doubled the value of it by just sweeping out all of the rotten wood!

My roof is going to have to come off completely. I'm debating just saving the sheet aluminum and rebuilding everything beneath it. I'm not a welder, so I'll probably use wood, but I want to beef it up a little to support a roof rack, rooftop A/C or cabinets later. I know SLO references that the roof is basically aluminum sheet, then foam insulation, then 1/8" plywood from the top down. If I were to add thicker plywood, how thick can you go without adding too much weight to make raising the top difficult?

On a side note, I thought I had another Skamper in need of repair snagged yesterday off of CL, but when I finally spoke to the owner in person, he had just hauled it to the scrap yard since no one would take on the project! Breaks my heart to see one go to waste...
 

SLO_F-250

Explorer
I know SLO references that the roof is basically aluminum sheet, then foam insulation, then 1/8" plywood from the top down. If I were to add thicker plywood, how thick can you go without adding too much weight to make raising the top difficult?

Bill, If I remember correctly it was an aluminum sheet with 1" thick plywood waffle structure with foam infill, then the 1/8" finish ply on the underside. Willymutt did way more work on his than I did on mine so he probably knows better. Mine came from the southern cali desert so water damage was not too much of an issue. :costumed-smiley-007
 

CLynn85

Explorer
Man you guys are ambitious! I'm too easily scared away by all this wood stuff! Will definitely be following the build though!
 

Bill_G_62439

Observer
Just performed a "roofectomy." Taking a break for lunch. There's not going to be much to salvage except for the skin and the outer aluminum rails, but I'm confident that it can be rebuilt. I'll try to post pics tonight.
 

Willymutt

New member
Mine didn't have any structure other than some plastic ribs formed into the first layer under the al. The al is really thin and will tear easily. I tried hard to salvage mine but it was too far gone. I'm actually going to work some more on it tonight when it cools off. I'll snap some pics and update my thread.

Sent from my ADR6400L using Tapatalk 2
 

Bill_G_62439

Observer
Got the roof off and, boy, is it a mess! I took several pics in case it might be of assistance to anyone else on upper canvas removal/replacement, also.

There are about umpteen hundred screws to remove between the canvas and the lower lip of the roof. If you look up into the gap and follow the canvas up, this is what it should look like:
P7217752.JPG

After removing several screws, the canvas will start separating from the roof and look like this:
P7217753.JPG

Continue all the way around the roof and the final result should like something like this (your results may be different, depending on the condition of your roof):
P7217757.JPG

To completely remove the roof, there are 4 brackets that have to be disconnected from the roof structure. The front brackets are simple pivots attached into the plywood with screws like this:
P7217755.JPG

The rear brackets are torsion-loaded, so keep the roof up. When I removed mine, there was no tension since the plywood they are attached to was rotten and twisted, so be careful--they could be under some stress and twist suddenly when the bolts are removed. To diconnect the rear brackets, remove these bolts:
P7217756.JPG

Now you may want to get a friend or three to simply lift the roof off the Skamper. Mine was pretty light since all the plywood was rotten, so I just slid it off myself:
P7217762.JPG

Here's the end result--one roof carcass ready to be ?
P7217764.JPG

Willymutt,
I'm going to examine what's left of my roof to see if it's worth salvaging. Otherwise I might just spring a few extra bucks and build one in the original manner with FRP for the outside material. I look forward to seeing what you've done with yours!

It's amazing how lightweight this one was built. From the top down the layers are: aluminum sheet with one seam in the middle, 1"? of polystyrene foam, aluminum sheets where inside fixtures were attached, then 1/8" paneling. There was also a border of 2 thicknesses of 1/2" plywood around the edge to screw the canvas into. the rigidity of the roof only comes from the outside edges that hang down which is 2 layers of 1/2 plywood". (I may be off on some of the thicknesses here since I didn't actually measure yet, but that's what my initial observations are.)

Here it is all "tucked in" for the night:
P7217784.JPG

And as I was moving it around the yard today, a teaser of what's to come :
P7217781.JPG
 

Willymutt

New member
My internal construction was very similar. There were some ribs that were broken on mine when I pulled the insulation down. I got some pics tonight and will upload in the morning.

Sent from my ADR6400L using Tapatalk 2
 

Bill_G_62439

Observer
Finally had a little time here and ther the past couple days to get the gunk off of the roof. It has been laying upside down in the backyard for the last week and a half, but, alas, it hasn't invited the rain to Southern Illinois. The "paneling" on the ceiling is merely contact paper covered cardboard! And it is glued well to the polystyrene foam above ( in this case, beneath) it. A blast of the garden hose removes another layer a bit at a time. The only wood in the structure is a strip of 2 layers of 1/2" plywood around the edge that is mostly rotted and coming off pretty easily, and the 3 1/2" double layer around the top of the walls. Oh, and some strips around the vent to attach it. It looks like I'll be able to save the skin and insulation at this point, but I did contemplate building a new roof from scratch with plywood, R board and FRP.

I'll post pics soon, especially of the rebuild.
 

Bill_G_62439

Observer
Willymutt, Mine had no ribs, just skin, foam and cardboard paneling. I don't know what kept these roof from sagging instantly! It will be rebuilt better.
 

Willymutt

New member
Sounds just like mine did. The only thing I saw was some witness marks but that May have been glue from putting the wires in.

Took ours out last weekend and actually got some rain. Didn't leak. My FIL and nephews slept in it a couple nights this week too while visiting so it is starting to pay off. Really need to get some lights in it and a roof vent.

Sent from my ADR6400L using Tapatalk 2
 

Bill_G_62439

Observer
Wow! It's 11:30pm CST and I just finished rebuilding the Skamper roof! It's not actually totally done, but all the hard stuff is done! I'm stoked!

I took bunches of photos, so I'll document the build very soon. Hope it will be some help to others with roof issues.

I will say in retrospect that it would have been easier to just build a new roof. But I wanted to retain the original roof so my Skamper will retain its value and can compete better in antique camper shows someday. Yeah, right!
 

Forum statistics

Threads
188,584
Messages
2,907,385
Members
230,704
Latest member
Sfreeman
Top