You are using an out of date browser. It may not display this or other websites correctly.
You should upgrade or use an alternative browser.
You should upgrade or use an alternative browser.
Blender, My LX450/FZJ80 + FJ45esk + GM + Land Rover crazy concoction
- Thread starter Metcalf
- Start date


Metcalf
Expedition Leader
Little bit....
Th
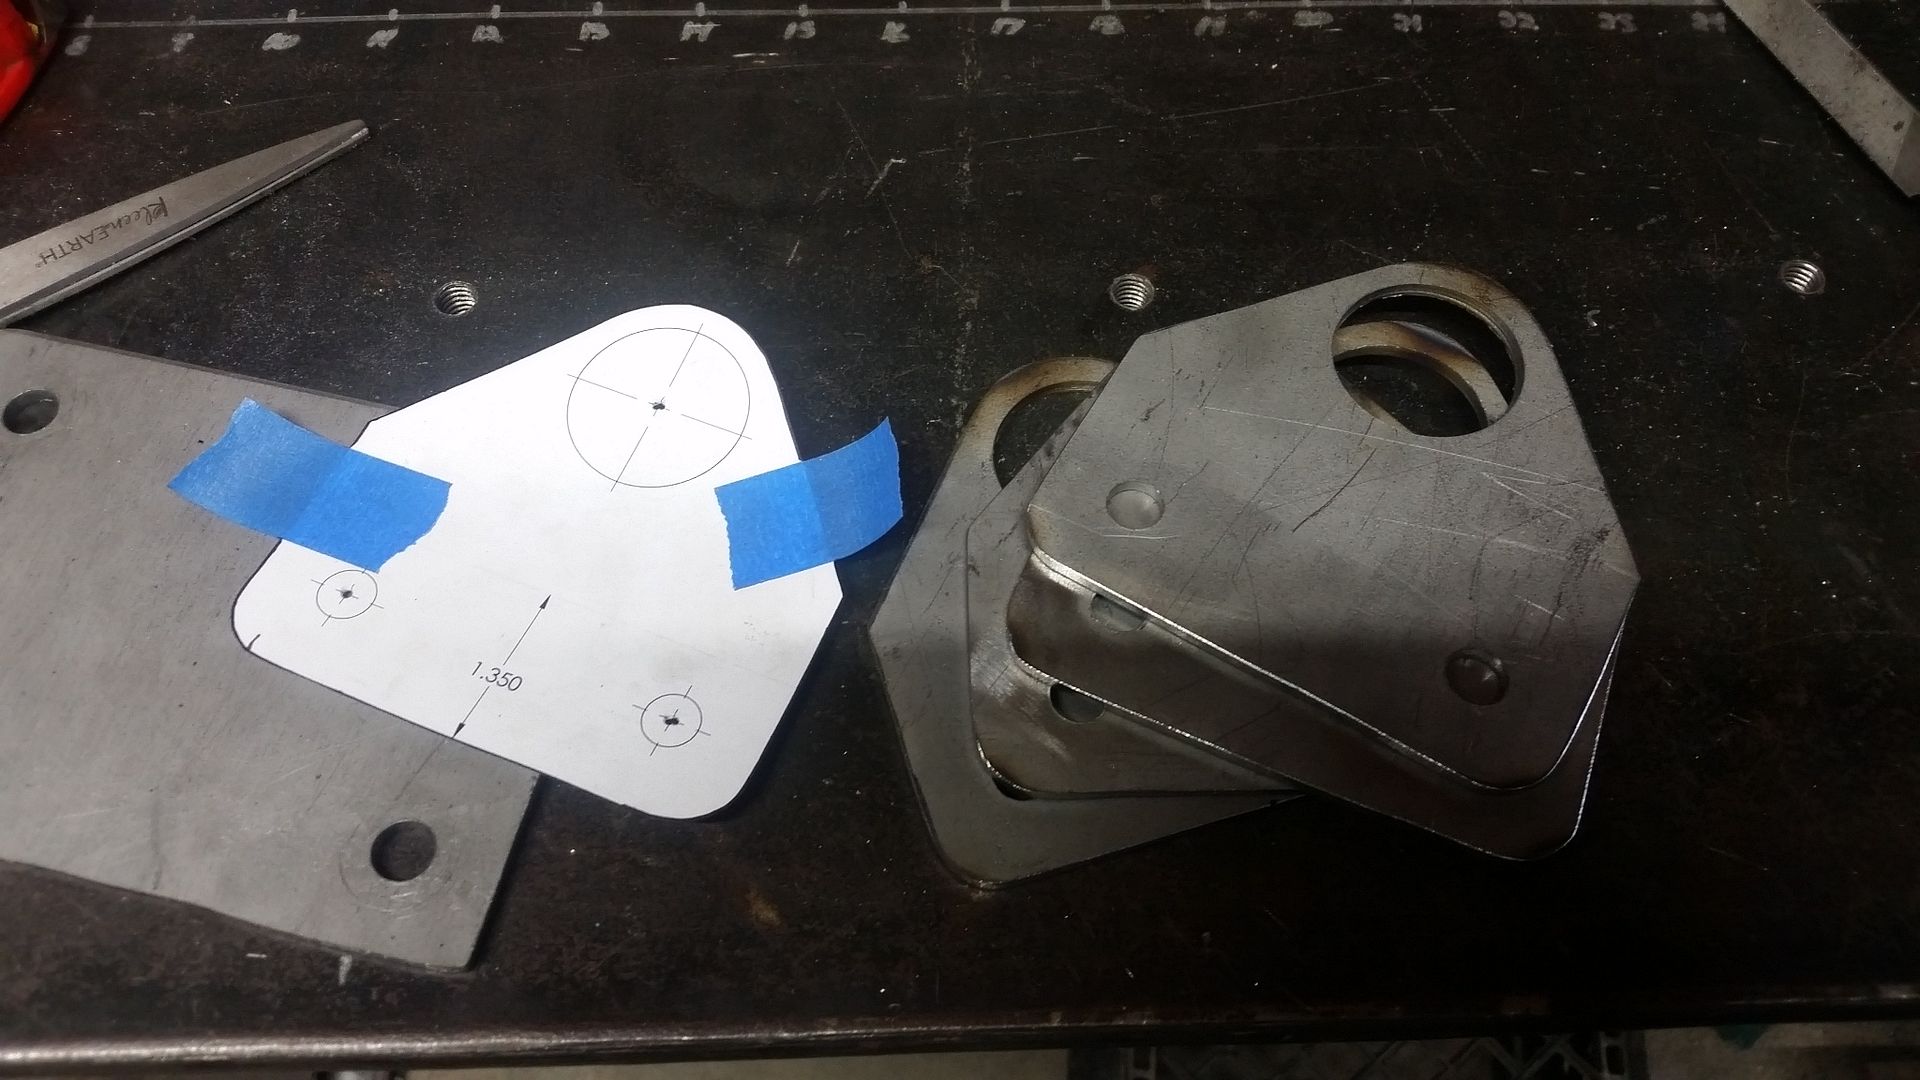
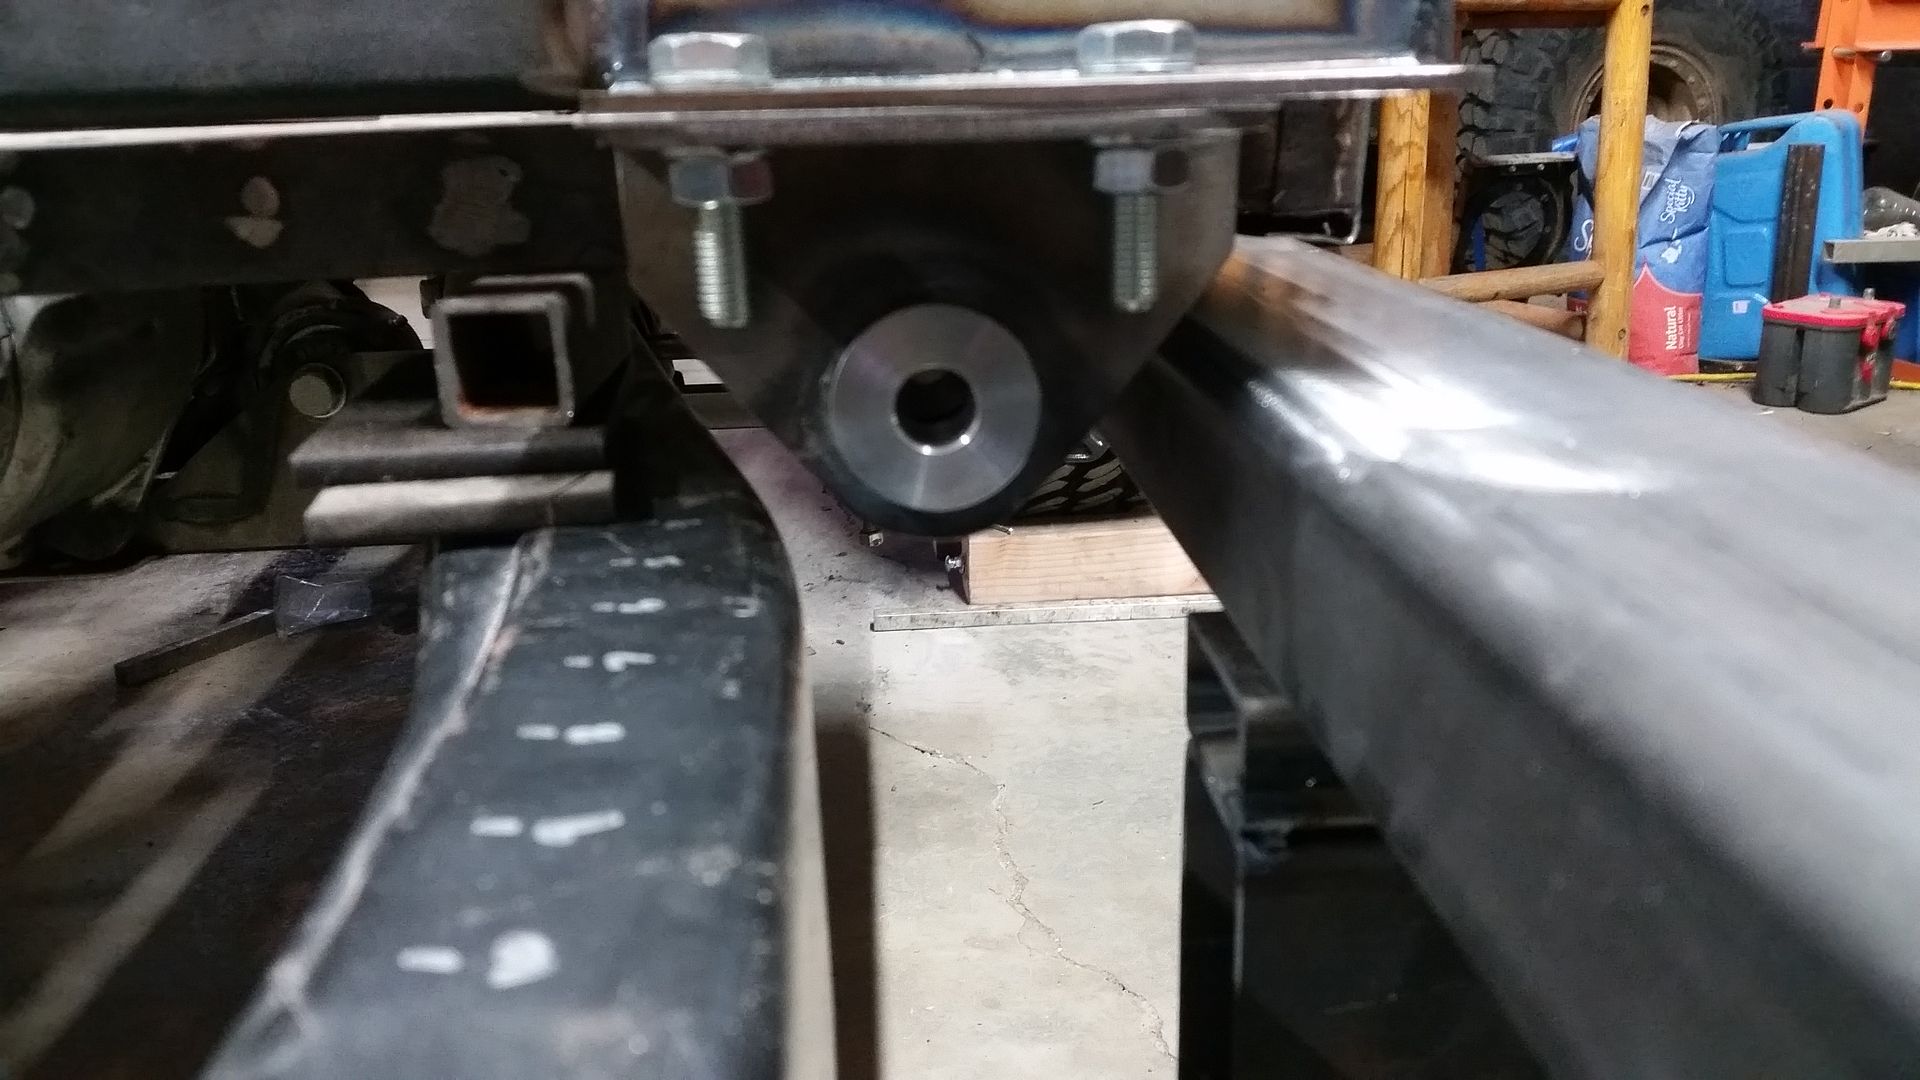
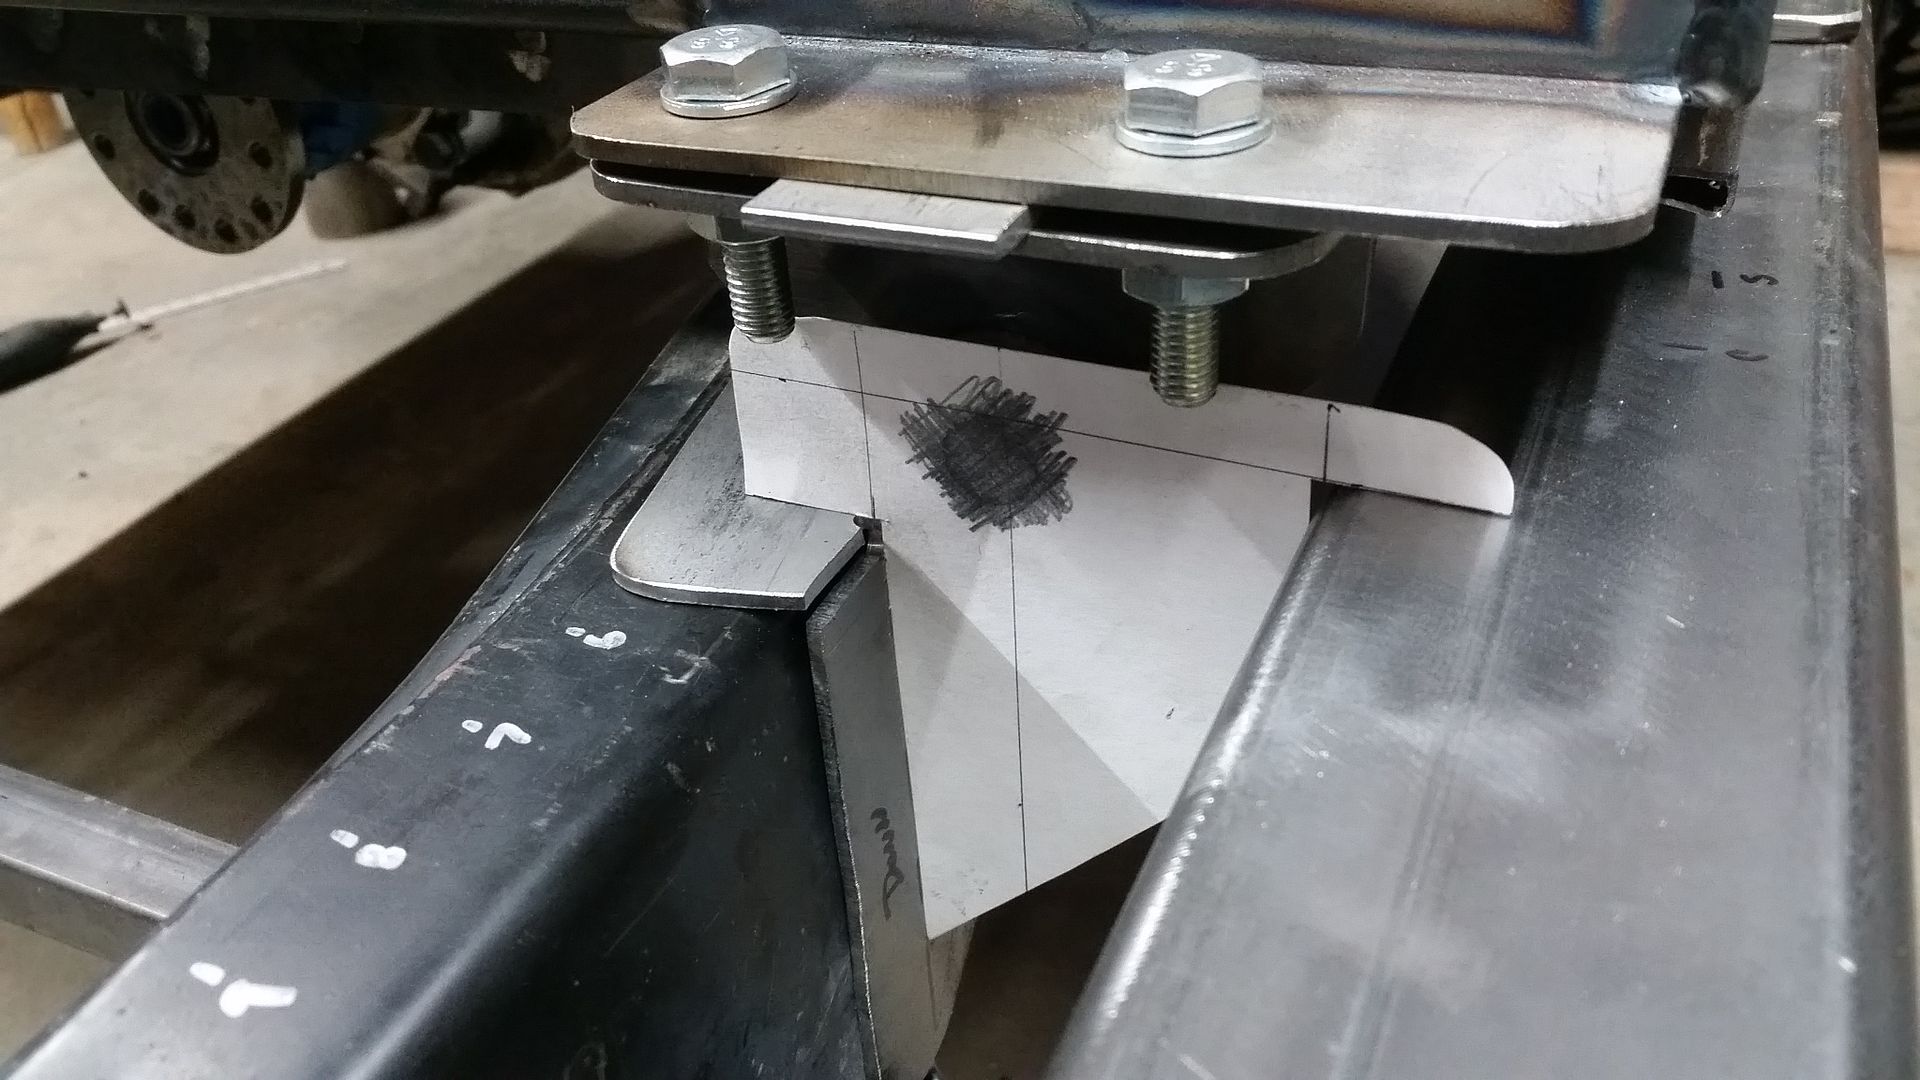
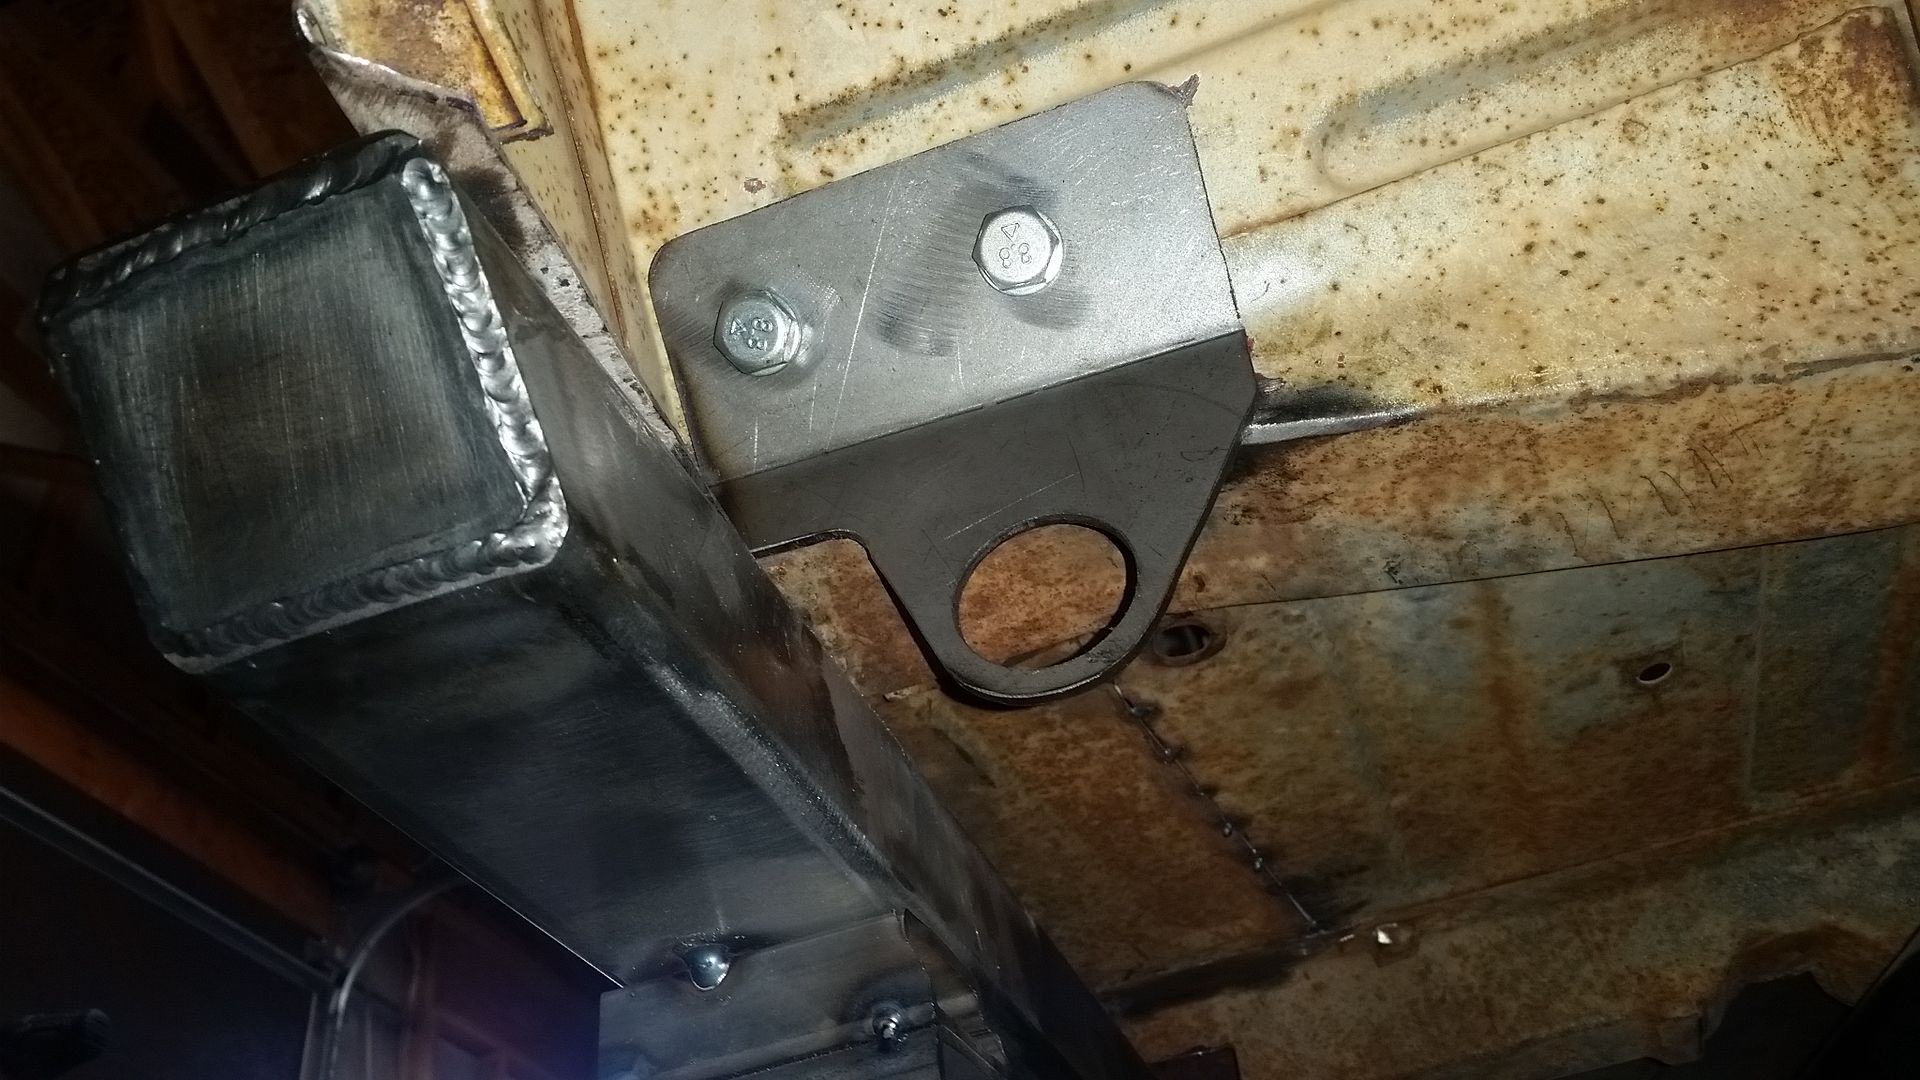
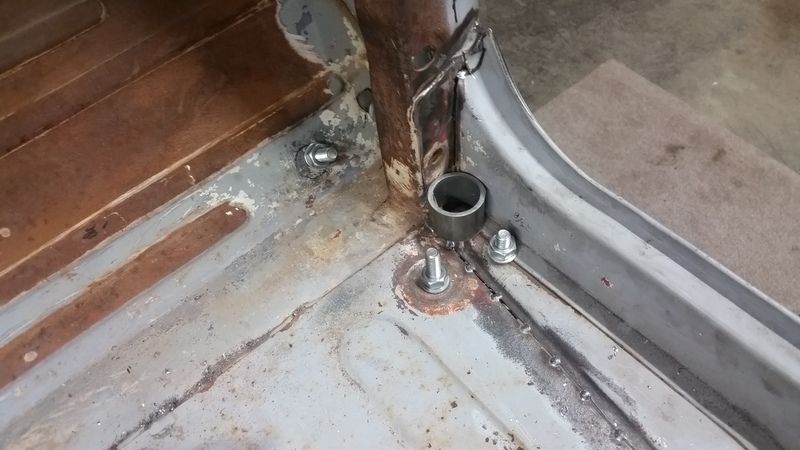
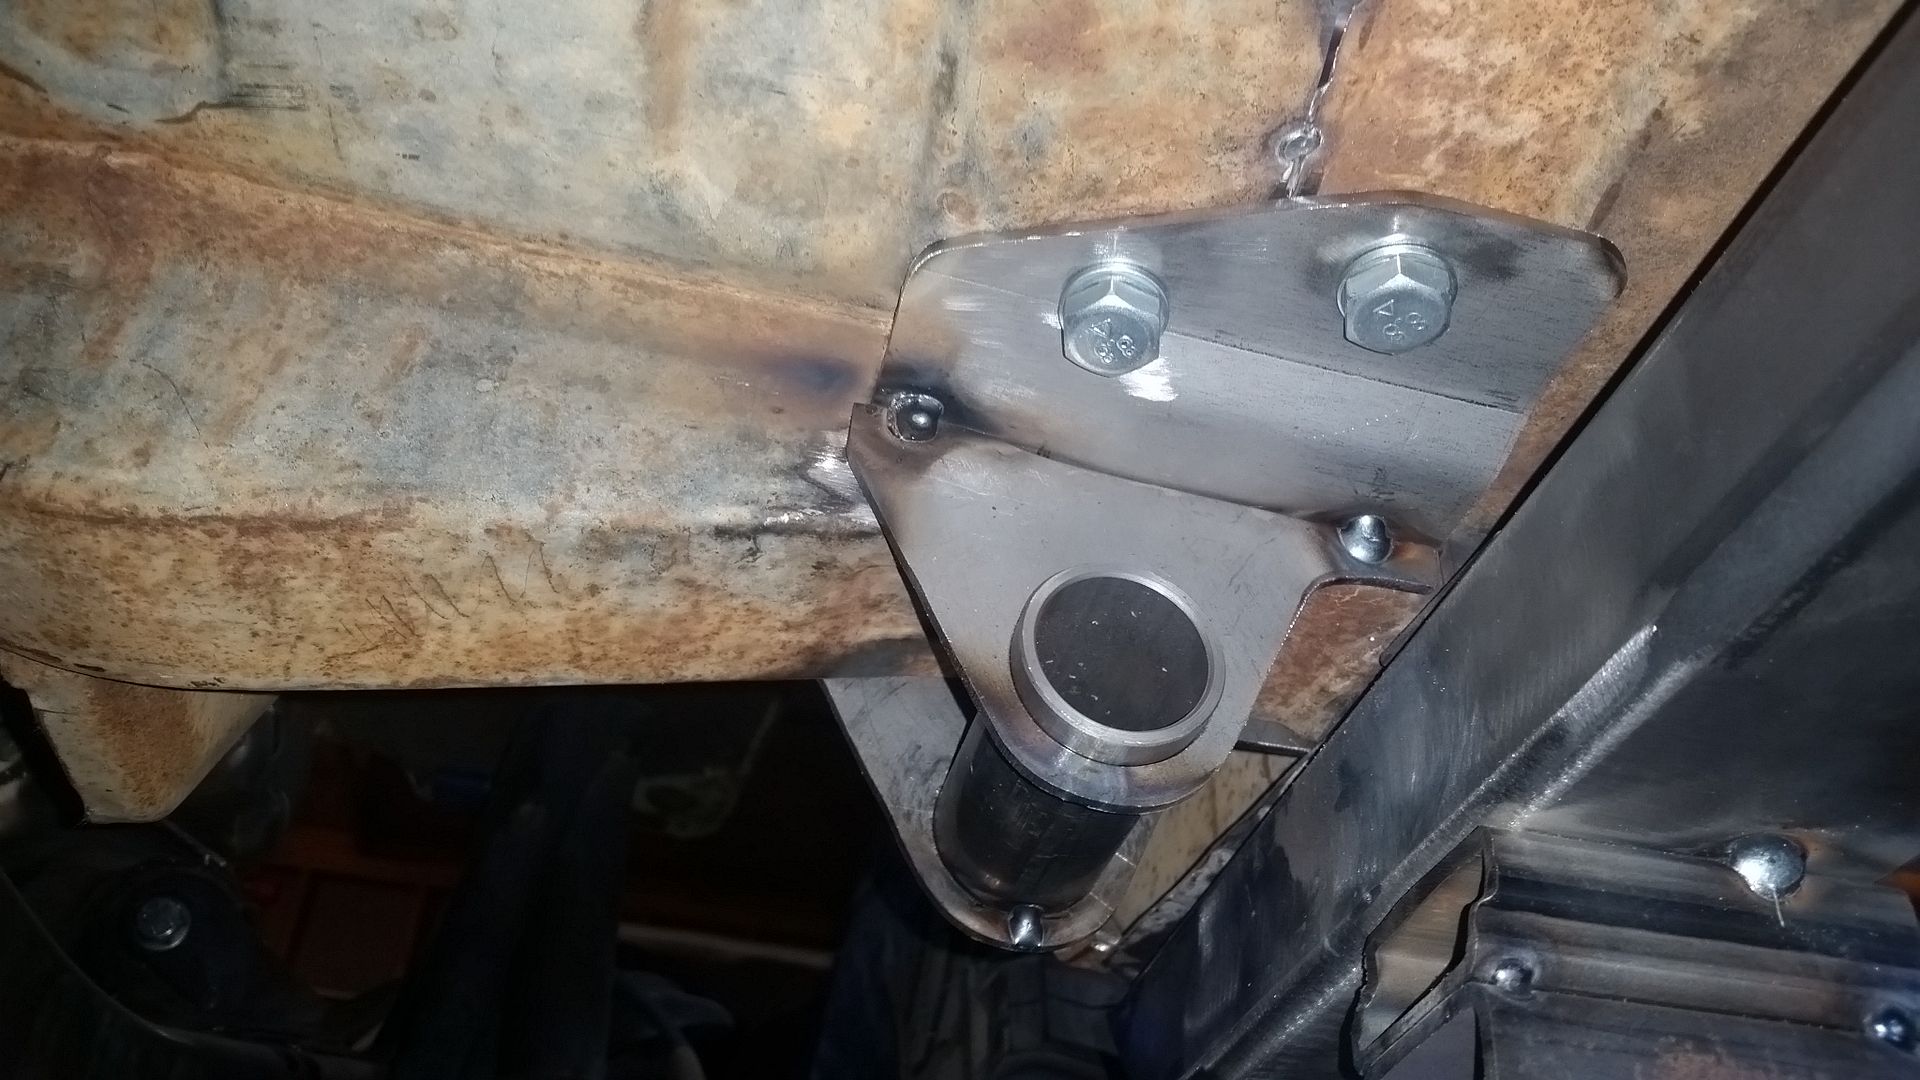
These are the start of the rear body mounts. These will basically bolt to the floor pads that I built into the B-pillar structure. These not only will provide the body mount for the rear of the body, they will also be the 'cage' tie-in at that location. The isolation will be with a universal poly bushing assembly. That will be mounted with a 14mm bolt in double shear. This mount will be tied directly to the frame and integrated into the rocker bar outrigger. The frame is very wide at the B-pillar so the outrigger and moment arm is very short. That should make it very strong....
I still have a few days on these parts for sure with fitting and welding. I need to make a spine in the middle of the assembly also to give it a little more of a complete structure. I have to work around the 1" stiffer I added to the rear of the old body also. I also need to make a temp shim to take the place of the rear floor material. I will make some aluminum dummy bushings to make setup a little more heat tolerant when fitting and tacking parts.
Fun Fun.


Th
These are the start of the rear body mounts. These will basically bolt to the floor pads that I built into the B-pillar structure. These not only will provide the body mount for the rear of the body, they will also be the 'cage' tie-in at that location. The isolation will be with a universal poly bushing assembly. That will be mounted with a 14mm bolt in double shear. This mount will be tied directly to the frame and integrated into the rocker bar outrigger. The frame is very wide at the B-pillar so the outrigger and moment arm is very short. That should make it very strong....
I still have a few days on these parts for sure with fitting and welding. I need to make a spine in the middle of the assembly also to give it a little more of a complete structure. I have to work around the 1" stiffer I added to the rear of the old body also. I also need to make a temp shim to take the place of the rear floor material. I will make some aluminum dummy bushings to make setup a little more heat tolerant when fitting and tacking parts.
Fun Fun.
Metcalf
Expedition Leader
TIG welding is good at teaching patience!
I was able to get a decent amount of welding done on the B-pillar body mounts. I still need to add a brace in the middle or something. I am still thinking on that one. I have to go around a flange on the body I may just elect to just weld this entire bracket to the bottom of the tub in the end. If I spray the bottom of the body in bedliner it would be nice not to have to deal with a change in the dimensions of the mating surface.
Anyhow.
I also have been giving this 'passive' welding helmet a try when TIG welding.
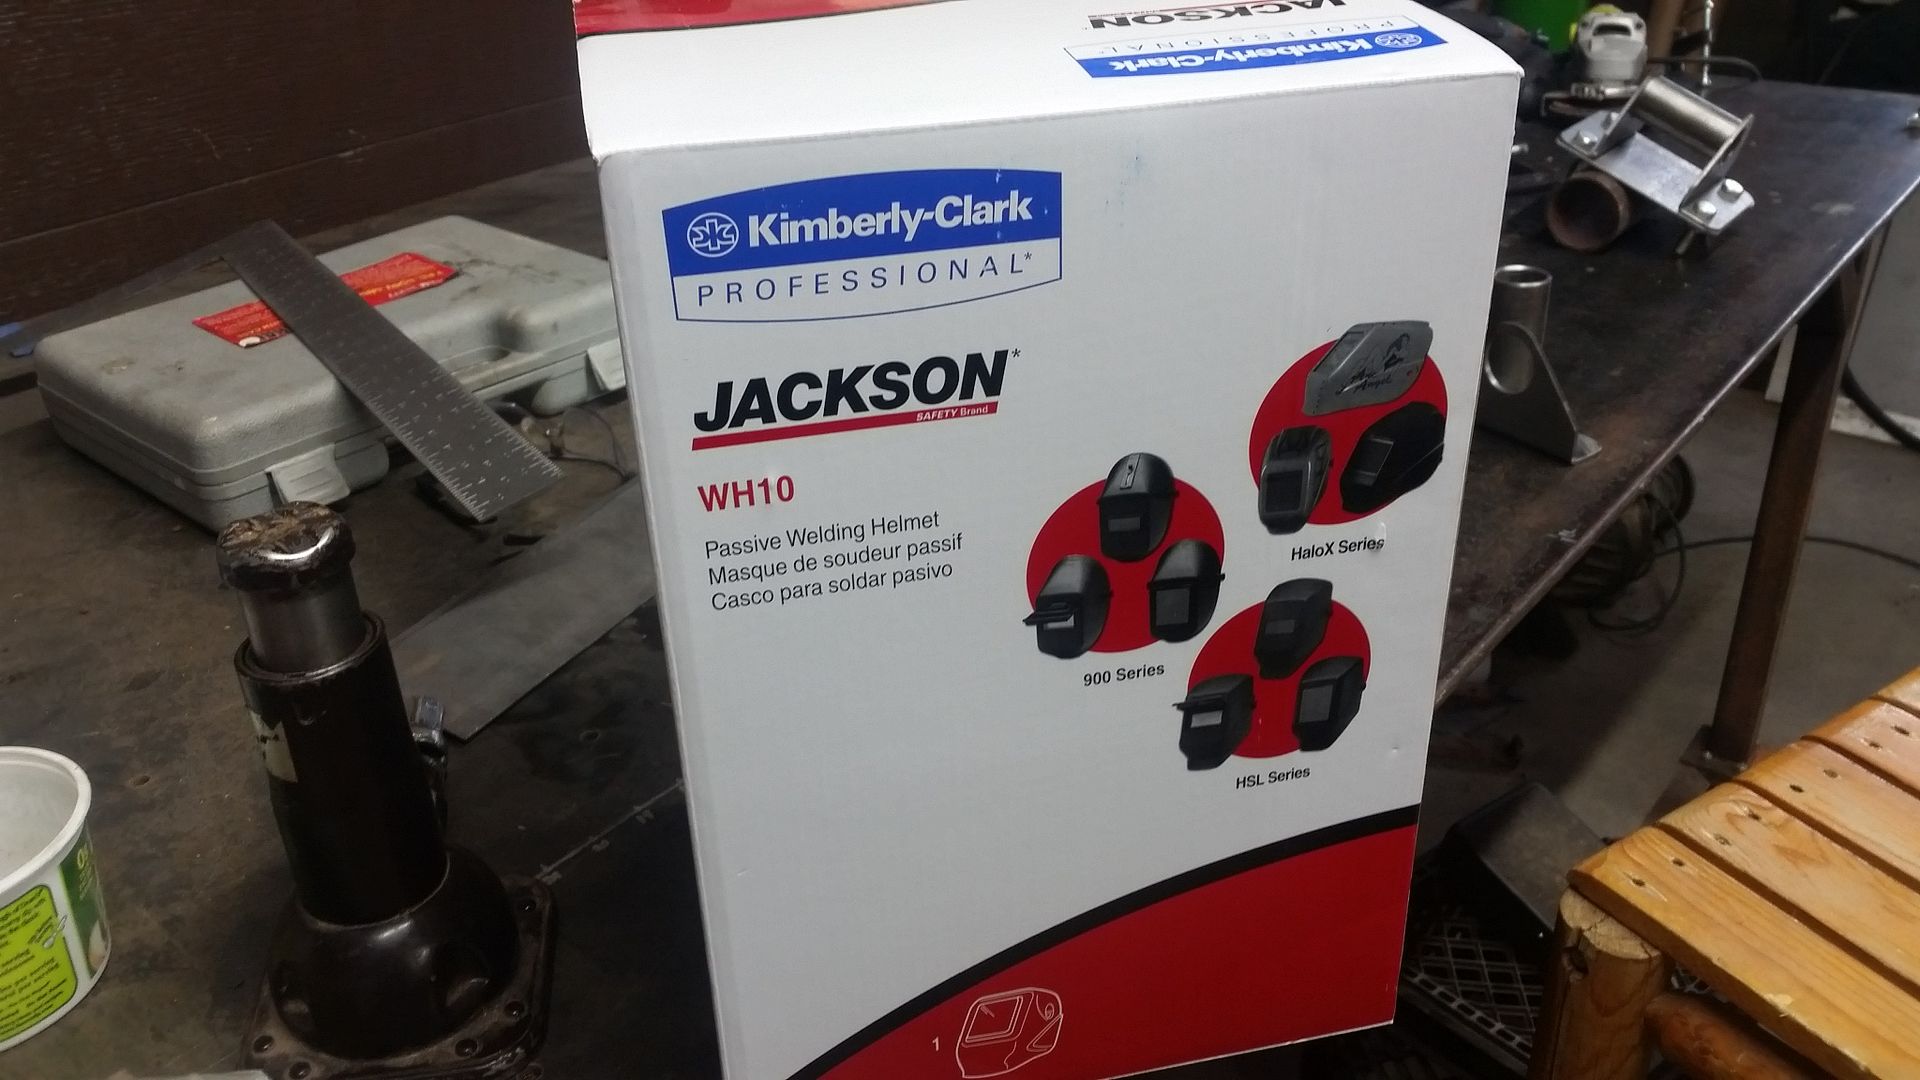
I like the MUCH larger window and the consistent shade. For lower amp TIG work I might even give a #9 lens a try. The only real downside for me is starting in the 'dark', but it doesn't seem to be a huge issue. It just takes some getting use to.
My auto-dark helmet was having some 'flash' issues when my hands would block the sensors when doing detail TIG work.
Metcalf
Expedition Leader
Small steps forward....
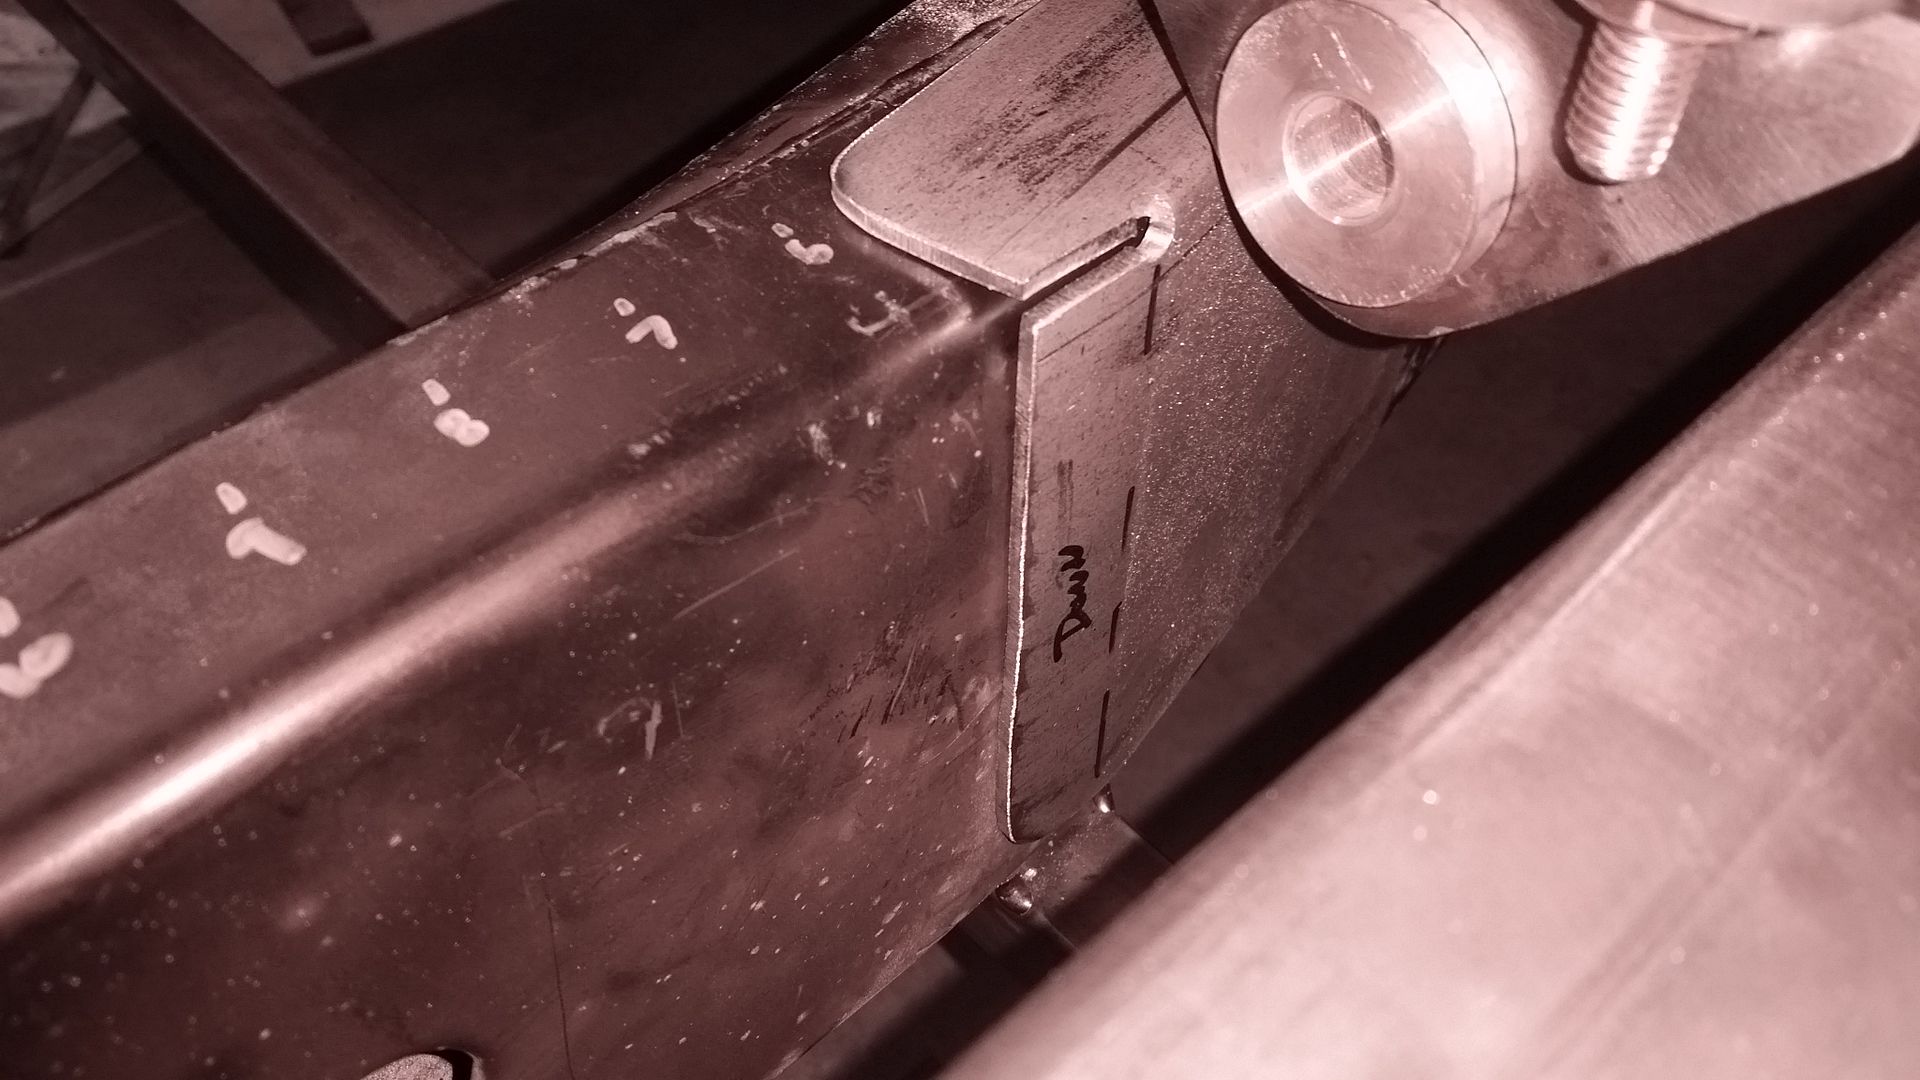
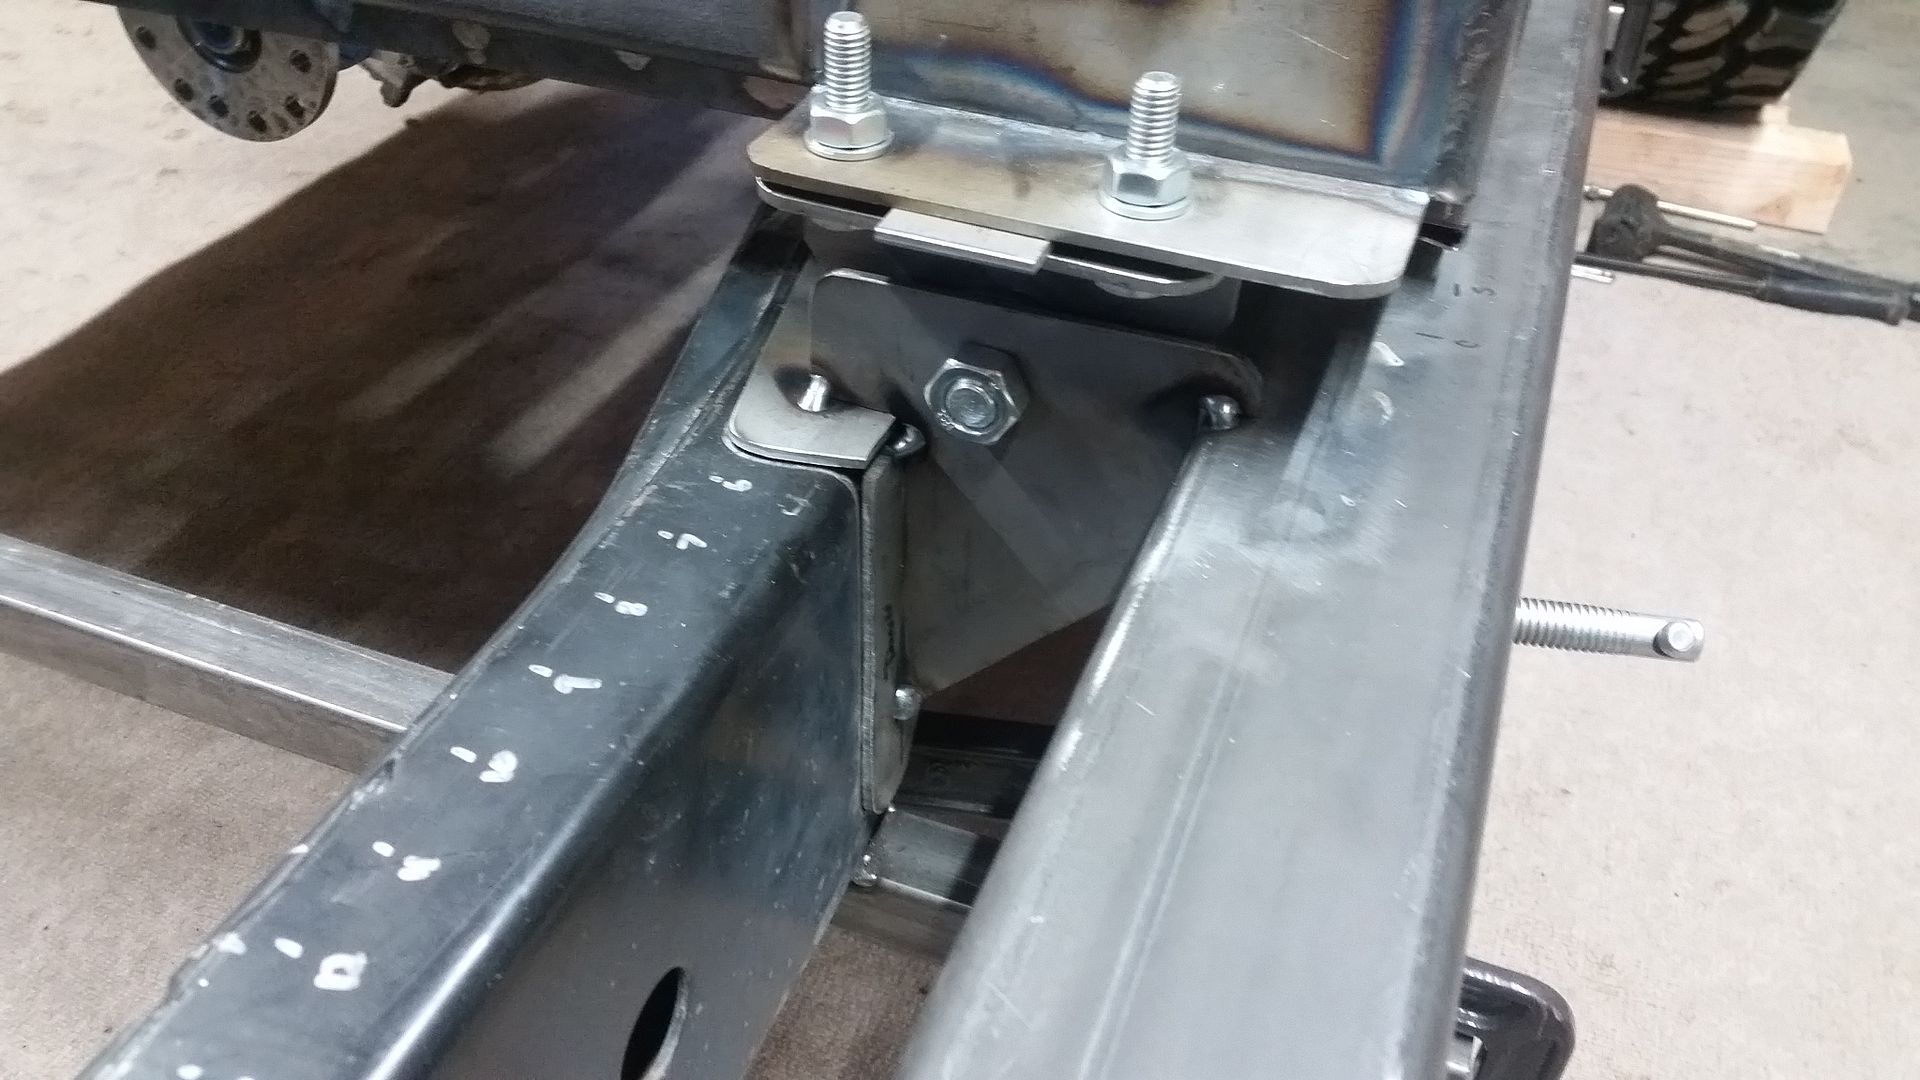
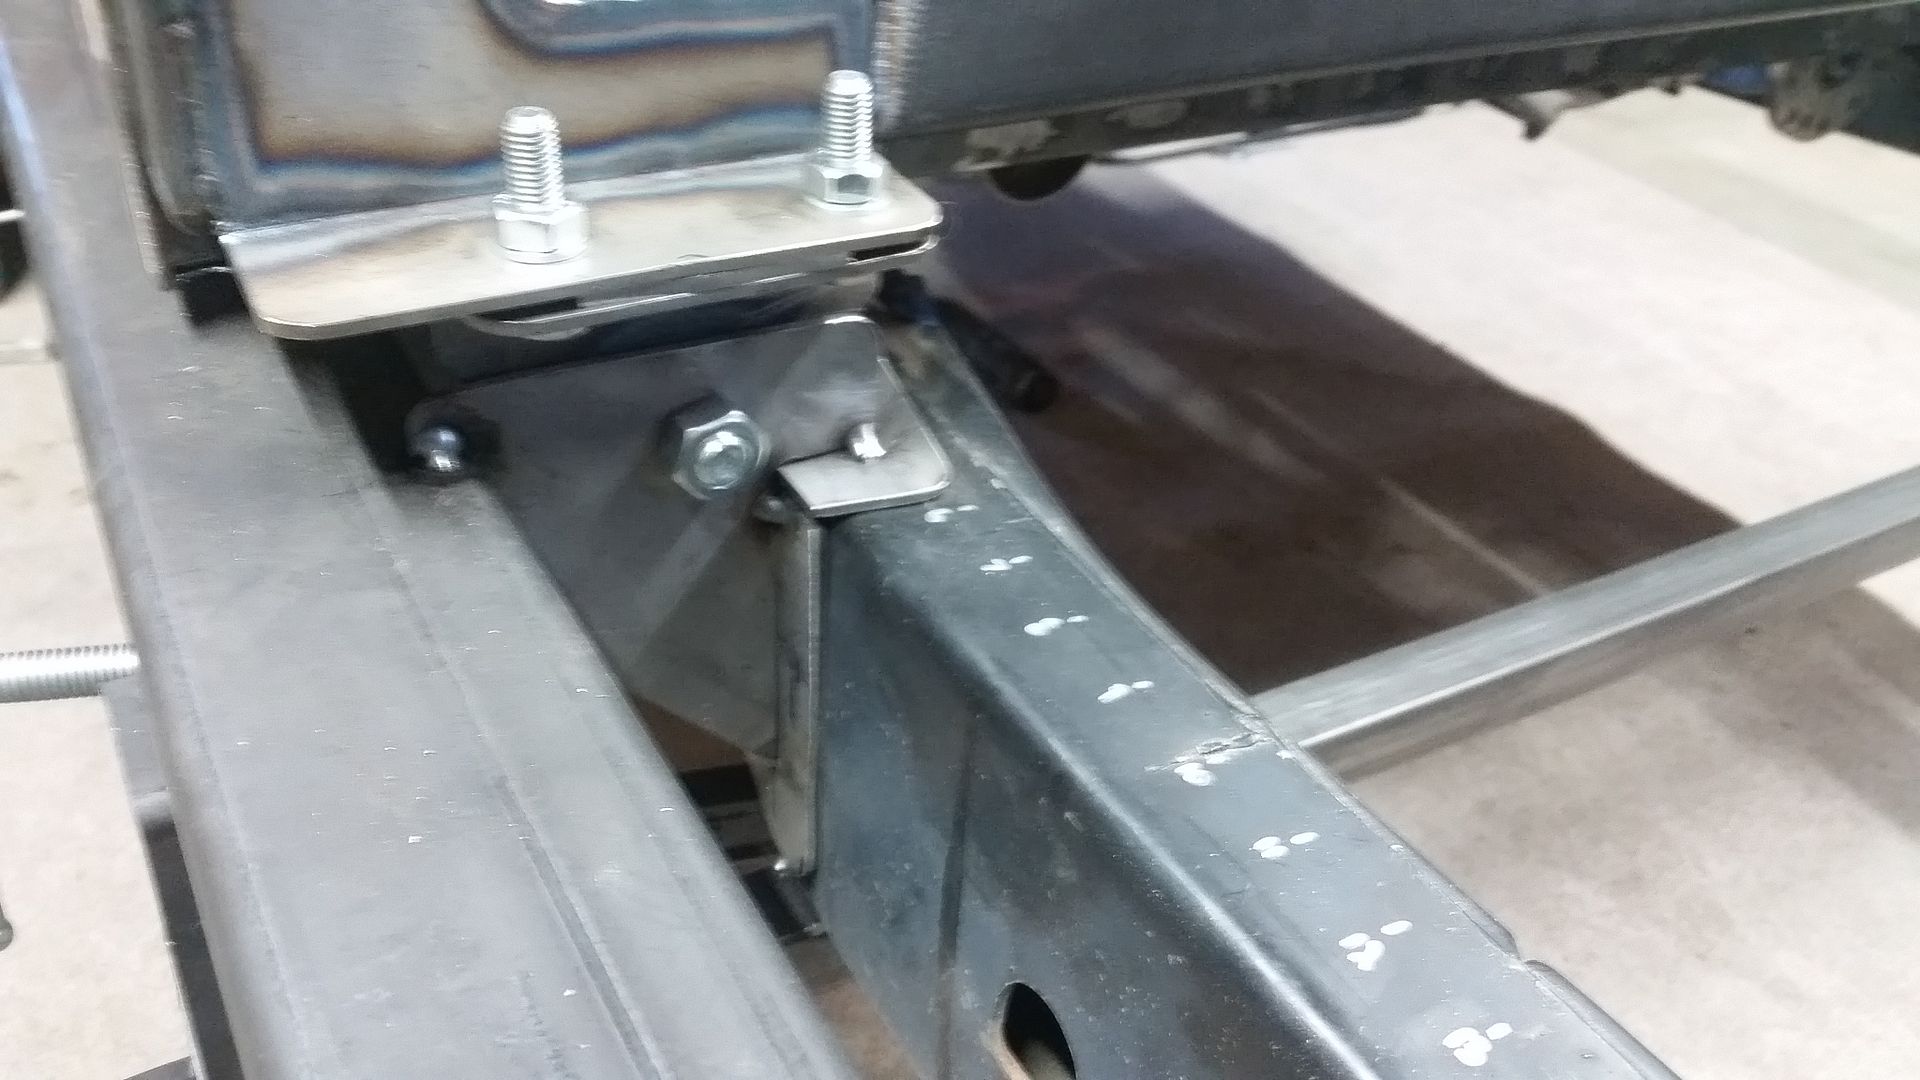
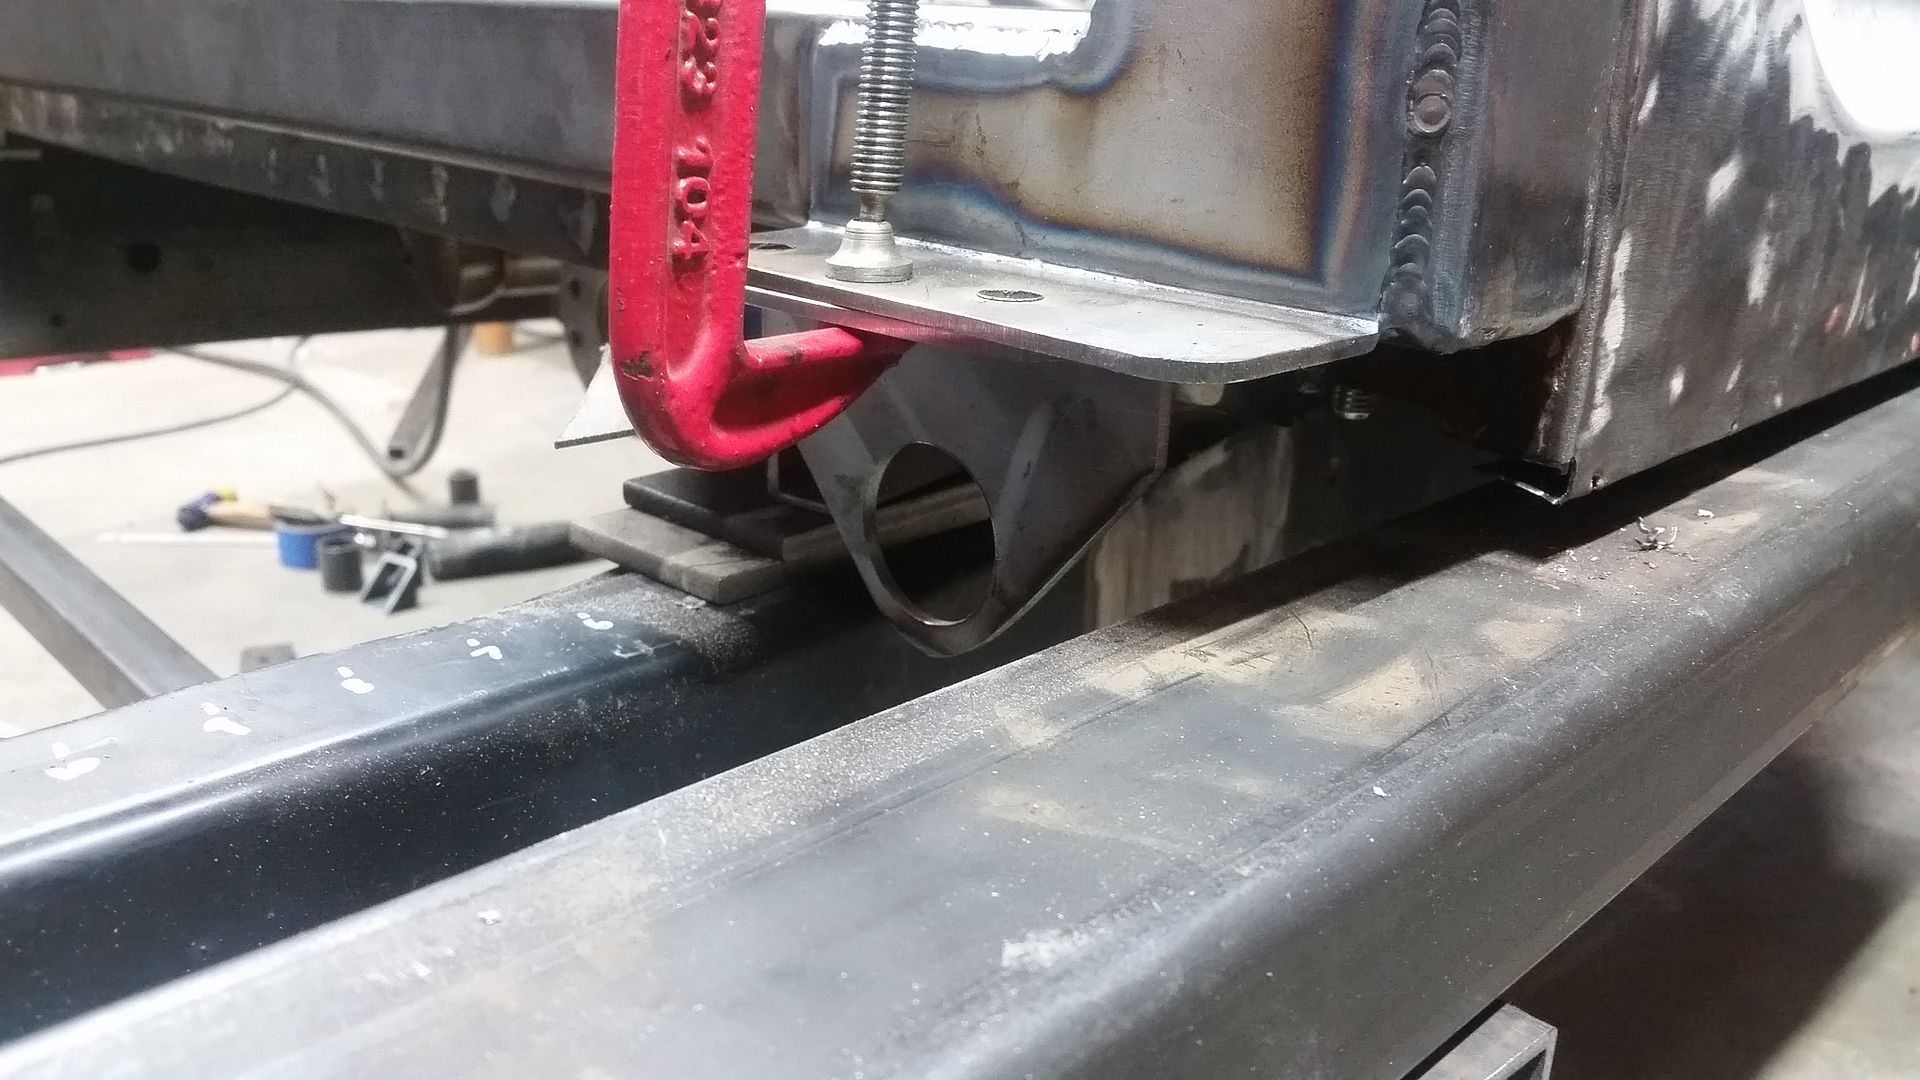
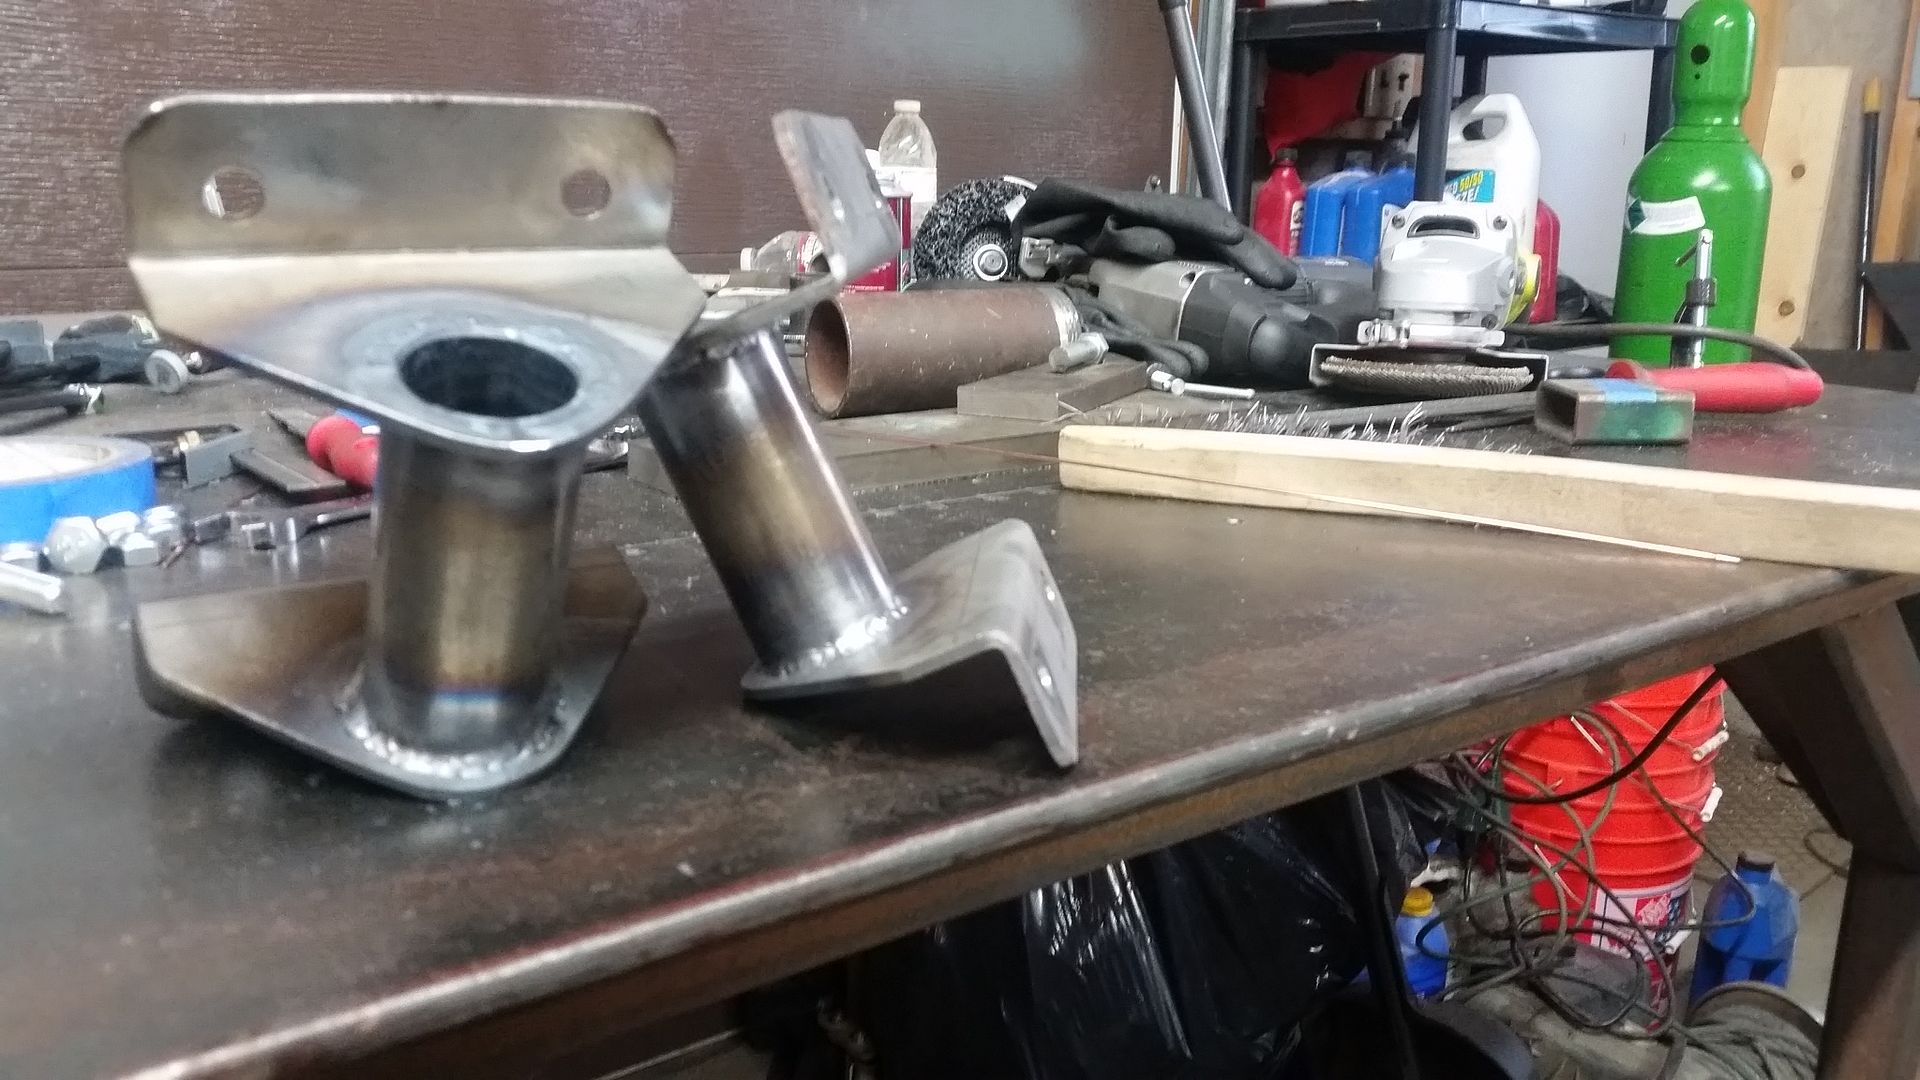
I finished the rough mock-in of the B-pillar frame side mounts. These brackets will also function as the outriggers for the rock sliders.
I decided to use some frame pads for the mounts to attach to. This should allow me to pull the rocker assemblies and weld them completely on the table. Then I will weld the pads to the frame. ( note: the A-pillar will be similar but has to also weld to the radius arm mount )
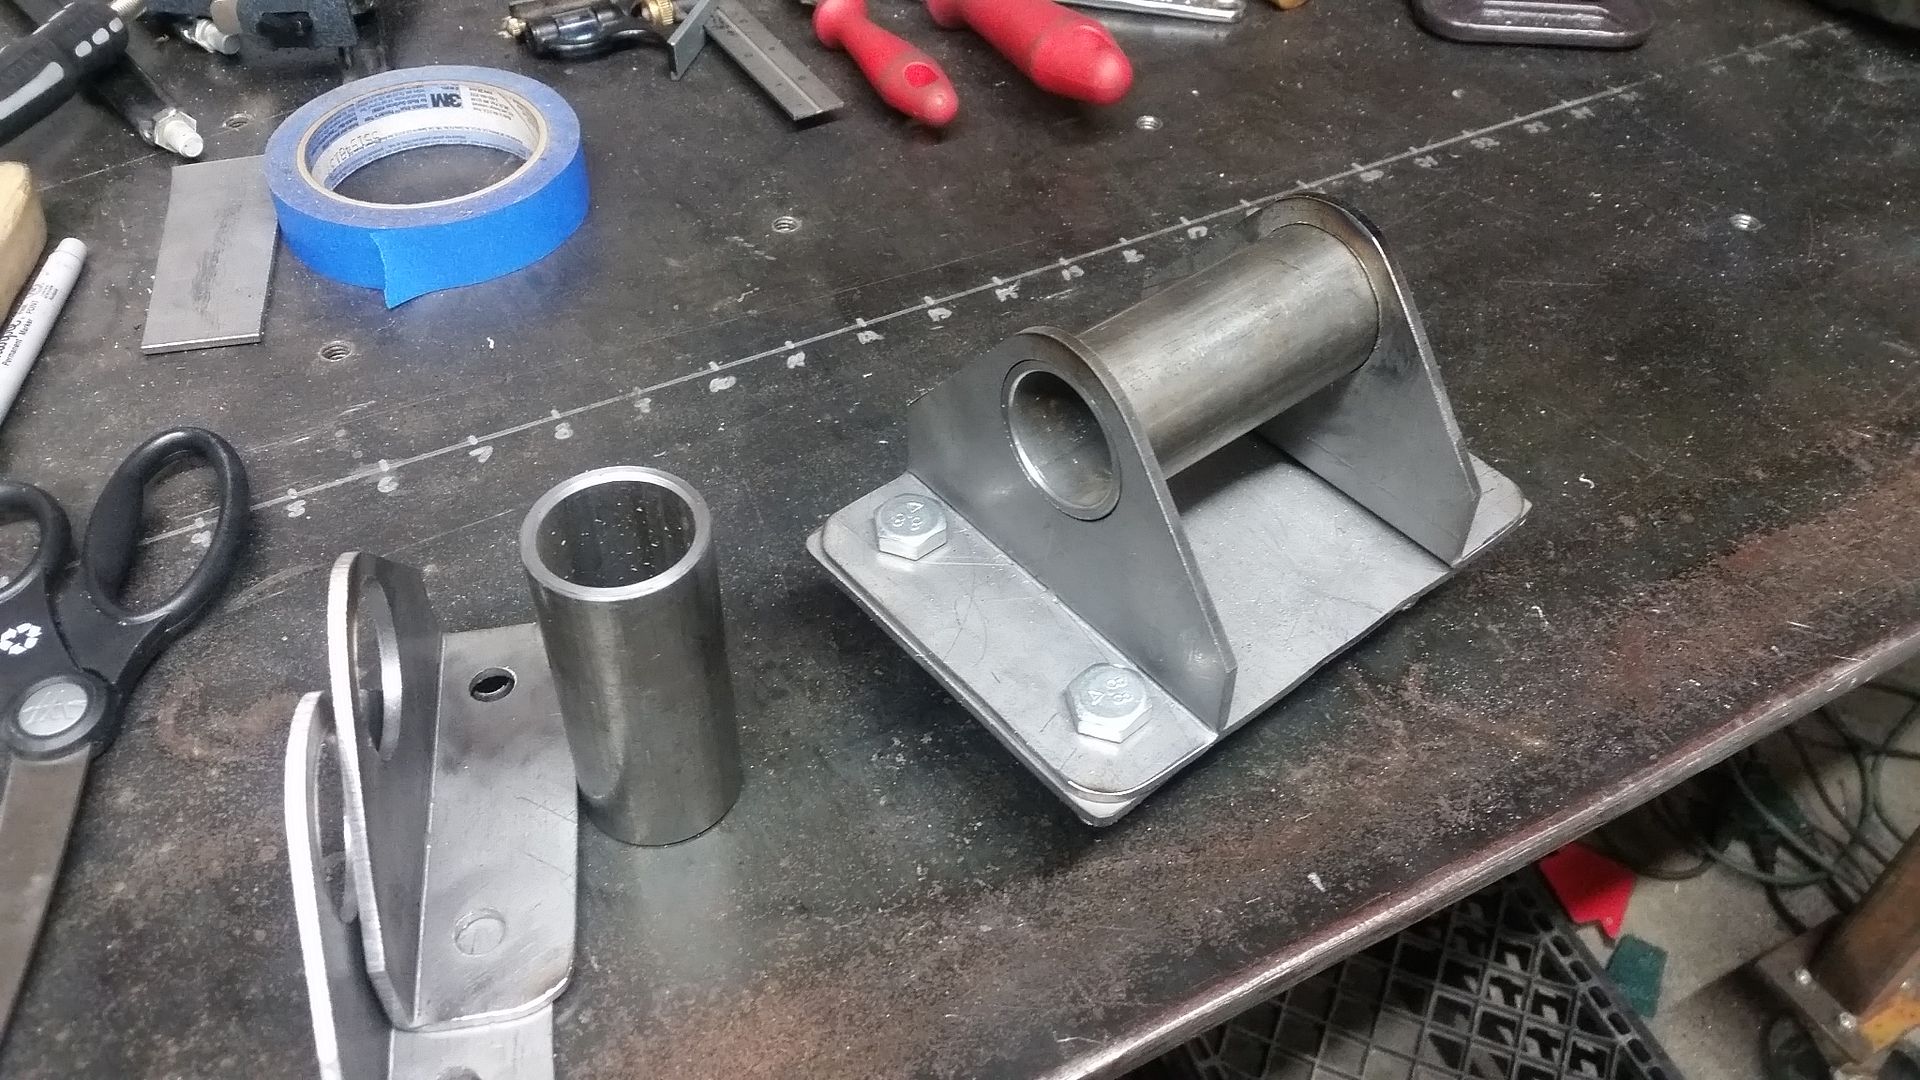
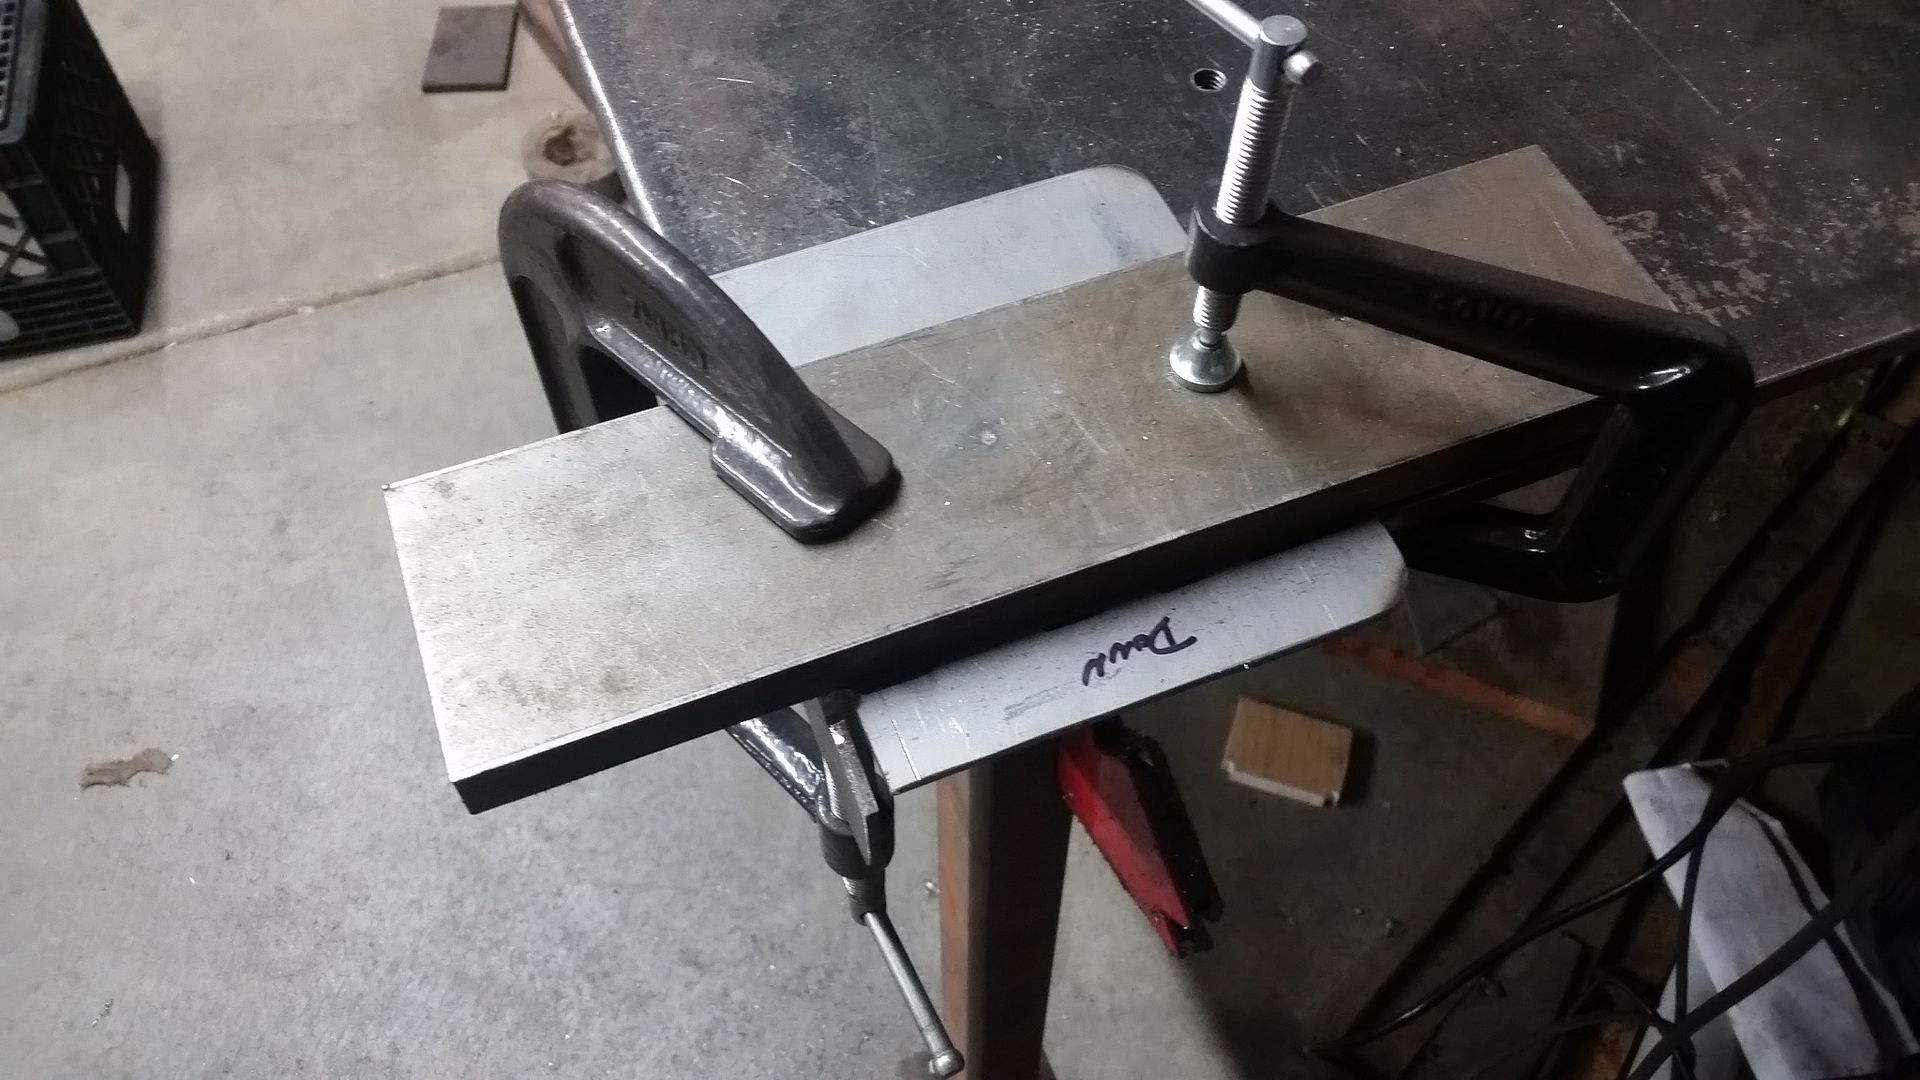
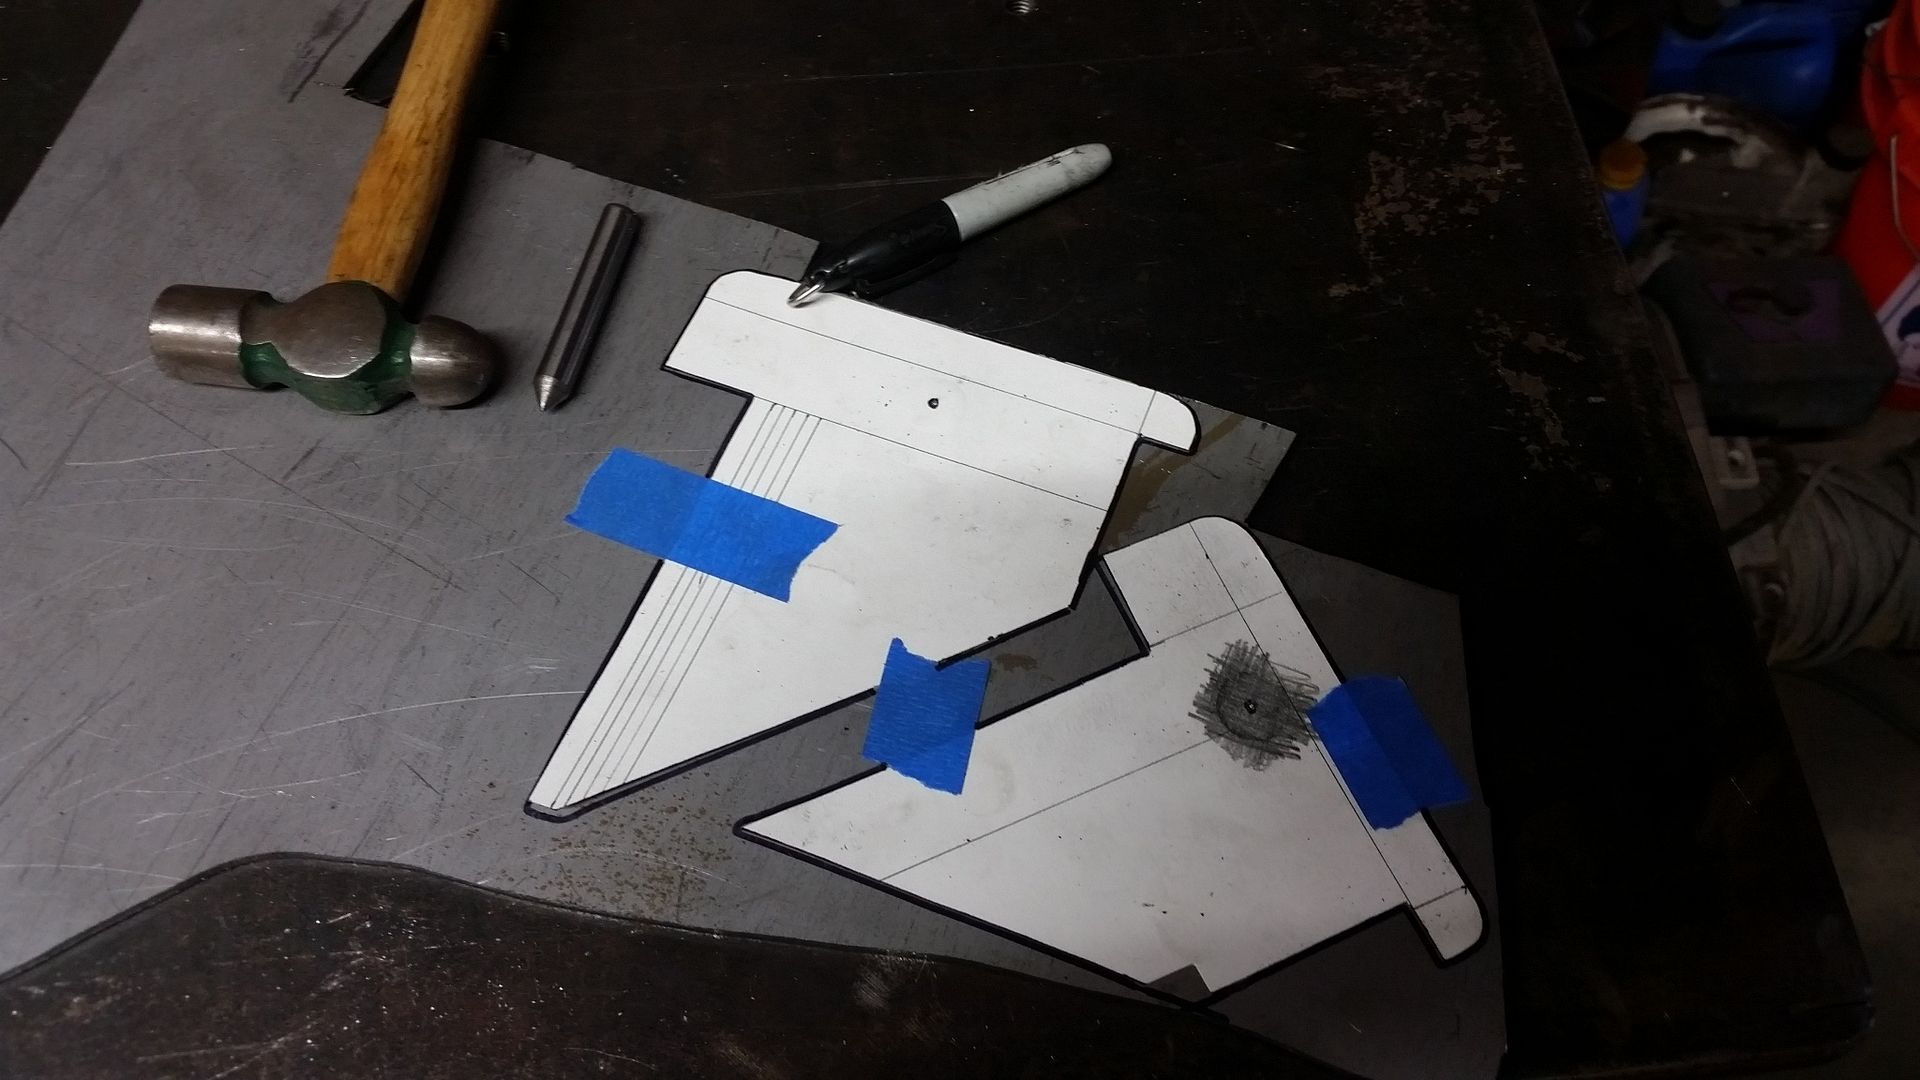
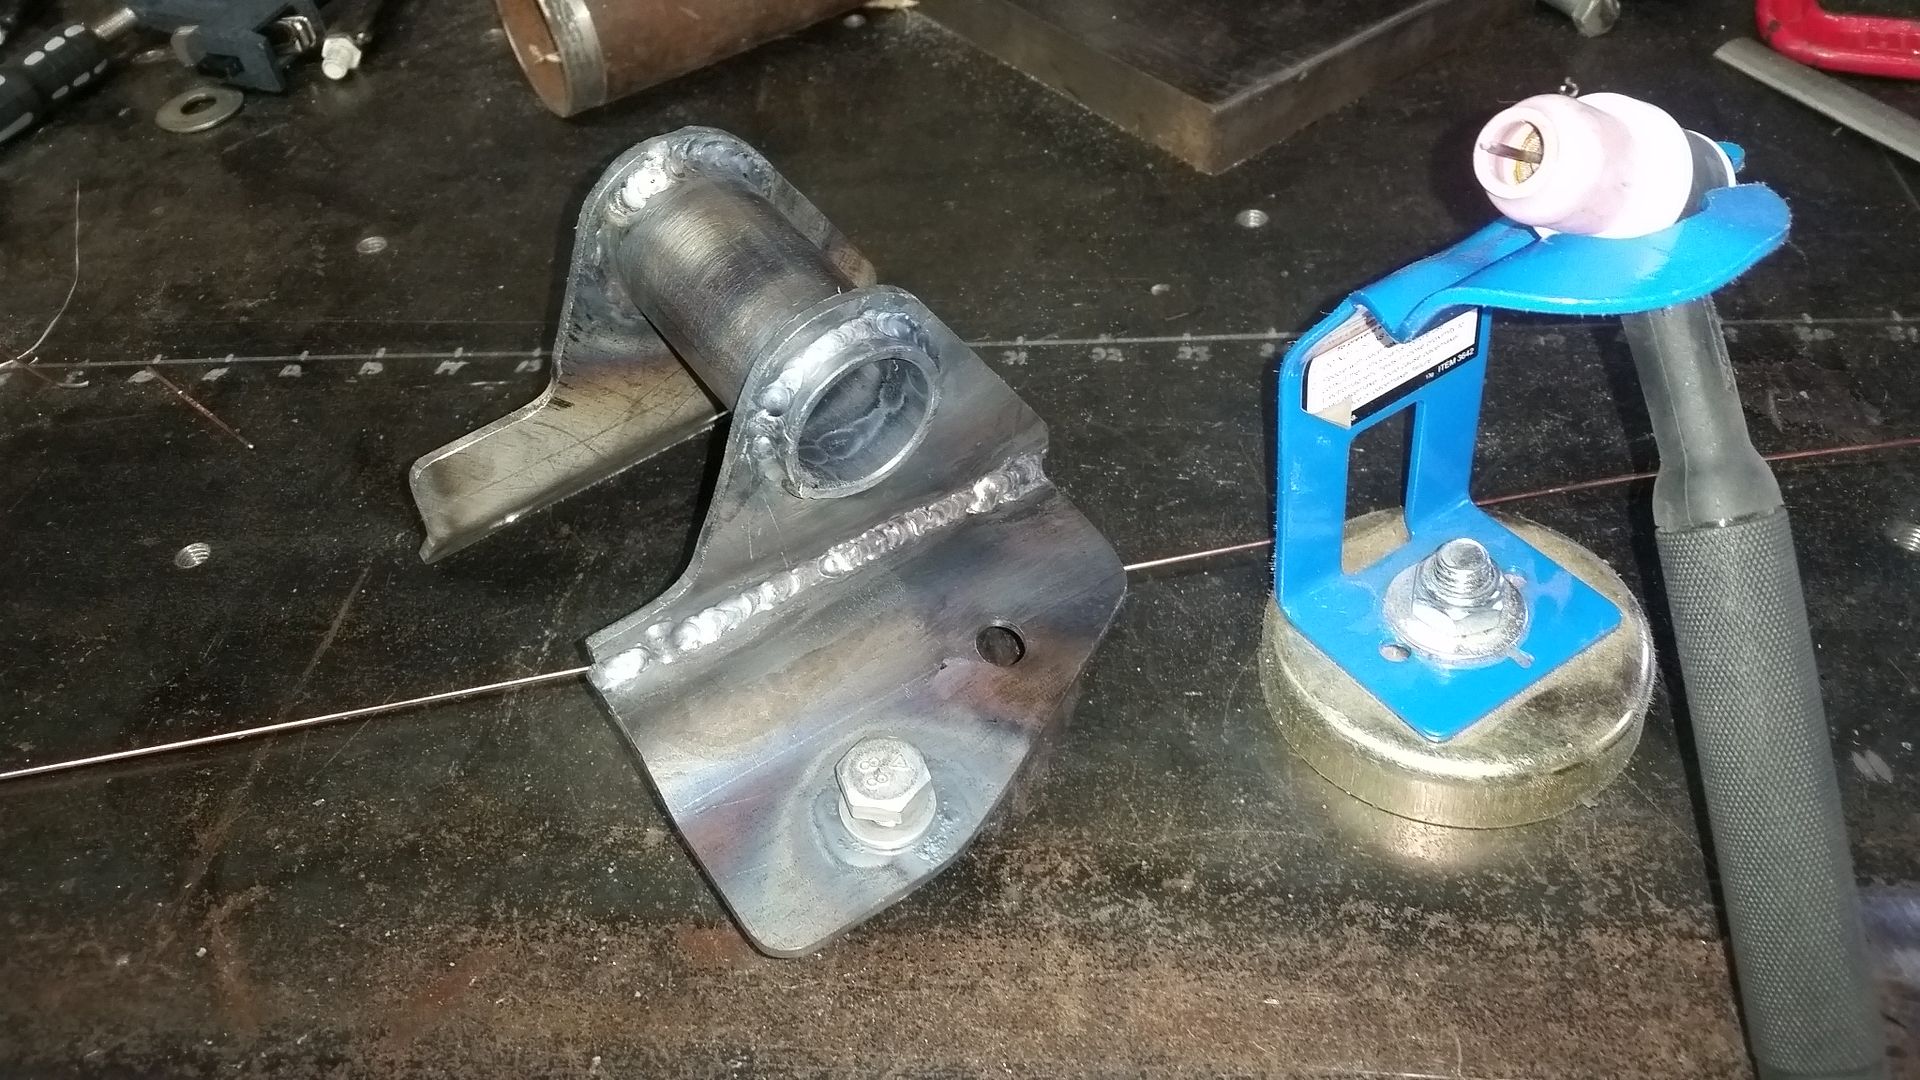
I made some aluminum setup bushings to keep everything aligned while I was tack welding. These aluminum bushings will be replaced with poly units during final assembly. The aluminum units let me bolt everything together with JUST a little bit of extra space in the assembly. I find building them about .030-.060" wider than the part allows for a little movement in the welding process.
Beyond that it was just head scratching, cardboard templates, some pencil transfer of the mounting holes, transfer to metal, a little trimming, and bingo bango I had some mounts. The only real tricky things were the small bend in the frame bad to deal with the frame bend and keeping the slope of the brackets 'in-plane'. A finger style press brake would have been handy for the complicated bend, but I ended up using the corner of the welding table and a large crescent wrench to make that 1" flange bend. Keeping the slope of the brackets 'in-plane' will make boxing the brackets much easier and cleaner in the future.
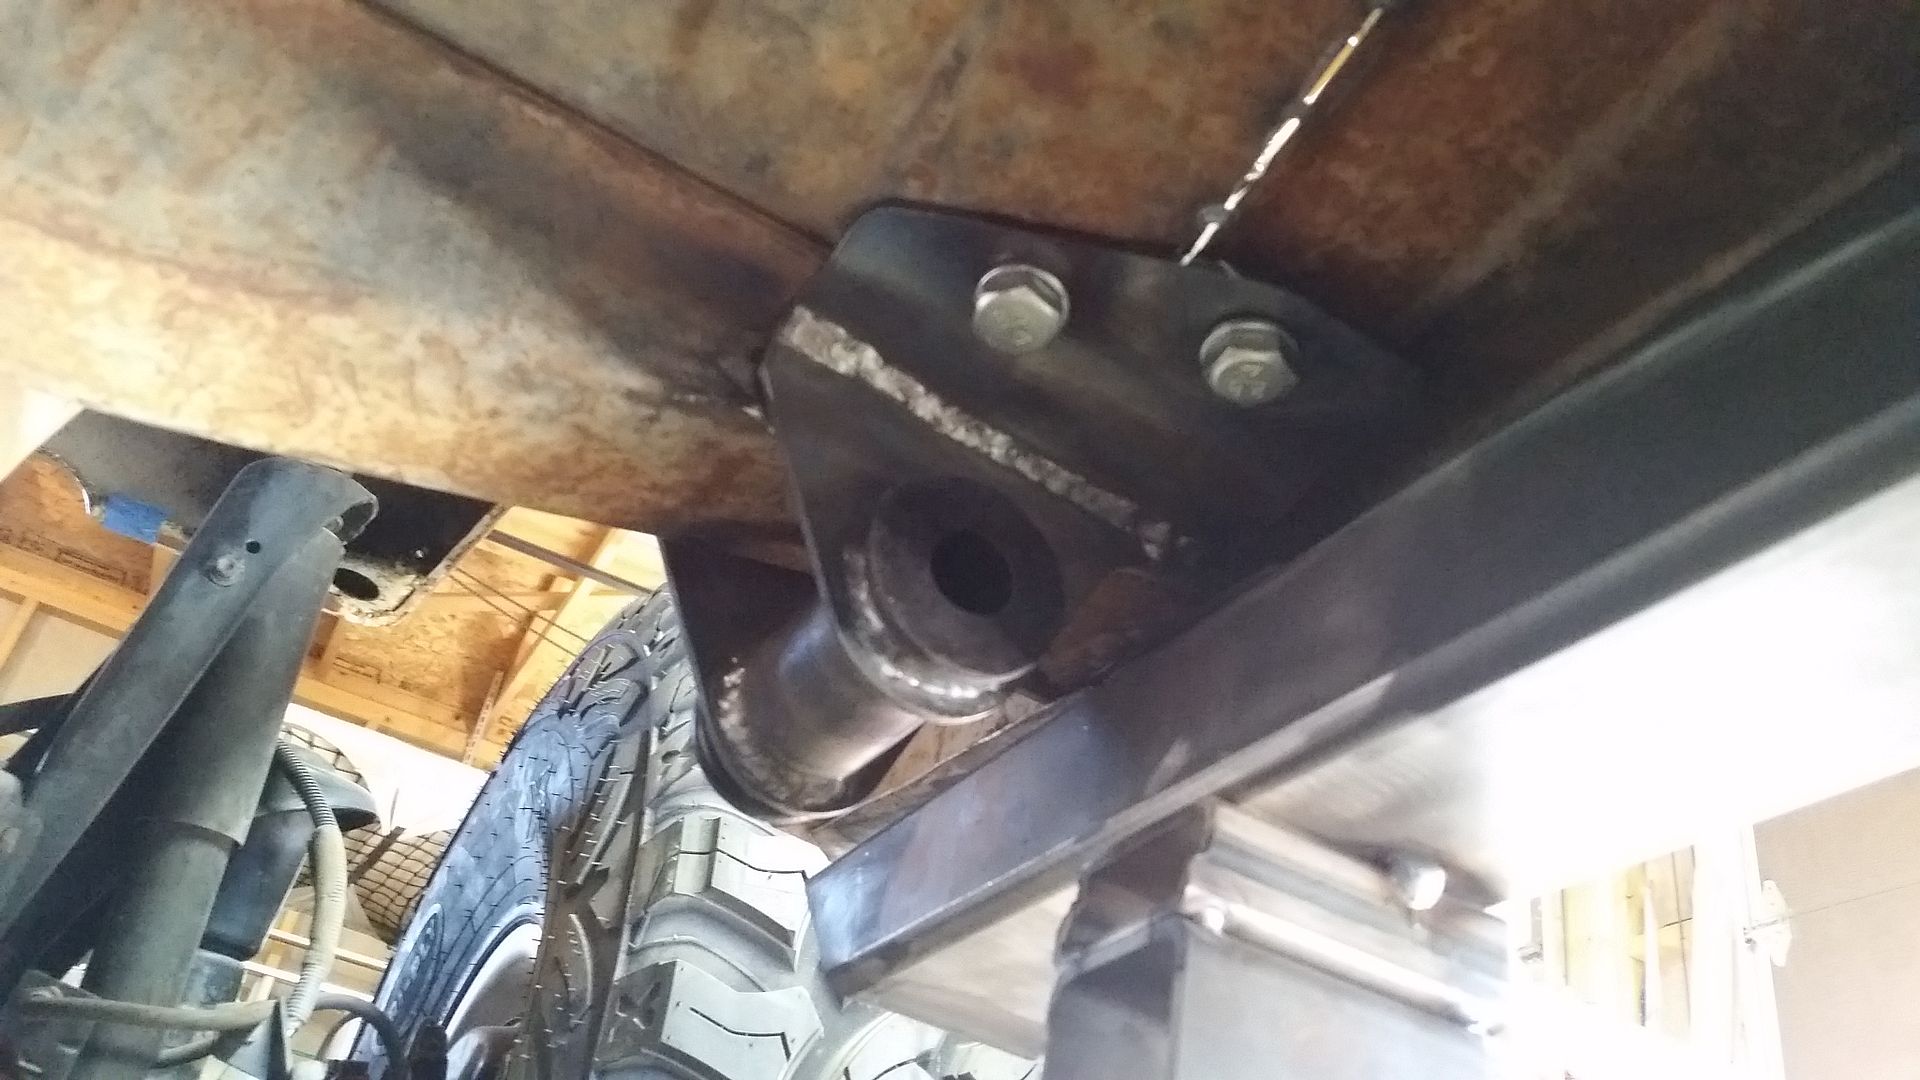
Both rear B-pillar mounts are fully tack welded onto the frame pads. I will be boxing and plating the mounts once I pull the rocker sub-assembly for final welding.
Now onto more head scratching and trying to figure out the much more complicated A-pillar mounts. I am going to need more poster board....


I finished the rough mock-in of the B-pillar frame side mounts. These brackets will also function as the outriggers for the rock sliders.
I decided to use some frame pads for the mounts to attach to. This should allow me to pull the rocker assemblies and weld them completely on the table. Then I will weld the pads to the frame. ( note: the A-pillar will be similar but has to also weld to the radius arm mount )
I made some aluminum setup bushings to keep everything aligned while I was tack welding. These aluminum bushings will be replaced with poly units during final assembly. The aluminum units let me bolt everything together with JUST a little bit of extra space in the assembly. I find building them about .030-.060" wider than the part allows for a little movement in the welding process.
Beyond that it was just head scratching, cardboard templates, some pencil transfer of the mounting holes, transfer to metal, a little trimming, and bingo bango I had some mounts. The only real tricky things were the small bend in the frame bad to deal with the frame bend and keeping the slope of the brackets 'in-plane'. A finger style press brake would have been handy for the complicated bend, but I ended up using the corner of the welding table and a large crescent wrench to make that 1" flange bend. Keeping the slope of the brackets 'in-plane' will make boxing the brackets much easier and cleaner in the future.
Both rear B-pillar mounts are fully tack welded onto the frame pads. I will be boxing and plating the mounts once I pull the rocker sub-assembly for final welding.
Now onto more head scratching and trying to figure out the much more complicated A-pillar mounts. I am going to need more poster board....
Metcalf
Expedition Leader
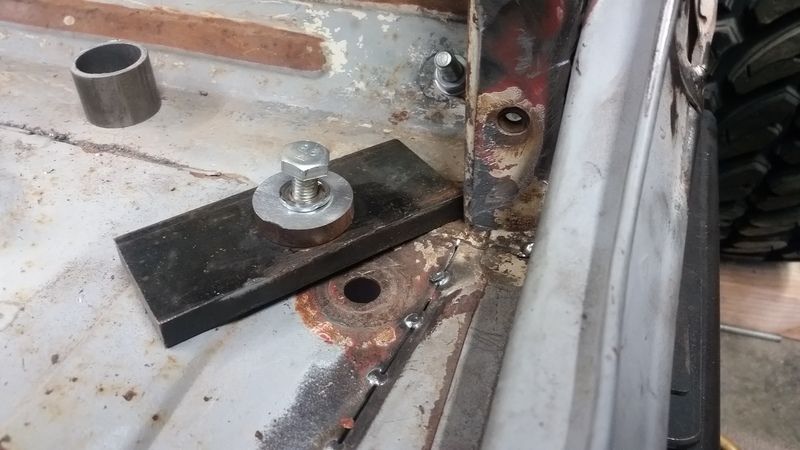
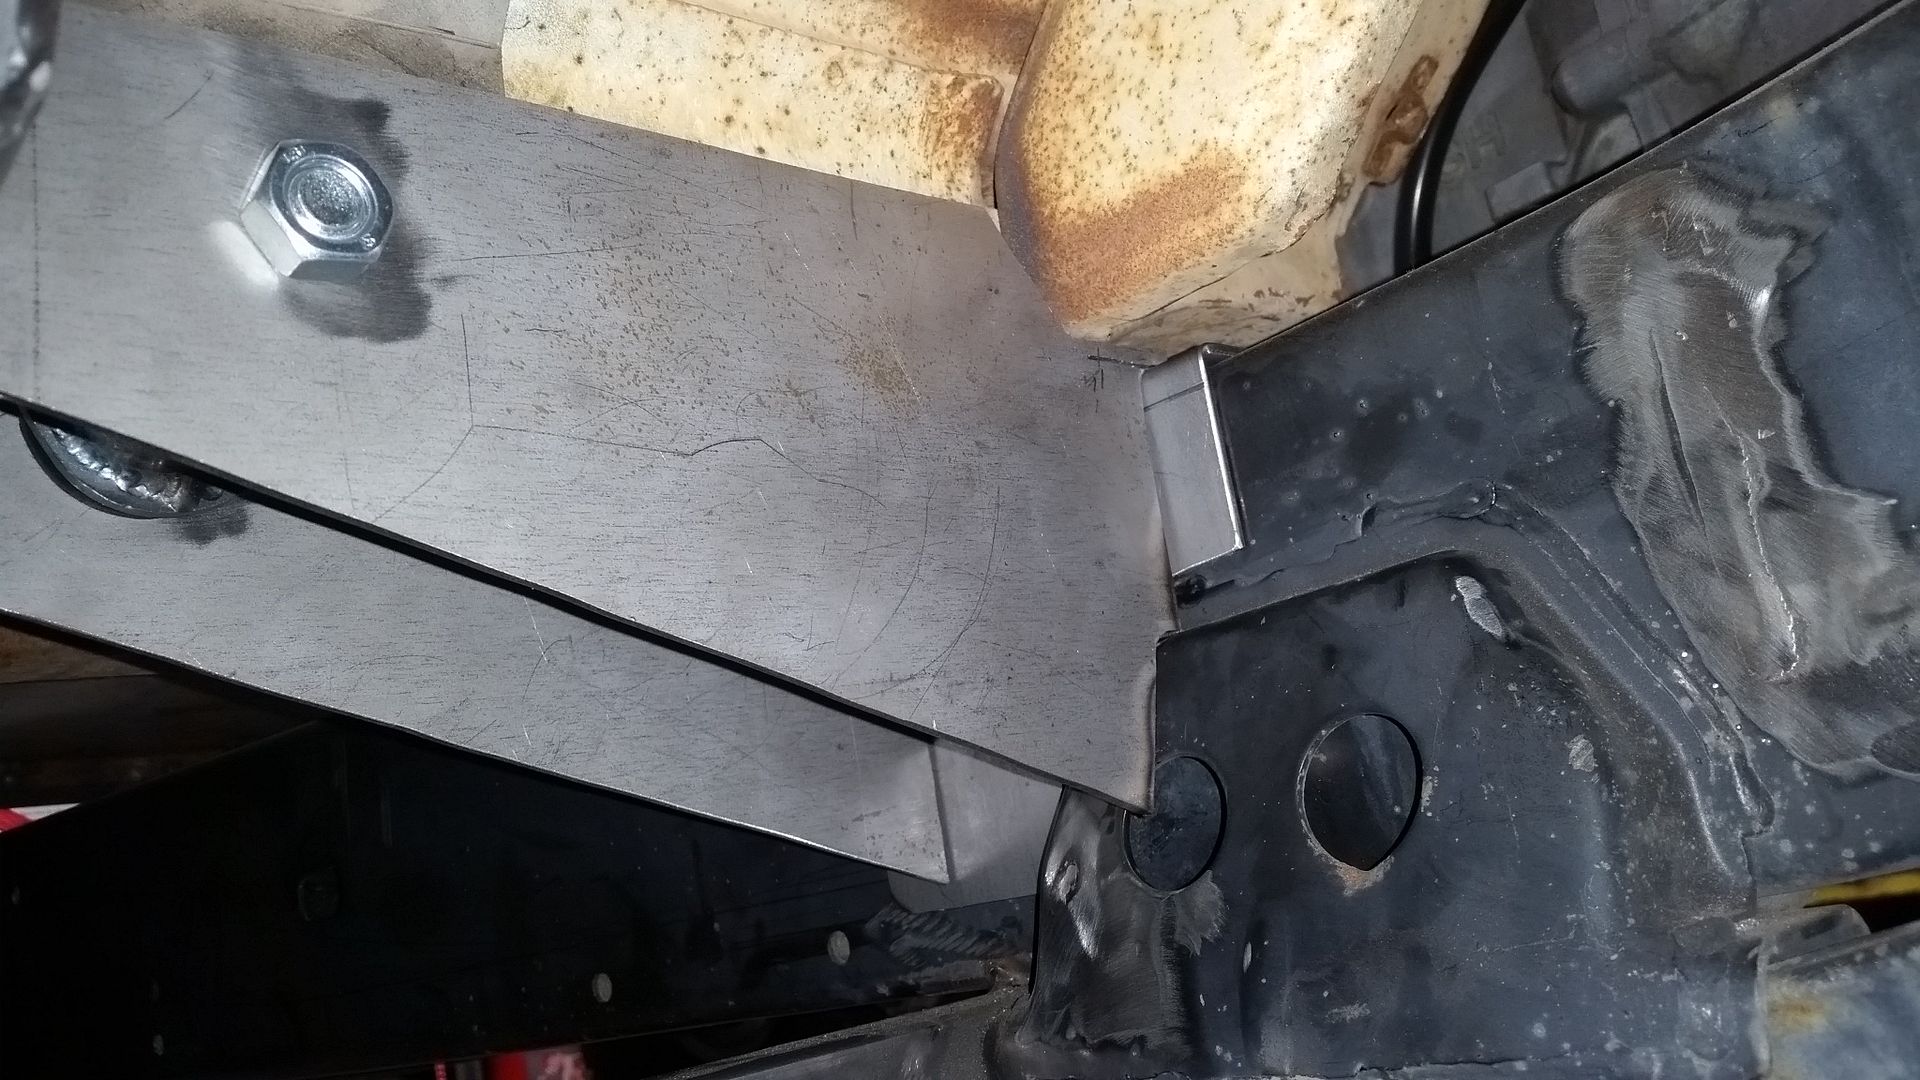
This A-pillar body mount tie in area is giving me fits....
The front of the factory body mount outrigger was fairly easy to make a body mount for. After removing the factory sandwich style mount in this area, I wanted to convert to a regular universal bushing assembly. That bushing will provide the body mount isolation, as well at the tie into the 'cage' structure of the body.
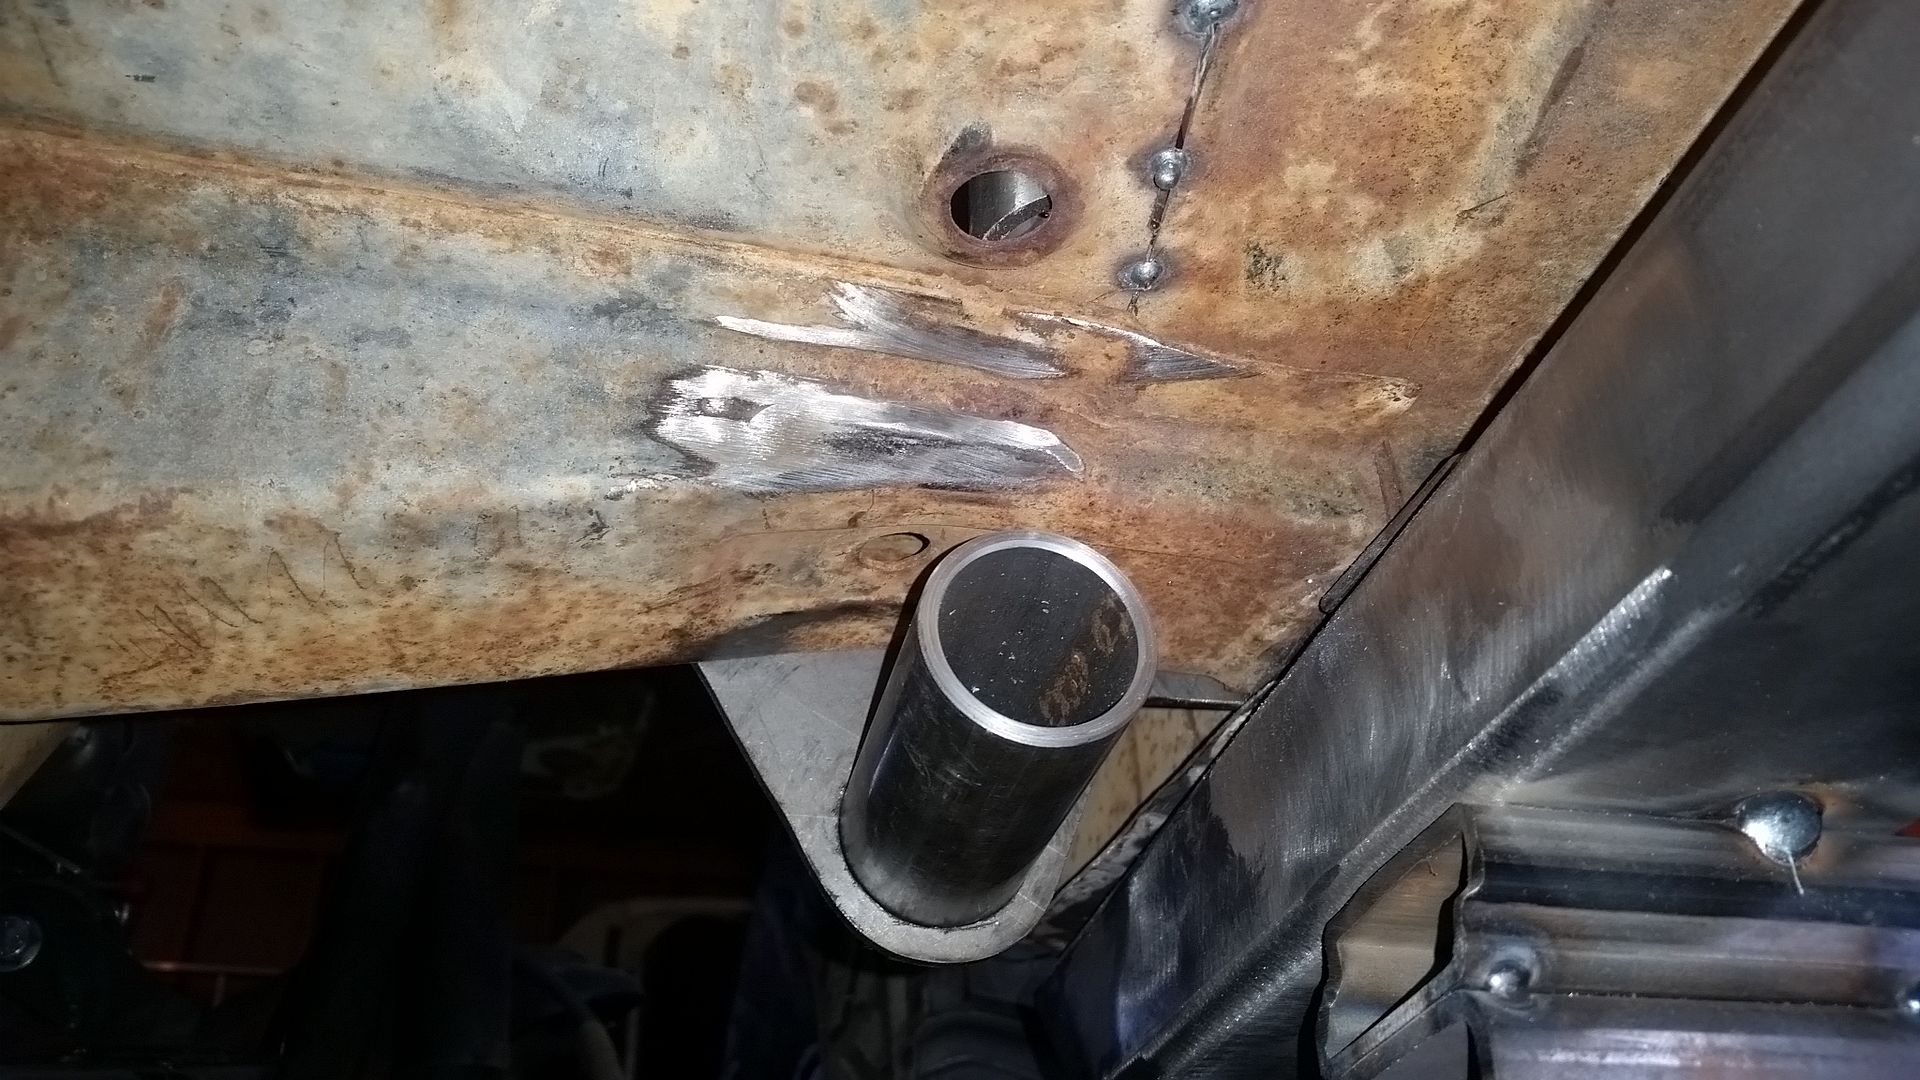
The other side is where things get complicated. There is a large multi-thickness flange with a rather complex shape. The outer part of the flange is a different level/thickness than the rest. This is where come of the outer factory door/dash/cowl structure ties into the body.
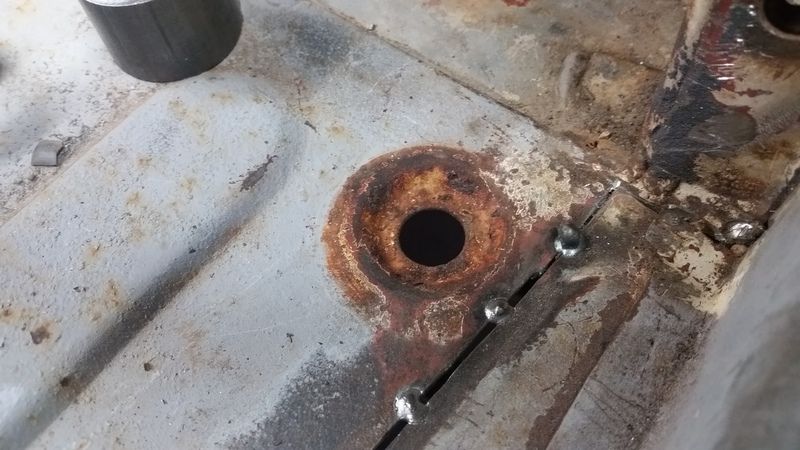
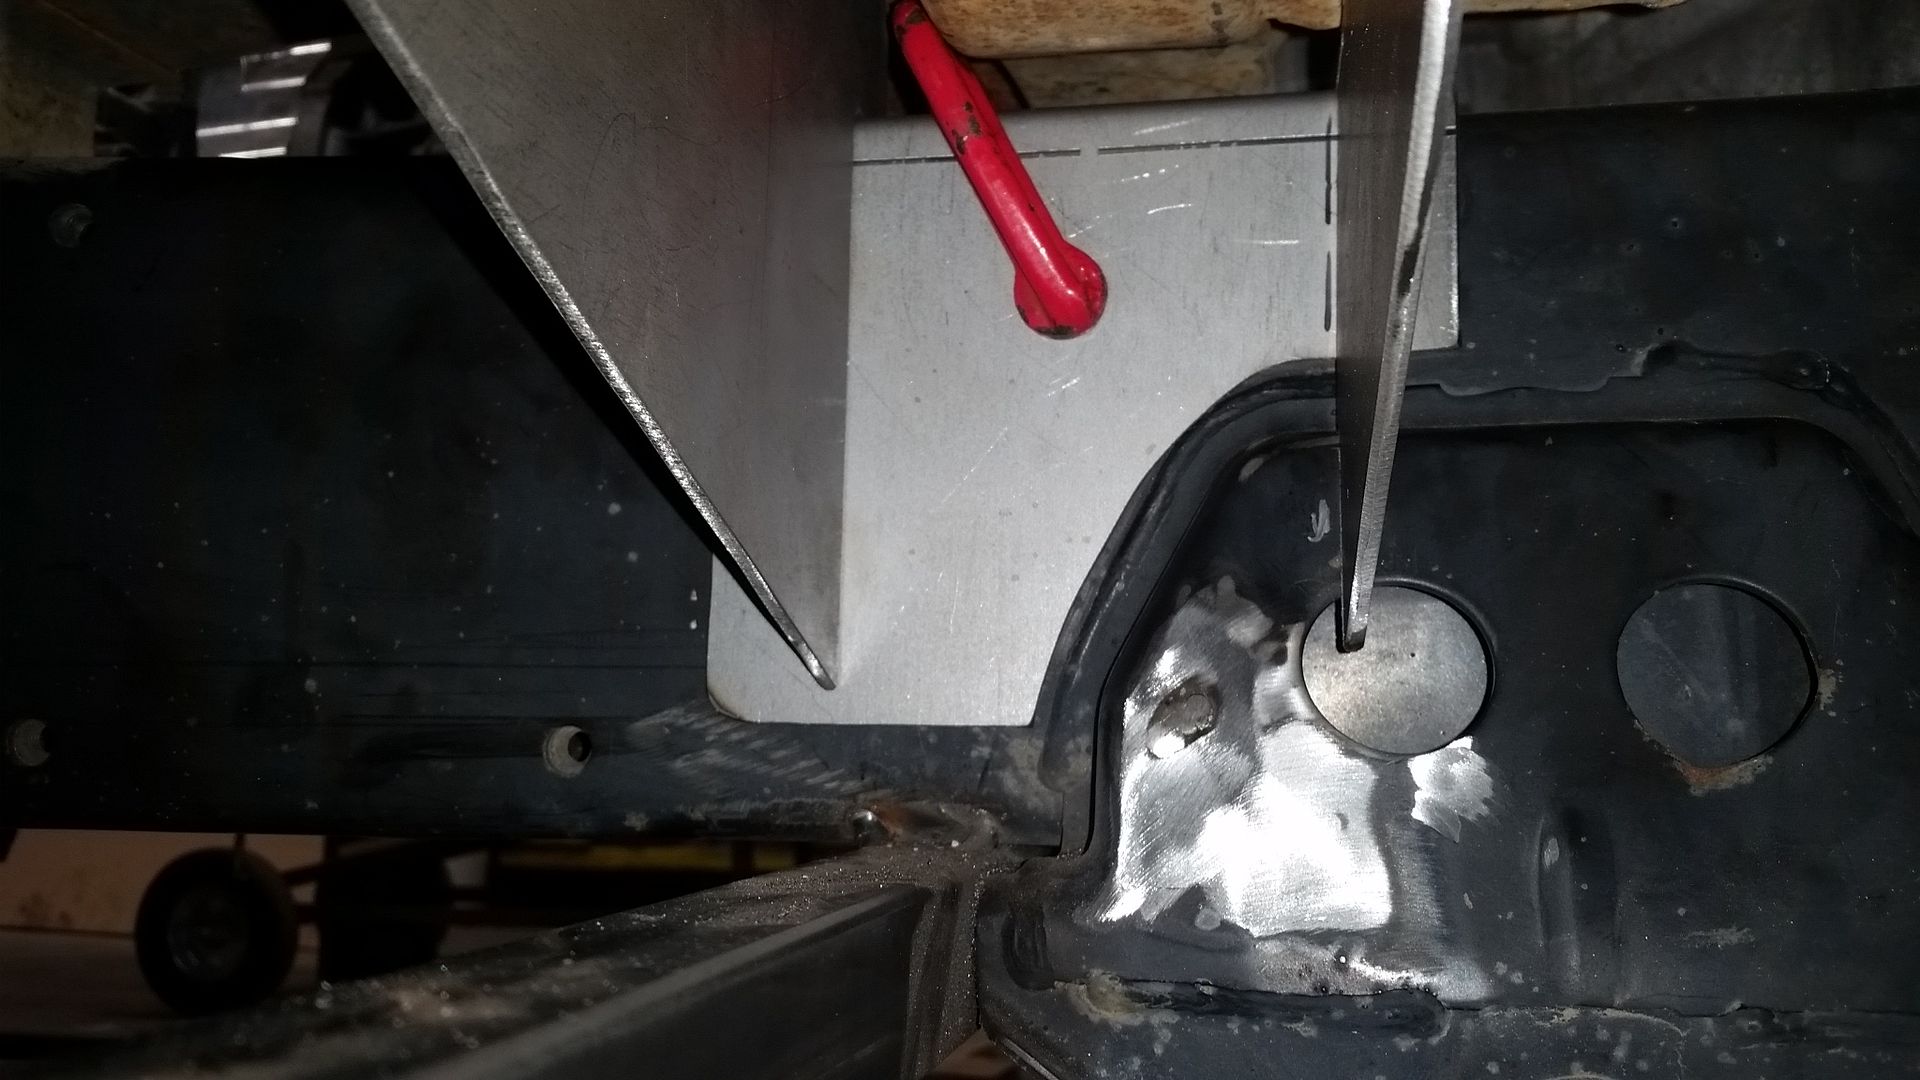
The hole in the floor is the factory drain plug.
This was my 1st try at a bracket for that area. I had to use a spacer under it and it just fit like crap....
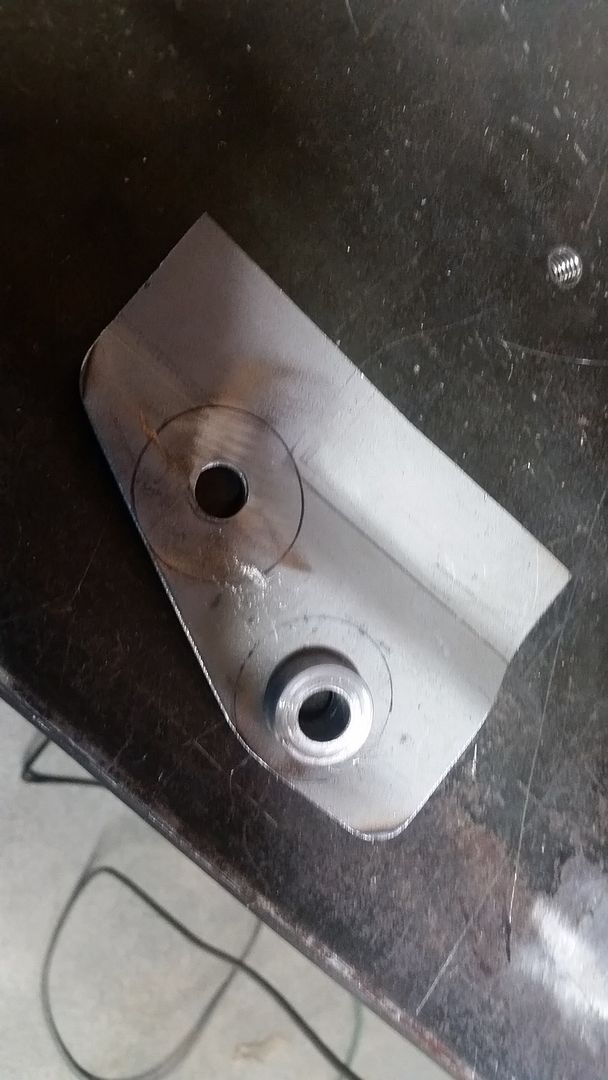
I decided the first thing to do was to 'flatten' the drain plug area. That gets rid of one of the 'levels' that the new bracket will need to conform to. I made a tool to mash the surfaces together using a bolt to apply the pressure. that actually worked better than I thought it would on a feature that deep. I did have to do a little hammer/dolly work to clean things up. The area doesn't have to be perfect.
This is what I came up with. I was able to use my press and some scrap material to build a laminated tool to form the 3d shape I needed to conform to the floor.

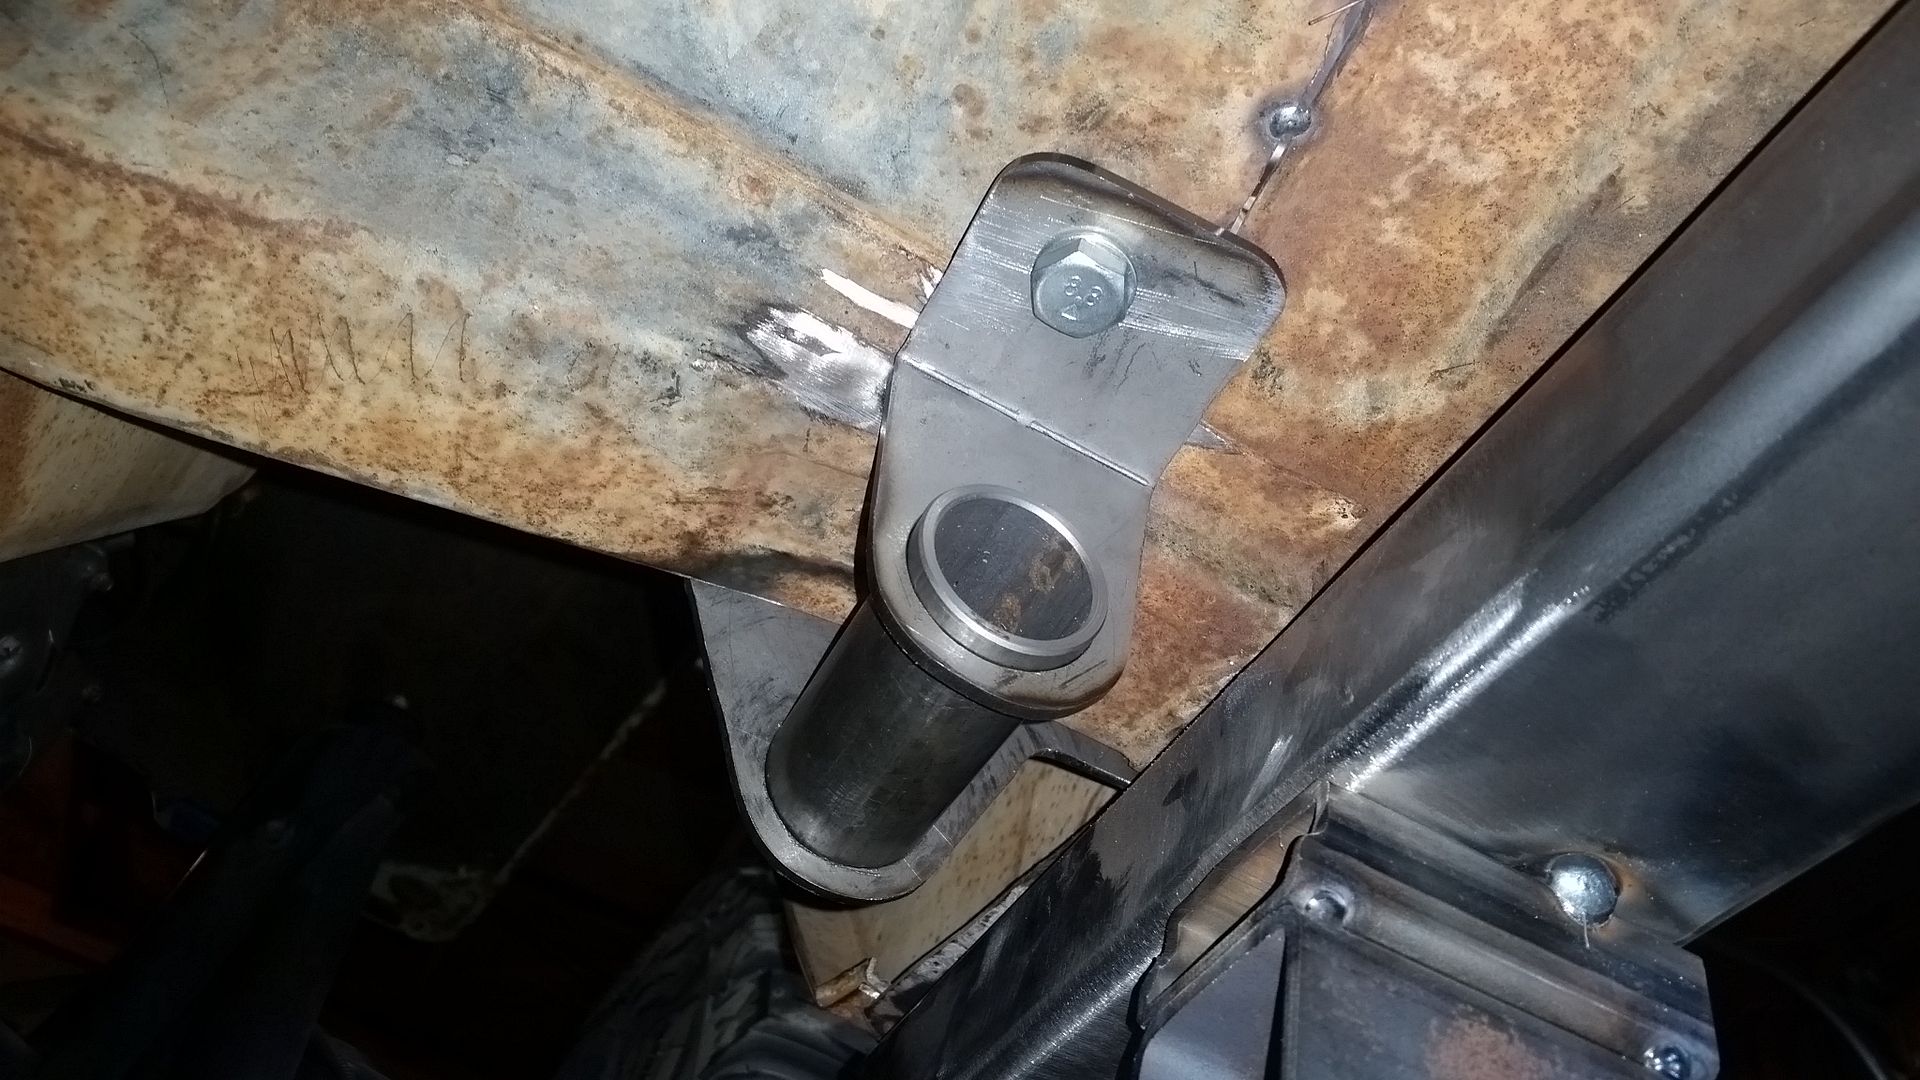
The bracket now confirms to the floor much better. I will have to build the bracket in two parts. I will add a vertical part that will connect to the bushing tube. I don't think I could have formed it in one part without a very complex die. For one part I don't think it was worth chasing.
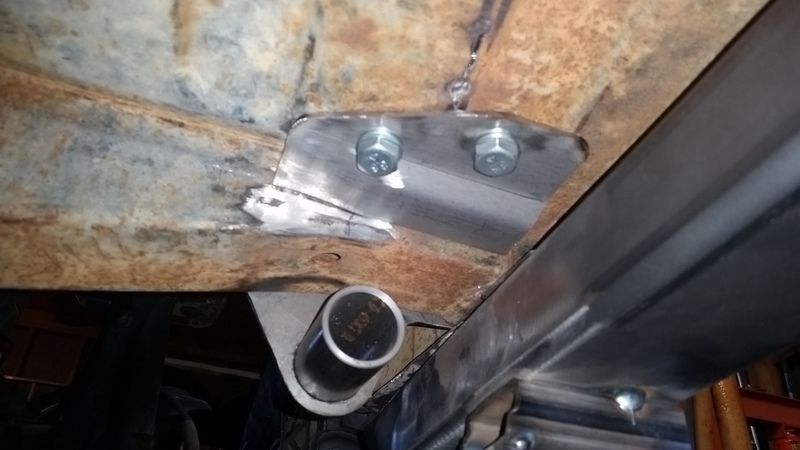
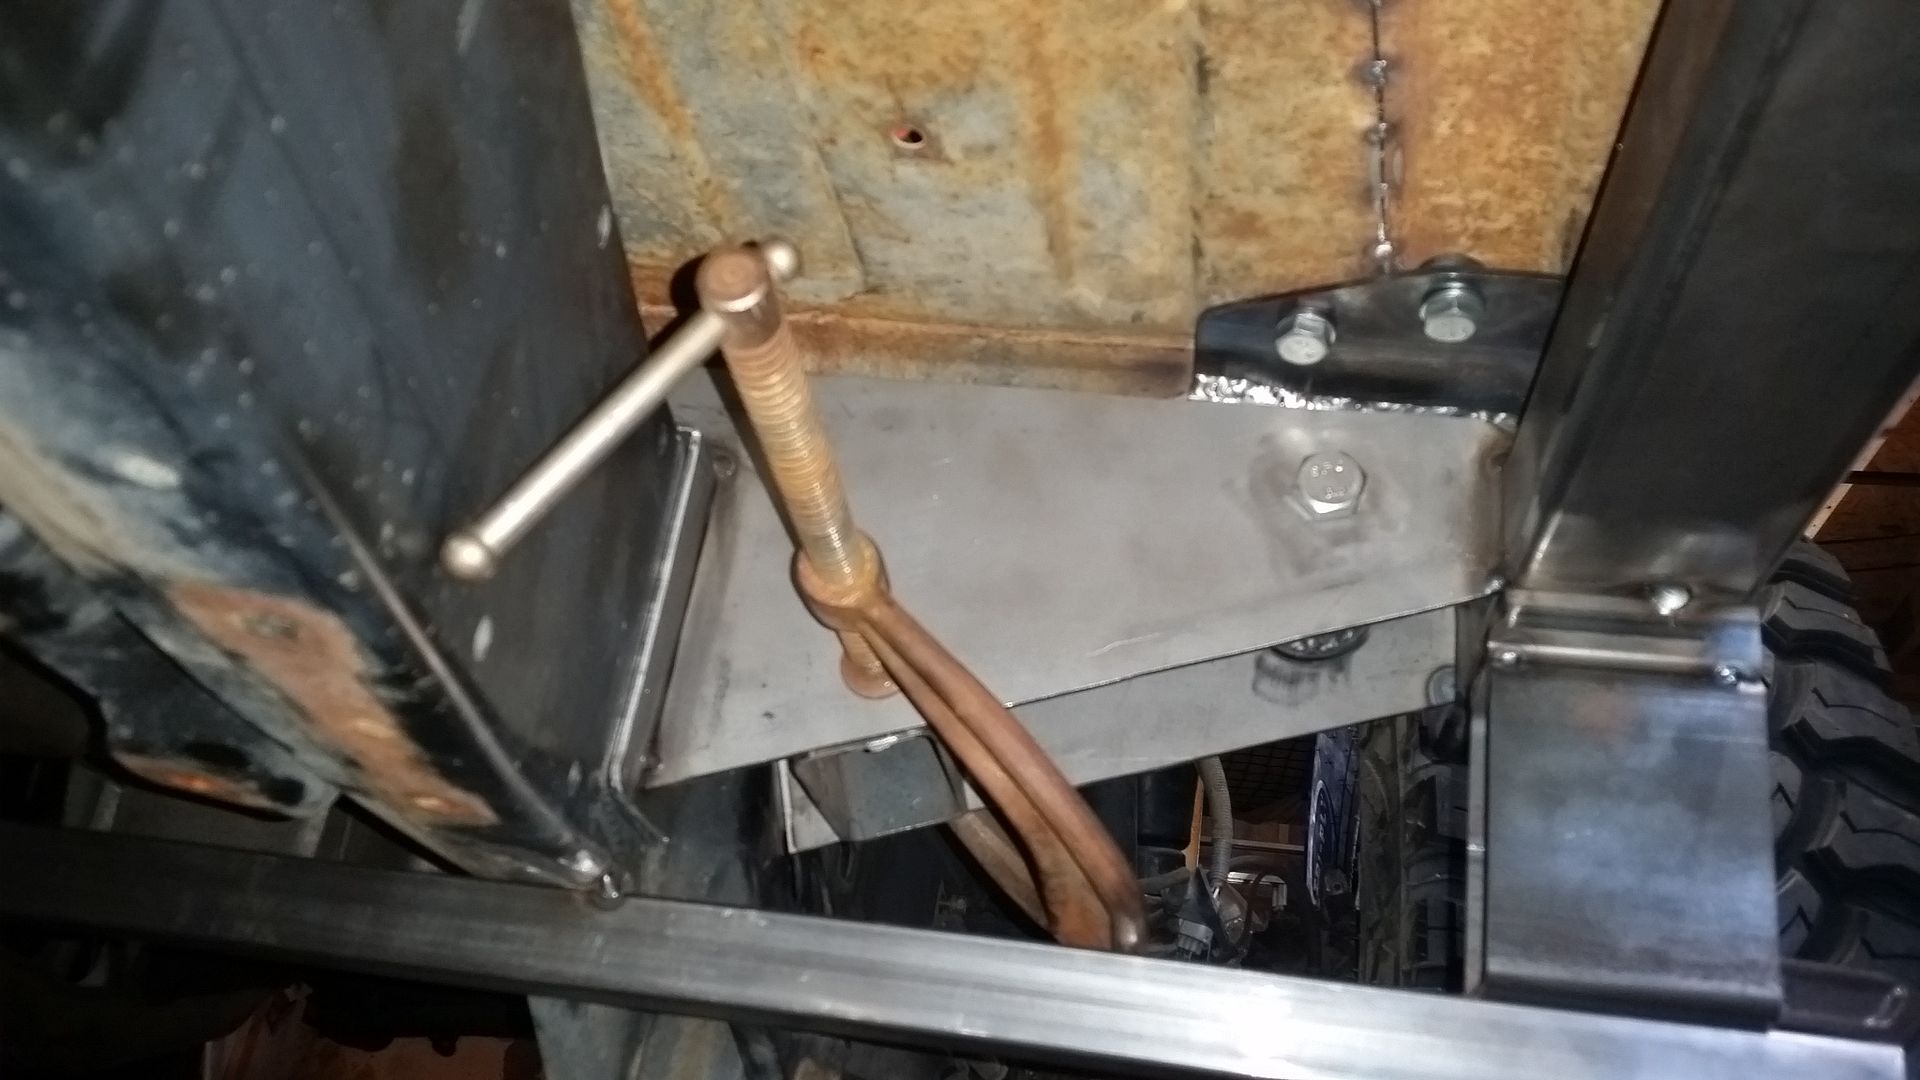
I decided to add a 4th fastener to the pad slightly behind where the A-pillar tube will be for the cage. The only place for this fastener was 'up' on one of the ribs on the floor right at the inside of the door panel.
That spacer will be tig welded to the bracket. I will probably be welding all these brackets into the body eventually also to tie everything together.
This is basically the configuration of the fasteners on the top side along with where I want to stick the A-pillar down tube. The fasteners are upside down right now for a little more clearance on the underside. I will be making a 'top' pad for the this part of the mount also. I am also going to try and tie into the factory vertical door pillar structure to spread out the load between the front and rear portion of the mounts. That still is still a little bit out, but on the horizon maybe. I try and plan as many moves ahead as I can....

The front of the factory body mount outrigger was fairly easy to make a body mount for. After removing the factory sandwich style mount in this area, I wanted to convert to a regular universal bushing assembly. That bushing will provide the body mount isolation, as well at the tie into the 'cage' structure of the body.

The other side is where things get complicated. There is a large multi-thickness flange with a rather complex shape. The outer part of the flange is a different level/thickness than the rest. This is where come of the outer factory door/dash/cowl structure ties into the body.
The hole in the floor is the factory drain plug.

This was my 1st try at a bracket for that area. I had to use a spacer under it and it just fit like crap....


I decided the first thing to do was to 'flatten' the drain plug area. That gets rid of one of the 'levels' that the new bracket will need to conform to. I made a tool to mash the surfaces together using a bolt to apply the pressure. that actually worked better than I thought it would on a feature that deep. I did have to do a little hammer/dolly work to clean things up. The area doesn't have to be perfect.

This is what I came up with. I was able to use my press and some scrap material to build a laminated tool to form the 3d shape I needed to conform to the floor.

The bracket now confirms to the floor much better. I will have to build the bracket in two parts. I will add a vertical part that will connect to the bushing tube. I don't think I could have formed it in one part without a very complex die. For one part I don't think it was worth chasing.

I decided to add a 4th fastener to the pad slightly behind where the A-pillar tube will be for the cage. The only place for this fastener was 'up' on one of the ribs on the floor right at the inside of the door panel.
That spacer will be tig welded to the bracket. I will probably be welding all these brackets into the body eventually also to tie everything together.

This is basically the configuration of the fasteners on the top side along with where I want to stick the A-pillar down tube. The fasteners are upside down right now for a little more clearance on the underside. I will be making a 'top' pad for the this part of the mount also. I am also going to try and tie into the factory vertical door pillar structure to spread out the load between the front and rear portion of the mounts. That still is still a little bit out, but on the horizon maybe. I try and plan as many moves ahead as I can....
Metcalf
Expedition Leader
I am going....slow.....


That finishes up the 'pre-pull' work for the outriggers on the rocker guards for the passenger side. This took way longer than I though it would. I haven't been doing any marathons in the shop, but I try and get at least a hour a day.
Tig welding parts takes much longer. It is just slow for me. When I pull the entire rocker assembly off I will likely MIG all the final seams. I don't really see TIG being a large advantage on those kinds of seams.
A few tips....
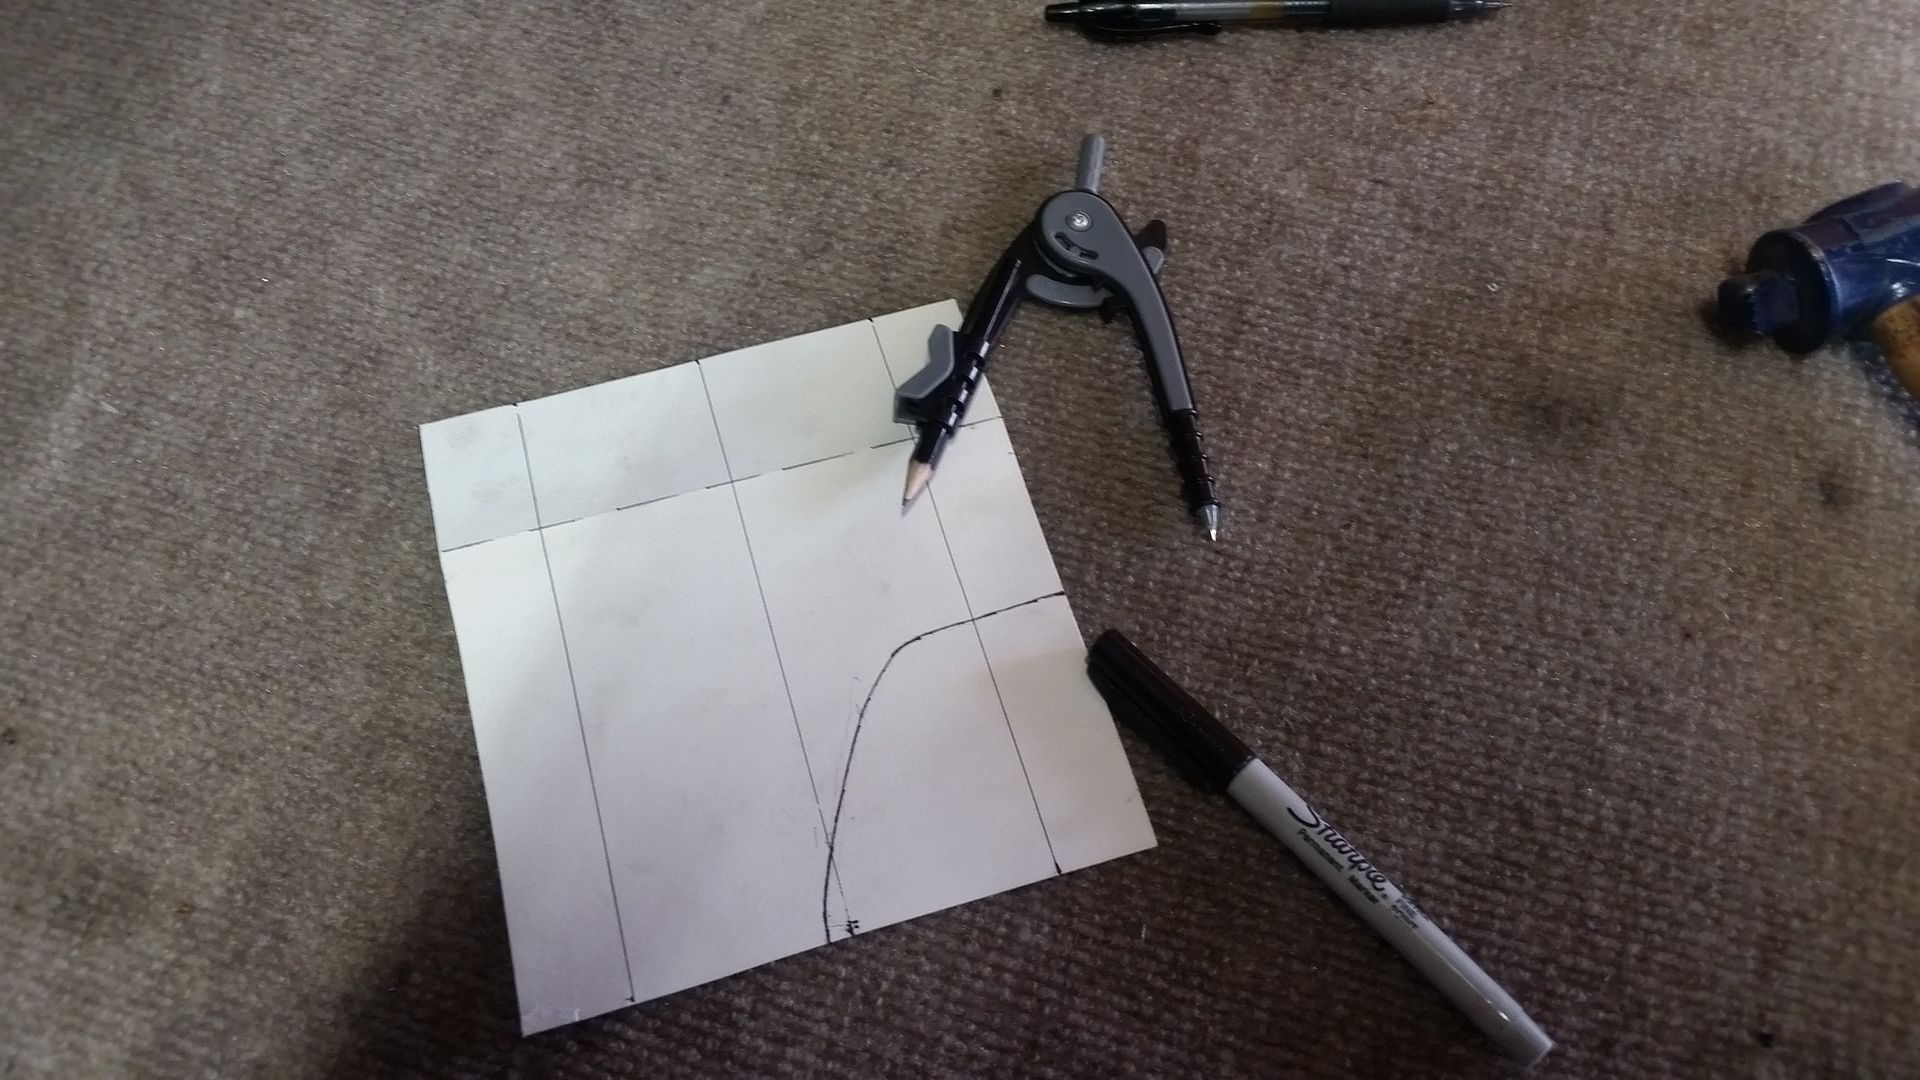
A drawing compass works well to transfer curves over to a template if you can offset things. This worked really well for making the template for the frame pad that has to go around the front suspension radius arm mount.
Making the outriggers a 'stock' size on the inside made it easy to use a short cut of material clamped in to keep everything parallel. That will come in handy later when I need to build the top and bottom panels for the outriggers.
What's next....
Now I need to do the same thing on the drivers side front. Overall, that should go faster right? I have templates for everything. We will see. I spent over an hour tonight prepping the drivers side by removing the temp body mount and that PIA bracket for the factory FJ40 front body mount. Aye.
The floor is a slightly different shape on the kick panel for the drivers side. I will need to figure out how to work with that.
Once the outriggers are roughed on both sides. I will pull one side at a time for final welding. I ordered up a set of dimple dies to play with for the bottom and top panels on the outriggers. I figure they will need big holes to allow them to drain properly. Sealing them is not an issue really with the design. I want to be able to wash them out too.
After the welding is done, I will heavily tack weld the pads to the frame. Then the body will be mounted! Yipee.
Looking longer out. After the body is mounted I can start to rough in the shape of the rear of the cab/tub. Finally!


That finishes up the 'pre-pull' work for the outriggers on the rocker guards for the passenger side. This took way longer than I though it would. I haven't been doing any marathons in the shop, but I try and get at least a hour a day.
Tig welding parts takes much longer. It is just slow for me. When I pull the entire rocker assembly off I will likely MIG all the final seams. I don't really see TIG being a large advantage on those kinds of seams.
A few tips....
A drawing compass works well to transfer curves over to a template if you can offset things. This worked really well for making the template for the frame pad that has to go around the front suspension radius arm mount.
Making the outriggers a 'stock' size on the inside made it easy to use a short cut of material clamped in to keep everything parallel. That will come in handy later when I need to build the top and bottom panels for the outriggers.
What's next....
Now I need to do the same thing on the drivers side front. Overall, that should go faster right? I have templates for everything. We will see. I spent over an hour tonight prepping the drivers side by removing the temp body mount and that PIA bracket for the factory FJ40 front body mount. Aye.
The floor is a slightly different shape on the kick panel for the drivers side. I will need to figure out how to work with that.
Once the outriggers are roughed on both sides. I will pull one side at a time for final welding. I ordered up a set of dimple dies to play with for the bottom and top panels on the outriggers. I figure they will need big holes to allow them to drain properly. Sealing them is not an issue really with the design. I want to be able to wash them out too.
After the welding is done, I will heavily tack weld the pads to the frame. Then the body will be mounted! Yipee.
Looking longer out. After the body is mounted I can start to rough in the shape of the rear of the cab/tub. Finally!
Wow - this is very impressive. I've always wanted to fabricate an awesome machine - its a true expression of how your mind works! This is great stuff - especially considering how you are getting creative in both solving the problem and creating the solution - even when the perfect tool isn't available. How did you acquire all of this fabrication knowledge? Do you do this type of work for a living also?
Keep up the good work - I don't even remember how I got to this thread, but I'm subscribed!
Keep up the good work - I don't even remember how I got to this thread, but I'm subscribed!
Metcalf
Expedition Leader
Wow - this is very impressive. I've always wanted to fabricate an awesome machine - its a true expression of how your mind works! This is great stuff - especially considering how you are getting creative in both solving the problem and creating the solution - even when the perfect tool isn't available. How did you acquire all of this fabrication knowledge? Do you do this type of work for a living also?
Keep up the good work - I don't even remember how I got to this thread, but I'm subscribed!
Thank you for the compliments.
I don't really know how I got started. I have always been a mechanical type person. I grew up in a small town in Idaho that was still stuck in the 70s during the 1990s. Kids bought trucks and cruised main. When you got bored with that you avoided 'town' by going up into the mountains. This was a very remote area and there where more old mining roads than you could shake a stick at. I lived in the area for 20 years and still didn't ferret out all the cool ones....
It was a good time in the 'sport' when people where making pretty big advancements in off road vehicle technology BUT you couldn't just get a catalog and order things. Even if you could have, we didn't have the money for it. We scoured junkyards for parts and made a lot of stuff. We got stuck a lot. We walked back to town more than once. We tried a lot of stuff that didn't work. We just learned....
Fast forward about 20 years now an here I am, still building junk in my garage. I enjoy it...most days. I still get overwhelmed just like anyone else. I still scrap some parts every now and again. Still learning. I work as a mechanical engineer, and basically specialize in solving odd machinery and process issues for a company that works in the pipeline industry. It pays the bills.
I generally just make most of this stuff up as I go along. I have a picture in my head. I spend a lot of time looking at what other people have done...and how they do it. I have learned a decent amount over the last 20 years in this sport. I have done 3 progressively bigger project builds over the last few years. I started, on this forum actually, with my beater dodge truck. Everyone seemed to like that one. I liked posting about building it. It is just a truck with big tires basically.

Then I built my old 1942 Willys flat fender. That one was probably the most in depth build I have ever done. I designed and built a frame from scratch and moved just about everything around to make it work like I wanted, but I still used pretty much just junk I found on Craigslist and cheap tools that I bought along the way. I built that entire thing with a 110V welder. Everyone seems to really love that little thing. I was lucky enough to get it in a magazine too. I also applied and was invited to go on Ultimate Adventure with 4-wheel and Off-Road Magazine in 2014 and 2015. Those trips, combined with others I have done solo, basically changed some of my perceptions on the sport. Basically how much vehicle performance you could have and still go down the highway. And basically how capable deceptively simple vehicles can really be.

This new build is an evolution of my others. Maybe a combination in some ways. In the end, I just like building stuff. I like expanding my skills, capabilities, and the general level of my fabrication. I am trying to push myself a bit out of my comfort zone with this new project. I don't generally pick my vehicle, my vehicles pick me. I had zero intention of building something like this right up till the point I found a lightly rolled gutted low mile 1996 LX450 with factory E-lockers on Craiglist. I had actually been trying to get a completely different project to take off, and it just didn't want to. This one is a time killer to let some of the market capabilities catch up a little.
Anyhow....that turned into a book.
Thanks again.
Stoffregen Motorsports
Explorer
This A-pillar body mount tie in area is giving me fits....
I had trouble with that area too. You and I both ended up doing about the same thing.


.....I work as a mechanical engineer, and basically specialize in solving odd machinery and process issues for a company that works in the pipeline industry.........
As someone that does similar work in a similar industry I knew it! Figured you were either a highly skilled Machinist/Millwright or an Engineer that likes getting his hands dirty. Anyways, as the other poster said, your attention to detail and problem solving skills in your builds are VERY impressive. Keep up the great work!
Metcalf
Expedition Leader
I had trouble with that area too. You and I both ended up doing about the same thing.
I thought about cutting some of the door opening structure, but I really want to be able to run a 'full' door on this thing when I am done....
I will probably be building my own 2pc aluminum hard doors with sliding glass uppers like you would see in an old rover. Something like that.
Do you have a thread on this FJ40 build. I need ideas!
Metcalf
Expedition Leader
As someone that does similar work in a similar industry I knew it! Figured you were either a highly skilled Machinist/Millwright or an Engineer that likes getting his hands dirty. Anyways, as the other poster said, your attention to detail and problem solving skills in your builds are VERY impressive. Keep up the great work!
Funny story. I was actually a Wildland Firefighter for 10 years for the BLM/FS, got hurt, and had to stop. Lucky, I had gone to school over the winters for mechanical engineering.
I started with the company I worked for now in our manufacturing department on the floor of the machine shop.
I came up with a few ideas they liked and ended up wiggling myself into an engineering trial position when the market crashed in 2008.
I've done a little bit of everything.