Jeepster Commando Build - A Different Sort of Jeep Thing - Stoffregen Motorsports

SkiWill

Well-known member
Always impressed with the quality of your work. I completely agree, it's the attention to details that makes the difference between a truck and something special. Well done.
 
Thank you.

One detail that doesn't show without really looking, is the hardware. I didn't want to use gold zinc plated hardware, so I spent about $600 on grade 8 zinc aluminum fasteners. It's a very subtle touch.

Some of the pics show gold zinc hardware, but those haven't yet been changed out for the zinc aluminum.
 

cj-10

Member
Thank you for the updates. I love reading all of your threads. Your attention to detail and work is top notch. I live about 5 min from the dealer that this jeep came from.
 

EZ JEEPER

New member
I've been reading your buildup of this Jeepster for a few days now and I am curious about the twin stick conversion of the Dana 300 transfer case. What does this make the shift pattern of the two sticks?
 

AggieOE

Trying to escape the city
Looks so great. Its almost sad that the frame and fasteners and all that work will soon be covered up.
 

Twistedz

New member
EZ Jeeper
Shift pattern is like an Atlas.

L L

Rear Front

H H

If you grind the shifter rod, you can do a front dig (like an Atlas) as in front wheel drive only.....
Link is more detailed.

I have a Dana 300 twin sticked in one of my commandos. It also has a dodge magnum 5.9 (360) and auto in it. It makes about 250 hp and is only used for medium wheeling. Nothing wrong with a Dana 300 but add a bunch of HP, low gears, big rubber, the actual case of the Dana 300 will possibly become a fuse -type link at some point if you are hard on it.

Hope this helps.

This build is fantastic, I'm getting ready to start another Commando build and this one inspires.
Keep up the beautiful work.
 
Last edited:
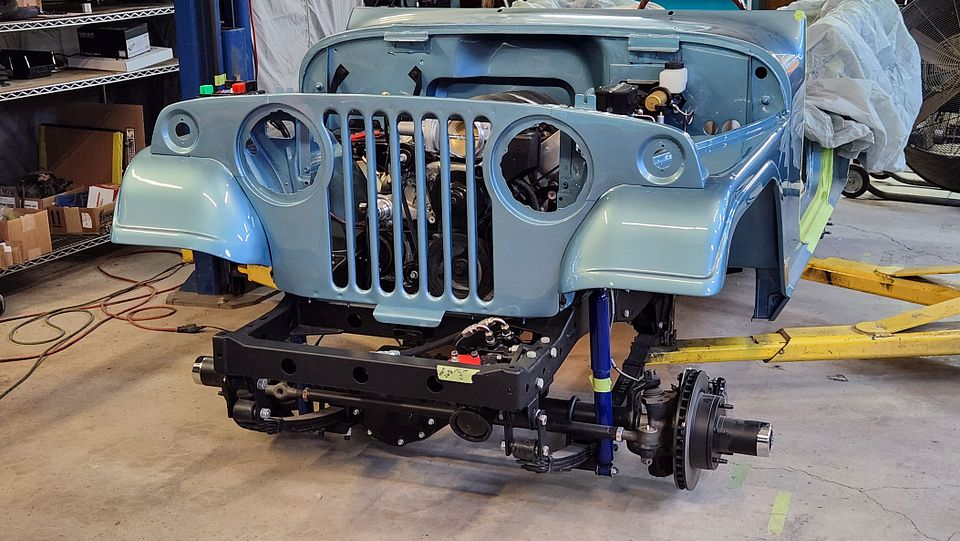
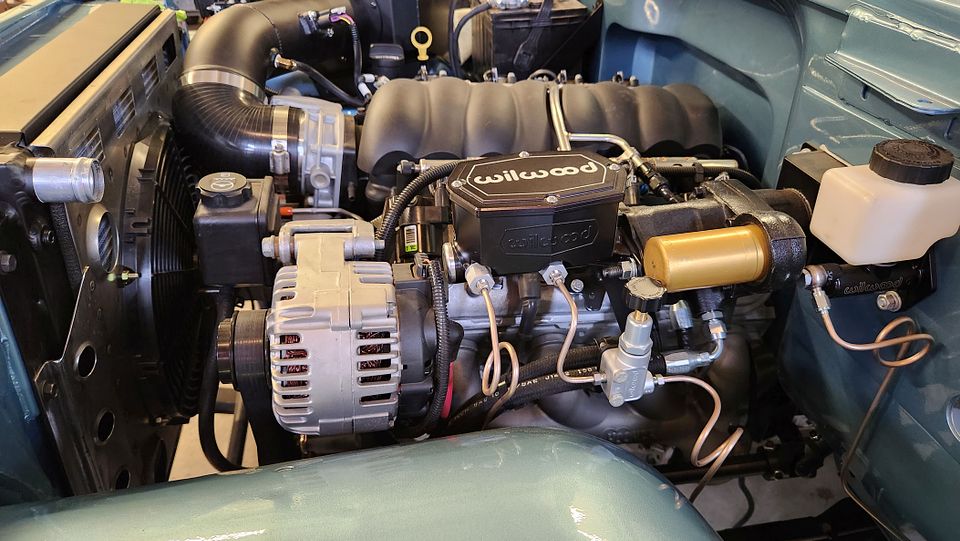
So much has happened in the past few weeks. I admit, this project has taken a long time to get where it is now. Every small decision turns into a hunt for the right part, then waiting for the part, and eventually having to modify the part because it doesn't fit as expected. It's par for the course when building a full custom. Add to that the tight fit on everything, I mean every single system, in this Jeep. I have a basic rule of 5/8" clearance to moving parts, and I was forced to subvert that rule at least a couple times here. The closest item on the list being the alternator to brake master cylinder clearance. It's a mere 1/2".

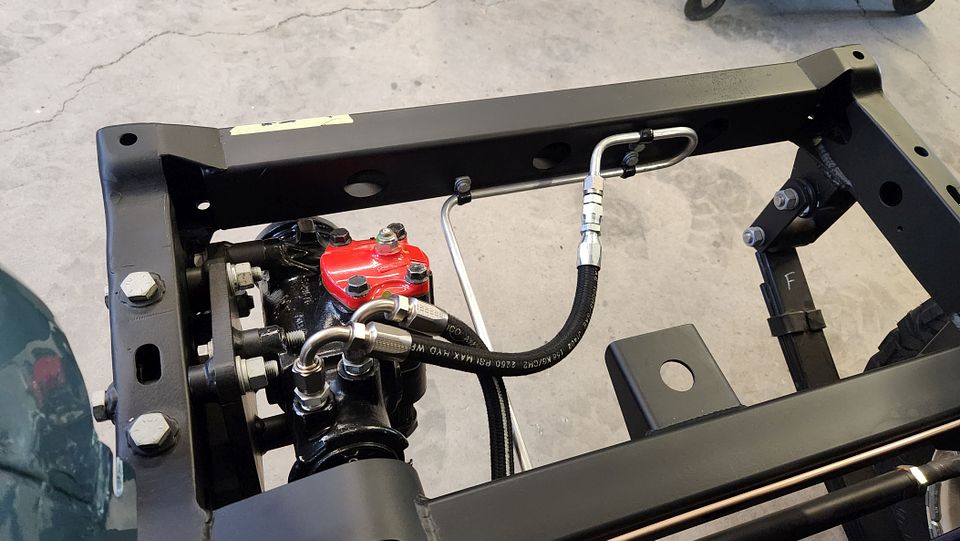
Moving forward meant finishing up the mechanical systems as the body parts were fitted and installed. The brake lines and power steering hoses pictured below were the first two complete systems on this Jeep. For the power steering, there had to be a tee in the pressure line to provide fluid return for the hydro boost. The hydro boost unit itself was very close to the valve cover, even in its upside down position, and 90 degree hose ends were used to keep the hoses away from the engine's heat. I even made a small OEM looking clamp bracket for the hoses to route under the brake master. You might be able to see it in the pics. The return line, as it comes from the factory, is 3/8" ID, but that size hose simply would not fit here. My solution? Make my own -4 AN to 5/16-18 nipple, and connect that to a -4 90 degree hose end and a braided hose.

The fluid is cooled simply by looping a coil of hard line, as I don't expect this Jeep to see hard trail use. If it ever does need a cooler, there is plenty of room to install one.


With almost all of the hard parts installed, attention was turned to the electrical. Using a "Highway 15 Plus" wiring kit from American Autowire, I started at the fuse panel and worked my way out. Easy stuff first, like headlights and turn signals. The engine control system is pretty much plug and play, but there is still room for improvement, mostly in the fit department, but also, since this is not an emission controlled vehicle, a couple items were deleted from the harness. All systems were run through either a circuit breaker, or Midi fuses, located on a panel inside the passenger fender.


toddz69

Explorer
Beautiful work as always! Is that a custom plate that the steering box bolts to? Is the p/s pump a stock TC pump? Any mods to it?

Thanks,
Todd Z.
 
I insist that all systems be removable from the vehicle, and wiring with that in mind means separating body wiring from engine wiring, and critical placement of connectors. Obviously the grommets and firewall boots need to be large enough for those connectors to pass through. I had planned ahead for the massive amount of wiring and had cut six large holes int he firewall before the body went to the paint shop, but there's always one that you forget... This time it was the drain hole for the A/C unit. Luckily, I know how to cut through metal without disturbing the paint.

Here is the A/C unit, from Vintage Air. The supplied wiring harnesses were a mess, so I took some time to tidy them up, install connectors for ease of removal, and also made a small panel which mounts to the unit and holds the relays and circuit breaker.


The wiper motor on the Jeepster is a grounding type with two speeds, and reverse engineering the switch helped figure out how to make it all work. Ultimately, we had to install a relay to get the two speeds and the park function to work properly.


Beautiful work as always! Is that a custom plate that the steering box bolts to? Is the p/s pump a stock TC pump? Any mods to it?

Thanks,
Todd Z.
Todd, the mounting plate came from Parts Mike, and is meant for a YJ (I think). I had to modify the frame to get it to work.

The pump is stock GM LS3. On heavier vehicles, they could use a boost, but on this light Jeep, it's finger light.

Thank you.
 

Forum statistics

Threads
185,888
Messages
2,879,477
Members
225,497
Latest member
WonaWarrior
Top