Jsmarine's 2005 ARB Tacoma Build

austintaco

Explorer
I didn't realize the old bumper had that much rust. Man, that looks amazing, and should hold up for years to come. I used to think that powder coating was over kill, but I have noticed that I am constantly chasing down pieces around my truck that need to be re sprayed from the paint chipping off.

On the lenses, I happened to watch one of the "truck'n" shows on the Speed channel and they had a quick how to on re spraying tail lights with a paint that is specifically made for old dull lights. Might be worth a shot?
 

jsmarine

Adventurer
On the lenses, I happened to watch one of the "truck'n" shows on the Speed channel and they had a quick how to on re spraying tail lights with a paint that is specifically made for old dull lights. Might be worth a shot?

Well its not just the lenses that need to be replaced, but the whole light assembly. Otherwise, I would just replace the lenses with some nice new ones for cheap. I'm going to look at Northern Tool & Equipment tomorrow to see what I can make fit.
 

jsmarine

Adventurer
Nice truck! Famous too ;)

How much did those wheel caps run you?

$7.84 each. http://www.trdparts4u.com/scripts/prodView.asp?idproduct=285357

And to get them to fit you need to sand down the backside of them. That may not make sense, its hard to describe and I didn't take any pics when I did it unfortunately. But they wont snap on correctly if you don't sand or trim some.

EDIT: I also removed the metal ring on the inside of the caps, it was way too stiff for my wheels
 

huntsonora

Explorer
Crazy to see this truck pop up on here. I looked at it in late May when it was for sale at the VW dealership in Boulder CO

Good luck with the build
 

jsmarine

Adventurer
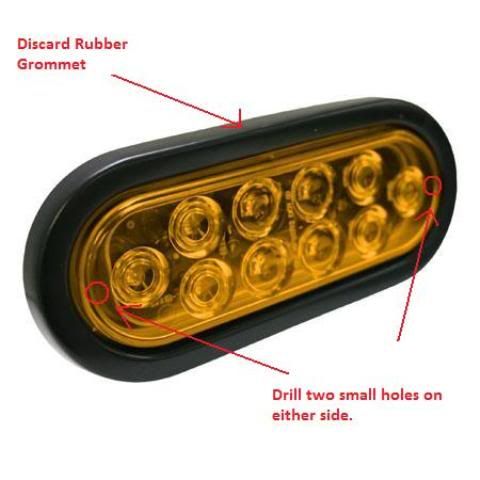
Well, I got some turn signals in the ARB bumper again, I found some at Northern Tool & Equipment. They are just their standard LED oval turn signal, mainly used on commercial trailers and equipment. But, I was able to make them work by drilling two small holes on either side of them, put in the screws and sealed with some silicone. Wiring them up was no big deal either, and they work as both turn signals and marker lights.

I like the brightness of the LED's, and the fact that they can easily be replaced again if need be. Heres a few pictures I took tonight with my iphone, the quality isn't great but you get the idea.

IMG_0810.jpg


IMG_0812.jpg


IMG_0811.jpg
 
Last edited:

jsmarine

Adventurer
RTT Bed Rack

I finished building my tent rack, this is the same rack that I had in my trailer, but I had to modify to fit the bed of the Tacoma. The rack sits on top of the bed rails and bolts to the existing rails along the inside of the bed. the rack is supported from the bed rails, not the hardware, the bolts just keep the rack in place. I was also able to utilize the existing hardware from my bed cover which makes changing from the cover to the tent rack very easy.

I also mounted my shovel and hi lift jack on the sides of the rack, I used hockey pucks as insulators from vibration for the hi lift jack.

Let me know what you guys think.

1.jpg


2.jpg


3.jpg


4.jpg


5.jpg


6.jpg


7.jpg


8.jpg


9.jpg


10.jpg


11.jpg


12.jpg
 
Last edited:

Dave Bennett

Adventurist
The rack looks great, very clean and low profile. You'll be glad you kept the drag coefficent down. The only issue I see is the "feet" on the bedrails... Kinda small for weight distribution and may "chew" on that plastic rail cap with time, YMMV.

I really like those LED's alot, any chance you can post more detailed pics of that mod and the part number? Are those available online? Thanks.
 

jsmarine

Adventurer
As far as the LED lights, I wish now I had taken more pictures of how I did it. I bought the lights at Northern Tool and Equipment, but I just looked online and found the same lights on walmart.com, and they are cheaper than what I paid. (I paid $18.99 each) The brand is Blazer if you can find them elsewhere. Also, just an FYI they are sold individually, so buy two. http://www.walmart.com/ip/Blazer-LED-Oval-Stop-Turn-and-Tail-Light-Kit-Amber/15111215

LEDAmberturn.jpg

Basically what I did was drill two small holes on either side of the light that matched up to the holes in the ARB. The holes will be on the edge of the light, and you are only drilling through the plastic housing, none of the LED's or wiring will be affected by the hole. Then I used a little silicone and filled the holes on both the front and back and put in a screw and attached it to the bumper. The silicone set up with the screw in place and should keep them sealed up from moisture and dirt. As for wiring, I saved the pigtail from the original lights that came with the ARB so I could reuse the connector, I just wired these lights to that pigtail. It took a little trial and error as the wires were different colors and I didn't know which was which, but I got it. The lights blink and stay on as marker lights.

EDIT: Heres a couple pics I just took of the lights from the inside of the bumper, kind of gives you a better idea of how they are mounted.
IMG_0833.jpg


IMG_0834.jpg
 
Last edited:

Forum statistics

Threads
189,385
Messages
2,916,185
Members
232,189
Latest member
Jonny Adventures
Top