Mark's '95 fzj80...

Mlachica

TheRAMadaINN on Instagram
:costumed-smiley-007 Thanks 24

waldrtw said:
I did that same thing to mine last year. Get ready to pay over 100 for a new one!

Did you experience the same down shifting issue?
 

98sr5

Observer
god that thing is nice theres always something about landcruisers they just scream functionality if only i could get my hands on a 5 speed diesel 80 series i would be the happiest person in the whole world
 

Mlachica

TheRAMadaINN on Instagram
98sr5 said:
if only i could get my hands on a 5 speed diesel 80 series i would be the happiest person in the whole world

You and me both!!!

Thanks for the kind words and welcome to the forum! :beer:
 

Mlachica

TheRAMadaINN on Instagram
Refigerator, aux driving lights, flood lights, winch, 2m radio, water pump, gps. All great ammenities for overlanding, right? Unfortunately they only work if there's enough battery to run them. After needing my first jump start about 5 years ago I realized that dual batteries would be a great solution.

To ensure that all of my accessories only drain the auxilliary battery I've turned to the perfectswitch.

The way it's wired:
The alternator and the aux battery are connected on one side of the isolator and the main battery is connected to the opposite side.

The isolator works like a one way valve. With the truck running, the alternator directly charges the aux battery and through the isolator it charges the main battery. With the engine off, the aux battery can feed the main battery but the main battery cannot feed the aux battery. Get it? So whatever is connected to the aux battery will only drain the aux battery - the main battery will not feed the aux battery. However, the aux battery is allowed to feed the main battery if the main battery needs it. In other words, the aux battery is always jump starting the main battery. This means the main battery will never have a lesser charge than the aux battery.

All of my ammenities will be connected to my aux battery. All that is factory, will stay connected to the main battery.

Major players:
2 lifeline 100ah deep cycle agm type batteries
200a single rectifier perfectswitch isolator
2/0 welding cable
4ga marine grade cable
2ga marine grade cable

The install:
I started with the OEM battery tray from 91-92 fj80's
IMG_2645.jpg


It required minor trimming on this side of the tray...
IMG_2646.jpg


I had a friend weld a mounting plate to the oem hold down for the perfectswitch. I lined the edges of the plate with self adhering door molding to prevent any chaeffing or cutting myself.
IMG_2642.jpg
 
Last edited:

Mlachica

TheRAMadaINN on Instagram
I then removed the center piece in front of the radiator to run the cable through. There's an existing run in there that I piggy backed to. There is plenty of room and it's not too hot - an ideal route.
IMG_2647.jpg


I cut and strip an estimated length of 2/0 to go from the aux positive to the isolator.
I filled the lug with a dielectric grease prior to crimping...
IMG_2648.jpg


Once crimped I sealed it with glue impregnated heat shrink
IMG_2650.jpg


I then slipped it into some conduit and wrapped it with electrical tape. I did this with all the cables. This picture isn't 2/0 btw...
IMG_2654.jpg


Where needed I added proper labels. The label indicates where it the other end of the cable is. I did this just in case I lose my mind :oops:
IMG_2653.jpg


I then ran the cable along the existing one and zip tied it together. The existing harness clips into the body piece that was removed to keep things tidy.
IMG_2652.jpg
 

Mlachica

TheRAMadaINN on Instagram
The aux battery engine block ground went to an existing unused M10x1.25 hole under the headers, behind the a/c. This is the view from underneath. I sprayed the surface and hole with a contact cleaner and hit it with a wire brush, I also ran a tap in there to clean it. I wanted to make sure the connection was as clean and electrically efficient as possible. This run was also 2/0. I didn't do it yet but I also need to run a good ground to the body, this is very important as a lot of accessories end up being grounded to the body.
IMG_2651.jpg


Now that the aux battery has it's positive and negative I moved on to the main side. I started by mounting this 1/4" stud to clean up some of the connections to the main battery. This isolator is installed inbetween the alternator and the main. So I took the cable off of the alternator, landed it on the 1/4" stud and ran a new wire (4ga) from the alternator to the isolator. On this 1/4" connection I landed a 2ga from the main battery positive, the existing cable to the starter, the factory cable that was on the alternator and a couple other oem wires.
IMG_2643.jpg

IMG_2644.jpg


The cable that was on the alternator needs to be hooked up to the 1/4" stud (essentially the positive from the main battery), it feeds some of the fuse block in the engine bay.

From the factory there's a little box that has two wires that go to the positive of the main battery. One of them is used to charge the battery, it's the one that's landed behind the larger nut. I removed it since the battery is now being charged via the isolator.

At this point the only cable I need to run is from the isolator to the main battery. Before doing so I mounted the isolator.
IMG_2655.jpg
 

Mlachica

TheRAMadaINN on Instagram
With the isolator mounted I completed the last bit of 2/0, from the isolator to the main, and finished off some of the smaller wires. I double/triple checked all of my connections prior to landing them to make sure I didn't fry anything. Per the instructions I hooked everything up and this is the result...

aux battery...
IMG_2659.jpg


The aux battery sat for a couple months so I hooked them up to a battery charger...ignore the loom of wires on the drivers side:oops: 
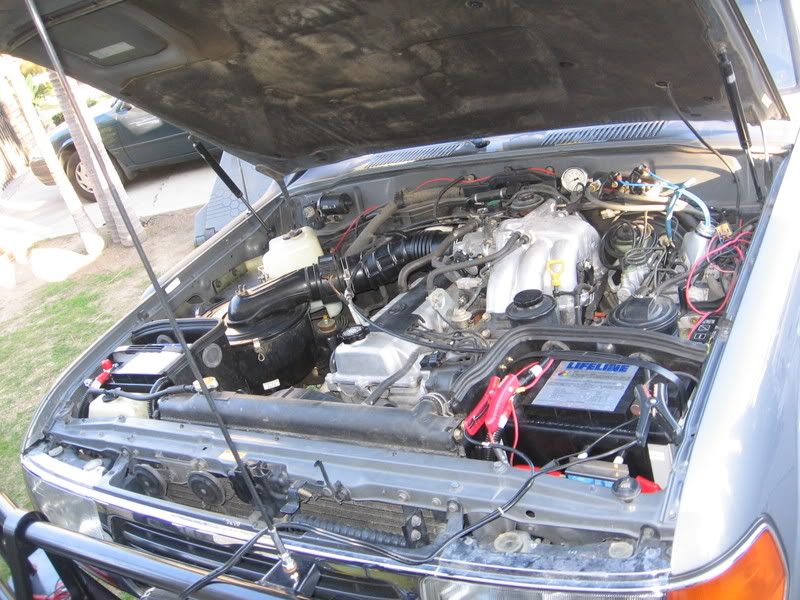
That was left from the previous owner. I chose not to deal with it until the aux battery was in.
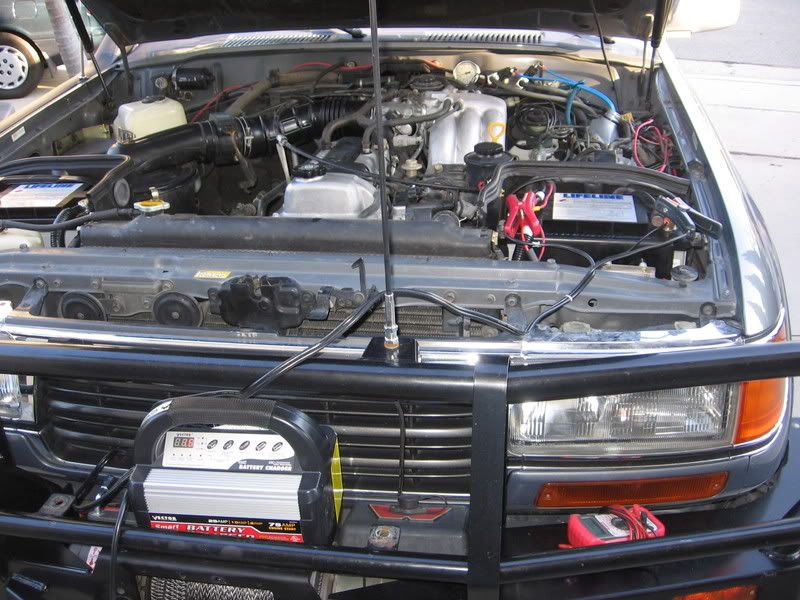
IMG_2658.jpg

IMG_2660.jpg

Now I just need to strategically place a few fuse blocks and clean up the existing wiring. Once that's done I can start adding all the other stuff in the garage like the aux fuel tank, water pump, lights, etc...
 

RAM5500 CAMPERTHING

OG Portal Member #183
Nice Install Mark!

Question, why install the clamp type terminals rather then using the supplied bolt from Lifeline and bolting the cable right to the battery??
 

Mlachica

TheRAMadaINN on Instagram
Thanks BM.

I used the battery clamps for the main battery connections just to have fewer connections landed under the bolt. I don't plan on having a lot of wires on the battery but I just want to avoid having a stack of lugs under the bolt. FWIW, the clamp type lug makes more contact (surface area) with the battery post, meaning less reistance at high current flow. Do we really benefit from it, probably not.
 

Starscream

Adventurer
Mlachica said:
Thank you all for the support...


IMG_8840.jpg


IMG_8841.jpg


compared to a stock 4r...Unfortunately UPS had nothing for me...

IMG_8834.jpg


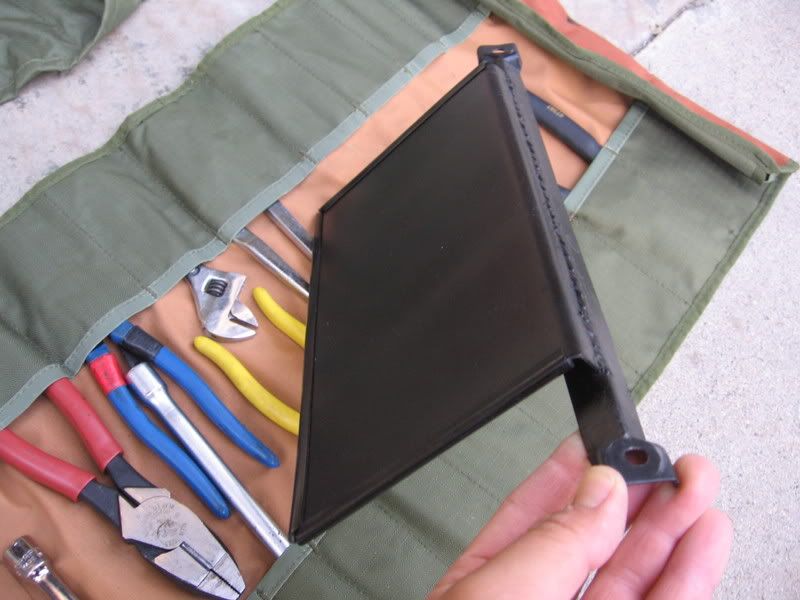
here's the fender I mentioned. tabs are broken, so the fender needs to be replaced :yikes:

IMG_8842.jpg

:Wow1: Man, that's not even fair! That is exactly how I would build it .... my hat's off to you!
 

Forum statistics

Threads
189,936
Messages
2,922,410
Members
233,156
Latest member
iStan814
Top