New Montero Sport Owner.

Justice R

Adventurer
Justice,

Supposedly the locker i ordered was from a montero sport, listed as a 2000. And many yards had lockers for sports up to year 2004. Where did you learn that lockers were discontinued in the sports in 99? The dealer had listings for locking thirds for my 2001, for....get this....$2800!

Hopefully they will not send you the hybrid LSD thinking that it was a true locker.

Mike

Mike, I could be wrong on my dates I know a lot about the regular Montero and less about the sport....but I dont think so. One other thing to check, In Montero's the models with the 3.0 V6 have a smaller diff than the models with the 3.5. I'm pretty sure the sport is the same way. So you want to make sure that the one you ordered was out of a 3.5 equipped model.

Quoted from consumer guide:

" 1998 Mitsubishi Montero Sport: A 2-wheel-drive model joined for 1998, in top XLS trim. Formerly optional, antilock brakes became standard on the LS 4x4 as well as XLS models. The 4-wheel-drive XLS added heated seats and door mirrors, plus a locking rear differential that would be useful in tough off-road situations.
1999 Mitsubishi Montero Sport: A new luxury Limited model joined the Montero Sport lineup, equipped with the bigger Montero's 3.5-liter V6 engine. Available with either 2- or 4-wheel drive, the Limited model featured a unique chrome grille with fog lamps, leather seats, power moonroof, and other amenities.
2000 Mitsubishi Montero Sport: A mild facelift included a fresh front-end look and black tailgate trim. The LImited got a new monochrome exterior. Interiors were revised with 2-tone color schemes and larger front cupholders in a revised console. Rear coil springs replaced leaf springs, and all but the price-leader ES got larger front brakes and 16-inch wheels. The ES dropped its 4-cylinder engine in favor of the 3.0-liter V6, and lost its manual transmission. The automatic gained electronic shift control that adapts to driving style. An antitheft engine immobilizer was integrated with the ignition key. A limited-slip differential was included on Limited and available for XLS, replacing the previous lock-rear-differential option.
2001 Mitsubishi Montero Sport: A new 3.5XS sport-trimmed model joined the lineup in 2001. All models added rear child-seat anchors, driver's-seatbelt pretensioner, front-seatbelt load-force limiters, and structural strengthening. All models also qualified as Low Emissions Vehicles in all 50 states this year.
2002 Mitsubishi Montero Sport: A more-sophisticated 4WD system, called All4-wheel drive, replaced a 4WD system that had to be disengaged on dry pavement for 2002. Among other additions this year: a color-keyed grille for the Limited, tube-type side steps standard on LS and XLS and optional on ES, and platinum-finish gauges on all but the ES.
2003 Mitsubishi Montero Sport: A .08-inch higher roof is the only significant change to the Montero Sport for '03.
2004 Mitsubishi Montero Sport: A 3.5-liter V6 is now standard on both the LS and XLS, instead of just the XLS, this year. "
 
Last edited:

shmabs

Explorer
Hybrid locker

When i ordered the locker i asked three times to make sure it was froma 3.5 V6 and was a factory locker. I just hope the guy on the other end of the phone line was as confident as he said he was. I knew about the different size thirds 8inch? vs 9.5, again, i hope he was right.

I called them today and my order has not yet shipped, so i wanted to have them confirm that it was a locker not a limited slip. He is supposed to call me back to confirm it is a locker, with the air line going into the third. we will see what they say.

To the axleshaft issue....

Down in the Oz much like up here it seems the montero's are much more popular and thats where most information comes from. I emailed a gentlemen via the link in my previous post and he told me that the Montero's do in fact use a differenlt length axleshaft, but he doesn't know for sure about the sports. He gave me the name of another gentlemen who might have some more insight.

ARB uses one common locker part number for both sports and montero's for the 3.5 V6 but makes no mention of axleshaft variations, for whats its worth anyway.


The running boards were removed last night, exactly 10000% better looking now.

Mike
 
Last edited:

shmabs

Explorer
No go

So the parts yard finally got me pictures of the third, and it clearly wasn't a locker, but a limited slip instead. It seems as though most yards are using the words locking/locker and limited slip interchangably

I can still probably get 94 SR axle for 350, then just swap my 4.90 gears onto it. Plus i would have the correct length axle shaft to boot. Currently that is looking like my only non arb option and still probably do-able at a reasonable price.

Mike
 

mires

Adventurer
A little off topic at this point, but your rear seats do fold all the way down to lay flat. You just have to flip the bottom seat cushion forward first. It's actually quite roomy back there.
 

shmabs

Explorer
cargo area

Mires,

Thats how i folded the seats but i still have the ridge there. Its a little strange to me because i test drove an 03 that had some sort of false floor storage system and the cargo area was completely flat. And i found a 97 2wd montero sport rally edition that had the same cargo/floor contraption.


Mike
 

mires

Adventurer
Mires,

Thats how i folded the seats but i still have the ridge there. Its a little strange to me because i test drove an 03 that had some sort of false floor storage system and the cargo area was completely flat. And i found a 97 2wd montero sport rally edition that had the same cargo/floor contraption.


Mike

Does yours not have the false floor in the rear with the storage compartments? Is there any way you can take some pics?
 

shmabs

Explorer
Floor

mine does not have the floor storage system, i will try to get some pics up. i wonder if one could be retrofitted?


Mike
 

shmabs

Explorer
Locker Update

To add some tech:

I finally got around to tearing apart the 94 SR rear axle, and putting the third member into my housing. When fitting up the shafts (original 01 MS shafts, not the ones from the 94SR) i found that the passenger side went in no problem and seemed to have full spline engagement.
The driver's side however was another story! When i pushed it all the way in, and gently bottomed it out on the differential i still had about 12 MM of axle shaft extending out. I removed the shaft and thought about my options for a while:

1. cut the shaft down and run it: the problem i have with this is a pretty substantial loss in spline engagement, and therefor strength. There also isn't enough material to roll new splines and retain full spline engagement.

2. Swap backing plates and utilize the 94SR axle shaft: The problem with solution this lies in the ABS sensors, the ABS Sensors (tone ring) on my 01 MS are inboard of the axle bearing, while the 94 has a much larger tone ring outboard of the bearings, almost in the emergency brake cavity. I looked at pressing my tone ring onto the 94SR shaft but found that the tone ring rides on a larger OD surface and would not easily be fitted to the SR shaft, as the SR shaft lacked this larger OD. Even if i had found a way to center the tone ring on the SR shaft, my seal surface on the axle shaft would be barely contacting the seal inside my axle tube. The seal location differs from 01 MS axle shaft to 94SR shaft due to the location of the ABS tone rings.

3. Use the 94 SR backing plate and Driver side shaft: The problem i encountered with this lies within the ABS again. I compared the plug side of the ABS sensors and found that the 94SR and 01MS are virtually the same, which made me believe that i could utilize the 94SR abs sensor, tone ring and shaft. However the 94SR tone ring is substantially larger and has a much higher tooth count, im not entirely well read on how the ABS system works but i believe that the difference in tone rings from right to left, or front to back could cause some strange braking situations during a panic stop scenario. As i understand ABS system, the differential speeds in comparitive tone rings is what triggers the ABS computer indicating a lock up or near lockup scenario.

4. Swap entire housings: despite looking virtually the same, dimensionally they are different.

Im not yet willing to lose ABS on this rig, as its my wife's daily driver, as of now i am thinking i will return the SR axle to the yard and end up biting the bullet on an ARB. I'm slowly talking myself into this based on the fact that it will be a NEW part, and one that is much easier to source parts for the the factory mitsu locker.

Is there some easy solution im over looking? And if anyone needs any clarification i will do my best, unfortunately i did not take any pictures.


Mike
 

shmabs

Explorer
Justice

The "locker" ended up being a limited slip, i was waiting on pictures and when i finally got them it was quite clear it wasn't a locker. After that i ened up purchasing the SR rear axle.


Now its just a matter of finding an ARB RD154.....


Mike
 

shmabs

Explorer
Update

Well my brother has been on my *** to get this thing ready for a moab trip in october....i guess it worked. I have begun building and acquring things little by little.

I started on my rock sliders, got the main tubes cut out, angled and capped. Also got all the support tubes cut to the appropriate angles and lengths. All frame scab plates have been cut as well, i started to weld them on this evening but was cut short. Ironically its easier for me to TIG them on at work, versus the borrowed 212 Miller Mig i was trying to use tonight at home. Apparently its been a while since i vertically MIG welded, because the one inch bead i laid down tonight sucked.

I picked up some used 285/75/16 toyo open country MT's locally. Certainly not my first choice in rubber but they were cheap enough and will fit the bill for fun tires while i keep the stock wheel and tire setup on there for daily driver duty. I still need to procure some wheels for them, im thinking some factory 16inch alloys will fit the bill.

OME medium duty rear springs and an ARB air locker was purchased from kurt and cruiser outfitters, who by the way was awesome to deal with and had the best price by far.

When i get further on the rocker assembly i will get some pics up, thats it for now


Mike
 

shmabs

Explorer
Electrical upgrades

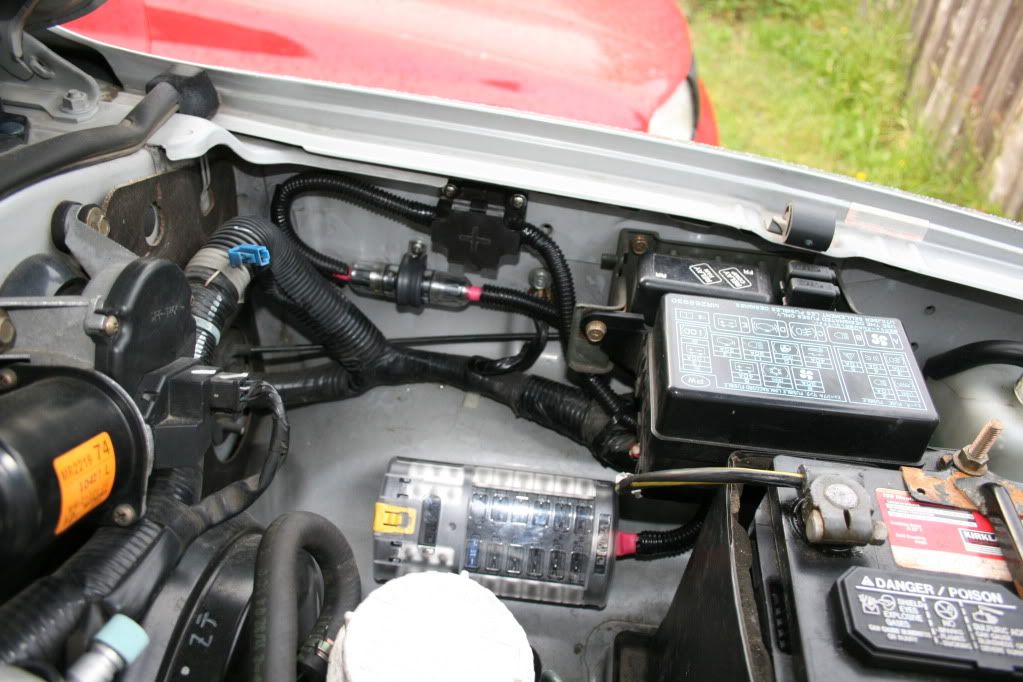
I knew i wanted a good quality aux fuse box for this build, after searching around my local area i found the blue sea systems 12 circuit negative bus unit at a local marine store. Being that it was the only one they had in stock, and for a good price, i grabbed it. Originally i wasn't planning on using a negative bus bar fuse box, but after some thought, i think i will like it. If i choose to run my power and ground back to one spot it will make the initial wiring slightly more difficult, but trouble shooting will be a breeze.
I also wanted a high capacity, yet small size 100 amp fuse for the whole box itself (blue sea recommends a 125 amp max) I found the mini ANL style fuses and holder and a local stereo shop. While changing the fuse wont be a 30 second task, i like small size of it, and ease of mounting.
The small black power box is something i removed from a mid 90's gm pickup. I liked the idea of a separate power tap, it made the install a lot easier, and future maintenance/fuse changes easier. With another slightly longer bolt i could add another high amp connection.
All wiring is 4 guage, crimped and heat shrunk. For the main power i tapped directly off of the battery. The whole idea is to have a minimum amount of cables running off of the positive lead, hence the additional power point and fuse box itself. Currently there are the factory two, and my one additional. Marine/HD style terminals are in my future for sure.

IMG_4441.jpg


IMG_4440.jpg
 

dsrtdcab

Adventurer
Looking good brother!

I knew i wanted a good quality aux fuse box for this build, after searching around my local area i found the blue sea systems 12 circuit negative bus unit at a local marine store. Being that it was the only one they had in stock, and for a good price, i grabbed it. Originally i wasn't planning on using a negative bus bar fuse box, but after some thought, i think i will like it. If i choose to run my power and ground back to one spot it will make the initial wiring slightly more difficult, but trouble shooting will be a breeze.
I also wanted a high capacity, yet small size 100 amp fuse for the whole box itself (blue sea recommends a 125 amp max) I found the mini ANL style fuses and holder and a local stereo shop. While changing the fuse wont be a 30 second task, i like small size of it, and ease of mounting.
The small black power box is something i removed from a mid 90's gm pickup. I liked the idea of a separate power tap, it made the install a lot easier, and future maintenance/fuse changes easier. With another slightly longer bolt i could add another high amp connection.
All wiring is 4 guage, crimped and heat shrunk. For the main power i tapped directly off of the battery. The whole idea is to have a minimum amount of cables running off of the positive lead, hence the additional power point and fuse box itself. Currently there are the factory two, and my one additional. Marine/HD style terminals are in my future for sure.

IMG_4441.jpg


IMG_4440.jpg
 

shmabs

Explorer
Springs and stuff

Progress has been slow, therefore so are the updates. I did however just finish install my OME 911 coils springs. Install was very straightforward; swaybar and shocks were disconnected and the axle was carefully lowered until the new springs could slip into place. After much research i ended up putting the "A" spring on the drivers side. The "A" spring was just slightly taller when comparing the two. The lift came out to 1.5 inches per side, with the drivers side being a quarter inch taller than the passenger side, which was the same as the stock springs. I haven't drove it yet (stuck at work) but look forward to a slightly stiffer rear end.

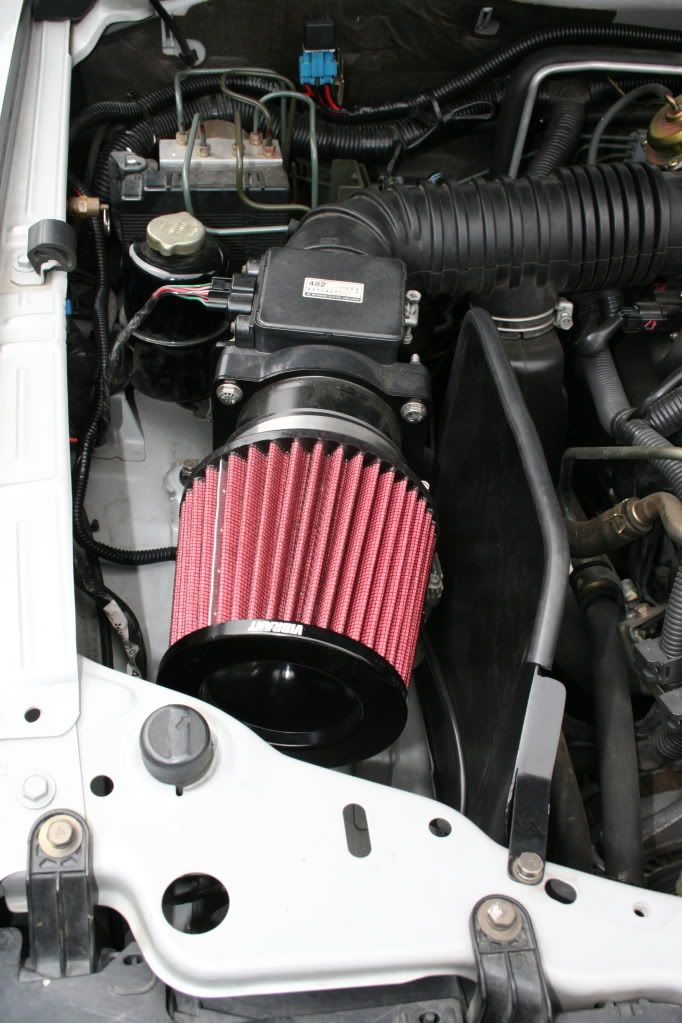
I also got my simple intake built to make room for the compressor which will eventually run my ARB. I dont have any good pics yet, but it a pretty simple MAF adapter, a Vibrant Air filter and heat shield. The compressor, and eventually pressure accumulator for the system will live beneath the air filter, which was the whole reason for ditching the stock airbox in the first place. Feels good to make progress, even if its very minor.


Mike

Edit: and the battery hold down has since been media blasted and painted, the above pictures were very inspirational in getting that done.
 

shmabs

Explorer
Electrical and Air Upgrades

I have been plugging away at some projects lately. Mainly concerning the on board air system, plumbing it properly and having the electrical system up to the task of running it. Everyone loves pictures.....

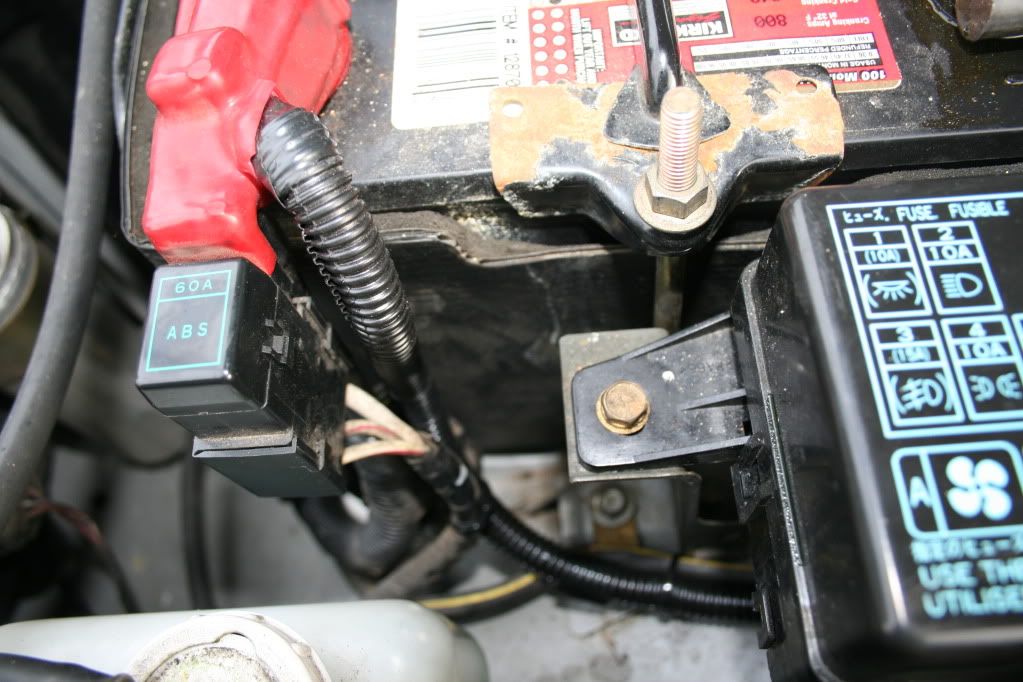
First is a simple stainless steel bar i made when i upgraded to the marine style battery terminals. I simple peice of .125 flat bar and some .250 SS bolts cut off and welded to the bar. I originally had it mounted stud side up, but it was a little too close to the hood for my comfort. Luckily it worked well flipped over. Also the neg terminal was upgraded.
DSC_0003.jpg


Here is shot of the fuse box doing its thing, i installed a blue sea systems power post next to the box. This will be used provide the power for the relay "triggers". You can also see were i ran the wires for the switches throught the firewall.
DSC_0004.jpg


Speaking of switches, here are the two that i ran into the overhead console. They live in the garage door opener space, as it is the only compartment in the overhead console i dont use. One is used to control the compressor, the other is blank for now. I ran wires for both switches behind the headliner down the a pillar and out through the firewall.
DSC_0002.jpg

DSC_0001.jpg


I thought long and hard about where and how to mount the relays, i knew i would be using at least two in the near future and wanted a clean solution for them. Budget is always a concern and after looking around at relay mounts i returned to my assorted electrical drawer in my vidmar. Its full of stuff i have grabbed while junkyard scrounging. Greeting me was a relay holder bracket that i removed from some older german car (im thinking BMW E28). Upon closer inspection i was elated to see that the back half of the relay sockets was easily dismanteled, allowing me to wire it as i choose and having the option of SPST, or SPDT relays. I pulled it all apart, mounted it and rewired as i needed. It got mounted on the passenger side of the firewall with some stainless 10-32 screws. (they are commonplace in my electrical upgrades underhood).
DSC_0005.jpg


here is a good shot of my compressor mounted, along with the filter/dryer. The filter/dryer is attached via some high strength adel clamps to a stainless steel flat bar mount that picks up one of the factory airbox mounting holes. I used .250 air line all around with push lock fittings. In my days working on trucks i grew quite fond of such setup.
DSC_0006.jpg


Here is a shot showing the pressure switch (on at 90 and off at 120), along with my pressure relief valve. Both are mounted with 10-32 SS machine screws and adel clamps. I dont care much for self tapping screws.
DSC_0007.jpg


And a shot showing the simple intake and heat sheild setup i had to build to make room for all this stuff.
IMG_5471.jpg


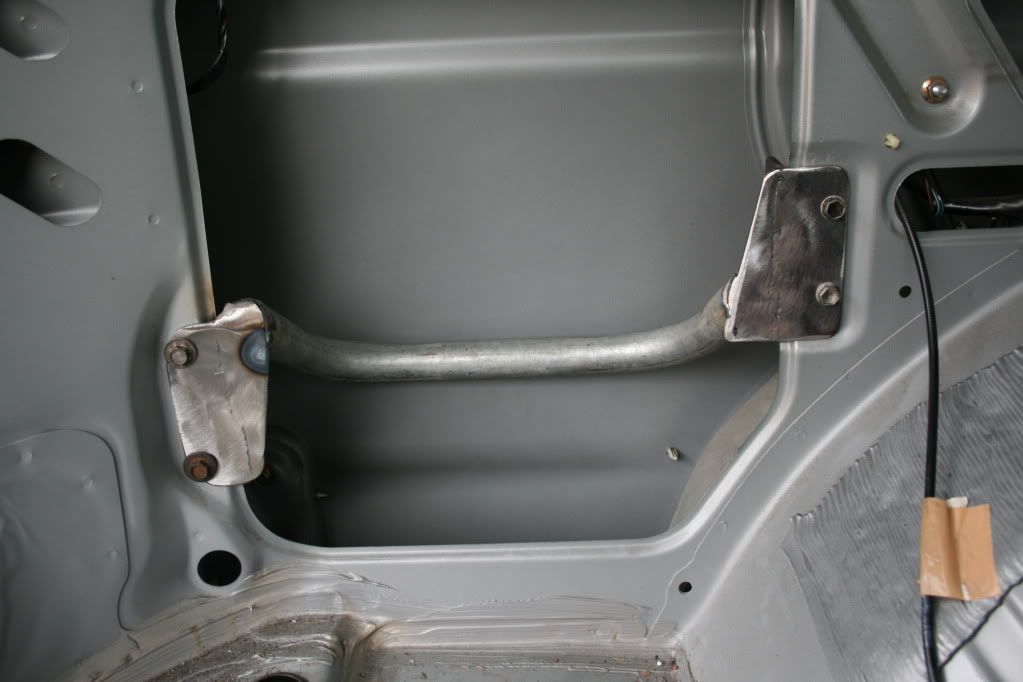
The air tank itself provided another challenge. I wanted a decent size tank, mounted somewhere unobtrusive. Again i returned to my garage after an unsucessful week of searching locally and online for the "right" tank. Sometime ago i bought a make your own soda kit a at a thrift shop becuase it had a nice 7lb aluminum tank, meant for CO2. I tend to be a bit of a scrounger/picker, which helps when operating on a budget. Im into the tank, fittings, and hose clamps for about $9. I fabbed a simple bracket to pickup four factory holes that are found behind the cubby in the trim panel. Ideally i didn't want to lose any of that cubby space, but i ended up losing the lower inch or two. Excuse the old crappy hardware, it was only used for mockup. You can also see the ARB solenoid in the top right corner. I still have to plumb from there to the locker itself, im still not sure if im going to use that solenoid.
IMG_5344.jpg

IMG_5432.jpg


Still lots to do and time doesn't seem to be slowing down.

Mike
 
Last edited:

Forum statistics

Threads
189,619
Messages
2,918,961
Members
232,571
Latest member
Psyph
Top