Geared4adventure
New member
They paid me out… so it’s up to me! And I decided to bed line the entire rig so stay tuned!


Fabricated an awning lift (17") . 3D printed some ABS bushings and used extruded aluminum and gas struts.
 youtube.com
Thanks for the compliment, I think I’m one of the few that enjoy messing with 12 volt wiring.I like how your "messy wiring" is by far cleaner than everything I've ever done 👍
Can you share more details on your awning lift? Pics would be great.


Tried outa new diesel heater for the tent installed a stove jack in the new awning and BAM 17 degrees of no problem later lol
Sent from my iPhone using Tapatalk Pro
I dig your awning and stove setup. I would like to do what you’ve done and add a stove jack to my awning room. I just haven’t figured out the best way to do it. My awning room is square (ARB) and it attaches underneath the awning. Those little stoves are great and really put out the heat. What a great winter camping setup!
Tried outa new diesel heater for the tent installed a stove jack in the new awning and BAM 17 degrees of no problem later lol
Sent from my iPhone using Tapatalk Pro
Thanks for the compliment, I think I’m one of the few that enjoy messing with 12 volt wiring.
")
The awning lift I built is made mostly of extruded aluminum profile. It’s similar to unistrut if you are familiar with that. I used that as a building mater because I don’t know how to weld. It can be cut with a miter saw and a metal cutting blade. It has a ton of connecting options and you can easily mount things to it like handles or eye hooks for hanging things.
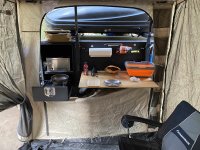
Do you happen to know the dimensions for the Engel MU40 you have pictured? I can't find any info about that model online anymore. Seems like that would be a pretty good reference for the max size to fit on the slider (you showed you could go back, and width/height is still limited by door frame).Finally managed to fit my fridge into the genny compartment. Required some surgery to the tray. Then I found out that I forgot to account for the bolts and riveted the tray to the slide. We’ll find out how well it works in a week or so. Next step, wire it properly.


Sent from my iPhone using Tapatalk
I had the MU40 in mine. Somewhere in the thread the install is.... Hrmmmm...Do you happen to know the dimensions for the Engel MU40 you have pictured? I can't find any info about that model online anymore. Seems like that would be a pretty good reference for the max size to fit on the slider (you showed you could go back, and width/height is still limited by door frame).
If memory serves me correct I had to grind a few bolts in order to make it fit perfect.