The DiscoDavis Discovery 3 Build Thread

DiscoDavis

Explorer
Spark plugs done

Finally got around to it. Was not as hard as I thought.

26944577752_4a235281b1_b.jpg


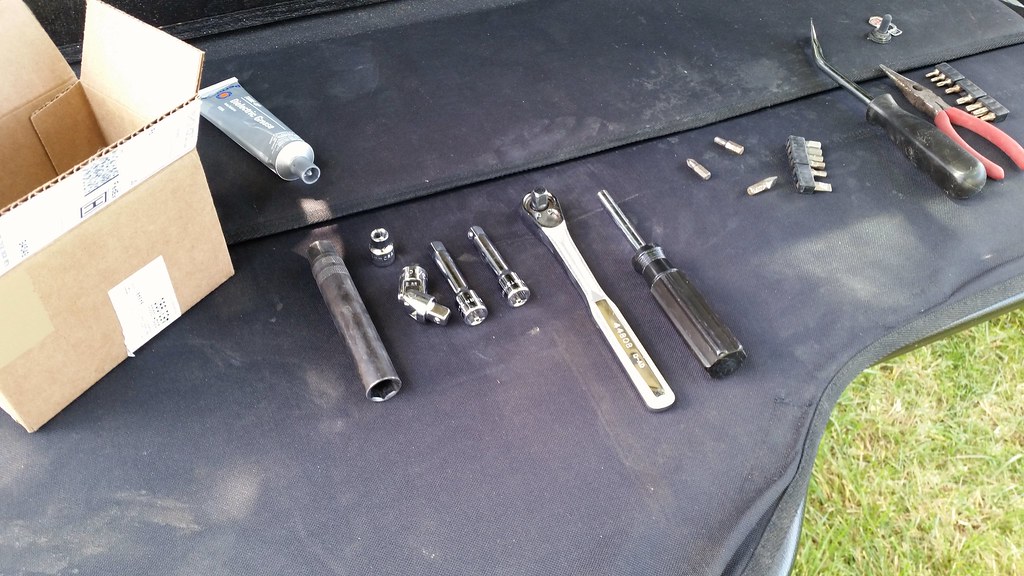
You will need: (I am adding this since it was very hard to tell based on older threads)
>3/8" drive ratchet (its a great size for the space restrictions, plus less chance of overtorque-ing)
>2x 3" extensions for 3/8 drive
>1 swivel joint for 3/8 drive
>1 8mm socket 3/8 drive (for coil pack bolt)
>1 spark plug socket (I borrowed this so I have yet to find specs on it, but it was the absolute perfect socket for this engine)

EDIT: this is from a later post, see below
Socket dimensions are:

3/4" overall diameter
5 1/8" overall length
5/8" plug size
3/8" drive


>1 screwdriver or multiple screwdrivers
>>>1 phillips for the airbox lid screws
>>>1 large flathead for the hose clamps around induction tubing (large tubes between throttle body and MAF)
>>>1 T25 torx for the PCV that sits on the passenger side, under the MAF, above the ignition covers
>Maybe 1 panel popper (always handy)
>Dielectric grease (optional, but I filled every plug when I put the coil packs back in)
>A torque wrench, I believe it was 6ftlbs for the coil pack bolts, 18 for the plugs

27038954115_669ed5f92d_b.jpg


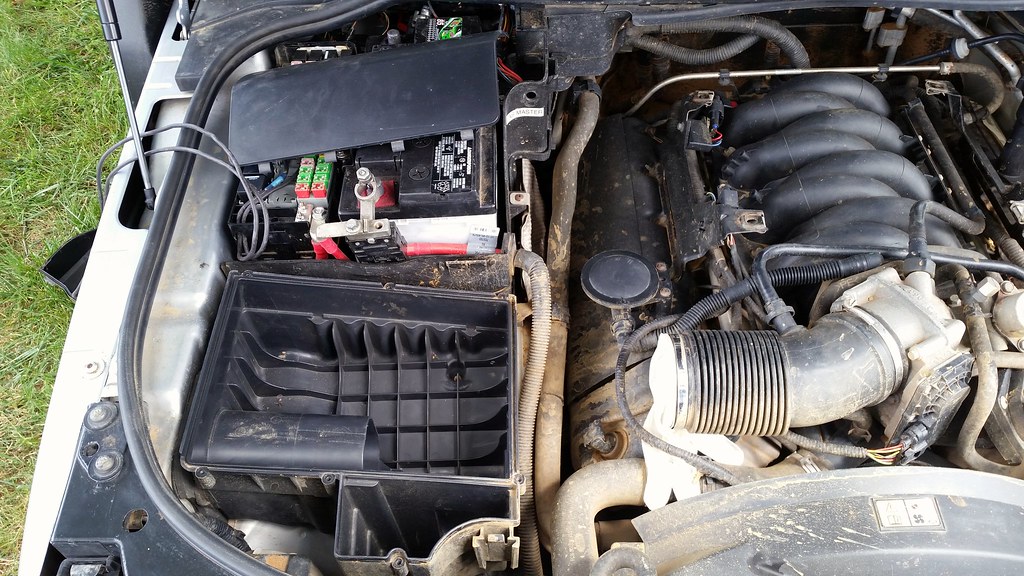
You'll wan't to remove the airbox lid and tubing to get access to the passenger side stuff

27038906465_bbb4353727_b.jpg


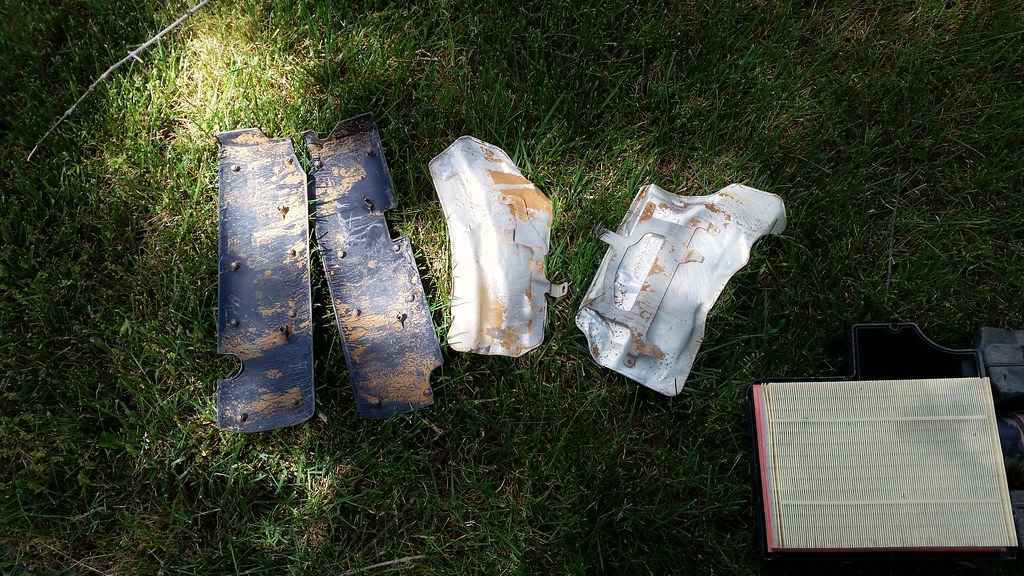
These are the ignition covers (rectangular plastic panels) that cover the coil packs and wiring, they just pop off (two fasteners in middle of each), and the head shielding from either side. The heat shielding can be easily removed, they are secured with one phillips screw each

26433209034_c70718b4be_b.jpg


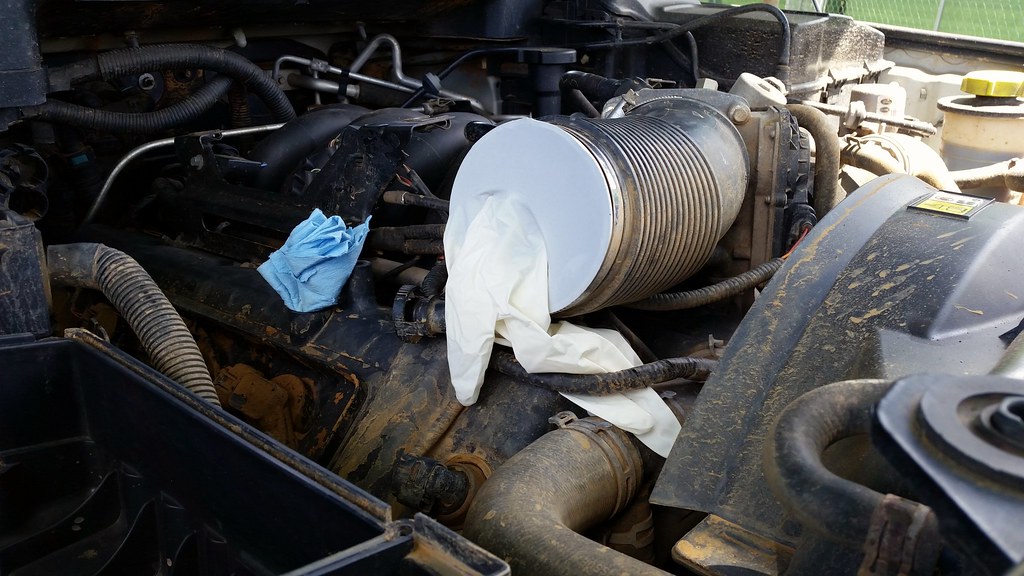
If you're not in a clean environment maybe put a rag in the exposed opening, or a glove whatever. I'm not your supervisor ;)

26764400860_519e55bcaf_b.jpg


Couple things here. 1) yes I see how filthy everything is. That is why you try to avoid using the expensive disco in the mud like an idiot :). 2) Remove the PCV and plug the hole with a rag. You don't want crud in there. 3) everything washed down fine, relax.

I took a water bottle, poked a hole in the lid and used mild pressure to wash down the area, and then let dry before I worked

4) you may want to unclamp the heater lines that run on the passenger side, just so they can be pushed one way or the other, makes access a little easier, but not really absolutely necessary because you have a swivel socket thing :)

27005405866_4a59c11967_b.jpg


Drivers's side. You can see the oil fill tube can be an issue once you get closer to the firewall. You can either leave it in place or remove it and plug the hole like the PCV. I left it. Again, dirty...

26970226681_ace9697380_b.jpg


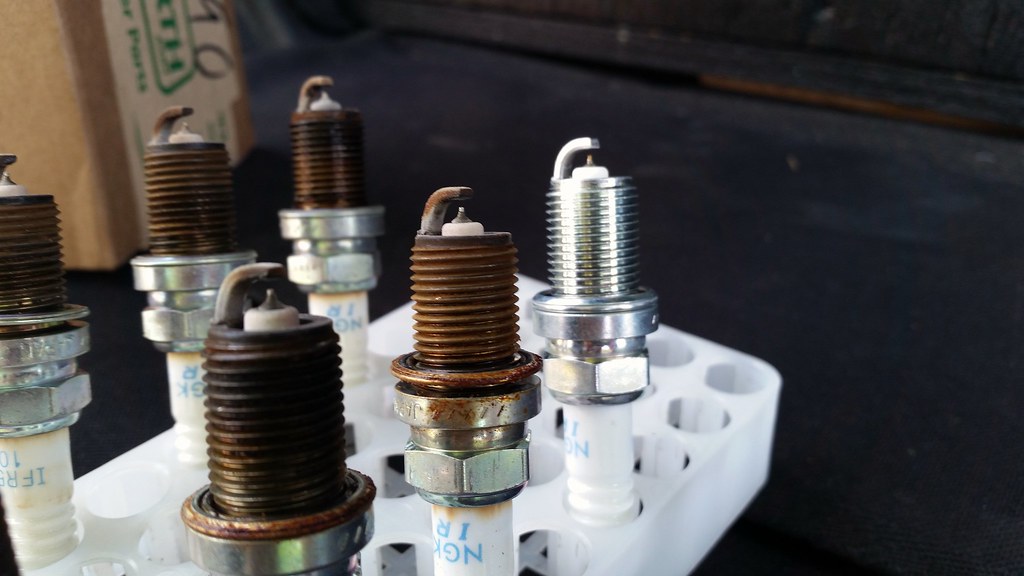
Here's the first plug I pulled out.
>Remove the 8mm bolt, set aside.
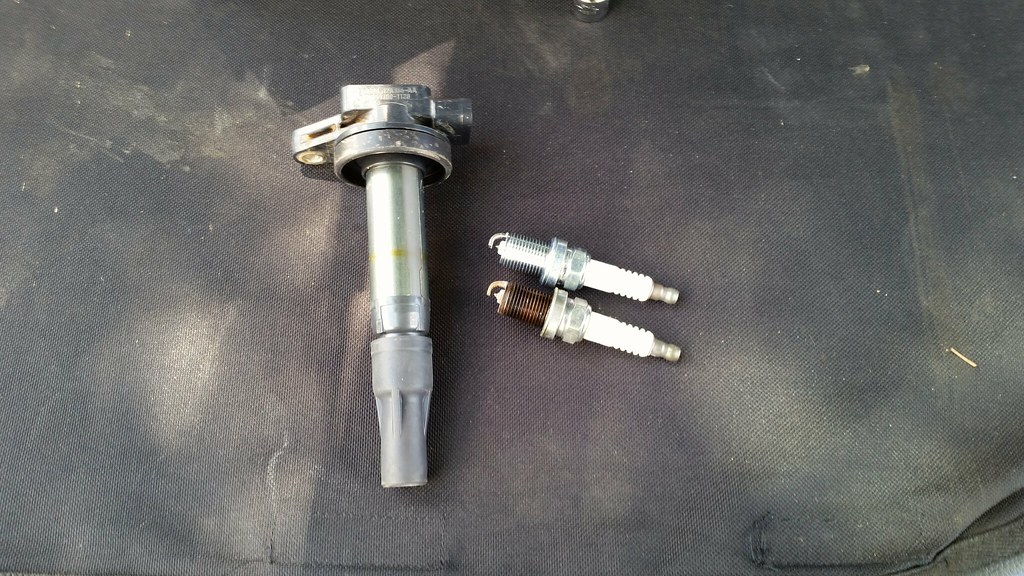
>Wiggle the coil pack free (carefully).
>Unplug the coil pack.
>Check for debris around the coil pack seal and the new exposed hole you just opened. Clean if necessary
>Insert spark plug socket. Add extensions and swivel where necessary (not usually necessary).
>Remove spark plug with even force, carefully.

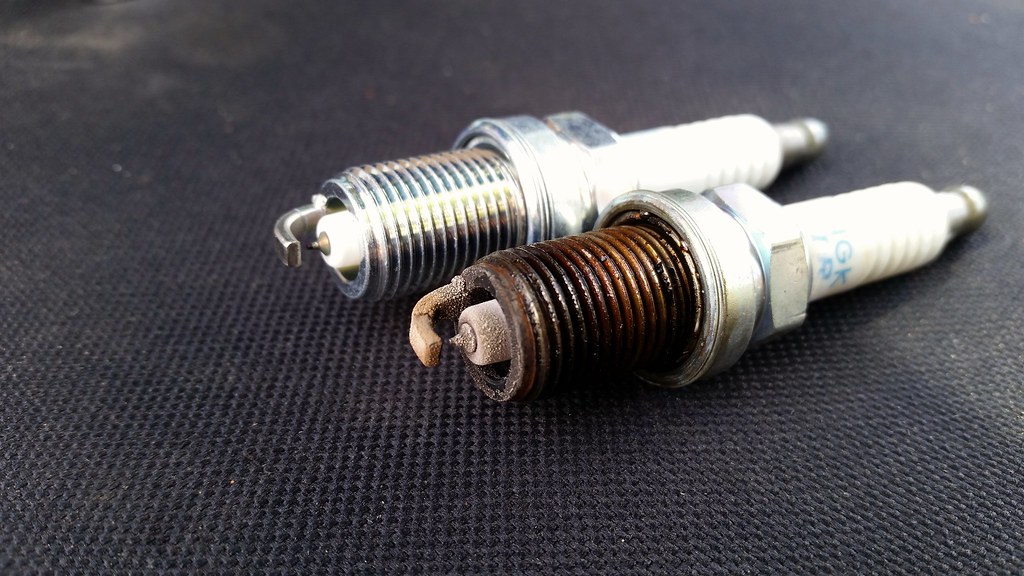
My first one was Passenger side, first towards engine bay, then worked back to firewall. It appears I have a small valve cover leak. Most of the plugs were stiff in breaking loose, but came out okay, not quite hand-removal but the threads were fine coming out.

26435150283_dfa2d61427_b.jpg


I thought the coil packs were pretty neat, very plug and play sort of thing. All were labeled FoMoCo :)

27038966615_640dd6bc45_b.jpg


Anyway,
>put new spark plug in, hand thread to tight, then torque down

Note In some older threads, mention was made to anti-seize on the spark plug threads. This is NOT to be done on these plugs with this block. NGK put out some TSB a while back stating that the silver metal coating on the threads was meant to act as the lubricant, and if anti-seize is used, it messes up the torque value of the plug. Only if a plug is removed and put back then anti-seize can be used.

View attachment NGKSP-0907-1-Anti-SeizeonSparkPlugs.pdf

>Put coil pack in, apply dielectric grease to plug (optional)
>Connect coil pack plug
>insert bolt and tighten to 6 ftlbs, (I tightened to hand-tight)

ADDENDUM: MONTHS LATER, spark plugs were pulled and I found they had not remained tight enough, you may want to double check later, OR use a little bit more torque when fitting.


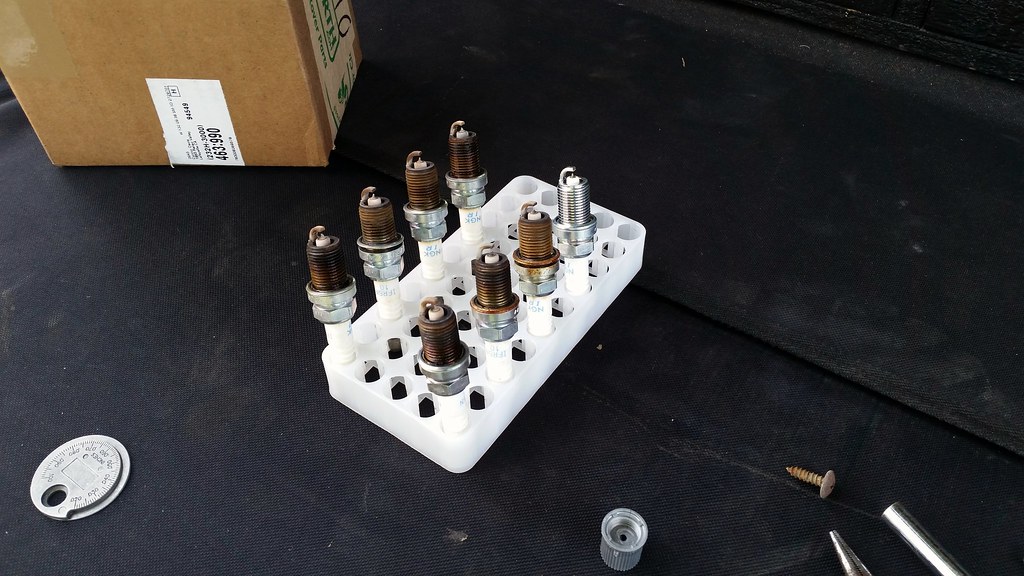
All cleaned up and put back together

26433246524_0eff5fd105_b.jpg


Last new plug to go in vs every other plug that came out of the engine.

26435172093_65b98f1792_b.jpg
 
Last edited:

DiscoDavis

Explorer
Also please let me know if the larger photos make pages like this way too slow to load. I am on the fence about medium resolution photos versus the larger ones if nobody can load the page to read anything, I'll go back to the medium size.
 
Looks like an even burn on each plug/cylinder. By the looks of the ceramic it was a great time to replace them. I need to track down that plug socket you have, looks like a great piece to keep in the tool kit specific to the Landy.
 
Last edited:

perkj

Explorer
DiscoDavis said:
>1 spark plug socket (I borrowed this so I have yet to find specs on it, but it was the absolute perfect socket for this engine)

I need to track down that plug socket you have, looks like a great piece to keep in the tool kit specific to the Landy.

Looks to be pretty close to one of these two here:
http://www.amazon.com/CTA-Tools-237...20134&sr=8-10&keywords=spark+plug+socket+deep
or
http://www.amazon.com/OEMTOOLS-Tool...519816&sr=8-9&keywords=spark+plug+socket+deep

@DiscoDavis - can you measure the one you have and compare it to the measurements of these socket stated in the Question section on the amazon links above to see if they are comparable?


Here is a broader Amazon search for deep/extra long spark plug sockets: http://www.amazon.com/s/ref=nb_sb_noss_1?url=search-alias=aps&field-keywords=spark+plug+socket+deep
 
Last edited:

DiscoDavis

Explorer
Socket dimensions are:

3/4" overall diameter
5 1/8" overall length
5/8" plug size
3/8" drive

it appears to correspond more closely to the first link you posted, but I will be asking the fellow I borrowed it from where he obtained it.

Hope this helps
 

DiscoDavis

Explorer
Update: New front diff :)

27160599830_ff6fb6980c_b.jpg


First, I did not do the swap, this was Colin's doing at CT Motorwerks in Walnut Creek, California. Photo is of original diff sitting in the sink at the shop when I picked the truck up after work. He took a few photos during the swap, so you'll see those at some point ;). Thanks again to Colin for doing all the hard stuff.

27160601230_81e129855b_b.jpg


Second, thank you Todd (Unseenone) for getting me a diff for a fair price. I am back to driving the landy so I will report back on how the new unit is, but so far so good. Todd is a phone call away, and I had a diff at the shop within a few days. Swell guy to deal with. Note: the refurb unit did not come with the seal for the diff/extension tube connection, so have one ready or very carefully reuse the old one.

To recap, when I purchased the truck, the front diff was noted as bad, but I changed fluid and drove another 30,000 miles. It got new clean fluid twice and new plugs, plus I hit it with a temp gun every once in a while after the commute to work. My diff temps were around 157 F, shouldn't get much hotter than that. I got my hands on one of those bearings and seals kits, but as Todd has noted in other threads, these are useless without a crush sleeve for the pinion, unless you only do the carrier bearings. The final diagnosis on the front diff was a bad pinion bearing, so it needed a complete swap or a crush sleeve plus the bearing kit. In the interest of keeping my work truck working we went with a swap. For those that have bearing kits, be aware you'll need a crush sleeve or maybe a diff shop can use shims instead if they're good. Otherwise the bearing kits are not worth much.

26829760943_931f0e2497_b.jpg


I also let my front brakes go too long without a change. Fortunately CT did them for me, and I had rotors and pads sitting at home ready. OEM rotors and Akebono pads are what went on. The old rusty bits left quite the mess on the shop floor, wish I got a photo of that.

More in the works, a few more things due to show up Monday...

Melville-and-Moon-Logo.jpg
 
Last edited:

A.J.M

Explorer
If they are as good as I think.
I'll be putting in an order for a set next month for my birthday gift to myself.
Alongside a possible Front runner slim line 2 full roof rack.
 

Forum statistics

Threads
185,981
Messages
2,880,490
Members
225,705
Latest member
Smudge12
Top