How to /manually/ process digital HDR?

neliconcept

Spirit Overland
to better explain, I masked certain sections of the sky, the lights (smalllll mask i mean smallll) to bring them out and enhance from the lightned layer, masked the dark areas with the darkened to bring out the shadows and darken those

its quite a bit the same as using a curve layer but without enhancing the noisyness that curves can do, and curves does the entire picture, I did sections to maintain a look I was going for.

photomatix however is a good program and will do what you need to with a lot of control

it is 99 dollars though
 

Lost Canadian

Expedition Leader
just about everybody get this wrong

I understand your point, but I don't see how what I said was wrong, you can still tone map HDR`s, no? I just like them when they are pushed, tone mapped if you will, to the edge. Like Slade pointed to, most, but not all, moderate HDR's that try to look natural, fail. It's those I don't like.

Ben Willmore is someone else I like who does HDR well.
 

Robthebrit

Explorer
OK, so any insight into how it does this.

Example: let's assume a 3-picture, 3-channel RGB arbitrary depth image at a meager 320x240 pixels. Each pixel in this configuration (let's say) has a red, green, and blue value of any fraction between 0.0 and 1.0. An overexposed image will have these values of all pixels at let's say 0.7 and above; and unexposed 0.3 and below and the "normal" exposure of roughly 0.3 - 0.7. As one iterates across the 76,800 pixels or 230,400 values, how does a program know to use the high value vs. the low value. If you just add them together you get basically white (1.0,1.0,1.0) or pretty close to it. If you assign a high or low threshold value the overexposed or underexposed image always wins.

My thinking is that there is some quantization level between the distinct color values and those with the highest deviation win? Or is it a matrix (dither style) calculation to compare adjacent pixels or channels?

I just dunno. I mean, I get the concept of the projected final, but I just don't know how it is implemented even at the most basic level.

If you are using jpegs the first thing you need to do is remove the srgb gamma correction to get an image which is in linear light space. This is important for any image processing as math doesn't work as expected in srgb. A close approximation is raise the value of the srgb pixel channels to 2.2 (gamma of 2.2 see http://en.wikipedia.org/wiki/SRGB).


Paul Debevec is the guy who started all of this about 10 years ago, his paper is fairly easy to follow and he explains it much better than I ever could, here is his paper:

http://www.debevec.org/Research/HDR/debevec-siggraph97.pdf


The thing to consider is whether you want an HDR photograph or an HDR image. The HDR photographs like the ones shown in this post are ultimately a standard LDR image which have features taken from various exposures. A true HDR image has a mathematical representation which can handle values outside of the range 0.0 to 1.0 and by default you don't get those wonderful results you see in a HDR photograph. HDR tone mapping is what gives the cool results an HDR image is simply a high bit depth image which allows computes to process images as light without hitting the limits of numerical accuracy (which is terrible for something like a jpeg).

For example if you have a floating point image you have pixels with pretty much any value but what is white? Most people use 1.0 for white and 0.0 for black but then what have you gained over an LDR image? Without any form of tone mapping, if you simply convert the HDR image to LDR the pixels that are over 1.0 in the HDR representation get clamped when writing out the LDR.

One thing you have gained is the ability to mathematically process an image without it clamping or loosing too much precision. For example, if you have a normally exposed jpeg photograph that contains the sun. All the pixels in the sun will be 1.0 because they clamped but if you could expose them you'd get values in the thousands, maybe millions.

If you take the original LDR jpeg and drop it by 1 stop you mathematically divide it by 2. All the pixels become half as bright but this includes the pixels in the sun too and 1.0 becomes 0.5 which is wrong, if you underexposed by 1 stop on a real camera the sun would still be white. The problem is information about the true value of the sun pixels has been lost because everything was clamped to the numerical range of the LDR image. In the full HDR version of the sun scene if you divided it by 2.0 the sun pixels would still be out of the 0.0 to 1.0 range of the final LDR image but would clamp to 1.0 when converted - this matches what the real camera did.

You would have to drop it by 10 stops to get the sun exposed by which point everything else would be really dark, but it would not be black, the result is only black because it's typically quantized when stored. If the original image had a pixel value of 0.25, 10 stops down means divide by 1024 so the original pixel with a value of 0.25 becomes 0.00024. If you converted this image to an 8 bit LDR image this pixel would be black (the smallest representable value in an 8bit image is 1/256 or 0.003).

HDR images were created to allow computers to process images in much the same way as a camera does, all HDR is really doing is trying to store real world irradiance. What I described about is called sliding window tone mapping and its exactly what you are doing when you intentionally underexpose or overexpose with a real camera. You are basically picking the range you want to be visible in the final LDR image.

What I am trying to say is deriving an HDR image from a set of LDR images is really easy. How you process/tone map that HDR image to being out the various exposures is alot more difficult to do automatically.

Remember when you have done processing you need to convert back to sRGB before you convert to LDR.

CG is pretty much what I do for work and and I work with linear light HDR images, so email me if you want info. I can at least forward you to hundreds of web sites and various research papers.

Rob
 

Rob O

Adventurer
just about everybody get this wrong

HDR and tonemapping are not the same thing. Tone mapped images have the cartoonish effect or have a flat lighting effect to them.

Tone mapping is a required process to resolve images such that they can be viewed properly on a monitor/display; they needn't look cartoonish simply because of tone mapping ... although many end up that way. The biggest problem with HDR is that too many people don't know how to do it properly, regardless of the desired effect (style, realism, etc) and you get a lot of crap.

a really good HDR will really just bring colors and a bit more light and shadow out but not overly done. To get this you really need to do it manually.

I think this is highly subjective. I've done a number of HDRs with the intent of looking natural -- i.e., aimed at simply preserving detail at each end of the range -- and others where the effects of using HDR and tone mapping result in an effect that works well with the image, be it pushing colors and saturation from realistic to stylistic or creating something that's, well, what you might call cartoonish. ;-)

Photomatix and other programs do it for you, make sure you are not taking a single raw file and just upping the EV +2 or -2, not a true HDR

FWIW, I use Photomatix and DPHDR (Dynamic Photo HDR) and both work quite well with true HDR; agree that single RAW HDR (aka DRI, or dynamic range increase) works better with manual blending in Photoshop.

set your camera to EV bracketing and you should be fine with 3-5 exposures, sometimes even 2 exposures.

an HDR i did that was not overly done, manually to

n85500505_30622430_778.jpg

^^^^^ Nice shot. Not sure I see the HDR effect though (i.e., benefit of blended multiple exposures), other than the highlights aren't clipped.

I do quite a bit of HDR, DRI and digital blend images. I'll admit being highly proficient at PS, which makes it "easier" than someone just starting out. All of my true HDRs are HDR processed and tone mapped in either Photomatix or DPHDR then final post done in CS3.

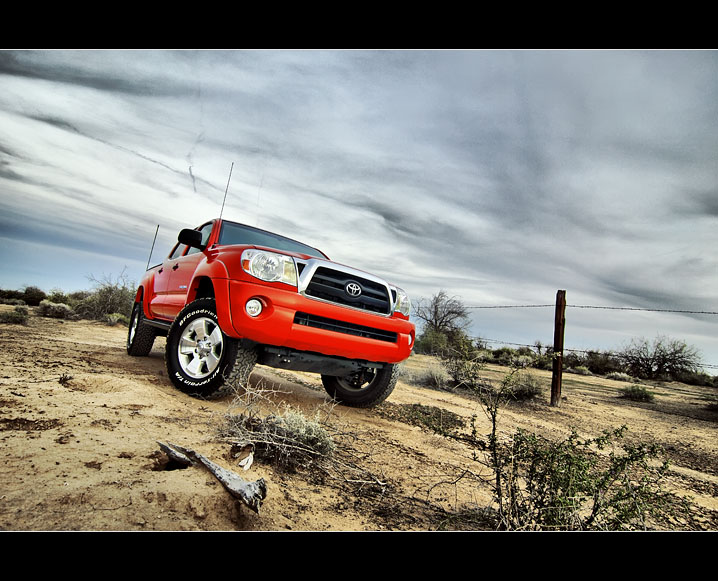
Here's a 6-exposure HDR (-2EV to +3EV), processed and tone mapped in dphdr (Human Eye mode) with final processing in CS3, followed by a 3-exposure version of the same shot blended manually in PS CS3 using masks and selective editing (3 of the 7 exposures used). Saturation in the HDR software version is pushed intentionally and, IMO, works better than my more "realistic", manually blended iteration.

EXIF: f/16, ISO 200, shutter speeds between 2.5sec and 30sec


_MG_3007_08_09_blend.jpg


Here's a 3 exposure HDR (+/- 2EV) processed and tone mapped in dphdr with final processing in PS CS3. The look is what I was going for, so it's intentional and not a result of goofy HDR processing.


This is a digital blend of 3 exposures done manually (masks) in CS3; a main exposure with passing light rail overhead, another for the light under the light rail bridge and a third for the silky smooth water. It falls under the broad definition of HDR, in that a single exposure couldn't resolve proper detail and contrast across the range, but isn't true HDR IMO (in a processing sense).


This is a DRI (dynamic range increase) using a single RAW exposure processed 3 times (baseline exposure then another each for shadow and highlight details) then manually blended in PS CS3 for a final exposure. The "straight from the camera" version follows it.


2918053811_5e4dab45e8_o.jpg


This is a 3-exposure HDR to ensure wide tonal range (mostly to retain shadow detail). RAW files were converted to TIFs in ACR (only tweak being consistent WB), HDR blended and tone mapped in dpHDR, then back to CS3 for final post processing.

B&W conversion was done using a number of adjustment layers including B&W, Saturation, and Curves. I did not employ Gorman's technique, although it does have a bit of that feel (very high contrast, with dark darks and bright brights). This one was actually done entirely in RGB mode, not LAB with High Pass as it might appear. Finished with localized dodge/burn.

Note: Depending on the quality/calibration of your LCD this might look a bit dark, with muddy shadows and contrast creating slightly "hot" highlights. If your display can resolve a wide tonal range then you should see good detail in the shadows and no clipping.


I don't want to hear about any pre-made software here, I'm curious as to the algorithm in order to combine multiple various-exposed pictures together to yield an HDR image.

Can anyone speak to the basic processing under the scenes?

I have been playing around with logically adding, subtracting, multiplying each associated pixel (color inclusive of course) values but it does not render as I would expect. e.g. you can not simply add (or subtract) RGB values from each picture as the results are a whitening (or resembling the over-exposed).

Thanks!!!

Oh, and sorry Scott ... can't answer your original query, although it looks like Rob (thebrit) did a great job. :D
 
Last edited:

Pskhaat

2005 Expedition Trophy Champion
See people this is why you pay people much better than I at this stuff,

Here is my first Pskhaat algorithmic attempt which basically interprets the deviation of the color channels and chooses the highest deviation across a 3x3 matrix. Now I need to go read how the pros do it:

-2EV:
DSC00222.JPG

0EV:
DSC00223.JPG

+2EV:
DSC00224.JPG

1st attempt:
f.jpeg
 
Last edited:

Pskhaat

2005 Expedition Trophy Champion
Thanks for the links, will be reading much.

0EV:
DSC00223.JPG

2nd linear attempt
avg.jpeg

3rd attempt with RMS:
avg2.jpeg
 
Last edited:

Pskhaat

2005 Expedition Trophy Champion
Thanks Robthebrit, I like to work in arbitrary bit-depth images so I'm not limited to 8-bit channels nor JPEG, but I am using these as a basic inputs. I so hate linear algebra (too many Coors beers at Uni I guess) so I may farm out the srgb decurve and dither to another filter.
 
Last edited:

Rob O

Adventurer
Thanks for the links, will be reading much.

0EV:
DSC00223.JPG

2nd attempt (like nothing ever happened)
avg.jpeg

Wow ... marked improvement, both in comparison to the first go and between this one and it's 0EV exposure. Nice work ... and kudos for the pursuit.
 

Forum statistics

Threads
190,028
Messages
2,923,314
Members
233,266
Latest member
Clemtiger84
Top