You are using an out of date browser. It may not display this or other websites correctly.
You should upgrade or use an alternative browser.
You should upgrade or use an alternative browser.
Chasingdreams Trailer Build
- Thread starter chasingdreams
- Start date
slimpartywagon
New member
looking good man... giving me a few ideas for my build...when i fianly get to it.
Lead Dog
Observer
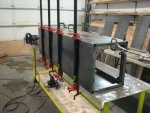
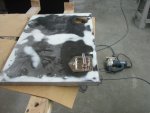
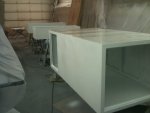
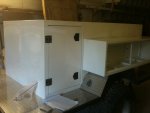
Where the two skins meet, i left a 1/16 gap. I welded it solid, then ground it down to almost flush with a grinding wheel, then finish the edge off with a high speed sanding pad (80 grit). There will still be some pits here and there, but they can be filled with icing (which is a skim coat filler). I'm doing the main box this way,.... but on the side boxes I think I am going to use seam sealer sanded out flush. I'm still thinking on that one.
Thanks for the kudos Titanpat57, much appreciated!
I'll have some more pics tomorrow,...I forgot my camera at the shop today.
That makes since.... It's all starting to come together... Your Build has made me start mine!
chasingdreams
Adventurer
Sweet!.... Post up a build thread when you get going and keep us updated on your progress:victory:
uk trailer guy
Observer
Man, this is coming on really well - my kinda up of tea. Keep up the good work!
chasingdreams
Adventurer
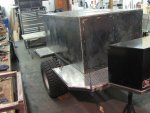
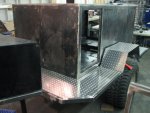
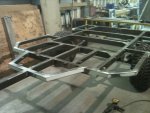
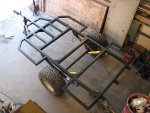
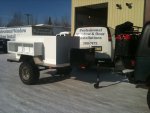
Time for a picture update..... Got the chassis painted and assembled,... still need to wire it up. My Max Coupler came in (Thanks Martin!). Working on some of the details.... body filler, T-locks, etc.
Attachments

Titanpat57
Expedition Leader
Love that frame design....clean, very substantial.
What's the paint type? Surfacing primer with a single stage? planning on spraying it yourself?
Great work...good luck!
Pat
What's the paint type? Surfacing primer with a single stage? planning on spraying it yourself?
Great work...good luck!
Pat
chasingdreams
Adventurer
Love that frame design....clean, very substantial.
What's the paint type? Surfacing primer with a single stage? planning on spraying it yourself?
Great work...good luck!
Pat
Thanks for the Kudos!..... Epoxy primer with some good ole farm implement white for the cargo boxes. Easy, cheap, durable..... The paint is cheap,... the primer makes the wallet pretty light..haha
The frame is Duplicolor bed liner paint,... It's more of a paint than bedliner material. I used it on the front bumper of my jeep and absolutely love it. It has a satin sheen and if you shoot it close and not allow for any overspray, it lays down a nice finish. If you shoot from a distance it gives you a "gritty" feel. The best part is "touch-ups". I can shoot a scratched or gouged spot with only cleaning for the prep work and it comes out like new.
Yes, I will be spraying it myself.... I may have to wait about 2 weeks to spray because I have a "paying" project comming through the shop that will create alot of sawdust. So there will be some extensive cleaning and shop prep before I shoot. Ideally you want to get the paint onto the epoxy primer within 24 hrs, so i need to make sure i can set aside the time to get it done from start to finish.
chasingdreams
Adventurer
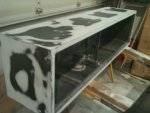
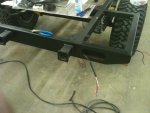
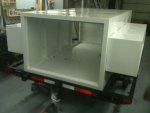
Was able to free up my shop again for more important things (My trailer haha).... Spent a good portion of Friday with one of my guys cleaning the shop up to make it as dust free as possible. I let everything sit over the weekend to let any finer particles settle.
So today I shot the epoxy primer. Instead of watching the paint dry I decided to step into another bay and start working on the wiring. Tomorrow morning I will be shooting the paint.
Some pics....:wings:
So today I shot the epoxy primer. Instead of watching the paint dry I decided to step into another bay and start working on the wiring. Tomorrow morning I will be shooting the paint.
Some pics....:wings:
Attachments

chasingdreams
Adventurer
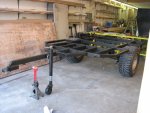
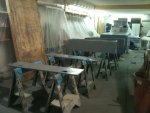
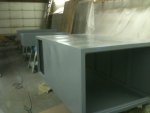
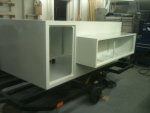
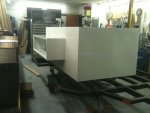
Progress pics......:wings:
Attachments
-
 Expedition Trailer 143.jpg73.5 KB · Views: 58
 -
 Expedition Trailer 145.jpg79.6 KB · Views: 56
 -
 Expedition Trailer 146.jpg80.5 KB · Views: 63
 -
 Expedition Trailer 149.jpg76.7 KB · Views: 72
 -
 Expedition Trailer 148.jpg74.5 KB · Views: 70
 -
 Expedition Trailer 147.jpg87.4 KB · Views: 60
 -
 Expedition Trailer 155.jpg86.7 KB · Views: 114
 -
 Expedition Trailer 153.jpg105.1 KB · Views: 193
Tom Foolery
Adventurer
Excellent work.
The Adam Blaster
Expedition Leader
It turned out really good!
Other than a roof that opens, that's pretty much how I want mine to end up like.
Other than a roof that opens, that's pretty much how I want mine to end up like.
Titanpat57
Expedition Leader
Very nice indeeeeed!!
How the hell did I miss this last set of pictures?...must be slippin'...
Looking great, tons of space, although we know how quick it gets filled.
Pat
How the hell did I miss this last set of pictures?...must be slippin'...
Looking great, tons of space, although we know how quick it gets filled.
Pat
The Adam Blaster
Expedition Leader
Hi Tom,.... Thank for the compliment. The springs are the same ones you used from Quadratech. "YJ fronts with the 1.5 lift"
Maybe Tom could chime in on this as well - do either of you guys have a part# from Quaratech for these springs?
I've looked a couple times and can't isolate just the springs to see the pricing...
Also, what are the dimensions of your main box?