1964 Nissan Patrol soft top restoration

RMP&O

Expedition Leader
Got a lot done these last few days. It never looks like it though... :rolleyes:

All hardware that is not being replaced for the axles has been selected, best of 4 axles worth. A fair share of that sand blasted to just remove any corrosion. A bit of it that is exterior I think I am going to paint with RB next week. All the other hardware, a huge pile, has been bagged and put away. Almost everything on the truck that gets black is now prepped for paint. Did a 6hr day of sand blasting yesterday. The only things not prepared for black paint at this point is the master cylinder body and the wiper motor housings. PTO prop shafts and related gear is all broke down, de-greased and sand blasted plus the best from two sets selected.

Any ways, here are a few pictures.

main.php

main.php

main.php


Cheers
 
Last edited:

RMP&O

Expedition Leader
Just so you know, I am following along. Thanks for sharing your build.

Thanks! Not much of an update but here goes....

Met with a machinist today. He had a beautiful shop and equipment. An older gentleman who is retired now but still does this on the side. Turns out he is only about a 10 minute drive from the shop.

Crappy cell phone pics but you get the idea...

main.php

main.php


The infamous "trunion" bushing.

main.php

main.php

main.php


I started the axle rebuilds. Doing the rear first. making a special tool to press the rear wheel bearings on the axle shafts and another to correctly tighten the wheel bearing nut down to spec. Got lot's of new hardware so moving forward and making progress! More pictures to come...

Cheers
 

RMP&O

Expedition Leader
The tool I am making for the rear axle wheel bearing nut...2" pipe is a perfect fit once modified.

main.php


Very soon the rest of the rear axle will be assembled.

main.php


Brake shoes have all been de-greased, old pads removed, sand blasted and painted. All that is left now is new pads.

main.php

main.php

main.php


Cheers
 

RMP&O

Expedition Leader
Your work is simply outstanding, and your attention to details leaves nothing to chance. Bravo!

Mike

Thanks Mike!! :beer:

So...more pictures! :D

Here is a rear axle wheel bearing nut that has seen a chisel on it. While a chisel/punch may work for a trail fix that is not what we are doing here. So it (the lock nut) needs to not only be cleaned up but a tool made to install it correctly and to factory ft/lbs.

main.php


Here is the chisel scarred nut after cleaning up with a file.

main.php

main.php


Here is the finished tool I made for the rear axle wheel bearing nut. Forgive my welds, they really are embarrassing, still learning. :oops: The tool came out good though and as you can see a 1/2" drive torque wrench fits perfect. IIRC, the manual specs this nut at 157ftlbs, hard to achieve that with a hammer & chisel. :rolleyes:

main.php

main.php

main.php


This is the flange/tool I made to press the rear wheel bearings on the axle shaft. An 1-1/2" pipe fits perfect on the bearing but we lacked a long enough piece of it in the scrap pile. We have lot's of 2" on hand though so I made this plate to allow for the 2" to come down onto the 1-1/2",I will press the bearings on using this tool & a piece of 2" pipe.

Every once in awhile I can lay a nice bead...just need some more practice to get more consistent. ;)

main.php


main.php

main.php

main.php


Here are pictures of the old stock wheel studs next to the replacements I found. As you can see the new ones will work great...

main.php

main.php

main.php

main.php


So that is it, I am armed and ready to go next week for axle rebuilds. The rear will come together quickly, the front I will get new/re-freshed knuckle cap/king pin bushings next week. Monday or Tuesday eta on those bushings. That is all I need to assemble the front axle.

Cheers
 

shmabs

Explorer
Nice work on the custom tools!

Regarding the torque arm tool you made for the rear bearing lock nut:

I use a similar tool at work for torquing tail rotor blade attachment nuts, and we have a formula for figuring out the exact torque applied when using a longer "arm". With your little adapter plate, you now have a small lever arm going from the drive of the of the torque wrench to the pivot point of your fastener. In your case, the tolerances probably aren't that tight, but it might be something to think about.

Mike

Edit: using my google ****....

http://www.engineersedge.com/manufacturing_spec/torque_wrench_1.htm
 

Scott Brady

Founder
This might be the coolest project thread on ExPo. Really enjoying the progress and attention to detail.

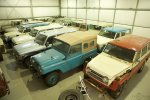
On my way back through Canada earlier this year, I had the chance to meet a Patrol and Land Cruiser collect and see his private collection. Sorry that I cannot provide more details (sworn to secrecy), but it is neat to see someone work hard to preserve these trucks. He gave permission for me to shoot images and make them public.

Patrols_2.jpg

Patrols_1.jpg
 

RMP&O

Expedition Leader
Nice work on the custom tools!

Regarding the torque arm tool you made for the rear bearing lock nut:

*snip*

Mike

Hey Mike,

You are absolutely correct about the tool I made. I am aware of the difference it causes to the torque applied. Basically, I built a "crows foot". This was also mentioned in another thread I have on the truck. Good stuff for anyone not in the know or watching this build for tips.

Here is a link to a little more reading...

http://www.shipkiller.com/Torque_Wrench_Basics.html

cheers
 

RMP&O

Expedition Leader
This might be the coolest project thread on ExPo. Really enjoying the progress and attention to detail.

Thank you Scott! And that is almost to much of a compliment. :eek:

On my way back through Canada earlier this year, I had the chance to meet a Patrol and Land Cruiser collect and see his private collection. Sorry that I cannot provide more details (sworn to secrecy), but it is neat to see someone work hard to preserve these trucks. He gave permission for me to shoot images and make them public.

That is friggin' awesome! I recognize the blue Patrol, looks like one that came from the Boise area and has been on Bring A Trailer.

http://bringatrailer.com/2008/11/10/40-year-owner-1964-nissan-patrol-l60-soft-top/

Very very nice Patrol!

I hope you suggested to the owner of those cool old trucks to come on over here to the forum and check out this build I am doing on the 1964!? :)

Cheers
 

RMP&O

Expedition Leader
This is how you would go about pressing the axle shaft off the bearing and bearing cage...

main.php


Using the "drift" I made this is how you would go about pressing the bearing onto the axle and into the cage, a piece of 1-1/2" pipe would work fine too. Note, I used a wheel since the wheel studs must be in place before pressing on the bearing.

main.php


Using the tool to set nut at 157ft/lbs. On the rear axle the bearing is not shimmed, rather it is preset using the bearing spacer found under the bearing & bearing cage. This is why it needs to be torqued to 157ft/lbs. In the later manuals, ie late 70's it states the torque at over 200ft/lbs. If I had to make a tool again, I would make it out of just one long piece of 2' pipe. But put a 1-1/2" spacer where the claw is on the inside of the pipe to keep the pipe aligned and limit play between the pipe and the axle shaft. Then just weld a cap on the pipe and do the square hole for a 1/2" drive. Last bit I would do is weld a ring around the outside of the claw to keep the tabs from spreading. Overall though it worked well and using an online conversion for the offset torque I was at 138ft/lbs with my tool.

main.php


setting the lock washer after tightening, you are likely only to get one tab but that is all you need.

main.php


axle shaft in but no shims...

main.php


Shimming it up to get axle end play within factory specs, ie .002-.006".

main.php


Besides brakes...all done!

main.php


main.php


I started on the front axle today too...

main.php


I had this race, turned down rather than having it made from scratch. The cone shaped king pin that goes along with it I also had turned down to match. This saved a few bucks and will work just fine, ie use less shims.

main.php


main.php


bottom bearing race in too....

main.php


even though they are thread locked I wired up the carrier bolts...

main.php


NOS gasket...

main.php


and new hardware...

main.php


Back at it tomorrow!!

main.php


main.php


Cheers
 
Last edited:

RMP&O

Expedition Leader
If you don't own a Patrol forgive some of the tech in these posts. This thread originates on a Patrol forum (I copy and paste updates here) and I am including the tech for Patrol owners. I have removed most of it but some still remains in the "captions" for the pictures.


All "closed knuckle" design axles are pretty much the same. However the method is different. Even on the 60-series Patrol it is different if you have the top cap as a bearing and not the cone + pin. I have done a lot of knuckle axle rebuilds and I got to say you really should use a scale to measure turning force on the knuckle. This also applies to wheel bearings. However the rear wheel bearing it doesn't matter since it is not shimmed up with a pre-load.

I edited my above post to include a few more pictures of the rear axle stuff.

This is the aftermarket knuckle seal. it is different from the stock seal.

main.php


you place the steel ring in the knuckle which acts as a backing plate. Make sure you have it facing the correct direction!

main.php


seal goes on top of it and make sure you have the seal facing the right direction!

main.php


then your outer backing plate goes on, again make sure it is the right direction, ie depression down.

main.php


Assemble these parts on the knuckle ball on the axle tube before you put the knuckle on! The seal is not split like the original seal and as such needs to be put on before the knuckle.

knuckle on....

main.php


seal in too...

main.php


all done with new hardware and you can see it seals up very nicely!

main.php


steering stop, yes it still needs a washer.

main.php


Now, measuring the rotational force on the knuckle. I use a cheapo $10 fish weighing scale. Attach it to the arm on the knuckle.

main.php


Pull the knuckle but pull it in an arch like it will move when steering not in a straight line. Watch the ft/lbs on the scale. I checked mine about 6x and had a variance of 19-22ft/lbs., manual states 20-22ft/lbs so I am happy with what I got and it is good enough being within less than 1ft/lbs of factory specs.

main.php


main.php


All new studs in the knuckle, for the caps and for the spindle. All the new nuts for these studs are "crimped" head style.

main.php


brake backing plate and spindle are on...

main.php


main.php


main.php


Keep in mind besides seals & bearings these are used parts. I have polished all seal/bearing surfaces on axles/spindle, ect as well as the caps on the knuckle and the mating surface for the spindle. More on this when I do the other side!

Cheers
 
Last edited:

RMP&O

Expedition Leader
Front & rear axle rebuilds is a done deal! The new Warn hubs are on and work well. I think they look stellar.

Few more pictures from the front axle rebuild.

main.php


main.php


main.php


axle shaft and tracta joint going in

main.php


preparing the hub

main.php


hub installed

main.php


Warn f/w hub going on

main.php


I need to do something about the hardware for these but otherwise looking sweet.

main.php


main.php


main.php


main.php


Ready for brakes and wheels!

main.php


main.php


I spent some time today getting ready to move the frame out. I am starting with suspension tomorrow. Will be doing some thing with the brakes too in order to get the wheel cylinders and rear brake adjusters installed. So another part of the restoration is complete and soon we will have a rolling chassis!

Cheers
 

Forum statistics

Threads
188,367
Messages
2,906,121
Members
230,117
Latest member
greatwhite24
Top